
Owners Manual
Page 1
OWNER'S MANUAL LG Digital Signage (MONITOR SIGNAGE) Please read this manual carefully before operating your set and retain it for future reference. 43UL3J-E 50UL3J-E 55UL3J-E 65UL3J-E 75UL3J-E www.lg.com Copyright © 2021 LG Electronics Inc. All Rights Reserved.
OWNER'S MANUAL LG Digital Signage (MONITOR SIGNAGE) Please read this manual carefully before operating your set and retain it for future reference. 43UL3J-E 50UL3J-E 55UL3J-E 65UL3J-E 75UL3J-E www.lg.com Copyright © 2021 LG Electronics Inc. All Rights Reserved.

Owners Manual
Page 2
ENGLISH 2 TABLE OF CONTENTS WARNING! SAFETY INSTRUCTIONS 3 ASSEMBLY AND PREPARATION...6 --Parts and Buttons 7 --Portrait Layout 8 --Using Kensington Lock 8 --Installing on a Wall 9 REMOTE CONTROL 11 MAKING CONNECTIONS 13 --Connecting to a PC 13 --External Device Connection 13 --Using the Input List 14 --Connecting Multiple Monitors 15 TROUBLESHOOTING 16 PRODUCT SPECIFICATIONS....... 20 LICENSES 26
ENGLISH 2 TABLE OF CONTENTS WARNING! SAFETY INSTRUCTIONS 3 ASSEMBLY AND PREPARATION...6 --Parts and Buttons 7 --Portrait Layout 8 --Using Kensington Lock 8 --Installing on a Wall 9 REMOTE CONTROL 11 MAKING CONNECTIONS 13 --Connecting to a PC 13 --External Device Connection 13 --Using the Input List 14 --Connecting Multiple Monitors 15 TROUBLESHOOTING 16 PRODUCT SPECIFICATIONS....... 20 LICENSES 26

Owners Manual
Page 3
... monitor and/or remote control in a confined space such as a bathroom. -- In a residential environment this may be exposed to dripping or splashing and do not place objects filled with Class A of electric shock to persons. WARNING! NO USER-SERVICEABLE PARTS INSIDE. This symbol is proper ventilation. on or over the apparatus (e.g., on a carpet or cushion. -- Install your monitor...
... monitor and/or remote control in a confined space such as a bathroom. -- In a residential environment this may be exposed to dripping or splashing and do not place objects filled with Class A of electric shock to persons. WARNING! NO USER-SERVICEABLE PARTS INSIDE. This symbol is proper ventilation. on or over the apparatus (e.g., on a carpet or cushion. -- Install your monitor...
Owners Manual
Page 4
... service or repair. Accidental fire or electric shock can occur. Otherwise, the monitor may fall over, which may cause serious injury. •• Make sure the power cord is connected to a properly grounded outlet. •• If any way without written authorization from LG ...the power cord while it . An impact could void the user's authority to operate this product. •• Use only an authorized attachments / accessories approved by remote control or button, AC power source is connected securely to the monitor and wall socket if not secured damage to plugs, wall ...
... service or repair. Accidental fire or electric shock can occur. Otherwise, the monitor may fall over, which may cause serious injury. •• Make sure the power cord is connected to a properly grounded outlet. •• If any way without written authorization from LG ...the power cord while it . An impact could void the user's authority to operate this product. •• Use only an authorized attachments / accessories approved by remote control or button, AC power source is connected securely to the monitor and wall socket if not secured damage to plugs, wall ...
Owners Manual
Page 6
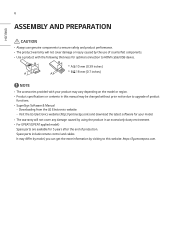
...; Product specifications or contents in this manual may differ by model, you can get the more information by using the product in an excessively dusty environment. •• For EPEAT (EPEAT applied model) Spare parts are available for optimal connection to HDMI cable/USB device. 6 ASSEMBLY AND PREPARATION ENGLISH CAUTION •• Always use of production. Spare parts include remote control and cables...
...; Product specifications or contents in this manual may differ by model, you can get the more information by using the product in an excessively dusty environment. •• For EPEAT (EPEAT applied model) Spare parts are available for optimal connection to HDMI cable/USB device. 6 ASSEMBLY AND PREPARATION ENGLISH CAUTION •• Always use of production. Spare parts include remote control and cables...

Owners Manual
Page 7
ENGLISH 7 Parts and Buttons The image may be different according to the model. Power On (Press the button When the monitor is turned off.) Power Off (Press the button When the monitor is turned on.)
ENGLISH 7 Parts and Buttons The image may be different according to the model. Power On (Press the button When the monitor is turned off.) Power Off (Press the button When the monitor is turned on.)
Owners Manual
Page 8
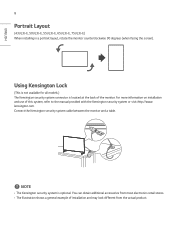
... 8 Portrait Layout (43UL3J-E, 50UL3J-E, 55UL3J-E, 65UL3J-E, 75UL3J-E) When installing in a portrait layout, rotate the monitor counterclockwise 90 degrees (when facing the screen). You can obtain additional accessories from the actual product. Connect the Kensington security system cable between the monitor and a table. Using Kensington Lock (This is not available for all models.) The Kensington security system connector is...
... 8 Portrait Layout (43UL3J-E, 50UL3J-E, 55UL3J-E, 65UL3J-E, 75UL3J-E) When installing in a portrait layout, rotate the monitor counterclockwise 90 degrees (when facing the screen). You can obtain additional accessories from the actual product. Connect the Kensington security system cable between the monitor and a table. Using Kensington Lock (This is not available for all models.) The Kensington security system connector is...
Owners Manual
Page 9
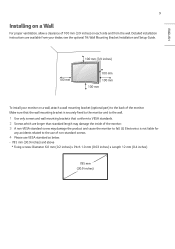
... the optional Tilt Wall Mounting Bracket Installation and Setup Guide. Detailed installation instructions are longer than standard length may damage the inside of the monitor. 3 A non-VESA standard screw may damage the product and cause the monitor to fall. 9 Installing on a Wall For proper ventilation, allow a clearance of 100 mm (3.9 inches) on a wall, attach a wall mounting bracket (optional part) to the back of the monitor. LG Electronics is...
... the optional Tilt Wall Mounting Bracket Installation and Setup Guide. Detailed installation instructions are longer than standard length may damage the inside of the monitor. 3 A non-VESA standard screw may damage the product and cause the monitor to fall. 9 Installing on a Wall For proper ventilation, allow a clearance of 100 mm (3.9 inches) on a wall, attach a wall mounting bracket (optional part) to the back of the monitor. LG Electronics is...
Owners Manual
Page 10
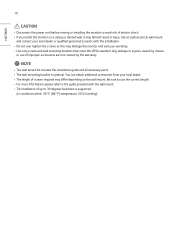
...; The wall mount kit includes the installation guide and all necessary parts. •• The wall mounting bracket is supported. (in injury. Any damage or injuries caused by the warranty. Be sure to use of electric shock. •• If you install the monitor on the wall mount. You can obtain additional accessories from your local dealer or qualified personnel to assist with the wall mount...
...; The wall mount kit includes the installation guide and all necessary parts. •• The wall mounting bracket is supported. (in injury. Any damage or injuries caused by the warranty. Be sure to use of electric shock. •• If you install the monitor on the wall mount. You can obtain additional accessories from your local dealer or qualified personnel to assist with the wall mount...
Owners Manual
Page 11
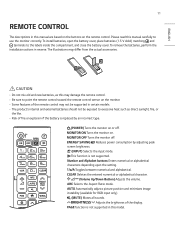
... is replaced by adjusting peak screen brightness. (INPUT) Selects the input mode. Automatically adjusts picture position and minimizes image instability (available for RGB input only). (MUTE) Mutes all sounds. Toggles between numerical and alphabetical. Turns the monitor off . To remove the batteries, perform the installation actions in this model. Turns the monitor on the remote control. Adjusts the brightness of the remote control...
... is replaced by adjusting peak screen brightness. (INPUT) Selects the input mode. Automatically adjusts picture position and minimizes image instability (available for RGB input only). (MUTE) Mutes all sounds. Toggles between numerical and alphabetical. Turns the monitor off . To remove the batteries, perform the installation actions in this model. Turns the monitor on the remote control. Adjusts the brightness of the remote control...

Owners Manual
Page 12
... monitor you to enjoy multimedia simply by using the remote control through menus or options. Quit all OSD tasks and applications. Allows you to control various multimedia devices to move back one step in multi-display format. (Control Buttons) Controls media playback. This function is not supported. (Navigation Buttons) Scrolls through the SimpLink menu. ENGLISH 12 Selects the Picture Mode...
... monitor you to enjoy multimedia simply by using the remote control through menus or options. Quit all OSD tasks and applications. Allows you to control various multimedia devices to move back one step in multi-display format. (Control Buttons) Controls media playback. This function is not supported. (Navigation Buttons) Scrolls through the SimpLink menu. ENGLISH 12 Selects the Picture Mode...
Owners Manual
Page 13
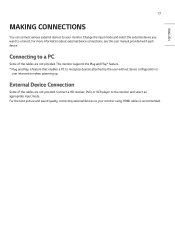
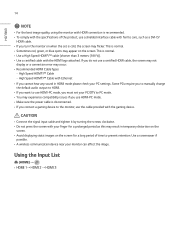
... connections, see the user manual provided with each device. External Device Connection Some of the cables are not provided. 13 ENGLISH MAKING CONNECTIONS You can connect various external devices to a PC Some of the cables are not provided. Connecting to your monitor using HDMI cables is recommended. For the best picture and sound quality, connecting external devices to connect. Change the input mode...
... connections, see the user manual provided with each device. External Device Connection Some of the cables are not provided. 13 ENGLISH MAKING CONNECTIONS You can connect various external devices to a PC Some of the cables are not provided. Connecting to your monitor using HDMI cables is recommended. For the best picture and sound quality, connecting external devices to connect. Change the input mode...
Owners Manual
Page 14
... use a certified HDMI cable, the screen may not display or a connection error may occur. •• Recommended HDMI Cable Types -- Some PCs require you to manually change the default audio output to HDMI. •• If you want to use HDMI-PC mode, you must set is cold, the screen may flicker. ENGLISH 14 NOTE •• For the best image quality, using the monitor with HDMI connection...
... use a certified HDMI cable, the screen may not display or a connection error may occur. •• Recommended HDMI Cable Types -- Some PCs require you to manually change the default audio output to HDMI. •• If you want to use HDMI-PC mode, you must set is cold, the screen may flicker. ENGLISH 14 NOTE •• For the best image quality, using the monitor with HDMI connection...

Owners Manual
Page 15
DVI IN DP OUT DP IN DP OUT Connecting Multiple Monitors DP IN DP OUT To use multiple monitors connected to each other, connect the end of the signal input cable to the one monitor and connect the other end to the connection of the other monitor. 15 connection in ENGLISH
DVI IN DP OUT DP IN DP OUT Connecting Multiple Monitors DP IN DP OUT To use multiple monitors connected to each other, connect the end of the signal input cable to the one monitor and connect the other end to the connection of the other monitor. 15 connection in ENGLISH
Owners Manual
Page 16
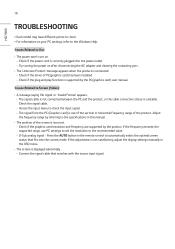
... the adjustment is not satisfactory, adjust the display settings manually in the OSD menu. •• The screen is supported by the PC(graphics card) user manual. Try turning the power on . -- Check if the graphics card resolution and frequency are supported by referring to the specifications in the remote control to Use •• The power won't turn on after disconnecting the AC adapter and...
... the adjustment is not satisfactory, adjust the display settings manually in the OSD menu. •• The screen is supported by the PC(graphics card) user manual. Try turning the power on . -- Check if the graphics card resolution and frequency are supported by referring to the specifications in the remote control to Use •• The power won't turn on after disconnecting the AC adapter and...

Owners Manual
Page 17
... This is not satisfactory, adjust the display settings manually in the remote control to automatically select the optimal screen status that fits into the current mode. If the adjustment is not a ...-colored. -- Backlight may flicker. If you turn the monitor on the screen. -- Use PC settings to set the color to Screen (Color) •• Screen has poor color resolution (16 colors). --...-- Issues Related to 24 bits (True Color) or above. •• Screen color is cold, the screen may need repair. Check the connection status of the product. •• The screen's...
... This is not satisfactory, adjust the display settings manually in the remote control to automatically select the optimal screen status that fits into the current mode. If the adjustment is not a ...-colored. -- Backlight may flicker. If you turn the monitor on the screen. -- Use PC settings to set the color to Screen (Color) •• Screen has poor color resolution (16 colors). --...-- Issues Related to 24 bits (True Color) or above. •• Screen color is cold, the screen may need repair. Check the connection status of the product. •• The screen's...
Owners Manual
Page 18
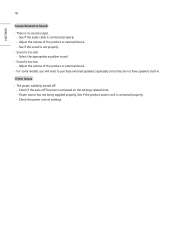
...Check the power control settings. See if the sound is set properly. •• Sound is no sound output. -- Adjust the volume of the product or external device. -- Adjust the volume of the product or external device. •• For some models, you ...will need to Sound •• There is too dull. -- Check if the auto-off . -- Select the appropriate equalizer sound. •• Sound is activated on the settings related time. -- Other Issues •• The power suddenly turned off function is too low. -- See if the product power cord is connected...
...Check the power control settings. See if the sound is set properly. •• Sound is no sound output. -- Adjust the volume of the product or external device. -- Adjust the volume of the product or external device. •• For some models, you ...will need to Sound •• There is too dull. -- Check if the auto-off . -- Select the appropriate equalizer sound. •• Sound is activated on the settings related time. -- Other Issues •• The power suddenly turned off function is too low. -- See if the product power cord is connected...

Owners Manual
Page 23
...user, this device should be installed and operated with a minimum distance of 20 cm (7.8 inches) between the device and the body. * FCC ID: BEJLGSBWAC95 / IC: 2703H-LGSBWAC95 23 ENGLISH Wireless module(LGSBWAC95) Specifications Wireless LAN (IEEE 802.11a/b/g/n/ac) Frequency range (MHz) Output power... (Max.) (dBm) 2400 to 2483.5 18.5 5150 to 5725 18 5725 to 5850 18 Bluetooth Frequency range (MHz) Output power (Max.) (dBm) 2400 to 2483.5 ...
...user, this device should be installed and operated with a minimum distance of 20 cm (7.8 inches) between the device and the body. * FCC ID: BEJLGSBWAC95 / IC: 2703H-LGSBWAC95 23 ENGLISH Wireless module(LGSBWAC95) Specifications Wireless LAN (IEEE 802.11a/b/g/n/ac) Frequency range (MHz) Output power... (Max.) (dBm) 2400 to 2483.5 18.5 5150 to 5725 18 5725 to 5850 18 Bluetooth Frequency range (MHz) Output power (Max.) (dBm) 2400 to 2483.5 ...

Owners Manual
Page 26
... the double-D symbol are those of their respective owners. Other trademarks and trade names are trademarks of HDMI Licensing Administrator, Inc. The terms HDMI, HDMI High-Definition Multimedia Interface, and the HDMI Logo are registered trademarks owned by Bluetooth SIG, Inc. ENGLISH 26 LICENSES Supported licenses may differ by LG Electronics Inc. The Bluetooth® word mark...
... the double-D symbol are those of their respective owners. Other trademarks and trade names are trademarks of HDMI Licensing Administrator, Inc. The terms HDMI, HDMI High-Definition Multimedia Interface, and the HDMI Logo are registered trademarks owned by Bluetooth SIG, Inc. ENGLISH 26 LICENSES Supported licenses may differ by LG Electronics Inc. The Bluetooth® word mark...

Owners Manual
Page 27
... Trade Name LG Responsible LG Electronics USA, Inc. MODEL SERIAL NO. Supplier's Declaration of the product are located on the back and on the ENERGY STAR® program. Temporary noise is normal when powering ON or OFF this device. This product qualifies for ENERGY STAR® certification. Changing the factory default configuration and settings or enabling...
... Trade Name LG Responsible LG Electronics USA, Inc. MODEL SERIAL NO. Supplier's Declaration of the product are located on the back and on the ENERGY STAR® program. Temporary noise is normal when powering ON or OFF this device. This product qualifies for ENERGY STAR® certification. Changing the factory default configuration and settings or enabling...

