
Owners Manual
Page 6
...Programming Codes 94~95 Troubleshooting Checklist 96~98 Maintenance 99 Product Specifications 100 Warranty 103~104 ࠘ POWER ENTER CH 6 DLP Projection TV After reading this manual, keep it handy for future reference. Contents Contents Warnings/Caution 2 Digital Cable Compatibility 3 Safety Instructions 4~5... Picture Control (Custom Option 62 Color Temperature Control 62 Video Reset 62 Audio Menu Options Audio Language 63 EZ SoundRite / EZ Sound 63 Manual Sound Control (Custom Option 63 Front Surround 64 TV Speakers On/Off Setup 64 ࠘ Stereo/SAP ...
...Programming Codes 94~95 Troubleshooting Checklist 96~98 Maintenance 99 Product Specifications 100 Warranty 103~104 ࠘ POWER ENTER CH 6 DLP Projection TV After reading this manual, keep it handy for future reference. Contents Contents Warnings/Caution 2 Digital Cable Compatibility 3 Safety Instructions 4~5... Picture Control (Custom Option 62 Color Temperature Control 62 Video Reset 62 Audio Menu Options Audio Language 63 EZ SoundRite / EZ Sound 63 Manual Sound Control (Custom Option 63 Front Surround 64 TV Speakers On/Off Setup 64 ࠘ Stereo/SAP ...
Owners Manual
Page 20
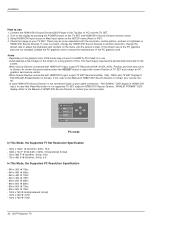
... FORMAT" OSD display. Installation How to use . - If not, refer to the Manual of TV SET and contact an PC graphics card service center. - POSITION G SIZE PHASE RESET Adjust Close D F G E PC mode In This Mode, the Supported TV Set Resolution Specification - 1920 x 1080 I @ 59.94Hz / 60Hz, 16:9 - 1280 x...- 1024 x 768 @ 60Hz(preferred format) - 1024 x 768 @ 70Hz - 1024 x 768 @ 75Hz 20 DLP Projection TV Connect the HDMI1/DVI Source Devices(DVD Player or Set Top Box or PC) and the TV SET. 2. As shown the picture below, press the ADJUST button to the Manual of HDMI1/DVI Source...
... FORMAT" OSD display. Installation How to use . - If not, refer to the Manual of TV SET and contact an PC graphics card service center. - POSITION G SIZE PHASE RESET Adjust Close D F G E PC mode In This Mode, the Supported TV Set Resolution Specification - 1920 x 1080 I @ 59.94Hz / 60Hz, 16:9 - 1280 x...- 1024 x 768 @ 60Hz(preferred format) - 1024 x 768 @ 70Hz - 1024 x 768 @ 75Hz 20 DLP Projection TV Connect the HDMI1/DVI Source Devices(DVD Player or Set Top Box or PC) and the TV SET. 2. As shown the picture below, press the ADJUST button to the Manual of HDMI1/DVI Source...

Owners Manual
Page 62
...Brightness, Color, Sharpness, or Tint). 3. Press the G button to reset the Video menu options to TV viewing. Press the EXIT button to save and return to original values. 62 DLP Projection TV Press EXIT button to return to TV viewing or press MENU button to return to their original factory preset ...values. 1. Choose one of three automatic color adjustments. Use to quickly reset all the Video menu options to the ...
...Brightness, Color, Sharpness, or Tint). 3. Press the G button to reset the Video menu options to TV viewing. Press the EXIT button to save and return to original values. 62 DLP Projection TV Press EXIT button to return to TV viewing or press MENU button to return to their original factory preset ...values. 1. Choose one of three automatic color adjustments. Use to quickly reset all the Video menu options to the ...

Owners Manual
Page 65
... is set the minutes. 6. Once selected, use D / E button to select your viewing area observes Daylight Savings Time. 6. Press EXIT button to return to TV viewing or press MENU button to return to the previous menu. The time is set the year, date, and time options. 4. Press the G button and...G button and then use D / E button to set to select the channel at turn -on . 7. Set the clock manually, if the current time is wrong, reset the clock manually. - When you set the sound level at turn -on . Press the G button and then use D / E button to select Off Timer or ...
... is set the minutes. 6. Once selected, use D / E button to select your viewing area observes Daylight Savings Time. 6. Press EXIT button to return to TV viewing or press MENU button to return to the previous menu. The time is set the year, date, and time options. 4. Press the G button and...G button and then use D / E button to set to select the channel at turn -on . 7. Set the clock manually, if the current time is wrong, reset the clock manually. - When you set the sound level at turn -on . Press the G button and then use D / E button to select Off Timer or ...

Owners Manual
Page 92
... using ADJUST button. - POSITION G SIZE PHASE RESET Adjust Close D F G E POSITION SIZE PHASE RESET Adjust Previous D F G E Move POSITION SIZE G PHASE RESET Adjust Close D F G E POSITION SIZE PHASE RESET Adjust Previous D F G E Size POSITION SIZE PHASE RESET Phase 0 F G Adjust Previous F G Control POSITION SIZE PHASE RESET Initialize Settings No Yes Adjust Previous F G Move Select 92 DLP Projection TV Position : Adjust the screen position.
... using ADJUST button. - POSITION G SIZE PHASE RESET Adjust Close D F G E POSITION SIZE PHASE RESET Adjust Previous D F G E Move POSITION SIZE G PHASE RESET Adjust Close D F G E POSITION SIZE PHASE RESET Adjust Previous D F G E Size POSITION SIZE PHASE RESET Phase 0 F G Adjust Previous F G Control POSITION SIZE PHASE RESET Initialize Settings No Yes Adjust Previous F G Move Select 92 DLP Projection TV Position : Adjust the screen position.
