
Owners Manual
Page 9
...core to P.12) * Wipe spots on the exterior only with your TV. Option Extras D-sub 15 pin Cable When using the VGA (D-sub 15 pin cable) PC connection, the user must use shielded signal interface cables with all models) scratch or discoloration. The ...RETURN 1.5V 1.5V FAV MARK Owner's Manual CD Manual Remote Control, Batteries Power Cord (Except 60PS60, 60PS60C, 60PS70, 60PS80) (Only 60PS60, 60PS60C, 50/60PS70, 50/60PS80) or Protection Cover (Refer to P.11) x 4 Bolts for stand assembly (Refer to P.11) x 2 Cable Holder Cable management clip (Refer to the power plug...
...core to P.12) * Wipe spots on the exterior only with your TV. Option Extras D-sub 15 pin Cable When using the VGA (D-sub 15 pin cable) PC connection, the user must use shielded signal interface cables with all models) scratch or discoloration. The ...RETURN 1.5V 1.5V FAV MARK Owner's Manual CD Manual Remote Control, Batteries Power Cord (Except 60PS60, 60PS60C, 60PS70, 60PS80) (Only 60PS60, 60PS60C, 50/60PS70, 50/60PS80) or Protection Cover (Refer to P.11) x 4 Bolts for stand assembly (Refer to P.11) x 2 Cable Holder Cable management clip (Refer to the power plug...
Owners Manual
Page 13
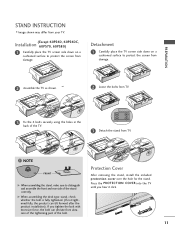
Installation (Except 60PS60, 60PS60C, 60PS70, 60PS80) 1 Carefully place the TV screen side down on a cushioned surface to protect the screen from abrasion of the tightening part of the bolt. NOTE FRONT G When assembling the stand, make sure to protect the screen from damage. 2 Assemble the TV as shown. ... COVER into the TV until you tighten the bolt with excessive force, the bolt can tilt forward after the product installation). PREPARATION STAND INSTRUCTION ■ Image shown may differ from TV. ! Detachment 1 Carefully place the TV screen side down on a cushioned surface...
Installation (Except 60PS60, 60PS60C, 60PS70, 60PS80) 1 Carefully place the TV screen side down on a cushioned surface to protect the screen from abrasion of the tightening part of the bolt. NOTE FRONT G When assembling the stand, make sure to protect the screen from damage. 2 Assemble the TV as shown. ... COVER into the TV until you tighten the bolt with excessive force, the bolt can tilt forward after the product installation). PREPARATION STAND INSTRUCTION ■ Image shown may differ from TV. ! Detachment 1 Carefully place the TV screen side down on a cushioned surface...
Owners Manual
Page 111
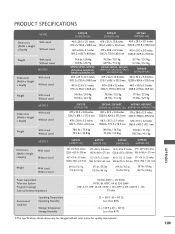
...3.2 inches 1216.7 x 759.0 x 83.0 mm 78.0 lbs / 35.4 kg 72.3 lbs / 32.8 kg 50PS60, 50PS60C 60PS60, 60PS60C (50PS60-UA, 50PS60C-UA) (60PS60-UA, 60PS60C-UA) 48.3 x 32.4 x 13.8 inches 57.6 x 38.6 x 15.5 inches 1228.8 x 824.6 x 353.0 mm...stand Without stand Weight With stand Without stand MODELS Dimensions (Width x Height x Depth) With stand Without stand Weight With stand Without stand MODELS Dimensions (Width x Height x Depth) With stand Without stand Weight With stand Without stand MODELS Dimensions (Width x Height x Depth) With stand Without stand Weight With stand Without stand...
...3.2 inches 1216.7 x 759.0 x 83.0 mm 78.0 lbs / 35.4 kg 72.3 lbs / 32.8 kg 50PS60, 50PS60C 60PS60, 60PS60C (50PS60-UA, 50PS60C-UA) (60PS60-UA, 60PS60C-UA) 48.3 x 32.4 x 13.8 inches 57.6 x 38.6 x 15.5 inches 1228.8 x 824.6 x 353.0 mm...stand Without stand Weight With stand Without stand MODELS Dimensions (Width x Height x Depth) With stand Without stand Weight With stand Without stand MODELS Dimensions (Width x Height x Depth) With stand Without stand Weight With stand Without stand MODELS Dimensions (Width x Height x Depth) With stand Without stand Weight With stand Without stand...


