Owner's Manual
Page 4
... a damaged or loose power cord. yyWarning - Periodically examine the cord of the TV. yyUse only with wet hands. Do not touch the TV with a cart, stand, tripod, bracket, or table specified by hanging the power and signal cables on the power cord to unplug the TV.
... a damaged or loose power cord. yyWarning - Periodically examine the cord of the TV. yyUse only with wet hands. Do not touch the TV with a cart, stand, tripod, bracket, or table specified by hanging the power and signal cables on the power cord to unplug the TV.
Owner's Manual
Page 8
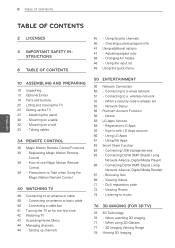
Attaching the stand 30 - Tidying cables 34 REMOTE CONTROL 38 Magic Motion Remote Control Functions 39 - Adjusting aspect ratio 48 - Notice 58 LG Apps function 58 - Registration LG Apps 59 - Connecting USB storage devices 63 - Viewing Photos 74 - Checking current program info 47 Using additional options... 47 - Connecting to an antenna or cable 40 - Sign in with LG Apps account 60 - Using LG Apps 61 - Connecting DLNA DMR (Digital Living Network Alliance, Digital Media Render) 67 - When using 3D Glasses 77 - ...
Attaching the stand 30 - Tidying cables 34 REMOTE CONTROL 38 Magic Motion Remote Control Functions 39 - Adjusting aspect ratio 48 - Notice 58 LG Apps function 58 - Registration LG Apps 59 - Connecting USB storage devices 63 - Viewing Photos 74 - Checking current program info 47 Using additional options... 47 - Connecting to an antenna or cable 40 - Sign in with LG Apps account 60 - Using LG Apps 61 - Connecting DLNA DMR (Digital Living Network Alliance, Digital Media Render) 67 - When using 3D Glasses 77 - ...
Owner's Manual
Page 9
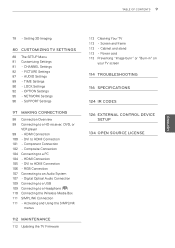
... a PC 104 - Activating and Using the SIMPLINK menus 112 MAINTENANCE 112 Updating the TV Firmware 113 Cleaning Your TV 113 - NETWORK Settings 96 - Cabinet and stand 113 - TABLE OF CONTENTS 9 ENEGNLGISH 78 - DVI to an Audio System 107 - Power cord 113 Preventing "Image burn" or "Burn-in" on your TV screen...
... a PC 104 - Activating and Using the SIMPLINK menus 112 MAINTENANCE 112 Updating the TV Firmware 113 Cleaning Your TV 113 - NETWORK Settings 96 - Cabinet and stand 113 - TABLE OF CONTENTS 9 ENEGNLGISH 78 - DVI to an Audio System 107 - Power cord 113 Preventing "Image burn" or "Burn-in" on your TV screen...

Owner's Manual
Page 23
... a large TV, there should face away from damage. PZ750, PZ950, PZ950U series 1 Lay the TV with the stand base of its side or tilt towards the left or right. Stand Body Stand Base ENEGNLGISH yyWhen transporting the TV, do not expose the TV to hold the TV as this may result... in damage to the screen. Attaching the stand If you to avoid damage. Stand Body Stand Base Make sure not to jolts or excessive vibration. Model 50PZ750, 50PZ950, 50PZ950U 60PZ750, 60PZ950, 60PZ950U Screw for safe transportation...
... a large TV, there should face away from damage. PZ750, PZ950, PZ950U series 1 Lay the TV with the stand base of its side or tilt towards the left or right. Stand Body Stand Base ENEGNLGISH yyWhen transporting the TV, do not expose the TV to hold the TV as this may result... in damage to the screen. Attaching the stand If you to avoid damage. Stand Body Stand Base Make sure not to jolts or excessive vibration. Model 50PZ750, 50PZ950, 50PZ950U 60PZ750, 60PZ950, 60PZ950U Screw for safe transportation...

Owner's Manual
Page 24
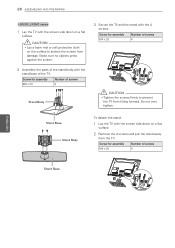
...tape. - Protection cover tape ENEGNLGISH Protection cover 24 ASSEMBLING AND PREPARING 3 Secure the TV and the stand with the screen side down on a flat surface. 2 Remove the 4 screws and pull the stand away from the TV. Do not over tighten. 3 Push the supplied protection cover into the opening...the screws firmly to prevent the TV from accumulating dust and dirt. - This will protect the opening at the bottom of screws 4 4 To detach the stand, 1 Lay the TV with the 4 screws. Model 50PZ750, 50PZ950, 50PZ950U 60PZ750, 60PZ950, 60PZ950U Screw for assembly M4 x 26 M4 x 28 Number ...
...tape. - Protection cover tape ENEGNLGISH Protection cover 24 ASSEMBLING AND PREPARING 3 Secure the TV and the stand with the screen side down on a flat surface. 2 Remove the 4 screws and pull the stand away from the TV. Do not over tighten. 3 Push the supplied protection cover into the opening...the screws firmly to prevent the TV from accumulating dust and dirt. - This will protect the opening at the bottom of screws 4 4 To detach the stand, 1 Lay the TV with the 4 screws. Model 50PZ750, 50PZ950, 50PZ950U 60PZ750, 60PZ950, 60PZ950U Screw for assembly M4 x 26 M4 x 28 Number ...

Owner's Manual
Page 25
... LV3700, M4 x 12 LV5400, LV5500, LW5600, LW5700, LW7700 series, 47/55LW6500 65LW6500 M4 x 16 Number of screws 4 4 Stand Body Stand Base 3 Secure the TV and the stand with the screen side down on the surface to prevent the TV from the TV. ASSEMBLING AND PREPARING 25 LV3700, LV5400, LV5500...of the TV. Make sure no objects press against the screen. 2 Assemble the parts of the stand body with the screen side down on a flat surface. 2 Remove the 4 screws and pull the stand away from tilting forward. Do not over tighten. CAUTION yyLay a foam mat or soft protective ...
... LV3700, M4 x 12 LV5400, LV5500, LW5600, LW5700, LW7700 series, 47/55LW6500 65LW6500 M4 x 16 Number of screws 4 4 Stand Body Stand Base 3 Secure the TV and the stand with the screen side down on the surface to prevent the TV from the TV. ASSEMBLING AND PREPARING 25 LV3700, LV5400, LV5500...of the TV. Make sure no objects press against the screen. 2 Assemble the parts of the stand body with the screen side down on a flat surface. 2 Remove the 4 screws and pull the stand away from tilting forward. Do not over tighten. CAUTION yyLay a foam mat or soft protective ...

Owner's Manual
Page 26
... LW9500 series 1 Lay the TV with the screen side down on a flat surface. To detach the stand, 1 Lay the TV with the TV. Screw for assembly M4 x 16 Number of screws 4 Stand Body Stand Base 3 Assemble the parts of screws 4 CAUTION yyTighten the screws firmly to protect the screen from tilting... forward. Screw for assembly M4 x 16 Number of the stand rear cover with the screen side down on a flat surface. 2 Remove the 4 screws and pull the stand away from the TV. CAUTION yyLay a foam mat or soft protective cloth on the surface to...
... LW9500 series 1 Lay the TV with the screen side down on a flat surface. To detach the stand, 1 Lay the TV with the TV. Screw for assembly M4 x 16 Number of screws 4 Stand Body Stand Base 3 Assemble the parts of screws 4 CAUTION yyTighten the screws firmly to protect the screen from tilting... forward. Screw for assembly M4 x 16 Number of the stand rear cover with the screen side down on a flat surface. 2 Remove the 4 screws and pull the stand away from the TV. CAUTION yyLay a foam mat or soft protective cloth on the surface to...

Owner's Manual
Page 27
... M4 x 26 Number of screws 4 ENEGNLGISH 4 Assemble the parts of the stand rear cover with the screen side down on a flat surface. 2 Remove the 4 screws and pull the stand away from tilting forward. Stand Body Stand Base 3 Assemble the TV. ASSEMBLING AND PREPARING 27 LZ9700 series 1 Lay the... TV with the stand base of the TV. Make sure no objects press against the screen. 2 Assemble...
... M4 x 26 Number of screws 4 ENEGNLGISH 4 Assemble the parts of the stand rear cover with the screen side down on a flat surface. 2 Remove the 4 screws and pull the stand away from tilting forward. Stand Body Stand Base 3 Assemble the TV. ASSEMBLING AND PREPARING 27 LZ9700 series 1 Lay the... TV with the stand base of the TV. Make sure no objects press against the screen. 2 Assemble...
Owner's Manual
Page 28
...Make sure no objects press against the screen. 2 Assemble the parts of the stand body with the stand base of screws 4 Stand Body 3 Secure the TV and the stand with the 4 screws. Stand Base Stand Body M4X20 To detach the stand, 1 Lay the TV with the screen side down on the surface to prevent ... AND PREPARING LK530, LK550 series 1 Lay the TV with the screen side down on a flat surface. 2 Remove the 4 screws and pull the stand away from tilting forward. CAUTION yyLay a foam mat or soft protective cloth on a flat surface. Screw for assembly M4 x 20 Number of screws 4 ...
...Make sure no objects press against the screen. 2 Assemble the parts of the stand body with the stand base of screws 4 Stand Body 3 Secure the TV and the stand with the 4 screws. Stand Base Stand Body M4X20 To detach the stand, 1 Lay the TV with the screen side down on the surface to prevent ... AND PREPARING LK530, LK550 series 1 Lay the TV with the screen side down on a flat surface. 2 Remove the 4 screws and pull the stand away from tilting forward. CAUTION yyLay a foam mat or soft protective cloth on a flat surface. Screw for assembly M4 x 20 Number of screws 4 ...
Owner's Manual
Page 30
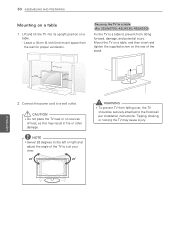
... in fire or other damage. 30 ASSEMBLING AND PREPARING Mounting on a table 1 Lift and tilt the TV into its upright position on sources of the stand. 10 cm 10 cm (4 inch) 10 cm 10 cm ENEGNLGISH 2 Connect the power cord to prevent from tilting forward, damage, and potential injury. Leave a 10...
... in fire or other damage. 30 ASSEMBLING AND PREPARING Mounting on a table 1 Lift and tilt the TV into its upright position on sources of the stand. 10 cm 10 cm (4 inch) 10 cm 10 cm ENEGNLGISH 2 Connect the power cord to prevent from tilting forward, damage, and potential injury. Leave a 10...

Owner's Manual
Page 33
LW9500 series 1 Gather and bind the cables with the cable holder on the stand cover and organize cables. LZ9700 series 1 Gather and bind the cables with the cable management clip. 2 Fix the cable management clip firmly to the TV. ...
LW9500 series 1 Gather and bind the cables with the cable holder on the stand cover and organize cables. LZ9700 series 1 Gather and bind the cables with the cable management clip. 2 Fix the cable management clip firmly to the TV. ...
Owner's Manual
Page 64
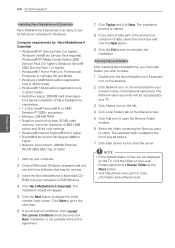
... that may be recognized by your computer's CD-ROM drive. 4 Click Nero MediaHome 4 Essentials. yyVisit http://www.nero.com for a typical installation of Nero MediaHome stand-alone yy1.2 GHz Intel® Pentium® III or AMD Sempron™ 2200+ processors yyMemory: 256 MB RAM yyGraphics card with at the More button...
... that may be recognized by your computer's CD-ROM drive. 4 Click Nero MediaHome 4 Essentials. yyVisit http://www.nero.com for a typical installation of Nero MediaHome stand-alone yy1.2 GHz Intel® Pentium® III or AMD Sempron™ 2200+ processors yyMemory: 256 MB RAM yyGraphics card with at the More button...
Owner's Manual
Page 88
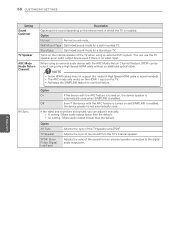
...sound are not synced, you can be output using an external Hi-Fi system. Adjusts the sync of the sound from the TV's internal speaker. Stand type Optimized sound mode for a wall-mounted TV. You can use this mode (A High Speed HDMI cable is enabled. yyActivates the SIMPLINK feature to... : Make audio output faster than the default. »»(+) setting : Make audio output slower than the default. Wall Mount Type Optimized sound mode for a stand-type TV. Adjusts the sync of the sound from an external speaker connected to use the TV speaker as an audio output device even if...
...sound are not synced, you can be output using an external Hi-Fi system. Adjusts the sync of the sound from the TV's internal speaker. Stand type Optimized sound mode for a wall-mounted TV. You can use this mode (A High Speed HDMI cable is enabled. yyActivates the SIMPLINK feature to... : Make audio output faster than the default. »»(+) setting : Make audio output slower than the default. Wall Mount Type Optimized sound mode for a stand-type TV. Adjusts the sync of the sound from an external speaker connected to use the TV speaker as an audio output device even if...

Owner's Manual
Page 113
... containing a small amount of time, image burn may occur on the screen and image distortions. CAUTION yyDo not spray liquid onto the surface. Cabinet and stand To remove dust or light dirt, wipe the cabinet with a dry, clean, and soft cloth. Preventing "Image burn" or "Burn-in " and not covered by...
... containing a small amount of time, image burn may occur on the screen and image distortions. CAUTION yyDo not spray liquid onto the surface. Cabinet and stand To remove dust or light dirt, wipe the cabinet with a dry, clean, and soft cloth. Preventing "Image burn" or "Burn-in " and not covered by...
Owner's Manual
Page 116
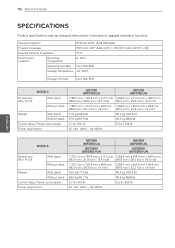
...80% Storage Temperature -20 - 60°C Storage Humidity Less than 85% MODELS Dimensions (W x H x D) With stand Without stand Weight With stand Without stand Current Value / Power consumption Power requirement 50PZ750 (50PZ750-UG) 60PZ750 (60PZ750-UG) 1185.2 mm x 782.6 mm x... A / 370 W 5.3 A / 530 W AC 100 - 240 V ~ 50 / 60 Hz MODELS Dimensions (W x H x D) With stand Without stand Weight With stand Without stand Current Value / Power consumption Power requirement 50PZ950 (50PZ950-UA) 60PZ950 (60PZ950-UA) 50PZ950U (50PZ950U-UA) 60PZ950U (60PZ950U-UA) 1175.2 mm x 787.6...
...80% Storage Temperature -20 - 60°C Storage Humidity Less than 85% MODELS Dimensions (W x H x D) With stand Without stand Weight With stand Without stand Current Value / Power consumption Power requirement 50PZ750 (50PZ750-UG) 60PZ750 (60PZ750-UG) 1185.2 mm x 782.6 mm x... A / 370 W 5.3 A / 530 W AC 100 - 240 V ~ 50 / 60 Hz MODELS Dimensions (W x H x D) With stand Without stand Weight With stand Without stand Current Value / Power consumption Power requirement 50PZ950 (50PZ950-UA) 60PZ950 (60PZ950-UA) 50PZ950U (50PZ950U-UA) 60PZ950U (60PZ950U-UA) 1175.2 mm x 787.6...
Owner's Manual
Page 117
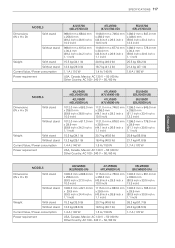
... / 60 Hz Other Country: AC 100 - 240 V ~ 50 / 60 Hz MODELS Dimensions (W x H x D) With stand Without stand Weight With stand Without stand Current Value / Power consumption Power requirement 42LV5400 (42LV5400-UB) 47LV5400 (47LV5400-UB) 55LV5400 (55LV5400-UB) 42LV5500 (42LV5500-UA) 47LV5500...50 / 60 Hz Other Country: AC 100 - 240 V ~ 50 / 60 Hz MODELS Dimensions (W x H x D) With stand Without stand Weight With stand Without stand Current Value / Power consumption Power requirement 42LW5600 (42LW5600-UA) 47LW5600 (47LW5600-UA) 55LW5600 (55LW5600-UA) 1005.0 mm x 688.0 mm...
... / 60 Hz Other Country: AC 100 - 240 V ~ 50 / 60 Hz MODELS Dimensions (W x H x D) With stand Without stand Weight With stand Without stand Current Value / Power consumption Power requirement 42LV5400 (42LV5400-UB) 47LV5400 (47LV5400-UB) 55LV5400 (55LV5400-UB) 42LV5500 (42LV5500-UA) 47LV5500...50 / 60 Hz Other Country: AC 100 - 240 V ~ 50 / 60 Hz MODELS Dimensions (W x H x D) With stand Without stand Weight With stand Without stand Current Value / Power consumption Power requirement 42LW5600 (42LW5600-UA) 47LW5600 (47LW5600-UA) 55LW5600 (55LW5600-UA) 1005.0 mm x 688.0 mm...
Owner's Manual
Page 118
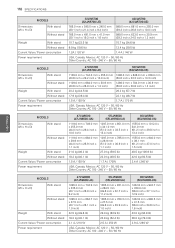
...: AC 100 - 240 V ~ 50 / 60 Hz MODELS Dimensions (W x H x D) With stand Without stand Weight With stand Without stand Current Value / Power consumption Power requirement 47LW5700 (47LW5700-UE) 55LW5700 (55LW5700-UE) 1109.0 mm x 744.0 mm x 255.0 mm 1286.0 mm x 848.0 mm x 338... 120 V ~ 50 / 60 Hz Other Country: AC 100 - 240 V ~ 50 / 60 Hz MODELS Dimensions (W x H x D) With stand Without stand Weight With stand Without stand Current Value / Power consumption Power requirement 47LW9500 (47LW9500-UA) 55LW9500 (55LW9500-UA) 60LW9500 (60LW9500-UA) 1095.2 mm x 734.9 mm 1265.0 mm...
...: AC 100 - 240 V ~ 50 / 60 Hz MODELS Dimensions (W x H x D) With stand Without stand Weight With stand Without stand Current Value / Power consumption Power requirement 47LW5700 (47LW5700-UE) 55LW5700 (55LW5700-UE) 1109.0 mm x 744.0 mm x 255.0 mm 1286.0 mm x 848.0 mm x 338... 120 V ~ 50 / 60 Hz Other Country: AC 100 - 240 V ~ 50 / 60 Hz MODELS Dimensions (W x H x D) With stand Without stand Weight With stand Without stand Current Value / Power consumption Power requirement 47LW9500 (47LW9500-UA) 55LW9500 (55LW9500-UA) 60LW9500 (60LW9500-UA) 1095.2 mm x 734.9 mm 1265.0 mm...
Owner's Manual
Page 119
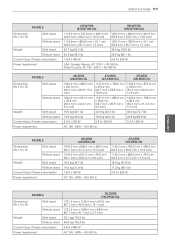
...V ~ 50 / 60 Hz Other Country: AC 100 - 240 V ~ 50 / 60 Hz MODELS Dimensions (W x H x D) With stand Without stand Weight With stand Without stand Current Value / Power consumption Power requirement 42LK530 (42LK530-UC) 47LK530 (47LK530-UC) 55LK530 (55LK530-UC) 1024.0 mm x 685.0 mm 1137.0 ... W 2.5 A / 250 W 3.2 A / 320 W AC 100 - 240V ~ 50 / 60 Hz MODELS Dimensions (W x H x D) With stand Without stand Weight With stand Without stand Current Value / Power consumption Power requirement 42LK550 (42LK550-UA) 47LK550 (47LK550-UA) 1019.0 mm x 698.0 mm x 265.0 mm 1132.0 mm x ...
...V ~ 50 / 60 Hz Other Country: AC 100 - 240 V ~ 50 / 60 Hz MODELS Dimensions (W x H x D) With stand Without stand Weight With stand Without stand Current Value / Power consumption Power requirement 42LK530 (42LK530-UC) 47LK530 (47LK530-UC) 55LK530 (55LK530-UC) 1024.0 mm x 685.0 mm 1137.0 ... W 2.5 A / 250 W 3.2 A / 320 W AC 100 - 240V ~ 50 / 60 Hz MODELS Dimensions (W x H x D) With stand Without stand Weight With stand Without stand Current Value / Power consumption Power requirement 42LK550 (42LK550-UA) 47LK550 (47LK550-UA) 1019.0 mm x 698.0 mm x 265.0 mm 1132.0 mm x ...
Specification
Page 2
... Leveler Sound Mode Clear Voice II 3D SPECIFICATIONS 3D 2D to 3D Converting Depth Control Level 3D Depth Control 3D to 2D CONNECTIVITY LG Smart TV LG App Store Web Browser Wi-Fi® Ready DLNA Certified® Windows 7 Certified SIMPLINK (HDMI CEC) Wireless HD Ready (2D... In (Y, Pb, Pr) + Audio 2 (Rear) HDMI™/HDCP Input 4 (Side) USB 2.0 2 (Side) Digital Audio Out (Optical) 1 (Rear) RGB In (D-Sub 15 Pin) - 55LW5700 55" Class 3D 1080p LED LCD TV PANEL SPECIFICATIONS Screen Size Resolution TruMotion (Frame Rate) Contrast Ratio (DCR) BROADCASTING SYSTEM Analog Digital VIDEO XD Engine...
... Leveler Sound Mode Clear Voice II 3D SPECIFICATIONS 3D 2D to 3D Converting Depth Control Level 3D Depth Control 3D to 2D CONNECTIVITY LG Smart TV LG App Store Web Browser Wi-Fi® Ready DLNA Certified® Windows 7 Certified SIMPLINK (HDMI CEC) Wireless HD Ready (2D... In (Y, Pb, Pr) + Audio 2 (Rear) HDMI™/HDCP Input 4 (Side) USB 2.0 2 (Side) Digital Audio Out (Optical) 1 (Rear) RGB In (D-Sub 15 Pin) - 55LW5700 55" Class 3D 1080p LED LCD TV PANEL SPECIFICATIONS Screen Size Resolution TruMotion (Frame Rate) Contrast Ratio (DCR) BROADCASTING SYSTEM Analog Digital VIDEO XD Engine...


