

Owner's Manual
Page 1
LED LCD TV MODELS 19LV2500 32LV3500 22LV2500 37LV3500 26LV2500 42LV3500 32LV2500 47LV3500 19LV2520 55LV3500 22LV2520 32LV3520 26LV2520 42LV3520 32LV2520 LCD TV MODELS 26LK330 32LK450 32LK330 37LK450 32LK430 42LK450 42LK430 47LK450 42LK520 47LK520 55LK520 P/NO : SAC34134216 (1102-REV08) PLASMA TV MODELS 42PW340 42PW350U 50PW340 50PW350U 42PW350 42PW350R 50PW350 50PW350R 50PZ200 60PZ200 www.lg.com OWNER'S MANUAL LED LCD TV / LCD TV / PLASMA TV Please read this manual carefully before operating the set and retain it for future reference.
LED LCD TV MODELS 19LV2500 32LV3500 22LV2500 37LV3500 26LV2500 42LV3500 32LV2500 47LV3500 19LV2520 55LV3500 22LV2520 32LV3520 26LV2520 42LV3520 32LV2520 LCD TV MODELS 26LK330 32LK450 32LK330 37LK450 32LK430 42LK450 42LK430 47LK450 42LK520 47LK520 55LK520 P/NO : SAC34134216 (1102-REV08) PLASMA TV MODELS 42PW340 42PW350U 50PW340 50PW350U 42PW350 42PW350R 50PW350 50PW350R 50PZ200 60PZ200 www.lg.com OWNER'S MANUAL LED LCD TV / LCD TV / PLASMA TV Please read this manual carefully before operating the set and retain it for future reference.
Owner's Manual
Page 8
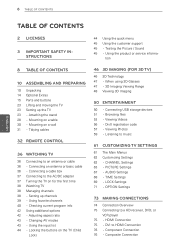
... (Child Lock) 46 3D IMAGING (FOR 3D TV) 46 3D Technology 47 - Changing AV modes 43 - Locking the buttons on a wall 31 - PICTURE Settings 67 - tion 8 TABLE OF CONTENTS 10 ASSEMBLING AND PREPARING 10 Unpacking 14 Optional Extras 15 Parts and buttons 23 Lifting and moving the TV 23... menu 45 Using the customer support 45 - Tidying cables 32 REMOTE CONTROL 36 WATCHING TV 36 Connecting to music 61 CUSTOMIZING TV SETTINGS 61 The Main Menus 62 Customizing Settings 62 - Using favorite channels 40 - Listening to an antenna or cable 36 - DVI to a HD receiver, DVD, or VCR player 75...
... (Child Lock) 46 3D IMAGING (FOR 3D TV) 46 3D Technology 47 - Changing AV modes 43 - Locking the buttons on a wall 31 - PICTURE Settings 67 - tion 8 TABLE OF CONTENTS 10 ASSEMBLING AND PREPARING 10 Unpacking 14 Optional Extras 15 Parts and buttons 23 Lifting and moving the TV 23... menu 45 Using the customer support 45 - Tidying cables 32 REMOTE CONTROL 36 WATCHING TV 36 Connecting to music 61 CUSTOMIZING TV SETTINGS 61 The Main Menus 62 Customizing Settings 62 - Using favorite channels 40 - Listening to an antenna or cable 36 - DVI to a HD receiver, DVD, or VCR player 75...
Owner's Manual
Page 16
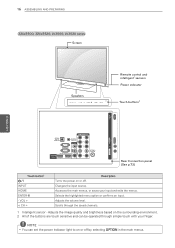
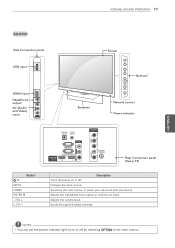
... input and exits the menus. Adjusts the image quality and brightness based on the surrounding environment. 2 All of the buttons are touch sensitive and can set the power indicator light to on or off by selecting OPTION in the main menus. Changes the input source. Adjusts the volume level. Accesses the...
... input and exits the menus. Adjusts the image quality and brightness based on the surrounding environment. 2 All of the buttons are touch sensitive and can set the power indicator light to on or off by selecting OPTION in the main menus. Changes the input source. Adjusts the volume level. Accesses the...
Owner's Manual
Page 17
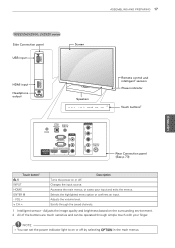
... ^ Description Turns the power on or off by selecting OPTION in the main menus. Adjusts the volume level. Changes the input source. NOTE yyYou can set the power indicator light to on the surrounding environment. 2 All of the buttons are touch sensitive and can be operated through the saved channels. 1 Intelligent...
... ^ Description Turns the power on or off by selecting OPTION in the main menus. Adjusts the volume level. Changes the input source. NOTE yyYou can set the power indicator light to on the surrounding environment. 2 All of the buttons are touch sensitive and can be operated through the saved channels. 1 Intelligent...
Owner's Manual
Page 18
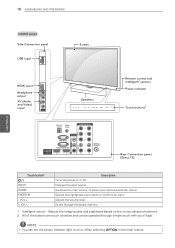
... input and exits the menus. Adjusts the image quality and brightness based on the surrounding environment. 2 All of the buttons are touch sensitive and can set the power indicator light to on or off by selecting OPTION in the main menus. Adjusts the volume level. 18 ASSEMBLING AND PREPARING ENEGNLGISH LK450...
... input and exits the menus. Adjusts the image quality and brightness based on the surrounding environment. 2 All of the buttons are touch sensitive and can set the power indicator light to on or off by selecting OPTION in the main menus. Adjusts the volume level. 18 ASSEMBLING AND PREPARING ENEGNLGISH LK450...
Owner's Manual
Page 19
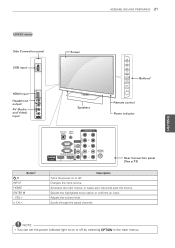
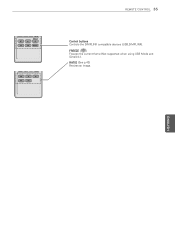
... IN (CONTROL&SERVICE) 2 1 AUDIO VIDEO R L PR PB Y COMPONENT IN ANTENNA / CABLE IN Rear Connection panel (See p.73) Button2 / I INPUT HOME ENTER ⊙ - NOTE yyYou can set the power indicator light to on or off by selecting OPTION in the main menus.
... IN (CONTROL&SERVICE) 2 1 AUDIO VIDEO R L PR PB Y COMPONENT IN ANTENNA / CABLE IN Rear Connection panel (See p.73) Button2 / I INPUT HOME ENTER ⊙ - NOTE yyYou can set the power indicator light to on or off by selecting OPTION in the main menus.
Owner's Manual
Page 20
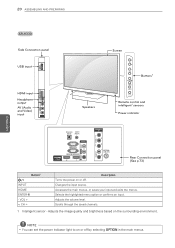
... the menus. Adjusts the volume level. VOL + v CH ^ Description Turns the power on or off by selecting OPTION in the main menus. NOTE yyYou can set the power indicator light to on the surrounding environment. 20 ASSEMBLING AND PREPARING ENEGNLGISH 32LK330 Side Connection panel USB input HDMI input Headphone output AV...
... the menus. Adjusts the volume level. VOL + v CH ^ Description Turns the power on or off by selecting OPTION in the main menus. NOTE yyYou can set the power indicator light to on the surrounding environment. 20 ASSEMBLING AND PREPARING ENEGNLGISH 32LK330 Side Connection panel USB input HDMI input Headphone output AV...
Owner's Manual
Page 21
NOTE yyYou can set the power indicator light to on or off by selecting OPTION in the main menus. Selects the highlighted menu option or confirms an input. Scrolls ...
NOTE yyYou can set the power indicator light to on or off by selecting OPTION in the main menus. Selects the highlighted menu option or confirms an input. Scrolls ...
Owner's Manual
Page 22
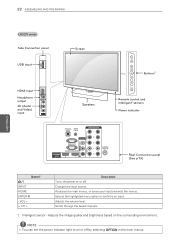
.... Accesses the main menus, or saves your input and exits the menus. Adjusts the image quality and brightness based on or off . NOTE yyYou can set the power indicator light to on the surrounding environment. 22 ASSEMBLING AND PREPARING ENEGNLGISH LK520 series Side Connection panel USB input USB IN IN 3 HDMI...
.... Accesses the main menus, or saves your input and exits the menus. Adjusts the image quality and brightness based on or off . NOTE yyYou can set the power indicator light to on the surrounding environment. 22 ASSEMBLING AND PREPARING ENEGNLGISH LK520 series Side Connection panel USB input USB IN IN 3 HDMI...
Owner's Manual
Page 23
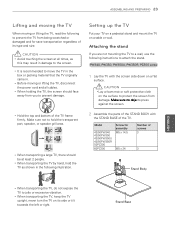
... 23 Lifting and moving the TV When moving or lifting the TV, disconnect the power cord and all times, as shown in the following illustration. Setting up the TV Put your TV on a pedestal stand and mount the TV on a flat surface. PW340, PW350, PW350U, PW350R, PZ200 series 1 Lay the TV...
... 23 Lifting and moving the TV When moving or lifting the TV, disconnect the power cord and all times, as shown in the following illustration. Setting up the TV Put your TV on a pedestal stand and mount the TV on a flat surface. PW340, PW350, PW350U, PW350R, PZ200 series 1 Lay the TV...
Owner's Manual
Page 32
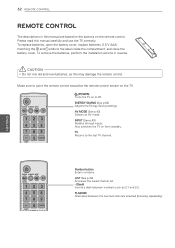
... SAVING 123 456 789 0 LIST MARK FAV VOL 3D MUTE FLASHBK P CH A G E INFO Home Q.MENU ENERGY AV MEONDETEINRPUT TV SAVING 1BACK 4 7 LIST VOL 2 3 EXIT 3D SETTING 56 FREEZE 89 RATIO 0 FLASHBK MARK FAV RATIO P CH A G E MUTE INFO Home Q.MENU (POWER) Turns the TV on the TV. ENERGY AV MODE INPUT LIST...
... SAVING 123 456 789 0 LIST MARK FAV VOL 3D MUTE FLASHBK P CH A G E INFO Home Q.MENU ENERGY AV MEONDETEINRPUT TV SAVING 1BACK 4 7 LIST VOL 2 3 EXIT 3D SETTING 56 FREEZE 89 RATIO 0 FLASHBK MARK FAV RATIO P CH A G E MUTE INFO Home Q.MENU (POWER) Turns the TV on the TV. ENERGY AV MODE INPUT LIST...
Owner's Manual
Page 33
... sounds. ENERGY AV MODE INPUT TV SAVING 123 456 789 0 LIST MARK FAV VOL 3D MUTE FLASHBK P CH A G E INFO Home Q.MENU ENTER BACK EXIT 3D SETTING FREEZE ENERGY AV MODE INPUTRATIO TV SAVING 123 456 789 LIST VOL 0 MARK FAV RATIO FLASHBK P CH A G E MUTE INFO Home Q.MENU ENTER BACK EXIT REMOTE...
... sounds. ENERGY AV MODE INPUT TV SAVING 123 456 789 0 LIST MARK FAV VOL 3D MUTE FLASHBK P CH A G E INFO Home Q.MENU ENTER BACK EXIT 3D SETTING FREEZE ENERGY AV MODE INPUTRATIO TV SAVING 123 456 789 LIST VOL 0 MARK FAV RATIO FLASHBK P CH A G E MUTE INFO Home Q.MENU ENTER BACK EXIT REMOTE...
Owner's Manual
Page 34
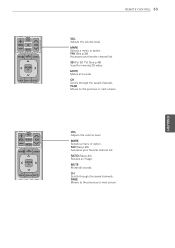
...exit the menus. ENEGNLGISH 456 34 7REMO8TE CO9NTROL 0 LIST MARK FAV VOL 3D MUTE FLASHBK P CH A G E INFO Home Q.MENU ENTER BACK EXIT 3D SETTING ENERGY AV MODE INPUT FREEZE SAVING TV RATIO 123 456 789 0 LIST MARK FAV VOL 3D MUTE FLASHBK P CH A G E INFO Home Q.MENU ENTER BACK... EXIT 3D SETTING FREEZE RATIO INFO (See p.40) Views the information of the current program and screen. Navigation buttons (up/down/left/right) Scrolls through menus or ...
...exit the menus. ENEGNLGISH 456 34 7REMO8TE CO9NTROL 0 LIST MARK FAV VOL 3D MUTE FLASHBK P CH A G E INFO Home Q.MENU ENTER BACK EXIT 3D SETTING ENERGY AV MODE INPUT FREEZE SAVING TV RATIO 123 456 789 0 LIST MARK FAV VOL 3D MUTE FLASHBK P CH A G E INFO Home Q.MENU ENTER BACK... EXIT 3D SETTING FREEZE RATIO INFO (See p.40) Views the information of the current program and screen. Navigation buttons (up/down/left/right) Scrolls through menus or ...
Owner's Manual
Page 35
RATIO (See p.42) Resizes anBiAmCKage. EXIT ENEGNLGISH FREEZE ( Plasma ) ENTER Freezes the current frame (Not supported when using USB Mode and Simplink.). 4 5 6 INFO Home Q.MENU 789 0 ENTER FLASHBK LIST MARK FAV P VBAOCKL RATIO EXICT H A G E MUTE 3D SETTING INFO FREEZE Home Q.MENU RATIO ENTER BACK EXIT 456 789 LIST VOL 0 MARK FAV RATIO FLASHBK P CH A G E MUTE REMOTE CONTROL 35 Control buINttFoOns Home Q.MENU Controls the SIMPLINK compatible devices (USB,SIMPLINK).
RATIO (See p.42) Resizes anBiAmCKage. EXIT ENEGNLGISH FREEZE ( Plasma ) ENTER Freezes the current frame (Not supported when using USB Mode and Simplink.). 4 5 6 INFO Home Q.MENU 789 0 ENTER FLASHBK LIST MARK FAV P VBAOCKL RATIO EXICT H A G E MUTE 3D SETTING INFO FREEZE Home Q.MENU RATIO ENTER BACK EXIT 456 789 LIST VOL 0 MARK FAV RATIO FLASHBK P CH A G E MUTE REMOTE CONTROL 35 Control buINttFoOns Home Q.MENU Controls the SIMPLINK compatible devices (USB,SIMPLINK).
Owner's Manual
Page 37
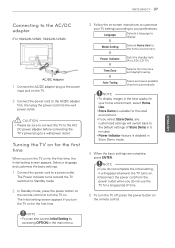
...TV switches to Standby mode. 2 In Standby mode, press the power button on the remote control to your preferences. Mode Setting Selects Home Use for your TV settings according to turn the TV off, press the power button on the remote control. yyStore Demo is disabled in the main menu...the home environment. Turning the TV on for the first time When you select Store Demo, any customized settings will appear whenever the TV turns on for the first time, the Initial setting screen appears. CAUTION yyPlease be sure to connect the TV to the AC/ DC power adapter before connecting...
...TV switches to Standby mode. 2 In Standby mode, press the power button on the remote control to your preferences. Mode Setting Selects Home Use for your TV settings according to turn the TV off, press the power button on the remote control. yyStore Demo is disabled in the main menu...the home environment. Turning the TV on for the first time When you select Store Demo, any customized settings will appear whenever the TV turns on for the first time, the Initial setting screen appears. CAUTION yyPlease be sure to connect the TV to the AC/ DC power adapter before connecting...
Owner's Manual
Page 38
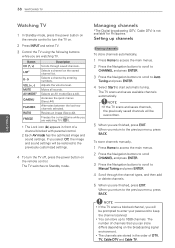
... channel scanned. Selects a channel by entering numbers. Accesses the quick menus (See p.44). If you select Off, the image and sound settings will be restored to the previous menu, press BACK. Freezes the current frame while you are finished, press EXIT. NOTE yyIf the TV ... to scroll CHANNEL and press ENTER. 3 Press the Navigation buttons to scroll to start automatic tuning. Selects an AV mode (See p.43). Setting up to 1000 channels. Resizes an image (See p.42). Selects a channel on the broadcasting signal environment. yyYou can store differs depending on ...
... channel scanned. Selects a channel by entering numbers. Accesses the quick menus (See p.44). If you select Off, the image and sound settings will be restored to the previous menu, press BACK. Freezes the current frame while you are finished, press EXIT. NOTE yyIf the TV ... to scroll CHANNEL and press ENTER. 3 Press the Navigation buttons to scroll to start automatic tuning. Selects an AV mode (See p.43). Setting up to 1000 channels. Resizes an image (See p.42). Selects a channel on the broadcasting signal environment. yyYou can store differs depending on ...
Owner's Manual
Page 39
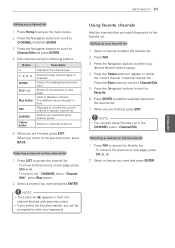
... page, press CH (^, v). - To move to the favorite list. 7 When you are finished, press EXIT. Selects the highlighted channel to the previous or next page. Setting up your favorite list 1 Select a channel to add to the favorite list. 2 Press FAV. 3 Press the Navigation buttons to access the favorite list. - Channel Edit...
... page, press CH (^, v). - To move to the favorite list. 7 When you are finished, press EXIT. Selects the highlighted channel to the previous or next page. Setting up your favorite list 1 Select a channel to add to the favorite list. 2 Press FAV. 3 Press the Navigation buttons to access the favorite list. - Channel Edit...
Owner's Manual
Page 40
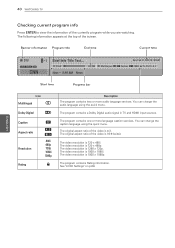
... HDMI input sources. The video resolution is 1280 x 720p. The program contains one or more audio language services. The program contains Rating information. See "LOCK Settings" on p.69. ENEGNLGISH You can change the audio language using the quick menu. The original aspect ratio of the screen. Sun, Feb 21, 2010 10...
... HDMI input sources. The video resolution is 1280 x 720p. The program contains one or more audio language services. The program contains Rating information. See "LOCK Settings" on p.69. ENEGNLGISH You can change the audio language using the quick menu. The original aspect ratio of the screen. Sun, Feb 21, 2010 10...
Owner's Manual
Page 42
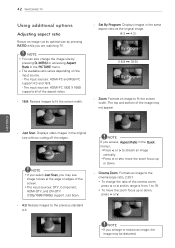
... or > and its optimal size by pressing Q. Just Scan: Displays video images in the same aspect ratio as the original image. (4:3 4:3 ) Set By Program (16:9 16:9 ) Set By Program - y The input sources: DTV, Component, HDMI-DTV, and DVI-DTV (720p/1080i/1080p) support Just Scan. Cinema Zoom: Formats an... image to move the zoom focus up or down , press ^ or v. - 4:3: Resizes images to fit the screen width. Set By Program: Displays images in the original size without cutting off the edges. The input sources: HDMI-PC and RGB-PC support 4:3 and 16:9. - y...
... or > and its optimal size by pressing Q. Just Scan: Displays video images in the same aspect ratio as the original image. (4:3 4:3 ) Set By Program (16:9 16:9 ) Set By Program - y The input sources: DTV, Component, HDMI-DTV, and DVI-DTV (720p/1080i/1080p) support Just Scan. Cinema Zoom: Formats an... image to move the zoom focus up or down , press ^ or v. - 4:3: Resizes images to fit the screen width. Set By Program: Displays images in the original size without cutting off the edges. The input sources: HDMI-PC and RGB-PC support 4:3 and 16:9. - y...
Owner's Manual
Page 43
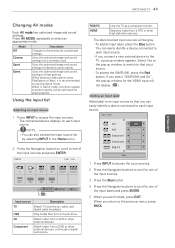
... a device connected to each input source. If you can easily identify a device connected to each input source. Uses the optimized image and sound settings for fast gaming. The disconnected input sources will not display. ( LCD ) Adding an Input label Add a label to an input source so ...On", the pop-up window for dynamic action sports. WATCHING TV 43 ENEGNLGISH Changing AV modes Each AV mode has optimized image and sound settings. The connected device displays on the pop-up window appears. Watch video from a HTS or other external devices. To add an input ...
... a device connected to each input source. If you can easily identify a device connected to each input source. Uses the optimized image and sound settings for fast gaming. The disconnected input sources will not display. ( LCD ) Adding an Input label Add a label to an input source so ...On", the pop-up window for dynamic action sports. WATCHING TV 43 ENEGNLGISH Changing AV modes Each AV mode has optimized image and sound settings. The connected device displays on the pop-up window appears. Watch video from a HTS or other external devices. To add an input ...

