
Owner's Manual (English)
Page 4
...its appearance indicates damage or deterioration, unplug it to be certain. Do not try to ground the unit by SWITCH" (Except 42/50PQ30C, 50/60PS60C) SAFETY INSTRUCTIONS 11 Never touch this owner's manual to telephone wires, lightening rods, or gas pipes. Overloaded wall outlets, loose or ...it , discontinue use a damaged or loose power cord. on shelves above the unit). 17 GROUNDING Ensure that is the disconnecting device. a TV with wet hands. on or over the apparatus (e.g. that you turn off this unit is not disconnected from physical or mechanical abuse, such as...
...its appearance indicates damage or deterioration, unplug it to be certain. Do not try to ground the unit by SWITCH" (Except 42/50PQ30C, 50/60PS60C) SAFETY INSTRUCTIONS 11 Never touch this owner's manual to telephone wires, lightening rods, or gas pipes. Overloaded wall outlets, loose or ...it , discontinue use a damaged or loose power cord. on shelves above the unit). 17 GROUNDING Ensure that is the disconnecting device. a TV with wet hands. on or over the apparatus (e.g. that you turn off this unit is not disconnected from physical or mechanical abuse, such as...
Owner's Manual (English)
Page 6
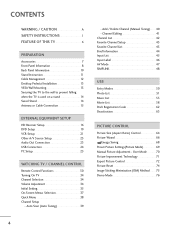
...43 Favorite Channel List 43 Brief Information 44 Input List 45 Input Label 46 AV Mode 47 SIMPLINK 48 USB Entry Modes 50 Photo List 51 Music List 55 Movie List 58 DivX Registration Code 62 Deactivation 63 PICTURE CONTROL Picture Size (Aspect Ratio)...72 Picture Reset 74 Image Sticking Minimization (ISM) Method 75 Demo Mode 76 4 CONTENTS WARNING / CAUTION A SAFETY INSTRUCTIONS 1 FEATURE OF THIS TV 6 PREPARATION Accessories 7 Front Panel Information 8 Back Panel Information 10 Stand Instruction 11 Cable Management 12 Desktop Pedestal Installation 13 VESA Wall Mounting ...
...43 Favorite Channel List 43 Brief Information 44 Input List 45 Input Label 46 AV Mode 47 SIMPLINK 48 USB Entry Modes 50 Photo List 51 Music List 55 Movie List 58 DivX Registration Code 62 Deactivation 63 PICTURE CONTROL Picture Size (Aspect Ratio)...72 Picture Reset 74 Image Sticking Minimization (ISM) Method 75 Demo Mode 76 4 CONTENTS WARNING / CAUTION A SAFETY INSTRUCTIONS 1 FEATURE OF THIS TV 6 PREPARATION Accessories 7 Front Panel Information 8 Back Panel Information 10 Stand Instruction 11 Cable Management 12 Desktop Pedestal Installation 13 VESA Wall Mounting ...
Owner's Manual (English)
Page 9
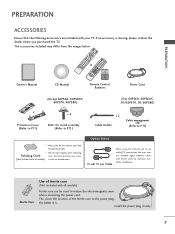
...RETURN 1.5V 1.5V FAV MARK Owner's Manual CD Manual Remote Control, Batteries Power Cord (Except 60PS60, 60PS60C, 60PS70, 60PS80) (Only 60PS60, 60PS60C, 50/60PS70, 50/60PS80) or Protection Cover (Refer to P.11) x 4 Bolts for stand assembly (Refer to P.11) x 2 Cable Holder Cable management clip (Refer ...core can be used to the power plug, the better it is missing, please contact the dealer where you purchased the TV. RETURN TV Q. Install the power plug closely. 7 Excessive pressure may differ from the images below. PREPARATION PREPARATION ACCESSORIES Ensure that the ...
...RETURN 1.5V 1.5V FAV MARK Owner's Manual CD Manual Remote Control, Batteries Power Cord (Except 60PS60, 60PS60C, 60PS70, 60PS80) (Only 60PS60, 60PS60C, 50/60PS70, 50/60PS80) or Protection Cover (Refer to P.11) x 4 Bolts for stand assembly (Refer to P.11) x 2 Cable Holder Cable management clip (Refer ...core can be used to the power plug, the better it is missing, please contact the dealer where you purchased the TV. RETURN TV Q. Install the power plug closely. 7 Excessive pressure may differ from the images below. PREPARATION PREPARATION ACCESSORIES Ensure that the ...
Owner's Manual (English)
Page 10
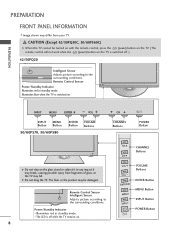
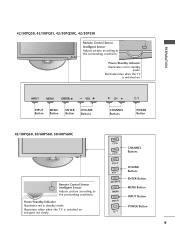
.... INPUT MENU ENTER VOL CH INPUT Button MENU Button 50/60PS70, 50/60PS80 ENTER Button VOLUME CHANNEL ButtoINnPsUT MENU EBNuTEtRtons VOL POWER Button CH G Do not step on the TV is switched off while the TV remains on . G Do not drag the TV. Illuminates blue when the TV is off . ) 42/50PQ20 Intelligent Sensor Adjusts picture...
.... INPUT MENU ENTER VOL CH INPUT Button MENU Button 50/60PS70, 50/60PS80 ENTER Button VOLUME CHANNEL ButtoINnPsUT MENU EBNuTEtRtons VOL POWER Button CH G Do not step on the TV is switched off while the TV remains on . G Do not drag the TV. Illuminates blue when the TV is off . ) 42/50PQ20 Intelligent Sensor Adjusts picture...
Owner's Manual (English)
Page 11
... CH CHANNEL Buttons POWER Button 42/50PQ60, 50/60PS60, 50/60PS60C ENTER VOL Remote Control Sensor Intelligent Sensor Adjusts picture according to the surrounding conditions. Power/Standby Indicator Illuminates red in standby mode. Power/Standby Indicator Illuminates red in standby mode. Illuminates white when the TV is switched on and goes out slowly...
... CH CHANNEL Buttons POWER Button 42/50PQ60, 50/60PS60, 50/60PS60C ENTER VOL Remote Control Sensor Intelligent Sensor Adjusts picture according to the surrounding conditions. Power/Standby Indicator Illuminates red in standby mode. Power/Standby Indicator Illuminates red in standby mode. Illuminates white when the TV is switched on and goes out slowly...
Owner's Manual (English)
Page 12
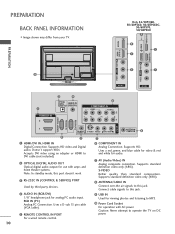
PREPARATION BACK PANEL INFORMATION ■ Image shown may differ from your TV. Doesn't support 480i. Supports HD. Connect cable signals to this jack. RGB IN (PC) Analog PC Connection. USB IN R USB IN Only 42/50PQ60, 50/60PS60, 50/60PS60C, 50/60PS70, 50/60PS80 9 9 1 1 HDMI/DVI IN 4 HDMI/DVI IN 3 HDMI / DVI ... output for analog PC audio input. Supports standard definition video only (480i). Accepts DVI video using an adapter or HDMI to operate the TV on DC power. 10 Uses a red, green, and blue cable for video & red and white for viewing photos and listening to MP3...
PREPARATION BACK PANEL INFORMATION ■ Image shown may differ from your TV. Doesn't support 480i. Supports HD. Connect cable signals to this jack. RGB IN (PC) Analog PC Connection. USB IN R USB IN Only 42/50PQ60, 50/60PS60, 50/60PS60C, 50/60PS70, 50/60PS80 9 9 1 1 HDMI/DVI IN 4 HDMI/DVI IN 3 HDMI / DVI ... output for analog PC audio input. Supports standard definition video only (480i). Accepts DVI video using an adapter or HDMI to operate the TV on DC power. 10 Uses a red, green, and blue cable for video & red and white for viewing photos and listening to MP3...
Owner's Manual (English)
Page 14
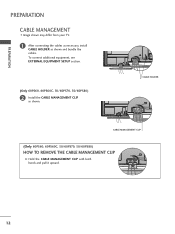
To connect additional equipment, see EXTERNAL EQUIPMENT SETUP section. (Only 60PS60, 60PS60C, 50/60PS70, 50/60PS80) 2 Install the CABLE MANAGEMENT CLIP as shown and bundle the cables. CABLE HOLDER CABLE MANAGEMENT CLIP (Only 60PS60, 60PS60C, 50/60PS70, 50/60PS80) HOW TO REMOVE THE CABLE MANAGEMENT CLIP G Hold the CABLE MANAGEMENT CLIP with both hands and pull it upward. 12 PREPARATION PREPARATION CABLE MANAGEMENT ■ Image shown may differ from your TV. 1 After connecting the cables as necessary, install CABLE HOLDER as shown.
To connect additional equipment, see EXTERNAL EQUIPMENT SETUP section. (Only 60PS60, 60PS60C, 50/60PS70, 50/60PS80) 2 Install the CABLE MANAGEMENT CLIP as shown and bundle the cables. CABLE HOLDER CABLE MANAGEMENT CLIP (Only 60PS60, 60PS60C, 50/60PS70, 50/60PS80) HOW TO REMOVE THE CABLE MANAGEMENT CLIP G Hold the CABLE MANAGEMENT CLIP with both hands and pull it upward. 12 PREPARATION PREPARATION CABLE MANAGEMENT ■ Image shown may differ from your TV. 1 After connecting the cables as necessary, install CABLE HOLDER as shown.
Owner's Manual (English)
Page 18
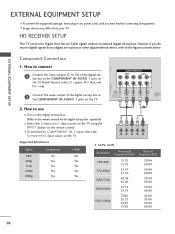
...equipment damage, never plug in any power cords until you do receive digital signals from your TV. HD RECEIVER SETUP This TV can receive Digital Over-the-air/Cable signals without an external digital set -top box or ...720x480p 1280x720p 1920x1080i 1920x1080p 15.73 15.73 31.47 31.50 44.96 45.00 33.72 33.75 27.00 33.75 67.43 67.50 59.94 60.00 59.94 60.00 59.94 ... Image shown may differ from a digital set -top box. operation) ■ Select the Component1 input source on the TV using the INPUT button on the remote control. ■ If connected to COMPONENT IN 2 input, select the Component2 input...
...equipment damage, never plug in any power cords until you do receive digital signals from your TV. HD RECEIVER SETUP This TV can receive Digital Over-the-air/Cable signals without an external digital set -top box or ...720x480p 1280x720p 1920x1080i 1920x1080p 15.73 15.73 31.47 31.50 44.96 45.00 33.72 33.75 27.00 33.75 67.43 67.50 59.94 60.00 59.94 60.00 59.94 ... Image shown may differ from a digital set -top box. operation) ■ Select the Component1 input source on the TV using the INPUT button on the remote control. ■ If connected to COMPONENT IN 2 input, select the Component2 input...
Owner's Manual (English)
Page 19
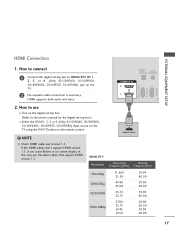
... box to the owner's manual for the digital set -top box. (Refer to HDMI/DVI IN 1, 2, 3 or 4 (Only 42/50PQ60, 50/60PS60, 50/60PS60C, 50/60PS70, 50/60PS80) jack on the remote control. ! NOTE G Check HDMI cable over version 1.3. OPTICAL DIGITAL AUDIO AUDIO OUT (RGB/DVI) HDMI/DVI IN...the digital set -top box.) ■ Select the HDMI1, 2, 3 or 4 (Only 42/50PQ60, 50/60PS60, 50/60PS60C, 50/60PS70, 50/60PS80) input source on the TV using the INPUT button on the TV. 2 No separate audio connection is necessary. HDMI supports both audio and video. HDMI Connection EXTERNAL EQUIPMENT SETUP...
... box to the owner's manual for the digital set -top box. (Refer to HDMI/DVI IN 1, 2, 3 or 4 (Only 42/50PQ60, 50/60PS60, 50/60PS60C, 50/60PS70, 50/60PS80) jack on the remote control. ! NOTE G Check HDMI cable over version 1.3. OPTICAL DIGITAL AUDIO AUDIO OUT (RGB/DVI) HDMI/DVI IN...the digital set -top box.) ■ Select the HDMI1, 2, 3 or 4 (Only 42/50PQ60, 50/60PS60, 50/60PS60C, 50/60PS70, 50/60PS80) input source on the TV using the INPUT button on the TV. 2 No separate audio connection is necessary. HDMI supports both audio and video. HDMI Connection EXTERNAL EQUIPMENT SETUP...
Owner's Manual (English)
Page 20
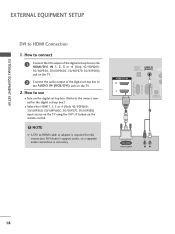
... Connect the DVI output of the digital set-top box to the HDMI/DVI IN 1, 2, 3 or 4 (Only 42/50PQ60, 50/60PS60, 50/60PS60C, 50/60PS70, 50/60PS80) jack on the TV. 2 Connect the audio output of the digital set -top box. (Refer to HDMI cable or adapter is necessary. DVI doesn't ...separate audio connection is required for the digital set-top box.) ■ Select the HDMI1, 2, 3 or 4 (Only 42/50PQ60, 50/60PS60, 50/60PS60C, 50/60PS70, 50/60PS80) input source on the TV using the INPUT button on the digital set -top box to HDMI Connection 1. NOTE G A DVI to the owner's manual for this...
... Connect the DVI output of the digital set-top box to the HDMI/DVI IN 1, 2, 3 or 4 (Only 42/50PQ60, 50/60PS60, 50/60PS60C, 50/60PS70, 50/60PS80) jack on the TV. 2 Connect the audio output of the digital set -top box. (Refer to HDMI cable or adapter is necessary. DVI doesn't ...separate audio connection is required for the digital set-top box.) ■ Select the HDMI1, 2, 3 or 4 (Only 42/50PQ60, 50/60PS60, 50/60PS60C, 50/60PS70, 50/60PS80) input source on the TV using the INPUT button on the digital set -top box to HDMI Connection 1. NOTE G A DVI to the owner's manual for this...
Owner's Manual (English)
Page 22
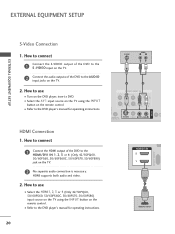
... control. ■ Refer to use ■ Select the HDMI1, 2, 3 or 4 (Only 42/50PQ60, 50/60PS60, 50/60PS60C, 50/60PS70, 50/60PS80) input source on the TV using the INPUT button on the TV. 2 No separate audio connection is necessary. How to the DVD player's manual for operating instructions. EXTERNAL EQUIPMENT ...1 Connect the S-VIDEO output of the DVD to the S -VIDEO input on the TV. 2 Connect the audio outputs of the DVD to the HDMI/DVI IN 1, 2, 3 or 4 (Only 42/50PQ60, 50/60PS60, 50/60PS60C, 50/60PS70, 50/60PS80) jack on the remote control. ■ Refer to use ■ Turn on...
... control. ■ Refer to use ■ Select the HDMI1, 2, 3 or 4 (Only 42/50PQ60, 50/60PS60, 50/60PS60C, 50/60PS70, 50/60PS80) input source on the TV using the INPUT button on the TV. 2 No separate audio connection is necessary. How to the DVD player's manual for operating instructions. EXTERNAL EQUIPMENT ...1 Connect the S-VIDEO output of the DVD to the S -VIDEO input on the TV. 2 Connect the audio outputs of the DVD to the HDMI/DVI IN 1, 2, 3 or 4 (Only 42/50PQ60, 50/60PS60, 50/60PS60C, 50/60PS70, 50/60PS80) jack on the remote control. ■ Refer to use ■ Turn on...
Owner's Manual (English)
Page 26
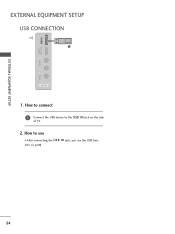
How to connect 1 Connect the USB device to use the USB function. (G p.50) 24 How to the USB I N jack, you use ■ After connecting the USB I N jack on the side of TV. 2. USB IN HDMI / DVI IN 3 VIDEO L/MONO AUDIO R EXTERNAL EQUIPMENT SETUP EXTERNAL EQUIPMENT SETUP USB CONNECTION i.e) 1 AV IN 2 1.
How to connect 1 Connect the USB device to use the USB function. (G p.50) 24 How to the USB I N jack, you use ■ After connecting the USB I N jack on the side of TV. 2. USB IN HDMI / DVI IN 3 VIDEO L/MONO AUDIO R EXTERNAL EQUIPMENT SETUP EXTERNAL EQUIPMENT SETUP USB CONNECTION i.e) 1 AV IN 2 1.
Owner's Manual (English)
Page 27
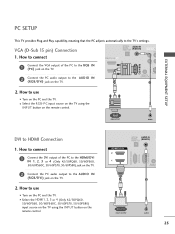
...3 or 4 (Only 42/50PQ60, 50/60PS60, 50/60PS60C, 50/60PS70, 50/60PS80) jack on the TV. 2 Connect the PC audio output to use ■ Turn on the PC and the TV. ■ Select the HDMI1, 2, 3 or 4 (Only 42/50PQ60, 50/60PS60, 50/60PS60C, 50/60PS70, 50/60PS80) input source on the TV using the INPUT button on the... TV. 1 REMOTE CONTROL IN S-VID 2 AV IN 1 2. VGA (D-Sub 15 pin) ...
...3 or 4 (Only 42/50PQ60, 50/60PS60, 50/60PS60C, 50/60PS70, 50/60PS80) jack on the TV. 2 Connect the PC audio output to use ■ Turn on the PC and the TV. ■ Select the HDMI1, 2, 3 or 4 (Only 42/50PQ60, 50/60PS60, 50/60PS60C, 50/60PS70, 50/60PS80) input source on the TV using the INPUT button on the... TV. 1 REMOTE CONTROL IN S-VID 2 AV IN 1 2. VGA (D-Sub 15 pin) ...

Owner's Manual (English)
Page 28
G 50PS30, 50/60PS60, 50/60PS60C, 50/60PS70, 50/60PS80: To get the the best picture quality, adjust the PC graphics card to 1920x1080. G Avoid keeping a fixed image on the screen for Horizontal and ...
G 50PS30, 50/60PS60, 50/60PS60C, 50/60PS70, 50/60PS80: To get the the best picture quality, adjust the PC graphics card to 1920x1080. G Avoid keeping a fixed image on the screen for Horizontal and ...
Owner's Manual (English)
Page 29
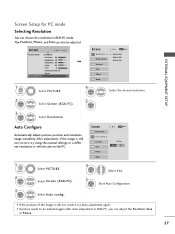
... Select the desired resolution. 3 ENTER Select Resolution. G Position Size Phase Reset Move MENU Prev. PICTURE Move Enter E Picture Mode : Standard • Contrast 90 • Brightness 50 • Sharpness 60 • Color 60 • Tint 0R G • Advanced Control • Reset Screen (RGB-PC) Screen Resolution G Auto config. Auto Configure Automatically adjusts...
... Select the desired resolution. 3 ENTER Select Resolution. G Position Size Phase Reset Move MENU Prev. PICTURE Move Enter E Picture Mode : Standard • Contrast 90 • Brightness 50 • Sharpness 60 • Color 60 • Tint 0R G • Advanced Control • Reset Screen (RGB-PC) Screen Resolution G Auto config. Auto Configure Automatically adjusts...

Owner's Manual (English)
Page 30
... auto adjustment and especially if characters are still trembling, adjust the picture phase manually. PICTURE Move Enter E Picture Mode : Standard • Contrast 90 • Brightness 50 • Sharpness 60 • Color 60 • Tint 0R G • Advanced Control • Reset Screen (RGB-PC) Screen Resolution Auto config. D F G E 1 MENU 2 ENTER 3 ENTER 4 ENTER...
... auto adjustment and especially if characters are still trembling, adjust the picture phase manually. PICTURE Move Enter E Picture Mode : Standard • Contrast 90 • Brightness 50 • Sharpness 60 • Color 60 • Tint 0R G • Advanced Control • Reset Screen (RGB-PC) Screen Resolution Auto config. D F G E 1 MENU 2 ENTER 3 ENTER 4 ENTER...

Owner's Manual (English)
Page 31
... (RGB-PC). Screen Resolution Move MENU Prev. Select Reset. Yes No Phase Reset G 29 PICTURE Move Enter E Picture Mode : Standard • Contrast 90 • Brightness 50 • Sharpness 60 • Color 60 • Tint 0R G • Advanced Control • Reset Screen (RGB-PC) 1 MENU 2 ENTER 3 ENTER 4 ENTER 5 ENTER Select PICTURE. This...
... (RGB-PC). Screen Resolution Move MENU Prev. Select Reset. Yes No Phase Reset G 29 PICTURE Move Enter E Picture Mode : Standard • Contrast 90 • Brightness 50 • Sharpness 60 • Color 60 • Tint 0R G • Advanced Control • Reset Screen (RGB-PC) 1 MENU 2 ENTER 3 ENTER 4 ENTER 5 ENTER Select PICTURE. This...
Owner's Manual (English)
Page 32
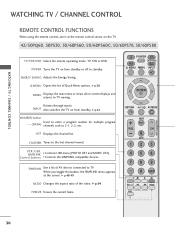
...G p.48-49 RATIO Changes the aspect ratio of AV devices connected to TV. G p.64 FREEZE Freezes the current frame. POWER Turns the TV on -screen displays and returns to enter a program number for multiple program ...- (DASH) channels such as 2-1, 2-2, etc. Rotates through inputs. FLASHBK Tunes to standby. TV POWER DVD ENERGY SAVING STB Q. G p.38 MENU Displays the main menu or clears all on ... from standby or off to the last channel viewed. G p.45 NUMBER button Used to TV viewing. Control buttons Controls the SIMPLINK compatible devices. ENERGY SAVING Adjusts the Energy Saving. VCR...
...G p.48-49 RATIO Changes the aspect ratio of AV devices connected to TV. G p.64 FREEZE Freezes the current frame. POWER Turns the TV on -screen displays and returns to enter a program number for multiple program ...- (DASH) channels such as 2-1, 2-2, etc. Rotates through inputs. FLASHBK Tunes to standby. TV POWER DVD ENERGY SAVING STB Q. G p.38 MENU Displays the main menu or clears all on ... from standby or off to the last channel viewed. G p.45 NUMBER button Used to TV viewing. Control buttons Controls the SIMPLINK compatible devices. ENERGY SAVING Adjusts the Energy Saving. VCR...
Owner's Manual (English)
Page 36
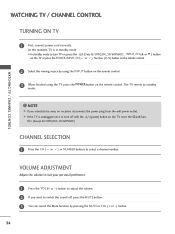
...) (power) button on vacation, disconnect the power plug from the wall power outlet. At this moment, TV is unplugged once or turn TV on, press the (Only 42/50PQ30C, 50/60PS60C) , INPUT, CH (D or E ) button on the TV or press the POWER, INPUT, CH( or ), Number (0~9) button on the remote control. 2 Select the viewing...
...) (power) button on vacation, disconnect the power plug from the wall power outlet. At this moment, TV is unplugged once or turn TV on, press the (Only 42/50PQ30C, 50/60PS60C) , INPUT, CH (D or E ) button on the TV or press the POWER, INPUT, CH( or ), Number (0~9) button on the remote control. 2 Select the viewing...
Owner's Manual (English)
Page 39
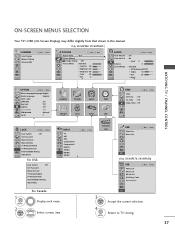
...2 ENTER For Canada Display each menu. Return to TV viewing. WATCHING TV / CHANNEL CONTROL 37 ON-SCREEN MENUS SELECTION Your TV's OSD (On Screen Display) may differ slightly from that shown in this manual. Only 50/60PS60, 50/60PS60C CHANNEL Auto Tuning Manual Tuning Channel Edit Move Enter...System : Off Set Password Block Channel TV Rating-English TV Rating-French Downloadable Rating Input Block INPUT Move Enter TV AV1 AV2 Component1 Component2 RGB-PC HDMI1 HDMI2 HDMI3 E USB Move Enter USB Photo List Music List (Only 50/60PS70, 50/60PS80) USB Photo List Music List ...
...2 ENTER For Canada Display each menu. Return to TV viewing. WATCHING TV / CHANNEL CONTROL 37 ON-SCREEN MENUS SELECTION Your TV's OSD (On Screen Display) may differ slightly from that shown in this manual. Only 50/60PS60, 50/60PS60C CHANNEL Auto Tuning Manual Tuning Channel Edit Move Enter...System : Off Set Password Block Channel TV Rating-English TV Rating-French Downloadable Rating Input Block INPUT Move Enter TV AV1 AV2 Component1 Component2 RGB-PC HDMI1 HDMI2 HDMI3 E USB Move Enter USB Photo List Music List (Only 50/60PS70, 50/60PS80) USB Photo List Music List ...


