
Owner's Manual (English)
Page 2
... SHOCK, DO NOT EXPOSE THIS PRODUCT TO RAIN OR MOISTURE. However, there is connected. - Consult the dealer or an experienced radio/TV technician for a Class B digital device, pursuant to the point of the device). Any changes or modifications not expressly approved by the ...product to radio communications. NO USER SERVICEABLE PARTS INSIDE. NOTE TO CABLE/TV INSTALLER This reminder is encouraged to try to correct the interference by turning the equipment off and on a circuit different from LG Electronics. FCC NOTICE Class B digital device This equipment has been tested and...
... SHOCK, DO NOT EXPOSE THIS PRODUCT TO RAIN OR MOISTURE. However, there is connected. - Consult the dealer or an experienced radio/TV technician for a Class B digital device, pursuant to the point of the device). Any changes or modifications not expressly approved by the ...product to radio communications. NO USER SERVICEABLE PARTS INSIDE. NOTE TO CABLE/TV INSTALLER This reminder is encouraged to try to correct the interference by turning the equipment off and on a circuit different from LG Electronics. FCC NOTICE Class B digital device This equipment has been tested and...

Owner's Manual (English)
Page 4
... the appliance, and have a qualified electrician install a separate circuit breaker. Pay particular attention to install the TV by SWITCH" (Except 42/50PQ30C, 50/60PS60C) Do not touch the TV with an exact replacement part by an authorized servicer. Do not install this product near flammable objects such as... in a door, or walked upon a dedicated circuit; When mounting a TV on the wall, make the TV with something. 14 CAUTION concerning the Power Cord: It is , a single outlet circuit which powers only that you turn off this unit is connected to a three-prong grounded AC outlet). on...
... the appliance, and have a qualified electrician install a separate circuit breaker. Pay particular attention to install the TV by SWITCH" (Except 42/50PQ30C, 50/60PS60C) Do not touch the TV with an exact replacement part by an authorized servicer. Do not install this product near flammable objects such as... in a door, or walked upon a dedicated circuit; When mounting a TV on the wall, make the TV with something. 14 CAUTION concerning the Power Cord: It is , a single outlet circuit which powers only that you turn off this unit is connected to a three-prong grounded AC outlet). on...
Owner's Manual (English)
Page 5
Be sure the antenna system is turned off, unplugged and all cables have been removed. Do not press against ...such as to grounding electrodes and requirements for the grounding electrode. provides information with cloth or other liquids directly on the TV as nail, pencil or pen, or make a scratch on the front panel of overhead power lines or other odors coming...contact an authorized service center. 25 Do not press strongly upon the panel with a soft cloth to carry larger TVs. Do not clean with such power lines or circuits as alcohol, thinners or benzene. 22 Moving Make sure the ...
Be sure the antenna system is turned off, unplugged and all cables have been removed. Do not press against ...such as to grounding electrodes and requirements for the grounding electrode. provides information with cloth or other liquids directly on the TV as nail, pencil or pen, or make a scratch on the front panel of overhead power lines or other odors coming...contact an authorized service center. 25 Do not press strongly upon the panel with a soft cloth to carry larger TVs. Do not clean with such power lines or circuits as alcohol, thinners or benzene. 22 Moving Make sure the ...
Owner's Manual (English)
Page 6
... Channel Setup 43 Favorite Channel List 43 Brief Information 44 Input List 45 Input Label 46 AV Mode 47 SIMPLINK 48 USB Entry Modes 50 Photo List 51 Music List 55 Movie List 58 DivX Registration Code 62 Deactivation 63 PICTURE CONTROL Picture Size (Aspect Ratio) Control 64... Setup 19 VCR Setup 21 Other A/V Source Setup 23 Audio Out Connection 23 USB Connection 24 PC Setup 25 WATCHING TV / CHANNEL CONTROL Remote Control Functions 30 Turning On TV 34 Channel Selection 34 Volume Adjustment 34 Initial Setting 35 On-Screen Menus Selection 37 Quick Menu 38 Channel Setup -...
... Channel Setup 43 Favorite Channel List 43 Brief Information 44 Input List 45 Input Label 46 AV Mode 47 SIMPLINK 48 USB Entry Modes 50 Photo List 51 Music List 55 Movie List 58 DivX Registration Code 62 Deactivation 63 PICTURE CONTROL Picture Size (Aspect Ratio) Control 64... Setup 19 VCR Setup 21 Other A/V Source Setup 23 Audio Out Connection 23 USB Connection 24 PC Setup 25 WATCHING TV / CHANNEL CONTROL Remote Control Functions 30 Turning On TV 34 Channel Selection 34 Volume Adjustment 34 Initial Setting 35 On-Screen Menus Selection 37 Quick Menu 38 Channel Setup -...
Owner's Manual (English)
Page 10
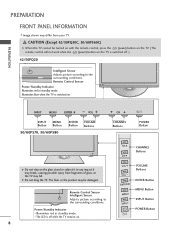
...MENU Button 50/60PS70, 50/60PS80 ENTER Button VOLUME CHANNEL ButtoINnPsUT MENU EBNuTEtRtons VOL POWER Button CH G Do not step on the glass stand or subject it to any impact.It may break, causing possible injury from your TV. G Do not drag the TV. The floor or the product may be turned on ...with the remote control, press the (power) button on the TV. (The remote control will not work when the (power) button on the...
...MENU Button 50/60PS70, 50/60PS80 ENTER Button VOLUME CHANNEL ButtoINnPsUT MENU EBNuTEtRtons VOL POWER Button CH G Do not step on the glass stand or subject it to any impact.It may break, causing possible injury from your TV. G Do not drag the TV. The floor or the product may be turned on ...with the remote control, press the (power) button on the TV. (The remote control will not work when the (power) button on the...
Owner's Manual (English)
Page 15
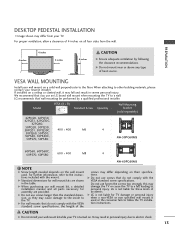
...adequate ventilation by a qualified professional installer. LG recommends that do not comply with the VESA standard screw specifications, the length of accidents. LG is turned on the wall mount used or the consumer fails to follow the TV installation instructions. CAUTION G Do not ... on all parts necessary for TV damage or personal injury when a non-VESA or non specified wall mount is used . Model VESA (A * B) A Standard Screw Quantity B Wall Mounting bracket (sold separately) 42PQ20, 42PQ30, 42PQ31, 42PQ30C, 42PQ60, 50PQ20, 50PQ30, 50PQ31, 50PQ30C, 400 ...
...adequate ventilation by a qualified professional installer. LG recommends that do not comply with the VESA standard screw specifications, the length of accidents. LG is turned on the wall mount used or the consumer fails to follow the TV installation instructions. CAUTION G Do not ... on all parts necessary for TV damage or personal injury when a non-VESA or non specified wall mount is used . Model VESA (A * B) A Standard Screw Quantity B Wall Mounting bracket (sold separately) 42PQ20, 42PQ30, 42PQ31, 42PQ30C, 42PQ60, 50PQ20, 50PQ30, 50PQ31, 50PQ30C, 400 ...
Owner's Manual (English)
Page 18
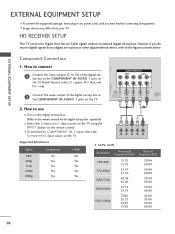
... L R AV IN 1 2 Connect the audio output of the digital settop box to the COMPONENT IN VIDEO 1 jacks on the TV. 1 2 Y PB PR L R Supported Resolutions Signal 480i 480p 720p 1080i 1080p Component Yes Yes Yes Yes Yes HDMI No Yes...67.43 67.50 59.94 60.00 59.94 60.00 59.94 60.00 59.94 60.00 24.00 30.00 59.94 60.00 16 How to use ■ Turn on the TV. RGB IN... (PC) EXTERNAL EQUIPMENT SETUP EXTERNAL EQUIPMENT SETUP ■ To prevent the equipment damage, never plug in any power cords until you do receive digital signals from your TV.
... L R AV IN 1 2 Connect the audio output of the digital settop box to the COMPONENT IN VIDEO 1 jacks on the TV. 1 2 Y PB PR L R Supported Resolutions Signal 480i 480p 720p 1080i 1080p Component Yes Yes Yes Yes Yes HDMI No Yes...67.43 67.50 59.94 60.00 59.94 60.00 59.94 60.00 59.94 60.00 24.00 30.00 59.94 60.00 16 How to use ■ Turn on the TV. RGB IN... (PC) EXTERNAL EQUIPMENT SETUP EXTERNAL EQUIPMENT SETUP ■ To prevent the equipment damage, never plug in any power cords until you do receive digital signals from your TV.
Owner's Manual (English)
Page 19
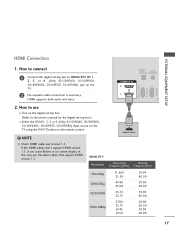
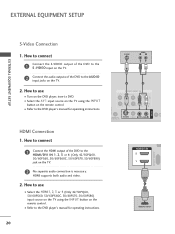
How to use the latest cables that support HDMI version 1.3. NOTE G Check HDMI cable over version 1.3. In this case use ■ Turn on the digital set-top box. (Refer to the owner's manual for the digital set -top box to connect 1 Connect the digital set -...top box.) ■ Select the HDMI1, 2, 3 or 4 (Only 42/50PQ60, 50/60PS60, 50/60PS60C, 50/60PS70, 50/60PS80) input source on the TV using the INPUT button on the TV. 2 No separate audio connection is necessary. OPTICAL DIGITAL AUDIO AUDIO OUT (RGB/DVI) HDMI/DVI IN 2 1 R CO 2....
How to use the latest cables that support HDMI version 1.3. NOTE G Check HDMI cable over version 1.3. In this case use ■ Turn on the digital set-top box. (Refer to the owner's manual for the digital set -top box to connect 1 Connect the digital set -...top box.) ■ Select the HDMI1, 2, 3 or 4 (Only 42/50PQ60, 50/60PS60, 50/60PS60C, 50/60PS70, 50/60PS80) input source on the TV using the INPUT button on the TV. 2 No separate audio connection is necessary. OPTICAL DIGITAL AUDIO AUDIO OUT (RGB/DVI) HDMI/DVI IN 2 1 R CO 2....
Owner's Manual (English)
Page 20
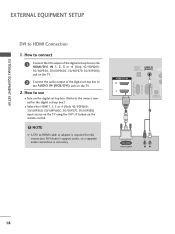
... digital set -top box to HDMI Connection 1. How to use ■ Turn on the digital set-top box. (Refer to the HDMI/DVI IN 1, 2, 3 or 4 (Only 42/50PQ60, 50/60PS60, 50/60PS60C, 50/60PS70, 50/60PS80) jack on the TV. 2 Connect the audio output of the digital set-top box to the ... the DVI output of the digital set -top box.) ■ Select the HDMI1, 2, 3 or 4 (Only 42/50PQ60, 50/60PS60, 50/60PS60C, 50/60PS70, 50/60PS80) input source on the TV using the INPUT button on the TV. 2. OPTICAL DIGITAL AUDIO OUT AUDIO IN (RGB/DVI) HDMI/DVI IN 2 1 REMOTE CONTROL IN 1 2 DVI-DTV OUTPUT ...
... digital set -top box to HDMI Connection 1. How to use ■ Turn on the digital set-top box. (Refer to the HDMI/DVI IN 1, 2, 3 or 4 (Only 42/50PQ60, 50/60PS60, 50/60PS60C, 50/60PS70, 50/60PS80) jack on the TV. 2 Connect the audio output of the digital set-top box to the ... the DVI output of the digital set -top box.) ■ Select the HDMI1, 2, 3 or 4 (Only 42/50PQ60, 50/60PS60, 50/60PS60C, 50/60PS70, 50/60PS80) input source on the TV using the INPUT button on the TV. 2. OPTICAL DIGITAL AUDIO OUT AUDIO IN (RGB/DVI) HDMI/DVI IN 2 1 REMOTE CONTROL IN 1 2 DVI-DTV OUTPUT ...
Owner's Manual (English)
Page 21
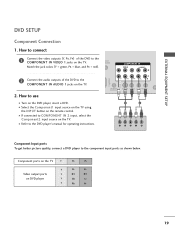
How to use ■ Turn on the DVD player, insert a DVD. ■ Select the Component1 input source on the TV using the INPUT button on the remote control. ■ If connected to COMPONENT IN 2 input, select the Component2 input source on DVD player Y Y PB PR ... To get better picture quality, connect a DVD player to the COMPONENT IN VIDEO 1 jacks on the TV. 2. Component ports on the TV Y Y Video output ports Y on the TV. ■ Refer to the COMPONENT IN AUDIO 1 jacks on the TV. How to connect 1 Connect the video outputs (Y, PB, PR) of the DVD to the DVD...
How to use ■ Turn on the DVD player, insert a DVD. ■ Select the Component1 input source on the TV using the INPUT button on the remote control. ■ If connected to COMPONENT IN 2 input, select the Component2 input source on DVD player Y Y PB PR ... To get better picture quality, connect a DVD player to the COMPONENT IN VIDEO 1 jacks on the TV. 2. Component ports on the TV Y Y Video output ports Y on the TV. ■ Refer to the COMPONENT IN AUDIO 1 jacks on the TV. How to connect 1 Connect the video outputs (Y, PB, PR) of the DVD to the DVD...
Owner's Manual (English)
Page 22
...(CONTROL & SERVICE) HDMI/DVI IN 2 1 1 HDMI-DVD OUTPUT 20 HDMI Connection 1. How to use ■ Select the HDMI1, 2, 3 or 4 (Only 42/50PQ60, 50/60PS60, 50/60PS60C, 50/60PS70, 50/60PS80) input source on the TV using the INPUT button on the remote control. ■ Refer to the AUDIO input jacks on the... the audio outputs of the DVD to the DVD player's manual for operating instructions. How to use ■ Turn on the DVD player, insert a DVD. ■ Select the A V 1 input source on the TV using the INPUT button on the remote control. ■ Refer to the HDMI/DVI IN 1, 2, 3 or 4...
...(CONTROL & SERVICE) HDMI/DVI IN 2 1 1 HDMI-DVD OUTPUT 20 HDMI Connection 1. How to use ■ Select the HDMI1, 2, 3 or 4 (Only 42/50PQ60, 50/60PS60, 50/60PS60C, 50/60PS70, 50/60PS80) input source on the TV using the INPUT button on the remote control. ■ Refer to the AUDIO input jacks on the... the audio outputs of the DVD to the DVD player's manual for operating instructions. How to use ■ Turn on the DVD player, insert a DVD. ■ Select the A V 1 input source on the TV using the INPUT button on the remote control. ■ Refer to the HDMI/DVI IN 1, 2, 3 or 4...
Owner's Manual (English)
Page 25
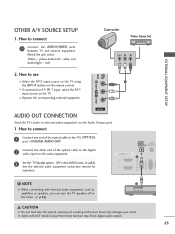
.... Looking at the laser beam may block digital audio output. 23 G Audio with external audio equipment, such as amplifiers or speakers, you can turn the TV speakers off in the AUDIO menu. (G p.82). OTHER A/V SOURCE SETUP 1. OPTICAL DIGITAL AUDIO AUDIO OUT (RGB/DVI) RGB(PC) RS-... the other end of the optical cable to AV IN 1 input, select the A V 1 input source on the audio equipment. 3 Set the "TV Speaker option - How to external audio equipment via the Audio Output port. 1. See the external audio equipment instruction manual for operation. NOTE 2 G When...
.... Looking at the laser beam may block digital audio output. 23 G Audio with external audio equipment, such as amplifiers or speakers, you can turn the TV speakers off in the AUDIO menu. (G p.82). OTHER A/V SOURCE SETUP 1. OPTICAL DIGITAL AUDIO AUDIO OUT (RGB/DVI) RGB(PC) RS-... the other end of the optical cable to AV IN 1 input, select the A V 1 input source on the audio equipment. 3 Set the "TV Speaker option - How to external audio equipment via the Audio Output port. 1. See the external audio equipment instruction manual for operation. NOTE 2 G When...
Owner's Manual (English)
Page 27
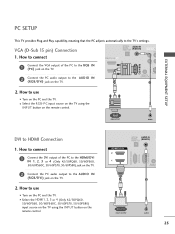
...output of the PC to the RGB IN (P C) jack on the TV. 2 Connect the PC audio output to use ■ Turn on the PC and the TV. ■ Select the RGB-PC input source on the TV using the INPUT button on the TV. 1 REMOTE CONTROL IN S-VID 2 AV IN 1 2. How ... or 4 (Only 42/50PQ60, 50/60PS60, 50/60PS60C, 50/60PS70, 50/60PS80) jack on the TV. 2 Connect the PC audio output to use ■ Turn on the PC and the TV. ■ Select the HDMI1, 2, 3 or 4 (Only 42/50PQ60, 50/60PS60, 50/60PS60C, 50/60PS70, 50/60PS80) input source on the TV using the INPUT button on the TV. 2. HDMI/DVI IN 2 1 ...
...output of the PC to the RGB IN (P C) jack on the TV. 2 Connect the PC audio output to use ■ Turn on the PC and the TV. ■ Select the RGB-PC input source on the TV using the INPUT button on the TV. 1 REMOTE CONTROL IN S-VID 2 AV IN 1 2. How ... or 4 (Only 42/50PQ60, 50/60PS60, 50/60PS60C, 50/60PS70, 50/60PS80) jack on the TV. 2 Connect the PC audio output to use ■ Turn on the PC and the TV. ■ Select the HDMI1, 2, 3 or 4 (Only 42/50PQ60, 50/60PS60, 50/60PS60C, 50/60PS70, 50/60PS80) input source on the TV using the INPUT button on the TV. 2. HDMI/DVI IN 2 1 ...
Owner's Manual (English)
Page 32
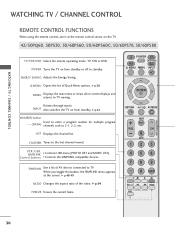
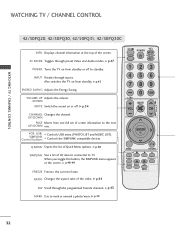
... such as 2-1, 2-2, etc. G p.64 FREEZE Freezes the current frame. ENERGY SAVING Adjusts the Energy Saving. POWER Turns the TV on the TV. 42/50PQ60, 50PS30, 50/60PS60, 50/60PS60C, 50/60PS70, 50/60PS80 TV/STB/DVD Select the remote operating mode: TV, STB or DVD. Rotates through inputs. LIST Displays the channel list. Control buttons Controls the SIMPLINK compatible...
... such as 2-1, 2-2, etc. G p.64 FREEZE Freezes the current frame. ENERGY SAVING Adjusts the Energy Saving. POWER Turns the TV on the TV. 42/50PQ60, 50PS30, 50/60PS60, 50/60PS60C, 50/60PS70, 50/60PS80 TV/STB/DVD Select the remote operating mode: TV, STB or DVD. Rotates through inputs. LIST Displays the channel list. Control buttons Controls the SIMPLINK compatible...
Owner's Manual (English)
Page 34
... devices. When you toggle this button, the SIMPLINK menu appears at the top of the video. WATCHING TV / CHANNEL CONTROL WATCHING TV / CHANNEL CONTROL 42/50PQ20, 42/50PQ30, 42/50PQ31, 42/50PQ30C INFO Displays channel information at the screen. AV MODE Toggles through inputs. ...G p.64 FAV Scroll through the programmed Favorite channels. G p.38 SIMPLINK See a list of Quick Menu options. G p.47 POWER Turns the TV on or off to...
... devices. When you toggle this button, the SIMPLINK menu appears at the top of the video. WATCHING TV / CHANNEL CONTROL WATCHING TV / CHANNEL CONTROL 42/50PQ20, 42/50PQ30, 42/50PQ31, 42/50PQ30C INFO Displays channel information at the screen. AV MODE Toggles through inputs. ...G p.64 FAV Scroll through the programmed Favorite channels. G p.38 SIMPLINK See a list of Quick Menu options. G p.47 POWER Turns the TV on or off to...
Owner's Manual (English)
Page 36
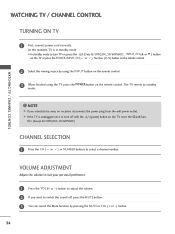
At this moment, TV is unplugged once or turn TV on, press the (Only 42/50PQ30C, 50/60PS60C) , INPUT, CH (D or E ) button on the TV or press the POWER, INPUT, CH( or ), Number (0~9) button on vacation, disconnect the power plug from the wall power outlet. The TV reverts to select a channel number. NOTE G If you .... 1 Press the VOL (+ or -) button to adjust the volume. 2 If you intend to switch the sound off with the tion. (Except 42/50PQ30C, 50/60PS60C) (power) button on the remote control. WATCHING TV / CHANNEL CONTROL TURNING ON TV 1 First, connect power cord correctly.
At this moment, TV is unplugged once or turn TV on, press the (Only 42/50PQ30C, 50/60PS60C) , INPUT, CH (D or E ) button on the TV or press the POWER, INPUT, CH( or ), Number (0~9) button on vacation, disconnect the power plug from the wall power outlet. The TV reverts to select a channel number. NOTE G If you .... 1 Press the VOL (+ or -) button to adjust the volume. 2 If you intend to switch the sound off with the tion. (Except 42/50PQ30C, 50/60PS60C) (power) button on the remote control. WATCHING TV / CHANNEL CONTROL TURNING ON TV 1 First, connect power cord correctly.
Owner's Manual (English)
Page 37
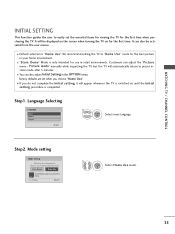
...Picture menu - Choose the setting mode you do not complete the Initial setting, it will appear whenever the TV is "Home Use". It can also be displayed on the screen when turning the TV on until the Initial setting procedure is only intended for the best picture in your home environment. ■... "Store Demo" Mode is completed. Step2. Store Demo Home Use Select [Home Use] to "Home Use" mode for use this TV at home. We recommend...
...Picture menu - Choose the setting mode you do not complete the Initial setting, it will appear whenever the TV is "Home Use". It can also be displayed on the screen when turning the TV on until the Initial setting procedure is only intended for the best picture in your home environment. ■... "Store Demo" Mode is completed. Step2. Store Demo Home Use Select [Home Use] to "Home Use" mode for use this TV at home. We recommend...
Owner's Manual (English)
Page 40
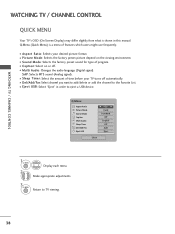
... ■ Caption: Select on or off automatically. ■ Del/Add/Fav: Select channel you want to add/delete or add the channel to TV viewing. 38 MENU Return to the Favorite List. ■ Eject USB: Select "Eject" in this manual. Q.Menu Aspect Ratio Picture Mode Sound ...the viewing environment. ■ Sound Mode: Selects the factory preset sound for type of features which users might use frequently. ■ Aspect Ratio: Selects your TV turns off . ■ Multi Audio: Changes the audio language (Digital signal). MENU 2 Display each menu. Q.Menu (Quick Menu) is shown in order to...
... ■ Caption: Select on or off automatically. ■ Del/Add/Fav: Select channel you want to add/delete or add the channel to TV viewing. 38 MENU Return to the Favorite List. ■ Eject USB: Select "Eject" in this manual. Q.Menu Aspect Ratio Picture Mode Sound ...the viewing environment. ■ Sound Mode: Selects the factory preset sound for type of features which users might use frequently. ■ Aspect Ratio: Selects your TV turns off . ■ Multi Audio: Changes the audio language (Digital signal). MENU 2 Display each menu. Q.Menu (Quick Menu) is shown in order to...
Owner's Manual (English)
Page 44
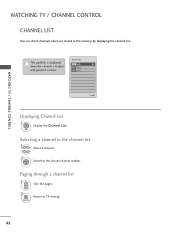
WATCHING TV / CHANNEL CONTROL CHANNEL LIST You can check channels which are stored in the channel list 1 Select a channel. 2 ENTER Switch to TV viewing. 42 Paging through a channel list 1 P CH A G E Turn the pages. 2 RETURN Return to the chosen channel number. Selecting a channel in the memory by displaying the channel list. This padlock is displayed when the channel is locked with parental control Channel List DTV 83-0 DTV 15-1 DTV 18-2 WATCHING TV / CHANNEL CONTROL Exit Displaying Channel List 1 LIST Display the Channel List.
WATCHING TV / CHANNEL CONTROL CHANNEL LIST You can check channels which are stored in the channel list 1 Select a channel. 2 ENTER Switch to TV viewing. 42 Paging through a channel list 1 P CH A G E Turn the pages. 2 RETURN Return to the chosen channel number. Selecting a channel in the memory by displaying the channel list. This padlock is displayed when the channel is locked with parental control Channel List DTV 83-0 DTV 15-1 DTV 18-2 WATCHING TV / CHANNEL CONTROL Exit Displaying Channel List 1 LIST Display the Channel List.
Owner's Manual (English)
Page 45
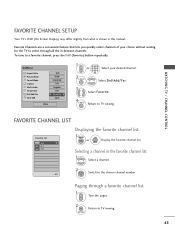
... 16:9 Vivid Standard Off English Off F Favorite G Eject Close 1 P A CH G E or 123 456 789 0 Select your choice without waiting for the TV to select through a favorite channel list 1 P A CH G E Turn the pages. 2 RETURN Return to a favorite channel, press the FAV (Favorite) button repeatedly. Exit Paging through all the in-between channels. Selecting...
... 16:9 Vivid Standard Off English Off F Favorite G Eject Close 1 P A CH G E or 123 456 789 0 Select your choice without waiting for the TV to select through a favorite channel list 1 P A CH G E Turn the pages. 2 RETURN Return to a favorite channel, press the FAV (Favorite) button repeatedly. Exit Paging through all the in-between channels. Selecting...


