
Owners Manual
Page 6
...Information 8 Back Panel Information 9 Stand Instruction 10 Cable Management 11 Desktop Pedestal Installation 12 Swivel Stand 12 VESA Wall Mounting 13 Securing the TV to the wall to prevent falling . . . . 14 Antenna or Cable Connection 15 EXTERNAL EQUIPMENT SETUP HD Receiver Setup 16 DVD ...- Auto Scan (Auto Tuning 36 - Add / Delete Channel (Manual Tuning 37 - Picture Mode - Expert Control 49 Picture Improvement Technology 50 Advanced Control - User Mode 48 - Film Mode 52 Picture Reset 53 Image Sticking Minimization (ISM) Method 54 Power Saving Picture Mode 55 4
...Information 8 Back Panel Information 9 Stand Instruction 10 Cable Management 11 Desktop Pedestal Installation 12 Swivel Stand 12 VESA Wall Mounting 13 Securing the TV to the wall to prevent falling . . . . 14 Antenna or Cable Connection 15 EXTERNAL EQUIPMENT SETUP HD Receiver Setup 16 DVD ...- Auto Scan (Auto Tuning 36 - Add / Delete Channel (Manual Tuning 37 - Picture Mode - Expert Control 49 Picture Improvement Technology 50 Advanced Control - User Mode 48 - Film Mode 52 Picture Reset 53 Image Sticking Minimization (ISM) Method 54 Power Saving Picture Mode 55 4

Owners Manual
Page 10
... VOLUME (-, +) Buttons CH CHANNEL (E,D)Buttons 42/50PG20/20C, 50/60PG30, 50/60PG30C Remote Control Sensor POWER Button Power/Standby Indicator Illuminates red in standby mode. Illuminates blue when the TV is switched on . Illuminates blue when the TV is switched on . And then wipe the TV with a cloth (If a polishing cloth is included with your...
... VOLUME (-, +) Buttons CH CHANNEL (E,D)Buttons 42/50PG20/20C, 50/60PG30, 50/60PG30C Remote Control Sensor POWER Button Power/Standby Indicator Illuminates red in standby mode. Illuminates blue when the TV is switched on . Illuminates blue when the TV is switched on . And then wipe the TV with a cloth (If a polishing cloth is included with your...

Owners Manual
Page 13
... CABLE MANAGEMENT I Image shown may be injured or the TV may differ from your TV has the CABLE HOLDER, install it upward. ! Hold the CABLE MANAGEMENT CLIP with both hands and pull it upward. 50PG10/20/20C, 50/60PG30, 50/60PG30C G Hold the CABLE MANAGEMENT CLIP with both hands and pull ...it as necessary. CABLE HOLDER CABLE MANAGEMENT CLIP CABLE MANAGEMENT CLIP How to remove the CABLE MANAGEMENT CLIP 42PG10/20/20C G First, press the cable management. If the TV is dropped, you may...
... CABLE MANAGEMENT I Image shown may be injured or the TV may differ from your TV has the CABLE HOLDER, install it upward. ! Hold the CABLE MANAGEMENT CLIP with both hands and pull it upward. 50PG10/20/20C, 50/60PG30, 50/60PG30C G Hold the CABLE MANAGEMENT CLIP with both hands and pull ...it as necessary. CABLE HOLDER CABLE MANAGEMENT CLIP CABLE MANAGEMENT CLIP How to remove the CABLE MANAGEMENT CLIP 42PG10/20/20C G First, press the cable management. If the TV is dropped, you may...

Owners Manual
Page 14
PREPARATION PREPARATION DESKTOP PEDESTAL INSTALLATION I Image shown may differ from the wall. 4 inches 4 inches 4 inches 4 inches CAUTION G Ensure adequate ventilation by 20 degrees to the left or right direction by following the clearance recommendations. For proper ventilation, allow a clearance of heat source. SWIVEL STAND (Only 50/60PG30, 50/60PG30C) After installing the TV, you can adjust the TV manually to suit your TV. G Do not mount near or above any type of 4 inches on all four sides from your viewing position. 12
PREPARATION PREPARATION DESKTOP PEDESTAL INSTALLATION I Image shown may differ from the wall. 4 inches 4 inches 4 inches 4 inches CAUTION G Ensure adequate ventilation by 20 degrees to the left or right direction by following the clearance recommendations. For proper ventilation, allow a clearance of heat source. SWIVEL STAND (Only 50/60PG30, 50/60PG30C) After installing the TV, you can adjust the TV manually to suit your TV. G Do not mount near or above any type of 4 inches on all four sides from your viewing position. 12

Owners Manual
Page 18
...TV. 1 2 Y PB PR L R Supported Resolutions Signal 480i 480p 720p 1080i 1080p Component Yes Yes Yes Yes Yes HDMI No Yes Yes Yes Yes Y, CB/PB, CR/PR Resolution Horizontal Vertical Frequency(KHz) Frequency(Hz) 720x480i 720x480p 1280x720p 15.73 15.73 31.47 31.50... 33.72 33.75 59.94 60.00 1920x1080p 27.00 33.75 67.43 67.50 24.00 30.00 59.94 60.00 ( 16 I If connected to COMPONENT IN2...colors (Y = green, PB = blue, and( ) PR = red). HD RECEIVER SETUP This TV can receive Digital Over-the-air/Cable signals without an external digital set -top box. However, if you ...
...TV. 1 2 Y PB PR L R Supported Resolutions Signal 480i 480p 720p 1080i 1080p Component Yes Yes Yes Yes Yes HDMI No Yes Yes Yes Yes Y, CB/PB, CR/PR Resolution Horizontal Vertical Frequency(KHz) Frequency(Hz) 720x480i 720x480p 1280x720p 15.73 15.73 31.47 31.50... 33.72 33.75 59.94 60.00 1920x1080p 27.00 33.75 67.43 67.50 24.00 30.00 59.94 60.00 ( 16 I If connected to COMPONENT IN2...colors (Y = green, PB = blue, and( ) PR = red). HD RECEIVER SETUP This TV can receive Digital Over-the-air/Cable signals without an external digital set -top box. However, if you ...
Owners Manual
Page 19
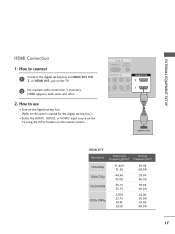
... OUTPUT HDMI-DTV Resolution Horizontal Vertical Frequency(KHz) Frequency(Hz) 720x480p 1280x720p 1920x1080i 1920x1080p 31.469 31.50 44.96 45.00 33.72 33.75 27.00 33.75 67.43 67.50 59.94 60.00 59.94 60.00 59.94 60.00 24.00 30.00 59.94... jack on the remote control. How to use I Turn on the digital set -top box.) I Select the HDMI1, HDMI2, or HDMI3 input source on the TV using the INPUT button on the TV. 2 No separate audio connection is necessary. ( ) HDMI supports both audio and video. 2.
... OUTPUT HDMI-DTV Resolution Horizontal Vertical Frequency(KHz) Frequency(Hz) 720x480p 1280x720p 1920x1080i 1920x1080p 31.469 31.50 44.96 45.00 33.72 33.75 27.00 33.75 67.43 67.50 59.94 60.00 59.94 60.00 59.94 60.00 24.00 30.00 59.94... jack on the remote control. How to use I Turn on the digital set -top box.) I Select the HDMI1, HDMI2, or HDMI3 input source on the TV using the INPUT button on the TV. 2 No separate audio connection is necessary. ( ) HDMI supports both audio and video. 2.

Owners Manual
Page 27
... 59.87 74.893 1280x1024 63.981 79.976 60.02 75.025 1360x768 47.712 60.015 1600x1200 75.00 60.00 1920x1080 67.50 60.00 * Only RGB-PC mode ! G Depending on the graphics card, DOS mode may be positioned on the graphics card, some resolution settings may not...
... 59.87 74.893 1280x1024 63.981 79.976 60.02 75.025 1360x768 47.712 60.015 1600x1200 75.00 60.00 1920x1080 67.50 60.00 * Only RGB-PC mode ! G Depending on the graphics card, DOS mode may be positioned on the graphics card, some resolution settings may not...

Owners Manual
Page 28
PICTURE Move Enter E • Contrast 50 • Brightness 50 • Sharpness 50 • Color 50 • Tint 0R G • Advanced Control • Reset Screen (RGB-PC) Screen Resolution G Auto config. Select Resolution. Position Size Phase Reset Move MENU Prev. 1024 x ...
PICTURE Move Enter E • Contrast 50 • Brightness 50 • Sharpness 50 • Color 50 • Tint 0R G • Advanced Control • Reset Screen (RGB-PC) Screen Resolution G Auto config. Select Resolution. Position Size Phase Reset Move MENU Prev. 1024 x ...

Owners Manual
Page 29
... a different resolution or refresh rate on the PC. To Set Yes No 1 MENU 2 ENTER 3 ENTER Select PICTURE. PICTURE Move Enter E • Contrast 50 • Brightness 50 • Sharpness 50 • Color 50 • Tint 0R G • Advanced Control • Reset Screen (RGB-PC) Screen Resolution Auto config. G Position Size Phase Reset Move MENU Prev...
... a different resolution or refresh rate on the PC. To Set Yes No 1 MENU 2 ENTER 3 ENTER Select PICTURE. PICTURE Move Enter E • Contrast 50 • Brightness 50 • Sharpness 50 • Color 50 • Tint 0R G • Advanced Control • Reset Screen (RGB-PC) Screen Resolution Auto config. G Position Size Phase Reset Move MENU Prev...

Owners Manual
Page 30
This feature operates only in RGB-PC mode. I P h a s e: This function allows you prefer. PICTURE Move Enter E • Contrast 50 • Brightness 50 • Sharpness 50 • Color 50 • Tint 0R G • Advanced Control • Reset Screen (RGB-PC) Screen Resolution Auto config. Position G Size Phase Reset Move MENU Prev. D F G E 1 MENU 2 ENTER 3 ENTER 4 ...
This feature operates only in RGB-PC mode. I P h a s e: This function allows you prefer. PICTURE Move Enter E • Contrast 50 • Brightness 50 • Sharpness 50 • Color 50 • Tint 0R G • Advanced Control • Reset Screen (RGB-PC) Screen Resolution Auto config. Position G Size Phase Reset Move MENU Prev. D F G E 1 MENU 2 ENTER 3 ENTER 4 ...

Owners Manual
Page 31
Screen Resolution Move MENU Prev. PICTURE Move Enter E • Contrast 50 • Brightness 50 • Sharpness 50 • Color 50 • Tint 0R G • Advanced Control • Reset Screen (RGB-PC) 1 MENU 2 ENTER 3 ENTER 4 ENTER 5 ENTER Select PICTURE. Select Reset. Yes No Phase Reset G 29 ...
Screen Resolution Move MENU Prev. PICTURE Move Enter E • Contrast 50 • Brightness 50 • Sharpness 50 • Color 50 • Tint 0R G • Advanced Control • Reset Screen (RGB-PC) 1 MENU 2 ENTER 3 ENTER 4 ENTER 5 ENTER Select PICTURE. Select Reset. Yes No Phase Reset G 29 ...

Owners Manual
Page 37
... Set Password Block Channel TV Rating-English TV Rating-French Downloadable Rating Input Block For USA For Canada 35 CHANNEL Auto Tuning Manual Tuning Channel Edit Move Enter PICTURE Move Aspect Ratio : 16:9 Picture Mode : Standard • Contrast 90 • Brightness 50 • Sharpness 60 ...AUDIO Move Enter Auto Volume : Off Clear Voice : On Balance 0L R Sound Mode : Standard • SRS TruSurround XT: Off • Treble 50 • Bass 50 • Reset E TIME Move Enter Clock : Feb/21/2008/ 2:10 AM Off Time : Off On Time : Off Sleep Timer : Off ...
... Set Password Block Channel TV Rating-English TV Rating-French Downloadable Rating Input Block For USA For Canada 35 CHANNEL Auto Tuning Manual Tuning Channel Edit Move Enter PICTURE Move Aspect Ratio : 16:9 Picture Mode : Standard • Contrast 90 • Brightness 50 • Sharpness 60 ...AUDIO Move Enter Auto Volume : Off Clear Voice : On Balance 0L R Sound Mode : Standard • SRS TruSurround XT: Off • Treble 50 • Bass 50 • Reset E TIME Move Enter Clock : Feb/21/2008/ 2:10 AM Off Time : Off On Time : Off Sleep Timer : Off ...

Owners Manual
Page 49
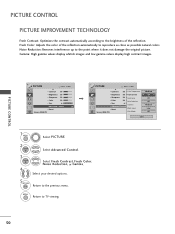
... Mode F Medium G Off Off Off Medium Low Off Close 47 PICTURE CONTROL PICTURE Move Enter E • Contrast 50 • Brightness 50 • Sharpness 50 • Color 50 • Tint 0R G • Advanced Control • Reset Screen (RGB-PC) 1 MENU 2 ENTER Select... PICTURE. Select Advanced Control. 3 ENTER Select Color Temperature. 4 Select C o o l, Medium, or W a r m. 5 RETURN Return to TV viewing. MENU ...
... Mode F Medium G Off Off Off Medium Low Off Close 47 PICTURE CONTROL PICTURE Move Enter E • Contrast 50 • Brightness 50 • Sharpness 50 • Color 50 • Tint 0R G • Advanced Control • Reset Screen (RGB-PC) 1 MENU 2 ENTER Select... PICTURE. Select Advanced Control. 3 ENTER Select Color Temperature. 4 Select C o o l, Medium, or W a r m. 5 RETURN Return to TV viewing. MENU ...

Owners Manual
Page 50
.... User Mode Adjust the picture appearance to the previous menu. MENU Return to TV viewing. 48 E E PICTURE CONTROL PICTURE CONTROL MANUAL PICTURE ADJUSTMENT Picture Mode - PICTURE Move Enter Aspect Ratio : 16:9 Picture Mode : Standard • Contrast 90 • Brightness 50 • Sharpness 60 • Color 60 • Tint 0R G • Advanced Control...
.... User Mode Adjust the picture appearance to the previous menu. MENU Return to TV viewing. 48 E E PICTURE CONTROL PICTURE CONTROL MANUAL PICTURE ADJUSTMENT Picture Mode - PICTURE Move Enter Aspect Ratio : 16:9 Picture Mode : Standard • Contrast 90 • Brightness 50 • Sharpness 60 • Color 60 • Tint 0R G • Advanced Control...

Owners Manual
Page 51
...90 5G0amma 6B0lack Level 6F0ilm Mode C0oloRr StandarGd F Off G Off Medium Low Off HD • Expert Control E White Balance Medium Red Contrast 50 E Close 1 MENU Select PICTURE. 2 ENTER Select Picture Mode. 3 ENTER Select Expert1 or Expert2. 4 ENTER Select Expert Control. 5 ENTER ...Select your desired menu option. 6 Make appropriate adjustments. 7 RETURN Return to TV viewing. 49 Expert Control By segmenting categories, Expert1 and Expert2 provide more categories which users can set as they see fit, offering the...
...90 5G0amma 6B0lack Level 6F0ilm Mode C0oloRr StandarGd F Off G Off Medium Low Off HD • Expert Control E White Balance Medium Red Contrast 50 E Close 1 MENU Select PICTURE. 2 ENTER Select Picture Mode. 3 ENTER Select Expert1 or Expert2. 4 ENTER Select Expert Control. 5 ENTER ...Select your desired menu option. 6 Make appropriate adjustments. 7 RETURN Return to TV viewing. 49 Expert Control By segmenting categories, Expert1 and Expert2 provide more categories which users can set as they see fit, offering the...
Owners Manual
Page 52
...: Removes interference up to TV viewing. 50 PICTURE CONTROL PICTURE Move Enter E • Contrast 50 • Brightness 50 • Sharpness 50 • Color 50 • Tint 0R G • Advanced Control • Reset Screen (RGB-PC) PICTURE Move Enter E • Contrast 50 Color Temperature • Brightness 50 Fresh Contrast • Sharpness 50 Fresh Color • Color 50 Noise Reduction • Tint...
...: Removes interference up to TV viewing. 50 PICTURE CONTROL PICTURE Move Enter E • Contrast 50 • Brightness 50 • Sharpness 50 • Color 50 • Tint 0R G • Advanced Control • Reset Screen (RGB-PC) PICTURE Move Enter E • Contrast 50 Color Temperature • Brightness 50 Fresh Contrast • Sharpness 50 Fresh Color • Color 50 Noise Reduction • Tint...
Owners Manual
Page 53
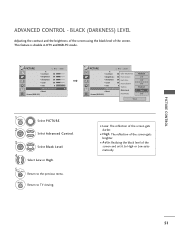
... RGB-PC mode. PICTURE Move Enter E • Contrast 50 • Brightness 50 • Sharpness 50 • Color 50 • Tint 0R G • Advanced Control • Reset Screen (RGB-PC) PICTURE Move Enter E • Contrast 50 Color Temperature • Brightness 50 Fresh Contrast • Sharpness 50 Fresh Color • Color 50 Noise Reduction • Tint 0R G Gamma • Advanced... ADVANCED CONTROL - BLACK (DARKNESS) LEVEL Adjusting the contrast and the brightness of the screen using the black level of the screen and set it to TV viewing.
... RGB-PC mode. PICTURE Move Enter E • Contrast 50 • Brightness 50 • Sharpness 50 • Color 50 • Tint 0R G • Advanced Control • Reset Screen (RGB-PC) PICTURE Move Enter E • Contrast 50 Color Temperature • Brightness 50 Fresh Contrast • Sharpness 50 Fresh Color • Color 50 Noise Reduction • Tint 0R G Gamma • Advanced... ADVANCED CONTROL - BLACK (DARKNESS) LEVEL Adjusting the contrast and the brightness of the screen using the black level of the screen and set it to TV viewing.

Owners Manual
Page 54
...Select Film Mode. 4 Select O n or O f f. 5 RETURN Return to TV viewing. 52 PICTURE Move Enter E • Contrast 50 Color Temperature • Brightness 50 Fresh Contrast • Sharpness 50 Fresh Color • Color 50 Noise Reduction • Tint 0R G Gamma • Advanced Control • Reset ... Pull-Down Mode or Cinema Correction Mode), the TV will adjust 24 fps video from movies to 30 fps video for viewing movies. PICTURE Move E • Contrast 50 • Brightness 50 • Sharpness 50 • Color 50 • Tint 0R • Advanced Control •...
...Select Film Mode. 4 Select O n or O f f. 5 RETURN Return to TV viewing. 52 PICTURE Move Enter E • Contrast 50 Color Temperature • Brightness 50 Fresh Contrast • Sharpness 50 Fresh Color • Color 50 Noise Reduction • Tint 0R G Gamma • Advanced Control • Reset ... Pull-Down Mode or Cinema Correction Mode), the TV will adjust 24 fps video from movies to 30 fps video for viewing movies. PICTURE Move E • Contrast 50 • Brightness 50 • Sharpness 50 • Color 50 • Tint 0R • Advanced Control •...

Owners Manual
Page 55
...Screen (RGB-PC) PICTURE Move Enter E • Contrast 50 • Brightness 50 • Sharpness 50 i Resetting video configuration... • Color 50 • Tint 0R G • Advanced Control •... Reset Screen (RGB-PC) 1 MENU Select PICTURE. 2 ENTER Select Reset. 3 ENTER Initialize the adjusted value. 4 MENU Return to the default factory settings. PICTURE CONTROL PICTURE RESET Settings of the selected picture modes return to TV...
...Screen (RGB-PC) PICTURE Move Enter E • Contrast 50 • Brightness 50 • Sharpness 50 i Resetting video configuration... • Color 50 • Tint 0R G • Advanced Control •... Reset Screen (RGB-PC) 1 MENU Select PICTURE. 2 ENTER Select Reset. 3 ENTER Initialize the adjusted value. 4 MENU Return to the default factory settings. PICTURE CONTROL PICTURE RESET Settings of the selected picture modes return to TV...

Owners Manual
Page 58
...8226; SRS TruSurround XT: Off • Treble 50 • Bass 50 • Reset E AUDIO Move Enter Auto Volume : On Off Clear Voice : On On Balance 0L R Sound Mode : Standard • SRS TruSurround XT: Off • Treble 50 • Bass 50 • Reset E 1 MENU Select AUDIO.... 2 ENTER Select Auto Volume. 3 ENTER Select O n or O f f. 4 RETURN Return to TV viewing. MENU Return to the previous menu. SOUND & LANGUAGE CONTROL 56 SOUND...
...8226; SRS TruSurround XT: Off • Treble 50 • Bass 50 • Reset E AUDIO Move Enter Auto Volume : On Off Clear Voice : On On Balance 0L R Sound Mode : Standard • SRS TruSurround XT: Off • Treble 50 • Bass 50 • Reset E 1 MENU Select AUDIO.... 2 ENTER Select Auto Volume. 3 ENTER Select O n or O f f. 4 RETURN Return to TV viewing. MENU Return to the previous menu. SOUND & LANGUAGE CONTROL 56 SOUND...


