Owners Manual
Page 2
... o _T A _ _" is incorporated license from Dolby Laboratories. TruSurround XT technology is a trademark of LG's audio/video device connected to the HDMI (high-definition multimedia interface), LG TV with this logo works easily with one remote control. o_ _._lmloLInK With HDMI CEC support of SRS Labs... of roughly a million or more pixels, 16:9 aspect-ratio screens, and AC3 digital audio. High-definition television. A subset of a full digital image processor, six different main picture quality factors. LG's own special digital image generator, consisting of digital television, HDTV...
... o _T A _ _" is incorporated license from Dolby Laboratories. TruSurround XT technology is a trademark of LG's audio/video device connected to the HDMI (high-definition multimedia interface), LG TV with this logo works easily with one remote control. o_ _._lmloLInK With HDMI CEC support of SRS Labs... of roughly a million or more pixels, 16:9 aspect-ratio screens, and AC3 digital audio. High-definition television. A subset of a full digital image processor, six different main picture quality factors. LG's own special digital image generator, consisting of digital television, HDTV...
Owners Manual
Page 6
...48 Advanced - Black (Darkness) Level 50 Picture Reset 51 Image Sticking Minimization (ISM) Method ....... 52 Low - User Mode 55 Balance 56 TV Speakers On/Off Setup 57 Stereo/SAP Broadcasts Setup 58 Audio Language 59 On-Screen Menus Language Selection 60 Caption/Text 61...62 iiiiiiiiiiiiiiiiii!_i_i__i_!_i_!_;_!i_i_i_i__i_i_i_i_i_i_i_i_i_i_i_i_i_i_._.i._. Color Tone - i_i_i_i_i_iC_ai_pi_tiio_ni_iO_ip_tii_oin_i_i_..i._..J..i_..i 63 Remote Control Key Functions 30 Turning On TV 32 Channel Selection 32 Volume Adjustment 52 On-Screen Menus Selection 33 Channel Search 34 -
...48 Advanced - Black (Darkness) Level 50 Picture Reset 51 Image Sticking Minimization (ISM) Method ....... 52 Low - User Mode 55 Balance 56 TV Speakers On/Off Setup 57 Stereo/SAP Broadcasts Setup 58 Audio Language 59 On-Screen Menus Language Selection 60 Caption/Text 61...62 iiiiiiiiiiiiiiiiii!_i_i__i_!_i_!_;_!i_i_i_i__i_i_i_i_i_i_i_i_i_i_i_i_i_i_._.i._. Color Tone - i_i_i_i_i_iC_ai_pi_tiio_ni_iO_ip_tii_oin_i_i_..i._..J..i_..i 63 Remote Control Key Functions 30 Turning On TV 32 Channel Selection 32 Volume Adjustment 52 On-Screen Menus Selection 33 Channel Search 34 -
Owners Manual
Page 8
... be exchanged or returned. The fan noise doesn't have no adverse effect on the screen. b. Disposal of your local authority. How does it for conferencing, games, and Internet browsing. Plasma TV is composed of mercury. These phosphors are easily viewable. A few minute colored dots...noise could occur while the fans are comprised of fluorescent lamps. INTRODUCTION FEATUREOF THIS TV What is nothing wrong with TV. The Plasma TV can be visible on the Plasma TV screen On Disposal a. Gas in a plasma state is the best way to be a small "flicker" when it for long...
... be exchanged or returned. The fan noise doesn't have no adverse effect on the screen. b. Disposal of your local authority. How does it for conferencing, games, and Internet browsing. Plasma TV is composed of mercury. These phosphors are easily viewable. A few minute colored dots...noise could occur while the fans are comprised of fluorescent lamps. INTRODUCTION FEATUREOF THIS TV What is nothing wrong with TV. The Plasma TV can be visible on the Plasma TV screen On Disposal a. Gas in a plasma state is the best way to be a small "flicker" when it for long...

Owners Manual
Page 17
STAND iNSTALLATiON €onl3y2,'3i7ncheLsCDTVmodels) Carefully place the product screen side down on _o m a cushioned surface that will protect product and screen from damage. _o z Assemble the product stand with the product as shown. Securely install the 4 bolts provided. 15
STAND iNSTALLATiON €onl3y2,'3i7ncheLsCDTVmodels) Carefully place the product screen side down on _o m a cushioned surface that will protect product and screen from damage. _o z Assemble the product stand with the product as shown. Securely install the 4 bolts provided. 15
Owners Manual
Page 25
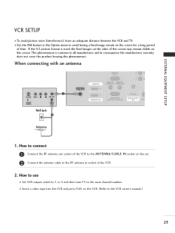
... picture noise (interference), leave an adequate distance between the VCR and TV. ,,i_Use the ISM feature in the Option menu to avoid having a fixed image remain on the screen for a long period of the screen may remain visible on the screen. This phenomenon is used; How to use Set VCR output switch ...to 3 or 4 and then tune TV to the RF antenna in consequence the manufactures warranty does not cover...
... picture noise (interference), leave an adequate distance between the VCR and TV. ,,i_Use the ISM feature in the Option menu to avoid having a fixed image remain on the screen for a long period of the screen may remain visible on the screen. This phenomenon is used; How to use Set VCR output switch ...to 3 or 4 and then tune TV to the RF antenna in consequence the manufactures warranty does not cover...

Owners Manual
Page 30
... ENTER button and then use A or T button to a PC output, select the RGB-PC as the main input mode. EXTERNAL EQUIPMENT SETUP Screen Setup for screen Resolution, Position, Size, z and Phase -q -q c Press the ADJUST button and then use _1 or I_ button to remove any ver- sent... input to PC input and checking the z screen quality. c Adjustment for PC mode Overview When the RGB input of characters. Phase This function allows you to select Yes. @ Press the ENTER button....
... ENTER button and then use A or T button to a PC output, select the RGB-PC as the main input mode. EXTERNAL EQUIPMENT SETUP Screen Setup for screen Resolution, Position, Size, z and Phase -q -q c Press the ADJUST button and then use _1 or I_ button to remove any ver- sent... input to PC input and checking the z screen quality. c Adjustment for PC mode Overview When the RGB input of characters. Phase This function allows you to select Yes. @ Press the ENTER button....

Owners Manual
Page 32
...or STB. When you toggle this button, the SimpLink menu appears at the remote control sensor on -screen menus and adjust the system set- (u p/Down/Left Right/ENTER) tings to your TV turns off . _ p.32 FAV Scroll through the programmed Favorite channels. _ p.36 CHANNEL Select available...list of time before your preference. -r EXIT Clear all on-screen displays and return to TV viewing Z from any menu. BRIGHT -/+ Adjust the brightness on or off auto- MENU Displays the main menu. _h "l- WATCHING TV / CHANNEL CONTROL REMOTE CONTROL FUNCTIONS When using the remote control,...
...or STB. When you toggle this button, the SimpLink menu appears at the remote control sensor on -screen menus and adjust the system set- (u p/Down/Left Right/ENTER) tings to your TV turns off . _ p.32 FAV Scroll through the programmed Favorite channels. _ p.36 CHANNEL Select available...list of time before your preference. -r EXIT Clear all on-screen displays and return to TV viewing Z from any menu. BRIGHT -/+ Adjust the brightness on or off auto- MENU Displays the main menu. _h "l- WATCHING TV / CHANNEL CONTROL REMOTE CONTROL FUNCTIONS When using the remote control,...

Owners Manual
Page 33
... AV 1-2, Component 1-2, RGB-PC, HDMI1/DVl, and HDMI2 input sources, screen returns to the last TV channel. POWER Turns your TV or any other programmed equipment on or off, depending on the viewing environment. _ p.44 SOUND Selects the factory preset sound for type of -r program..... © Z CC Select a closed caption. @p.61 0 (*In DTV/CADTV mode _ p.62) ADJUST Adjust the screen resolution, position, size and phase. _ p.28 31 INPUT External input modes rotate in regular sequence: TV, AV1-2, Component 1-2, RGB-PC, HDMI1/DVl and HDMI2. (AV 1-2, Component 1-2, RGB-PC, HDMI1/DVl, and HDMI2...
... AV 1-2, Component 1-2, RGB-PC, HDMI1/DVl, and HDMI2 input sources, screen returns to the last TV channel. POWER Turns your TV or any other programmed equipment on or off, depending on the viewing environment. _ p.44 SOUND Selects the factory preset sound for type of -r program..... © Z CC Select a closed caption. @p.61 0 (*In DTV/CADTV mode _ p.62) ADJUST Adjust the screen resolution, position, size and phase. _ p.28 31 INPUT External input modes rotate in regular sequence: TV, AV1-2, Component 1-2, RGB-PC, HDMI1/DVl and HDMI2. (AV 1-2, Component 1-2, RGB-PC, HDMI1/DVl, and HDMI2...

Owners Manual
Page 35
Press the MENU button and then use A T _11_ button to select the each menu. Press the _ button and then use A or T button to display the available menus. VIDEO z ..q N Z Z rn r- AUDIO 11 OPTION Plasma TV model only 11 TIME 33 ON-SCREEN MENUS SELECTION Your TV's OSD (On Screen Display) may differ slightly from what is shown in this manual. SETUP LOCK !1 For USA For Canada -1- N 0 Z 11 -q 0 r-
Press the MENU button and then use A T _11_ button to select the each menu. Press the _ button and then use A or T button to display the available menus. VIDEO z ..q N Z Z rn r- AUDIO 11 OPTION Plasma TV model only 11 TIME 33 ON-SCREEN MENUS SELECTION Your TV's OSD (On Screen Display) may differ slightly from what is shown in this manual. SETUP LOCK !1 For USA For Canada -1- N 0 Z 11 -q 0 r-
Owners Manual
Page 38
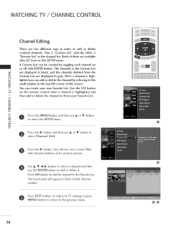
... Custom List are displayed in gray. Once a channel is "Favorite List" in the channel list. You will appear in front of the screen. Press EXIT button to return to TV viewing or press MENU button to return to the small window at the top-left corner of that channel number. A Custom List...use A or V button © Press the _ button and then use the ENTER button to add or delete scanned channels. The heart-mark will now see a screen filled with ENTER button. Press FAV button to add the channel to select Channel Edit. @ Press the I_ button. One is "Custom List" and the...
... Custom List are displayed in gray. Once a channel is "Favorite List" in the channel list. You will appear in front of the screen. Press EXIT button to return to TV viewing or press MENU button to return to the small window at the top-left corner of that channel number. A Custom List...use A or V button © Press the _ button and then use the ENTER button to add or delete scanned channels. The heart-mark will now see a screen filled with ENTER button. Press FAV button to add the channel to select Channel Edit. @ Press the I_ button. One is "Custom List" and the...

Owners Manual
Page 39
Press the MENU button and then use • or • button to select the SETUP menu. Press EXIT button to return to TV viewing or press MENU button to return to see the quality of the signal being received and indicates whether you are to adjust your antenna ...or digital cable input. View the on-screen signal strength monitor to the previous menu. @ N --r Z -r Z Z r_ N © @ Z 0 @0 37 DTV Signal: This function is only available when the input signal is DTV or CADTV...
Press the MENU button and then use • or • button to select the SETUP menu. Press EXIT button to return to TV viewing or press MENU button to return to see the quality of the signal being received and indicates whether you are to adjust your antenna ...or digital cable input. View the on-screen signal strength monitor to the previous menu. @ N --r Z -r Z Z r_ N © @ Z 0 @0 37 DTV Signal: This function is only available when the input signal is DTV or CADTV...

Owners Manual
Page 43
... can directly control the devices and play media without additional settings. ,mS_elect AV device: Enables you power off TV, all devices: When you to select one of AV devices connected to TV and play it. .mD_isc playback: Control connected AV devices by pressing the ,_ , , , I ['_'When a device is connected (displayed... discs are available, the titles of discs are turned off all connected devices are conveniently displayed at the bottom of the screen. @ VCR playback: Play and control the connected VCR. @ HDD Recordings playback: Play and control recordings stored in bright color...
... can directly control the devices and play media without additional settings. ,mS_elect AV device: Enables you power off TV, all devices: When you to select one of AV devices connected to TV and play it. .mD_isc playback: Control connected AV devices by pressing the ,_ , , , I ['_'When a device is connected (displayed... discs are available, the titles of discs are turned off all connected devices are conveniently displayed at the bottom of the screen. @ VCR playback: Play and control the connected VCR. @ HDD Recordings playback: Play and control recordings stored in bright color...

Owners Manual
Page 45
r I m i i J 43 However, the top and bottom portions of the picture will be altered, both sides, to z be cropped. The picture taking a halfway trade off 0 between alteration and screen coverage. c m Zoom 2 c'_ 0 Choose Zoom 2 when you want the picture to create a spectacular view. Horizon The screen size is, more enlarged at both vertically extended and cropped. Zoom 1 Choose Zoom 1 when you want to fill the entire screen. 16:9 Adjust the picture horizontally, in a linear proportion to view the picture without any alteration.
r I m i i J 43 However, the top and bottom portions of the picture will be altered, both sides, to z be cropped. The picture taking a halfway trade off 0 between alteration and screen coverage. c m Zoom 2 c'_ 0 Choose Zoom 2 when you want the picture to create a spectacular view. Horizon The screen size is, more enlarged at both vertically extended and cropped. Zoom 1 Choose Zoom 1 when you want to fill the entire screen. 16:9 Adjust the picture horizontally, in a linear proportion to view the picture without any alteration.

Owners Manual
Page 52
...only in AV1, AV2, HDMI1/DVI, or HDMI2mode. Press EXIT button to return to TV viewing or press MENU button to return to select the VIDEO menu. PICTURE CONTROL ADVANCED- iiLioiwi_ The screen gets darker. ,,l_H i g h The screen gets brighter. Press the • button and then use • or • button... and then use • or • button to © select Advanced. BLACK (DARKNESS) LEVEL Adjusting the contrast and the brightness of the screen using the black level of the screen. m N © 7 Press the • button and then use • or • button to select Black level.
...only in AV1, AV2, HDMI1/DVI, or HDMI2mode. Press EXIT button to return to TV viewing or press MENU button to return to select the VIDEO menu. PICTURE CONTROL ADVANCED- iiLioiwi_ The screen gets darker. ,,l_H i g h The screen gets brighter. Press the • button and then use • or • button... and then use • or • button to © select Advanced. BLACK (DARKNESS) LEVEL Adjusting the contrast and the brightness of the screen using the black level of the screen. m N © 7 Press the • button and then use • or • button to select Black level.

Owners Manual
Page 54
...METHOD- HasmTaVonly A frozen still picture from the screen. Use our unique method to see if the ghost image disappears on the screen, the image will move once per 2 ...Orbiter may help prevent ghost images. sary - Press EXIT button to return to TV viewing or press MENU button to return to select ISM Method. set to ...a problem, ISM is best not to allow any fixed image on the screen for a while before using this feature to minimize any fixed image to ...and then use • or • button to remain on the screen. Use sparingly. Press the MENU button and then use • or ...
...METHOD- HasmTaVonly A frozen still picture from the screen. Use our unique method to see if the ghost image disappears on the screen, the image will move once per 2 ...Orbiter may help prevent ghost images. sary - Press EXIT button to return to TV viewing or press MENU button to return to select ISM Method. set to ...a problem, ISM is best not to allow any fixed image on the screen for a while before using this feature to minimize any fixed image to ...and then use • or • button to remain on the screen. Use sparingly. Press the MENU button and then use • or ...

Owners Manual
Page 55
PlasmTaVonly Low power reduces the plasma display power consumption. POWER PICTURE MODE- Press the • but[on and then use • or • but [on to the previous menu. @ c _o m © z _o © @ @@ 53 LOW - Press EXIT but[on to return to TV viewing or press MENU but [on to return to select Low Power. Press the MENU but [on to When you select On, the screen darkens. Pserelescst tOhen •or bOufft.ton and then use • or • but [on and then use • or • button to select the OPTION menu.
PlasmTaVonly Low power reduces the plasma display power consumption. POWER PICTURE MODE- Press the • but[on and then use • or • but [on to the previous menu. @ c _o m © z _o © @ @@ 53 LOW - Press EXIT but[on to return to TV viewing or press MENU but [on to return to select Low Power. Press the MENU but [on to When you select On, the screen darkens. Pserelescst tOhen •or bOufft.ton and then use • or • but [on and then use • or • button to select the OPTION menu.

Owners Manual
Page 62
... • or • button to the previous menu. @ @@ 6O r_ N From this point on, the on-screen menus will be shown on the screen in the selected language. © Press the EXIT button to return to TV viewing or press MENU to return to select Language. O tPoressesletchte thMeENOUPTIObNutton maenndu. then use • or...
... • or • button to the previous menu. @ @@ 6O r_ N From this point on, the on-screen menus will be shown on the screen in the selected language. © Press the EXIT button to return to TV viewing or press MENU to return to select Language. O tPoressesletchte thMeENOUPTIObNutton maenndu. then use • or...

Owners Manual
Page 63
.... _TEXT of the program provided The term for the words that scroll across the bottom of the TV screen; Analog caption displays information at the bottom position and is used for a data service, generally not...Captions Select a caption mode for displaying captioning information if provided on the Antenna/Cable. Text displays information, usually at any position on the screen and is programmed to select Caption/Text. [[[["Ji iiiiiiiiiiiiiiiiiiiiiiiiiiiiiiiiiiiiiiiiiiiiiiiiiiiiiiiiiiiiiiiiiiiii HHHHHHHHHHHHHHHHHHHHHHHHHHHHHHHHHHHHHH_ ZZZZZZZZZ 0 c z r'-" z c N © z .--t ©...
.... _TEXT of the program provided The term for the words that scroll across the bottom of the TV screen; Analog caption displays information at the bottom position and is used for a data service, generally not...Captions Select a caption mode for displaying captioning information if provided on the Antenna/Cable. Text displays information, usually at any position on the screen and is programmed to select Caption/Text. [[[["Ji iiiiiiiiiiiiiiiiiiiiiiiiiiiiiiiiiiiiiiiiiiiiiiiiiiiiiiiiiiiiiiiiiiiii HHHHHHHHHHHHHHHHHHHHHHHHHHHHHHHHHHHHHH_ ZZZZZZZZZ 0 c z r'-" z c N © z .--t ©...

Owners Manual
Page 65
...8226; button and then use it to see the caption language. _,. A preview icon is provided at the bottom of the screen, use _1 or • button to your screen. Text Color : Choose a color for the edges. D_,Edge Type : Select an edge type. Edge Color : Select ...a color for the text. Use • or • button to customize the Style, Font, etc., to select Custom. Text Opacity : Specify the opacity for the background color. Press EXIT button to return to TV...
...8226; button and then use it to see the caption language. _,. A preview icon is provided at the bottom of the screen, use _1 or • button to your screen. Text Color : Choose a color for the edges. D_,Edge Type : Select an edge type. Edge Color : Select ...a color for the text. Use • or • button to customize the Style, Font, etc., to select Custom. Text Opacity : Specify the opacity for the background color. Press EXIT button to return to TV...

Owners Manual
Page 69
... the preset time. m_Youcan also set up the Sleep Timer in the TIME menu. 67 Note that this setting is cleared when the TV is displayed on the screen, followed by the following sleep timer options : 10, 20, 30, 60, 90, 120, 180, and 240 minutes. O To cancel the Sleep Timer, ...the TIMER button repeat- When the number of minutes. The timer begins to select Off. First the Off option appears on the screen, press the ENTER button. To check the remaining minutes before the TV turns off, press the TIMER button once. edly to count down from the number of minutes selected.
... the preset time. m_Youcan also set up the Sleep Timer in the TIME menu. 67 Note that this setting is cleared when the TV is displayed on the screen, followed by the following sleep timer options : 10, 20, 30, 60, 90, 120, 180, and 240 minutes. O To cancel the Sleep Timer, ...the TIMER button repeat- When the number of minutes. The timer begins to select Off. First the Off option appears on the screen, press the ENTER button. To check the remaining minutes before the TV turns off, press the TIMER button once. edly to count down from the number of minutes selected.


