User Guide
Page 6
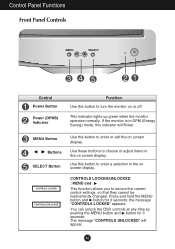
... CONTROLS UNLOCKED Use this button to enter or exit the on screen display. You can unlock the OSD controls at any time by pushing the MENU button and button for 3 seconds: the message "CONTROLS LOCKED" appears. Use these buttons to secure the current control settings, so that they cannot be ...inadvertently changed. If the monitor is in the on or off. CONTROLS LOCKED/UNLOCKED : MENU and This function allows you to choose or adjust items in DPM (Energy Saving) mode, this button to turn the monitor on screen display. A5...
... CONTROLS UNLOCKED Use this button to enter or exit the on screen display. You can unlock the OSD controls at any time by pushing the MENU button and button for 3 seconds: the message "CONTROLS LOCKED" appears. Use these buttons to secure the current control settings, so that they cannot be ...inadvertently changed. If the monitor is in the on or off. CONTROLS LOCKED/UNLOCKED : MENU and This function allows you to choose or adjust items in DPM (Energy Saving) mode, this button to turn the monitor on screen display. A5...
User Guide
Page 7
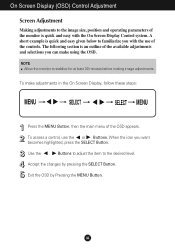
...an outline of the available adjustments and selections you can make adjustments in the On Screen Display, follow these steps: Press the MENU Button, then the main menu of the OSD appears. To access a control, use of the controls. The following section is quick and easy given below... icon you with the On Screen Display Control system. NOTE Allow the monitor to the desired level. Accept the changes by Pressing the MENU Button. On Screen Display (OSD) Control Adjustment Screen Adjustment Making adjustments to the image size, position and operating parameters of the monitor ...
...an outline of the available adjustments and selections you can make adjustments in the On Screen Display, follow these steps: Press the MENU Button, then the main menu of the OSD appears. To access a control, use of the controls. The following section is quick and easy given below... icon you with the On Screen Display Control system. NOTE Allow the monitor to the desired level. Accept the changes by Pressing the MENU Button. On Screen Display (OSD) Control Adjustment Screen Adjustment Making adjustments to the image size, position and operating parameters of the monitor ...
User Guide
Page 8
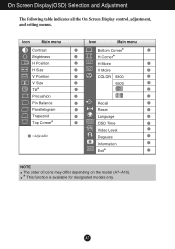
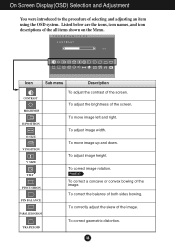
A7 On Screen Display(OSD) Selection and Adjustment The following table indicates all the On Screen Display control, adjustment, and setting menus. Icon Main menu Contrast Brightness H Position H Size V Position V Size Tilt* Pincushion Pin Balance Parallelogram Trapezoid Top Corner* : Adjustable Icon Main menu Bottom Corner* H Corner* H Moire V Moire COLOR 9300 6500 Recall Reset Language OSD Time Video Level Degauss Information Exit* NOTE The order of icons may differ depending on the model (A7~A10). * This function is available for designated models only.
A7 On Screen Display(OSD) Selection and Adjustment The following table indicates all the On Screen Display control, adjustment, and setting menus. Icon Main menu Contrast Brightness H Position H Size V Position V Size Tilt* Pincushion Pin Balance Parallelogram Trapezoid Top Corner* : Adjustable Icon Main menu Bottom Corner* H Corner* H Moire V Moire COLOR 9300 6500 Recall Reset Language OSD Time Video Level Degauss Information Exit* NOTE The order of icons may differ depending on the model (A7~A10). * This function is available for designated models only.
User Guide
Page 9
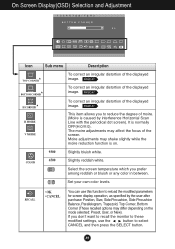
... the image. To move image left and right. To correct image rotation. To correct a concave or convex bowing of the all items shown on the Menu. A8 On Screen Display(OSD) Selection and Adjustment You were introduced to the procedure of the screen. Icon Sub... menu Description CONTRAST BRIGHTNESS H POSITION H SIZE V POSITION V SIZE TILT* PINCUSHION PIN BALANCE PARALLELOGRAM TRAPEZOID To adjust the contrast of selecting and adjusting an item using the ...
... the image. To move image left and right. To correct image rotation. To correct a concave or convex bowing of the all items shown on the Menu. A8 On Screen Display(OSD) Selection and Adjustment You were introduced to the procedure of the screen. Icon Sub... menu Description CONTRAST BRIGHTNESS H POSITION H SIZE V POSITION V SIZE TILT* PINCUSHION PIN BALANCE PARALLELOGRAM TRAPEZOID To adjust the contrast of selecting and adjusting an item using the ...
User Guide
Page 10
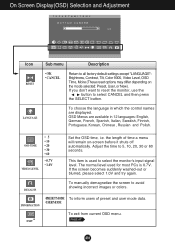
A9 On Screen Display(OSD) Selection and Adjustment Icon Sub menu Description * TOP CORNER * BOTTOM CORNER * H CORNER H MOIRE V MOIRE To correct an irregular distortion of the displayed image. This item allows you to reduce the degree ...
A9 On Screen Display(OSD) Selection and Adjustment Icon Sub menu Description * TOP CORNER * BOTTOM CORNER * H CORNER H MOIRE V MOIRE To correct an irregular distortion of the displayed image. This item allows you to reduce the degree ...
User Guide
Page 11
... and Polish. DEGAUSS To manually demagnetize the screen to avoid showing incorrect images or colors. •PRESETMODE To inform users of time a menu will remain on the mode selected: Preset, User, or New). If the screen becomes suddenly washed-out or blurred, please select 1.0V... and try again. On Screen Display(OSD) Selection and Adjustment Icon Sub menu Description RESET • OK • CANCEL Return to all factory default settings except "LANGUAGE": Brightness, Contrast, Tilt, Color 9300, Video Level...
... and Polish. DEGAUSS To manually demagnetize the screen to avoid showing incorrect images or colors. •PRESETMODE To inform users of time a menu will remain on the mode selected: Preset, User, or New). If the screen becomes suddenly washed-out or blurred, please select 1.0V... and try again. On Screen Display(OSD) Selection and Adjustment Icon Sub menu Description RESET • OK • CANCEL Return to all factory default settings except "LANGUAGE": Brightness, Contrast, Tilt, Color 9300, Video Level...
User Guide
Page 13
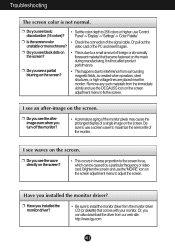
Be sure to use the 'MOIRE' icon on the screen adjustment menu to adjust the screen. A12 It will not affect product performance. • This happens due to install the monitor driver from surrounding magnetic fields, as ... when you turn off the monitor? • A premature aging of the monitor pixels may cause the prolonged display of a single image on the screen adjustment menu to the screen focus, which can also download the driver from the immediate vicinity and use 'Control Panel' -> 'Display' -> 'Settings' -> 'Color Palette' • Check the...
Be sure to use the 'MOIRE' icon on the screen adjustment menu to adjust the screen. A12 It will not affect product performance. • This happens due to install the monitor driver from surrounding magnetic fields, as ... when you turn off the monitor? • A premature aging of the monitor pixels may cause the prolonged display of a single image on the screen adjustment menu to the screen focus, which can also download the driver from the immediate vicinity and use 'Control Panel' -> 'Display' -> 'Settings' -> 'Color Palette' • Check the...


