Owner's Manual
Page 4
yyUnplug this apparatus or antenna during lightning storms or when unused for long periods of time. yyWhen mounting a TV on the wall, make sure not to install the TV by an authorized service. that is, a single outlet circuit which powers only that appliances be... cart/apparatus combination to avoid injury from physical or mechanical abuse, such as this product to rain, moisture or other liquids. Overloaded wall outlets, loose or damaged wall outlets, extension cords, frayed power cords, or damaged or cracked wire insulation are dangerous. Periodically examine the cord of the TV....
yyUnplug this apparatus or antenna during lightning storms or when unused for long periods of time. yyWhen mounting a TV on the wall, make sure not to install the TV by an authorized service. that is, a single outlet circuit which powers only that appliances be... cart/apparatus combination to avoid injury from physical or mechanical abuse, such as this product to rain, moisture or other liquids. Overloaded wall outlets, loose or damaged wall outlets, extension cords, frayed power cords, or damaged or cracked wire insulation are dangerous. Periodically examine the cord of the TV....
Owner's Manual
Page 8
Attaching the stand 28 - Mounting on a table 30 - Setting up the TV 23 - Checking current program info 42 Using additional options 42 - Adjusting aspect ratio 43 - PICTURE Settings 67 - tion 8 ... CONTENTS 10 ASSEMBLING AND PREPARING 10 Unpacking 14 Optional Extras 15 Parts and buttons 23 Lifting and moving the TV 23 Setting up channels 39 - Mounting on a wall 31 - Locking the buttons on for the first time 38 Watching TV 38 Managing channels 38 - Browsing files 53 - DivX registration code 57 - OPTION...
Attaching the stand 28 - Mounting on a table 30 - Setting up the TV 23 - Checking current program info 42 Using additional options 42 - Adjusting aspect ratio 43 - PICTURE Settings 67 - tion 8 ... CONTENTS 10 ASSEMBLING AND PREPARING 10 Unpacking 14 Optional Extras 15 Parts and buttons 23 Lifting and moving the TV 23 Setting up channels 39 - Mounting on a wall 31 - Locking the buttons on for the first time 38 Watching TV 38 Managing channels 38 - Browsing files 53 - DivX registration code 57 - OPTION...
Owner's Manual
Page 23
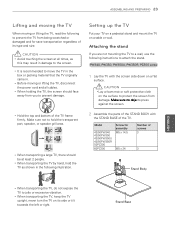
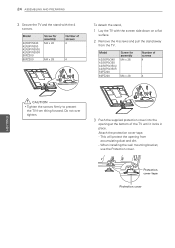
... the STAND BASE of the TV. Setting up the TV Put your TV on a pedestal stand and mount the TV on the surface to protect the screen from you are not mounting the TV to a wall, use the following to prevent the TV from being scratched or damaged and for assembly M5 x 14... TV by hand, hold the transparent part, speaker, or speaker grill area. Stand Base CAUTION yyLay a foam mat or soft protective cloth on a table or wall. CAUTION yyAvoid touching the screen at least 2 people. ASSEMBLING AND PREPARING 23 Lifting and moving the TV When moving or lifting the TV, disconnect the...
... the STAND BASE of the TV. Setting up the TV Put your TV on a pedestal stand and mount the TV on the surface to protect the screen from you are not mounting the TV to a wall, use the following to prevent the TV from being scratched or damaged and for assembly M5 x 14... TV by hand, hold the transparent part, speaker, or speaker grill area. Stand Base CAUTION yyLay a foam mat or soft protective cloth on a table or wall. CAUTION yyAvoid touching the screen at least 2 people. ASSEMBLING AND PREPARING 23 Lifting and moving the TV When moving or lifting the TV, disconnect the...
Owner's Manual
Page 24
... and the stand with the screen side down on a flat surface. 2 Remove the 4 screws and pull the stand away from the TV. When installing the wall mounting bracket, use the Protection cover. Model 42/50PW340 42/50PW350 42/50PW350U 42/50PW350R 50PZ200 60PZ200 Screw for assembly M4 x 26 M4 x 28 Number of...
... and the stand with the screen side down on a flat surface. 2 Remove the 4 screws and pull the stand away from the TV. When installing the wall mounting bracket, use the Protection cover. Model 42/50PW340 42/50PW350 42/50PW350U 42/50PW350R 50PZ200 60PZ200 Screw for assembly M4 x 26 M4 x 28 Number of...

Owner's Manual
Page 27
... the stand with the STAND BASE of the TV. Screw for assembly M4 x 20 Number of the STAND BODY with the 4 screws. When installing the wall mounting bracket, use the Protection cover. ENEGNLGISH CAUTION yyTighten the screws firmly to protect the screen from the TV. Make sure no objects press against the...
... the stand with the STAND BASE of the TV. Screw for assembly M4 x 20 Number of the STAND BODY with the 4 screws. When installing the wall mounting bracket, use the Protection cover. ENEGNLGISH CAUTION yyTighten the screws firmly to protect the screen from the TV. Make sure no objects press against the...
Owner's Manual
Page 28
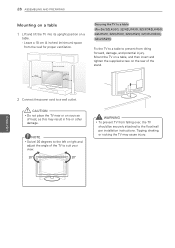
Mount the TV on a table, and then insert and tighten the supplied screw on the rear of the TV to the floor/wall per installation instructions. Leave a 10 cm (4 inches) (minimum) space from the wall for proper ventilation. 10 cm 10 cm (4 inches) 10 cm 10 cm Securing the TV to a table ...damage, and potential injury. ENEGNLGISH 2 Connect the power cord to the left or right and adjust the angle of the stand. 28 ASSEMBLING AND PREPARING Mounting on a table 1 Lift and tilt the TV into its upright position on sources of heat, as this may cause injury. Tipping, shaking, or rocking...
Mount the TV on a table, and then insert and tighten the supplied screw on the rear of the TV to the floor/wall per installation instructions. Leave a 10 cm (4 inches) (minimum) space from the wall for proper ventilation. 10 cm 10 cm (4 inches) 10 cm 10 cm Securing the TV to a table ...damage, and potential injury. ENEGNLGISH 2 Connect the power cord to the left or right and adjust the angle of the stand. 28 ASSEMBLING AND PREPARING Mounting on a table 1 Lift and tilt the TV into its upright position on sources of heat, as this may cause injury. Tipping, shaking, or rocking...
Owner's Manual
Page 29
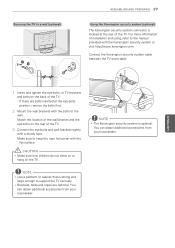
... or hang on the rear of the TV. - You can obtain additional accessories from your local dealer. Match the location of the wall bracket and the eye-bolts on the TV. For more information of the TV. yyBrackets, bolts and ropes are bolts inserted at the... a table. NOTE yyThe Kensington security system is located at the eye-bolts position, remove the bolts first. 2 Mount the wall brackets with the bolts to the wall. Make sure to a wall (optional) ASSEMBLING AND PREPARING 29 Using the Kensington security system (optional) The Kensington security system connector is optional....
... or hang on the rear of the TV. - You can obtain additional accessories from your local dealer. Match the location of the wall bracket and the eye-bolts on the TV. For more information of the TV. yyBrackets, bolts and ropes are bolts inserted at the... a table. NOTE yyThe Kensington security system is located at the eye-bolts position, remove the bolts first. 2 Mount the wall brackets with the bolts to the wall. Make sure to a wall (optional) ASSEMBLING AND PREPARING 29 Using the Kensington security system (optional) The Kensington security system connector is optional....
Owner's Manual
Page 30
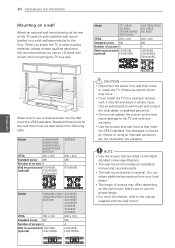
...42LK430 37/42/47LK450 42/47LK520 VESA 200 x 200 Standard screw M6 Number of screws may fall and result in the following table. Otherwise electric shock may cause damage to use screws and wall mounts that meet the VESA standard. Use an authorized LG wall mount and contact the local dealer... other building materials, please contact qualified personnel. When you attach the TV to the manual supplied with the wall mount. Make sure to use an LG brand wall mount when mounting the TV to the floor. Any damages or injuries by the warranty. NOTE yyUse the screws that you install...
...42LK430 37/42/47LK450 42/47LK520 VESA 200 x 200 Standard screw M6 Number of screws may fall and result in the following table. Otherwise electric shock may cause damage to use screws and wall mounts that meet the VESA standard. Use an authorized LG wall mount and contact the local dealer... other building materials, please contact qualified personnel. When you attach the TV to the manual supplied with the wall mount. Make sure to use an LG brand wall mount when mounting the TV to the floor. Any damages or injuries by the warranty. NOTE yyUse the screws that you install...


