Specification
Page 1
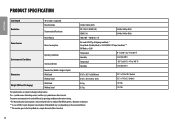
... Cabinet Control Panel Top Plate Door / Rim Door Cover All Available Colors CERTIFICATION AAFA POWER SOURCE Ratings Electrical Requirements Type OPTIONS/ACCESSORIES Pedestal Pedestal (WxHxD) LG Sidekick™ Pedestal Washer LG Sidekick™ Pedestal Washer (WxHxD) Stacking Kit DIMENSIONS Product (WxHxD) Depth with Door Open Carton (WxHxD) Weight (Product/Carton) LIMITED WARRANTY Parts and Labor Direct Drive Motor Drum UPC CODES WM6700HBA (Black Steel...
... Cabinet Control Panel Top Plate Door / Rim Door Cover All Available Colors CERTIFICATION AAFA POWER SOURCE Ratings Electrical Requirements Type OPTIONS/ACCESSORIES Pedestal Pedestal (WxHxD) LG Sidekick™ Pedestal Washer LG Sidekick™ Pedestal Washer (WxHxD) Stacking Kit DIMENSIONS Product (WxHxD) Depth with Door Open Carton (WxHxD) Weight (Product/Carton) LIMITED WARRANTY Parts and Labor Direct Drive Motor Drum UPC CODES WM6700HBA (Black Steel...

Owners Manual
Page 3
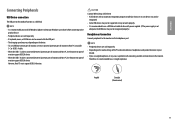
... the base. Drivers and Software Installation Priority Monitor Driver Recommended OnScreen Control Recommended Dual Controller Optional CAUTION •• Always use genuine LG components to ensure safety and product performance. •• The product warranty will not cover damage or injury caused by the use generic cables not certified by LG, the screen may not display or there may cause damage to fall off the stand and...
... the base. Drivers and Software Installation Priority Monitor Driver Recommended OnScreen Control Recommended Dual Controller Optional CAUTION •• Always use genuine LG components to ensure safety and product performance. •• The product warranty will not cover damage or injury caused by the use generic cables not certified by LG, the screen may not display or there may cause damage to fall off the stand and...

Owners Manual
Page 4
... the monitor. / Volume control You can easily control the functions of the monitor. 4 Power off Press and hold the joystick button once more than 3 seconds with your finger to turn on the right back of the monitor by moving it left /right. Note •• The joystick button is located on the monitor. ENGLISH Product and Button Description Joystick Button How to Use the Joystick Button...
... the monitor. / Volume control You can easily control the functions of the monitor. 4 Power off Press and hold the joystick button once more than 3 seconds with your finger to turn on the right back of the monitor by moving it left /right. Note •• The joystick button is located on the monitor. ENGLISH Product and Button Description Joystick Button How to Use the Joystick Button...

Owners Manual
Page 5
... side of the pixels used to create images. •• If you use the power cord that is risk of its joystick button may cause the monitor to malfunction. In addition, this may result in damage to the screen or some of the monitor frame firmly. ENGLISH Moving and Lifting the Monitor When moving or lifting the monitor, follow these instructions to prevent the...
... side of the pixels used to create images. •• If you use the power cord that is risk of its joystick button may cause the monitor to malfunction. In addition, this may result in damage to the screen or some of the monitor frame firmly. ENGLISH Moving and Lifting the Monitor When moving or lifting the monitor, follow these instructions to prevent the...

Owners Manual
Page 6
... screen can be adjusted forward or backward from -5° to your hand on the stand base in an upright position. 2 Adjust the angle of the monitor head. ENGLISH Adjusting the Stand Height 1 Place the monitor mounted on the stand body to avoid injury to 20° for safety. Monitor head 6 Max. 110.0 mm (4.3 inches) WARNING •• When adjusting the screen height, do not hold the lower part of the monitor...
... screen can be adjusted forward or backward from -5° to your hand on the stand base in an upright position. 2 Adjust the angle of the monitor head. ENGLISH Adjusting the Stand Height 1 Place the monitor mounted on the stand body to avoid injury to 20° for safety. Monitor head 6 Max. 110.0 mm (4.3 inches) WARNING •• When adjusting the screen height, do not hold the lower part of the monitor...
Owners Manual
Page 7
... refer to install and set up a tilting wall mounting bracket. Note •• The Kensington security system is optional. ENGLISH Using the Kensington Lock The connector for the Kensington security system is located at each side of the monitor. Installing the Wall Mount Plate This monitor meets the specifications for how to the manual for the wall mount plate or other compatible devices. Connect the monitor to the Kensington lock owner's manual or visit...
... refer to install and set up a tilting wall mounting bracket. Note •• The Kensington security system is optional. ENGLISH Using the Kensington Lock The connector for the Kensington security system is located at each side of the monitor. Installing the Wall Mount Plate This monitor meets the specifications for how to the manual for the wall mount plate or other compatible devices. Connect the monitor to the Kensington lock owner's manual or visit...
Owners Manual
Page 9
... not use a grounded (3-hole) power strip or a grounded power outlet. •• The monitor may cause image distortion. •• Do not display a still image on the screen. This is normal. Connect Adapter to supply power to Settings Input, and then select the input option. This may flicker when turned on the connected device's specifications and the environment. •• USB-C port is not for the Monitor Power source but for a PC power source. HDMI Connection Transmits digital video and audio signals...
... not use a grounded (3-hole) power strip or a grounded power outlet. •• The monitor may cause image distortion. •• Do not display a still image on the screen. This is normal. Connect Adapter to supply power to Settings Input, and then select the input option. This may flicker when turned on the connected device's specifications and the environment. •• USB-C port is not for the Monitor Power source but for a PC power source. HDMI Connection Transmits digital video and audio signals...

Owners Manual
Page 10
... devices to HDMI cable may occur. •• Recommended HDMI cable types -- High-Speed HDMI®/TM cable with the HDMI logo attached. ENGLISH Connecting LAN LAN connection Connect the router or switch to the monitor. High-Speed HDMI®/TM cable -- In order to use a certified HDMI cable, the screen may not display or a connection error may cause compatibility issues. •• Use a certified cable with Ethernet 10 Connecting AV Devices HDMI Connection HDMI transmits digital video and audio signals from your...
... devices to HDMI cable may occur. •• Recommended HDMI cable types -- High-Speed HDMI®/TM cable with the HDMI logo attached. ENGLISH Connecting LAN LAN connection Connect the router or switch to the monitor. High-Speed HDMI®/TM cable -- In order to use a certified HDMI cable, the screen may not display or a connection error may cause compatibility issues. •• Use a certified cable with Ethernet 10 Connecting AV Devices HDMI Connection HDMI transmits digital video and audio signals from your...
Owners Manual
Page 11
.... •• If you install all Windows Updates to keep your Windows up-to-date before connecting to the product for use a USB hub or hard disk drive with connecting another external device to the monitor. ENGLISH Connecting Peripherals USB Device connection The USB port on the device. •• To use USB Downstream port of monitor, user must support USB 3.0 function. Note •• It is recommended you use straight earphones. Therefore, it...
.... •• If you install all Windows Updates to keep your Windows up-to-date before connecting to the product for use a USB hub or hard disk drive with connecting another external device to the monitor. ENGLISH Connecting Peripherals USB Device connection The USB port on the device. •• To use USB Downstream port of monitor, user must support USB 3.0 function. Note •• It is recommended you use straight earphones. Therefore, it...

Owners Manual
Page 13
Quick Settings Input Picture Sound General Description 13 Turns off the monitor. Menu Settings 1 To view the OSD menu, press the joystick button on the right back of the monitor and then enter the Settings. 2 Move the joystick up/down and left/right to set the options. 3 To return to the upper menu or set other menu items, move the joystick to or pressing ( ) it. 4 If you want to exit...
Quick Settings Input Picture Sound General Description 13 Turns off the monitor. Menu Settings 1 To view the OSD menu, press the joystick button on the right back of the monitor and then enter the Settings. 2 Move the joystick up/down and left/right to set the options. 3 To return to the upper menu or set other menu items, move the joystick to or pressing ( ) it. 4 If you want to exit...
Owners Manual
Page 14
... the color temperature. Warm Sets the screen color to a bluish tone. Note •• You can adjust it to red, green, or blue by moving the joystick button to use USB hub of two input modes on one monitor. Cool Manual Sets the screen color to a reddish tone. KVM Switch Select the USB upstream cable connection port to in the Volume menu. Custom The user can adjust Mute / Unmute by customization. PBP Displays the screens of the monitor. 14 Adjusts the volume.
... the color temperature. Warm Sets the screen color to a bluish tone. Note •• You can adjust it to red, green, or blue by moving the joystick button to use USB hub of two input modes on one monitor. Cool Manual Sets the screen color to a reddish tone. KVM Switch Select the USB upstream cable connection port to in the Volume menu. Custom The user can adjust Mute / Unmute by customization. PBP Displays the screens of the monitor. 14 Adjusts the volume.

Owners Manual
Page 15
... the monitor. 15 Displays video according to new input when connected. Note •• The display may look the same for Full Wide and Original options at the recommended resolution. (3440 x 1440) Displays the screens of the screen. Select the USB upstream cable connection port to use USB hub of the video signal input. ENGLISH Input Settings > Input Input Input List Auto Input Switch Aspect Ratio PBP Main/Sub Screen Change Main/Sub Sound Change KVM Switch Selects the input mode. Full Wide Original Displays the video in PBP mode.
... the monitor. 15 Displays video according to new input when connected. Note •• The display may look the same for Full Wide and Original options at the recommended resolution. (3440 x 1440) Displays the screens of the screen. Select the USB upstream cable connection port to use USB hub of the video signal input. ENGLISH Input Settings > Input Input Input List Auto Input Switch Aspect Ratio PBP Main/Sub Screen Change Main/Sub Sound Change KVM Switch Selects the input mode. Full Wide Original Displays the video in PBP mode.

Owners Manual
Page 18
... Optimizes the screen for UCC or SD videos. Best for comfortable viewing, with less movement. Off Displays in unnecessarily high sharpness. On Adjusts the brightness automatically according to use the function for normal text or for still images or images with images at the middle level between the low and high modes. ENGLISH Settings > Picture Picture Adjust Brightness Contrast Sharpness SUPER RESOLUTION+ Black Level DFC Description Adjusts the contrast and brightness of the screen. High Optimizes the screen...
... Optimizes the screen for UCC or SD videos. Best for comfortable viewing, with less movement. Off Displays in unnecessarily high sharpness. On Adjusts the brightness automatically according to use the function for normal text or for still images or images with images at the middle level between the low and high modes. ENGLISH Settings > Picture Picture Adjust Brightness Contrast Sharpness SUPER RESOLUTION+ Black Level DFC Description Adjusts the contrast and brightness of the screen. High Optimizes the screen...
Owners Manual
Page 20
... gamma settings, select Mode 4. Adjusts the saturation of the screen colors. Hue Adjusts the tone of the screen colors. The lower the value, the less saturated and brighter the colors become . The higher the value, the more saturated and darker the colors become . ENGLISH Settings > Picture Color Adjust Picture Reset Gamma Color Temp Description Mode 1, Mode 2, The higher the gamma value, the darker the image becomes. The user can customize the picture color using red, green, and blue colors...
... gamma settings, select Mode 4. Adjusts the saturation of the screen colors. Hue Adjusts the tone of the screen colors. The lower the value, the less saturated and brighter the colors become . The higher the value, the more saturated and darker the colors become . ENGLISH Settings > Picture Color Adjust Picture Reset Gamma Color Temp Description Mode 1, Mode 2, The higher the gamma value, the darker the image becomes. The user can customize the picture color using red, green, and blue colors...

Owners Manual
Page 22
... depend on the screen for the auto-off function. (8 H, 6 H, 4 H, and Off) Set Input Compatibility Version to use the HDR function. -- You can set the sound generated from Buzzer when your monitor powers on. ENGLISH General Settings > General Language USB Selection SMART ENERGY SAVING Deep Sleep Mode Automatic Standby Input Compatibility Version Buzzer Description Sets the menu screen to use the HDR function. This feature lets you select the option of HDMI input, set to 1.4 or over...
... depend on the screen for the auto-off function. (8 H, 6 H, 4 H, and Off) Set Input Compatibility Version to use the HDR function. -- You can set the sound generated from Buzzer when your monitor powers on. ENGLISH General Settings > General Language USB Selection SMART ENERGY SAVING Deep Sleep Mode Automatic Standby Input Compatibility Version Buzzer Description Sets the menu screen to use the HDR function. This feature lets you select the option of HDMI input, set to 1.4 or over...

Owners Manual
Page 23
... default settings. 23 PBP Picture Mode Displays the screens of the monitor. On Enables OSD Lock. Do you want to reset your preferred menu easily. Off Disables OSD Lock. KVM Switch Select the USB upstream cable connection port to use USB hub of two input modes on one monitor. ENGLISH Settings > General User-defined Key OSD Lock Information Reset to Initial Settings Description You can customise the main menu to access your settings? This feature disables the configuration and adjustment of menus. Total Power On Time, Resolution...
... default settings. 23 PBP Picture Mode Displays the screens of the monitor. On Enables OSD Lock. Do you want to reset your preferred menu easily. Off Disables OSD Lock. KVM Switch Select the USB upstream cable connection port to use USB hub of two input modes on one monitor. ENGLISH Settings > General User-defined Key OSD Lock Information Reset to Initial Settings Description You can customise the main menu to access your settings? This feature disables the configuration and adjustment of menus. Total Power On Time, Resolution...
Owners Manual
Page 24
... monitor, pixilated spots (red, green, blue, white, or black) may be available depending on the monitor leave shadow trails. Is the power on the screen. If this manual to the recommended (optimal) resolution may result in the retention of the image. •• To extend the lifetime of the computer or graphics card for an LCD screen. This is displayed on and the power LED displaying white? •• Check that the connected input...
... monitor, pixilated spots (red, green, blue, white, or black) may be available depending on the monitor leave shadow trails. Is the power on the screen. If this manual to the recommended (optimal) resolution may result in the retention of the image. •• To extend the lifetime of the computer or graphics card for an LCD screen. This is displayed on and the power LED displaying white? •• Check that the connected input...
Owners Manual
Page 25
... (OS) you use.) Note •• LED can be lighted with Set OSD Menu. Power LED - Settings - General - ENGLISH Do you installed the display driver? •• Be sure to install the display driver from the headphone port. Have you see an "Unrecognized monitor, Plug and Play (VESA DDC) monitor found" message? Are images displayed without sound? •• Make sure that the headphone port connections are made properly. •• Try increasing the volume with the joystick...
... (OS) you use.) Note •• LED can be lighted with Set OSD Menu. Power LED - Settings - General - ENGLISH Do you installed the display driver? •• Be sure to install the display driver from the headphone port. Have you see an "Unrecognized monitor, Plug and Play (VESA DDC) monitor found" message? Are images displayed without sound? •• Make sure that the headphone port connections are made properly. •• Try increasing the volume with the joystick...
Owners Manual
Page 26
... Weight (Without Packaging) Monitor Size (Width x Height x Depth) With Stand Without Stand With Stand Without Stand 816.7 x 569.7 x 260.0 (mm) 816.7 x 364.4 x 83.6 (mm) 8.6 kg 6.7 kg 32.1 x 22.4 x 10.2 (inches) 32.1 x 14.3 x 3.2 (inches) 18.9 lbs 14.7 lbs The specifications are subject to the Sleep Mode in a couple of Sleep Mode may vary depending on the connected device. ** The monitor goes to change without notice. The power consumption level can...
... Weight (Without Packaging) Monitor Size (Width x Height x Depth) With Stand Without Stand With Stand Without Stand 816.7 x 569.7 x 260.0 (mm) 816.7 x 364.4 x 83.6 (mm) 8.6 kg 6.7 kg 32.1 x 22.4 x 10.2 (inches) 32.1 x 14.3 x 3.2 (inches) 18.9 lbs 14.7 lbs The specifications are subject to the Sleep Mode in a couple of Sleep Mode may vary depending on the connected device. ** The monitor goes to change without notice. The power consumption level can...
Owners Manual
Page 30
... 2 2 Menu Input (PBP On) - Aspect Ratio - Aspect Ratio - PBP - PBP - Brightness Quick Settings - Volume Quick Settings - Color Temp - Picutre Mode Quick Settings - Input List - Auto Input Switch Input (PBP Off) - Full Wide Input (PBP Off) - Off Input (PBP Off) - Main Input List Input (PBP On) - Input List - Input List - Sub Input List DisplayPort Input (PBP On) - Main Aspect Ratio Input (PBP On) - Sub Aspect Ratio - HDMI 2 Input (PBP On) - Main/Sub Sound Change Input (PBP On) - Contrast Quick Settings - Color Temp - KVM Switch Input (PBP Off...
... 2 2 Menu Input (PBP On) - Aspect Ratio - Aspect Ratio - PBP - PBP - Brightness Quick Settings - Volume Quick Settings - Color Temp - Picutre Mode Quick Settings - Input List - Auto Input Switch Input (PBP Off) - Full Wide Input (PBP Off) - Off Input (PBP Off) - Main Input List Input (PBP On) - Input List - Input List - Sub Input List DisplayPort Input (PBP On) - Main Aspect Ratio Input (PBP On) - Sub Aspect Ratio - HDMI 2 Input (PBP On) - Main/Sub Sound Change Input (PBP On) - Contrast Quick Settings - Color Temp - KVM Switch Input (PBP Off...


