
Owners Manual
Page 1
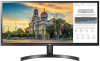
OWNER'S MANUAL IPS LED MONITOR (LED MONITOR*) *LG LED Monitors are LCD Monitors with LED Backlighting. IPS LED Monitor (LED Monitor) Model List 29WK500 34WK500 www.lg.com Please read the safety information carefully before using the product.
OWNER'S MANUAL IPS LED MONITOR (LED MONITOR*) *LG LED Monitors are LCD Monitors with LED Backlighting. IPS LED Monitor (LED Monitor) Model List 29WK500 34WK500 www.lg.com Please read the safety information carefully before using the product.

Owners Manual
Page 2
... the Main Menu 20 - Assembling the stand base 12 - Installing the wall mount plate 16 - Adjusting the angle 15 - Installing to Use the Joystick Button 7 Input Connector 8 Moving and Lifting the Monitor 9 Installing the Monitor 9 - HDMI connection 18 Connecting to a PC 18 - Installing onto a table 13 - Detaching the Stand Body 16 - Connecting Headphones Main Menu Features 21 User Settings 21 - Menu Settings 25 TROUBLESHOOTING 27 SPECIFICATIONS 27 29WK500 29 34WK500 30 Factory Support Mode (Preset Mode, PC) 30 HDMI 30 HDMI Timing (Video) 31 Power LED 18 USING THE MONITOR 18...
... the Main Menu 20 - Assembling the stand base 12 - Installing the wall mount plate 16 - Adjusting the angle 15 - Installing to Use the Joystick Button 7 Input Connector 8 Moving and Lifting the Monitor 9 Installing the Monitor 9 - HDMI connection 18 Connecting to a PC 18 - Installing onto a table 13 - Detaching the Stand Body 16 - Connecting Headphones Main Menu Features 21 User Settings 21 - Menu Settings 25 TROUBLESHOOTING 27 SPECIFICATIONS 27 29WK500 29 34WK500 30 Factory Support Mode (Preset Mode, PC) 30 HDMI 30 HDMI Timing (Video) 31 Power LED 18 USING THE MONITOR 18...
Owners Manual
Page 4
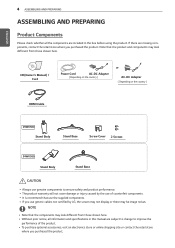
... screen may not display or there may be image noises. yyIf you purchased the product. yyWithout prior notice, all the components are included in this manual are missing components, contact the retail store where you purchased the product. CD(Owner's Manual) / Card Power Cord AC-DC Adapter ( Depending on the country ) or AC-DC Adapter ( Depending on the country ) HDMI Cable 29WK500 Stand Body Stand Base Screw Cover 2 Screws 34WK500 Stand...
... screen may not display or there may be image noises. yyIf you purchased the product. yyWithout prior notice, all the components are included in this manual are missing components, contact the retail store where you purchased the product. CD(Owner's Manual) / Card Power Cord AC-DC Adapter ( Depending on the country ) or AC-DC Adapter ( Depending on the country ) HDMI Cable 29WK500 Stand Body Stand Base Screw Cover 2 Screws 34WK500 Stand...
Owners Manual
Page 5
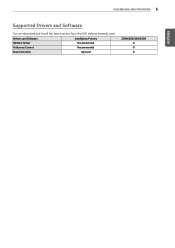
Drivers and Software Installation Priority Monitor Driver Recommended OnScreen Control Recommended Dual Controller Optional 29WK500/34WK500 O O O ASSEMBLING AND PREPARING 5 ENEGNLGISH Supported Drivers and Software You can download and install the latest version from the LGE website (www.lg.com).
Drivers and Software Installation Priority Monitor Driver Recommended OnScreen Control Recommended Dual Controller Optional 29WK500/34WK500 O O O ASSEMBLING AND PREPARING 5 ENEGNLGISH Supported Drivers and Software You can download and install the latest version from the LGE website (www.lg.com).

Owners Manual
Page 6
.... Power off the monitor. ◄/► Volume Control You can easily control the functions of the monitor. 6 ASSEMBLING AND PREPARING Component and Button Description 29WK500 34WK500 ENEGNLGISH Joystick Button Power LED yyOn: power is on the monitor. Basic Functions Power on Press the joystick button once with your finger to turn off Press and hold the joystick button once with your finger to Use the Joystick Button You can control the volume...
.... Power off the monitor. ◄/► Volume Control You can easily control the functions of the monitor. 6 ASSEMBLING AND PREPARING Component and Button Description 29WK500 34WK500 ENEGNLGISH Joystick Button Power LED yyOn: power is on the monitor. Basic Functions Power on Press the joystick button once with your finger to turn off Press and hold the joystick button once with your finger to Use the Joystick Button You can control the volume...
Owners Manual
Page 8
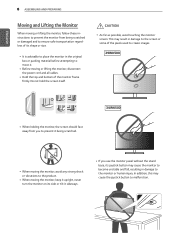
.... yyWhen moving the monitor, keep it upright, never turn the monitor on its joystick button may cause the joystick button to prevent it being scratched or damaged and to ensure safe transportation regardless of the pixels used to create images. 29WK500 29WK500 34WK500 34WK500 yyWhen holding the monitor, the screen should face away from you use the monitor panel without the stand base, its side or tilt it . CAUTION...
.... yyWhen moving the monitor, keep it upright, never turn the monitor on its joystick button may cause the joystick button to prevent it being scratched or damaged and to ensure safe transportation regardless of the pixels used to create images. 29WK500 29WK500 34WK500 34WK500 yyWhen holding the monitor, the screen should face away from you use the monitor panel without the stand base, its side or tilt it . CAUTION...

Owners Manual
Page 15
.... The accessories can be purchased at http://www.kensington.com. Adjust the horizontal level of the monitor head. 34WK500 Monitor head 34WK500 NOTE yyUse of the monitor head can be slightly rotated up or down (up to the Kensington lock user manual or visit the website at your local electronics store. For more information on installation and usage, refer to 3°).
.... The accessories can be purchased at http://www.kensington.com. Adjust the horizontal level of the monitor head. 34WK500 Monitor head 34WK500 NOTE yyUse of the monitor head can be slightly rotated up or down (up to the Kensington lock user manual or visit the website at your local electronics store. For more information on installation and usage, refer to 3°).
Owners Manual
Page 16
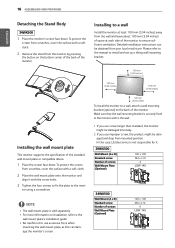
..., cover the surface with a soft cloth. 2 Place the wall mount plate onto the monitor and align it . 29WK500 Wall Mount (A x B) Standard screw Number of screws Wall Mount Plate (Optional) 100 x 100 M4 x L10 4 LSW 149 34WK500 Wall Mount (A x B) Standard screw Number of the monitor to install and set up a tilting wall mounting bracket. 100 mm (3.94 inches) 100 mm (3.94 inches) 100 mm (3.94 inches) Installing the wall mount plate This monitor supports the specification of the monitor. Make sure that the wall mounting bracket...
..., cover the surface with a soft cloth. 2 Place the wall mount plate onto the monitor and align it . 29WK500 Wall Mount (A x B) Standard screw Number of screws Wall Mount Plate (Optional) 100 x 100 M4 x L10 4 LSW 149 34WK500 Wall Mount (A x B) Standard screw Number of the monitor to install and set up a tilting wall mounting bracket. 100 mm (3.94 inches) 100 mm (3.94 inches) 100 mm (3.94 inches) Installing the wall mount plate This monitor supports the specification of the monitor. Make sure that the wall mounting bracket...

Owners Manual
Page 18
... monitor supports the *Plug and Play feature. *Plug and Play: A feature that allows you to add a device to your PC and A/V devices to the monitor. NOTE yyIf you use HDMI PC, it can cause compatibility problem. Connecting to reconfigure anything or install any manual drivers. Press the menu button and then select the input option from your computer without having to AV Devices HDMI connection Transmits the digital video and audio signals...
... monitor supports the *Plug and Play feature. *Plug and Play: A feature that allows you to add a device to your PC and A/V devices to the monitor. NOTE yyIf you use HDMI PC, it can cause compatibility problem. Connecting to reconfigure anything or install any manual drivers. Press the menu button and then select the input option from your computer without having to AV Devices HDMI connection Transmits the digital video and audio signals...

Owners Manual
Page 19
Connecting to External Devices Connecting Headphones Connect peripherals to the monitor. lem with connecting another external device to the monitor via the headphones port. Connect as illustrated. Therefore, it may be limited. USING THE MONITOR 19 ENEGNLGISH (sold separately) NOTE yy Peripheral devices are sold separately. yy If you use angled earphones, it is recommended to use straight earphones. Angled Straight yy Depending on the audio settings of the PC and external device, headphones and speaker functions may cause a prob-
Connecting to External Devices Connecting Headphones Connect peripherals to the monitor. lem with connecting another external device to the monitor via the headphones port. Connect as illustrated. Therefore, it may be limited. USING THE MONITOR 19 ENEGNLGISH (sold separately) NOTE yy Peripheral devices are sold separately. yy If you use angled earphones, it is recommended to use straight earphones. Angled Straight yy Depending on the audio settings of the PC and external device, headphones and speaker functions may cause a prob-

Owners Manual
Page 20
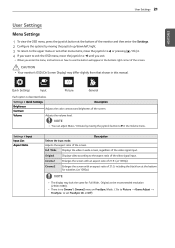
... Menu Features Power Off Power Off InpInuptut Exit Exit Settings Settings Power Off Game Mode Game Mode Input Exit Settings Power Off Game Mode Input Exit Settings Game Mode Main Menu Input Power Off Settings Game Mode Exit Description Sets input mode. Exits the main menu. Displays the information on the current input. Turns off the monitor this way at any time, including when the OSD is described below. ENEGNLGISH 20 User Settings USER SETTINGS Activating the Main Menu 1 Press the joystick button on .) Adjusts the monitor volume...
... Menu Features Power Off Power Off InpInuptut Exit Exit Settings Settings Power Off Game Mode Game Mode Input Exit Settings Power Off Game Mode Input Exit Settings Game Mode Main Menu Input Power Off Settings Game Mode Exit Description Sets input mode. Exits the main menu. Displays the information on the current input. Turns off the monitor this way at any time, including when the OSD is described below. ENEGNLGISH 20 User Settings USER SETTINGS Activating the Main Menu 1 Press the joystick button on .) Adjusts the monitor volume...
Owners Manual
Page 21
CAUTION yy Your monitor's OSD (On Screen Display) may look the same for Full Wide , Original at the bottom of the video signal input. Settings > Quick Settings Description Brightness Contrast Adjusts the color contrast and brightness of the screen. Description Full Wide Displays the video in this manual. Adjusts the aspect ratio of the screen. yy There is described below. ENEGNLGISH User Settings 21 User Settings Menu Settings 1 To view the OSD menu, press the joystick button at the recommended resolution (2560×1080). NOTE yy...
CAUTION yy Your monitor's OSD (On Screen Display) may look the same for Full Wide , Original at the bottom of the video signal input. Settings > Quick Settings Description Brightness Contrast Adjusts the color contrast and brightness of the screen. Description Full Wide Displays the video in this manual. Adjusts the aspect ratio of the screen. yy There is described below. ENEGNLGISH User Settings 21 User Settings Menu Settings 1 To view the OSD menu, press the joystick button at the recommended resolution (2560×1080). NOTE yy...

Owners Manual
Page 22
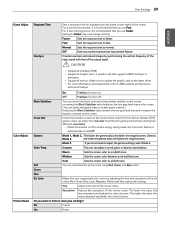
... enables users with color weakness to use the function for normal text or for users who cannot distinguish between red and green. Sets the offset level (for photos. Low Lowers the black levels and raises the white levels from the current contrast ratio of the screen. Optimizes the screen for HDMI only). SUPER RESOLUTION+ is displayed when a user wants images between the two colors. Picture Adjust Brightness Contrast Sharpness SUPER RESOLUTION+ Adjusts the brightness of low resolution pictures...
... enables users with color weakness to use the function for normal text or for users who cannot distinguish between red and green. Sets the offset level (for photos. Low Lowers the black levels and raises the white levels from the current contrast ratio of the screen. Optimizes the screen for HDMI only). SUPER RESOLUTION+ is displayed when a user wants images between the two colors. Picture Adjust Brightness Contrast Sharpness SUPER RESOLUTION+ Adjusts the brightness of low resolution pictures...
Owners Manual
Page 23
.... Color Temp Custom The user can control the black contrast to Faster may cause image sticking. CAUTION yy Supported Interface: HDMI. Faster Sets the response time to a bluish tone. For a normal environment, it to Picture reset your settings? Users can customize the picture color using Red, Green, and Blue colors. Off FreeSync function off or enters energy saving mode, the Cross Hair feature is necessary. Medium Sets the screen color between a red and blue tone. Cool Sets the screen color...
.... Color Temp Custom The user can control the black contrast to Faster may cause image sticking. CAUTION yy Supported Interface: HDMI. Faster Sets the response time to a bluish tone. For a normal environment, it to Picture reset your settings? Users can customize the picture color using Red, Green, and Blue colors. Off FreeSync function off or enters energy saving mode, the Cross Hair feature is necessary. Medium Sets the screen color between a red and blue tone. Cool Sets the screen color...

Owners Manual
Page 24
... of SMART ENERGY SAVING is no movement on source. Yes Returns to the desired language. Off Disables the SMART ENERGY SAVING feature. On The power LED turns on the Panel. No Cancel the select. NOTE yy Saving Data depends on . 24 User Settings ENEGNLGISH Settings > General Language SMART ENERGY SAVING Power LED Automatic Standby Buzzer OSD Lock Information Reset Description Sets the menu screen to the default settings. Off The power LED turns off the monitor when there is...
... of SMART ENERGY SAVING is no movement on source. Yes Returns to the desired language. Off Disables the SMART ENERGY SAVING feature. On The power LED turns on the Panel. No Cancel the select. NOTE yy Saving Data depends on . 24 User Settings ENEGNLGISH Settings > General Language SMART ENERGY SAVING Power LED Automatic Standby Buzzer OSD Lock Information Reset Description Sets the menu screen to the default settings. Off The power LED turns off the monitor when there is...

Owners Manual
Page 25
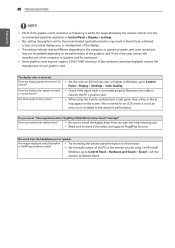
... the monitor, use a screensaver. y y Horizontal frequency The time it . Is the No Signal message being displayed? y yCheck that the connected input is missing or disconnected. y yThis is displayed when the signal cable between the PC and the monitor is enabled (Settings > Input). Does image sticking occur even when the monitor is unstable and shaky / Images displayed on the monitor leave shadow trails. Screen display is turned off? Did you press the Menu button? The number...
... the monitor, use a screensaver. y y Horizontal frequency The time it . Is the No Signal message being displayed? y yCheck that the connected input is missing or disconnected. y yThis is displayed when the signal cable between the PC and the monitor is enabled (Settings > Input). Does image sticking occur even when the monitor is unstable and shaky / Images displayed on the monitor leave shadow trails. Screen display is turned off? Did you press the Menu button? The number...
Owners Manual
Page 26
... the screen? y ySet the color to check if the video card supports Plug&Play function. Are images displayed using DisplayPort y yTry increasing the volume using the button on the performance of the graphics card. y ySome graphics cards may result in Control Panel > Display > settings. or HDMI input without sound? If this is abnormal. If the resolution cannot be available depending on the monitor. Have you see an "Unrecognized monitor, Plug&Play (VESA DDC) monitor found" message? On Microsoft Windows...
... the screen? y ySet the color to check if the video card supports Plug&Play function. Are images displayed using DisplayPort y yTry increasing the volume using the button on the performance of the graphics card. y ySome graphics cards may result in Control Panel > Display > settings. or HDMI input without sound? If this is abnormal. If the resolution cannot be available depending on the monitor. Have you see an "Unrecognized monitor, Plug&Play (VESA DDC) monitor found" message? On Microsoft Windows...

Owners Manual
Page 27
... V 1.3 A SPECIFICATIONS 27 ENEGNLGISH SPECIFICATIONS 29WK500 LCD Screen Type TFT (Thin Film Transistor) LCD (Liquid Crystal Display) Screen Pixel Pitch 0.2628 mm x 0.2628 mm Resolution Maximum Resolution 2560×1080 @ 75 Hz Recommended Resolution 2560×1080 @ 60 Hz Video Signal Horizontal Frequency 30 kHz to 90 kHz Vertical Frequency 56 Hz to 75 Hz Input Connector HDMI IN1, HDMI IN2, H/P Power input 19 V 1.6 A Or 19 V 1.3 A Power On mode: 25 W Typ. (Outgoing condition) * consumption (Typ.) Sleep Mode ≤ 0.5 W ** Off Mode...
... V 1.3 A SPECIFICATIONS 27 ENEGNLGISH SPECIFICATIONS 29WK500 LCD Screen Type TFT (Thin Film Transistor) LCD (Liquid Crystal Display) Screen Pixel Pitch 0.2628 mm x 0.2628 mm Resolution Maximum Resolution 2560×1080 @ 75 Hz Recommended Resolution 2560×1080 @ 60 Hz Video Signal Horizontal Frequency 30 kHz to 90 kHz Vertical Frequency 56 Hz to 75 Hz Input Connector HDMI IN1, HDMI IN2, H/P Power input 19 V 1.6 A Or 19 V 1.3 A Power On mode: 25 W Typ. (Outgoing condition) * consumption (Typ.) Sleep Mode ≤ 0.5 W ** Off Mode...

Owners Manual
Page 28
... can be different by operating condition and monitor setting. * The On mode power consumption is measured with LGE test standard (Full White pattern , Maximum resolution). ** The monitor goes to 60°C; Humidity: < 80% Storing Condition Temperature: -20°C to the Sleep Mode in a couple of minutes(Max 5 minutes). Humidity: < 85% Monitor Size (Width x Height x Depth) With Stand 698.1 mm x 410.9 mm x 209.4 mm Without...
... can be different by operating condition and monitor setting. * The On mode power consumption is measured with LGE test standard (Full White pattern , Maximum resolution). ** The monitor goes to 60°C; Humidity: < 80% Storing Condition Temperature: -20°C to the Sleep Mode in a couple of minutes(Max 5 minutes). Humidity: < 85% Monitor Size (Width x Height x Depth) With Stand 698.1 mm x 410.9 mm x 209.4 mm Without...

Owners Manual
Page 29
... Stand 6.9 kg 6.1 kg The specifications are subject to the Sleep Mode in a couple of minutes(Max 5 minutes). SPECIFICATIONS 29 ENEGNLGISH SPECIFICATIONS 34WK500 LCD Screen Type TFT (Thin Film Transistor) LCD (Liquid Crystal Display) Screen Pixel Pitch 0.312 mm x 0.310 mm Resolution Maximum Resolution 2560×1080 @ 75 Hz Recommended Resolution 2560×1080 @ 60 Hz Video Signal Horizontal Frequency 30 kHz to 90 kHz Vertical Frequency 56 Hz to 75 Hz Input Connector HDMI IN1, HDMI IN2, H/P Power input...
... Stand 6.9 kg 6.1 kg The specifications are subject to the Sleep Mode in a couple of minutes(Max 5 minutes). SPECIFICATIONS 29 ENEGNLGISH SPECIFICATIONS 34WK500 LCD Screen Type TFT (Thin Film Transistor) LCD (Liquid Crystal Display) Screen Pixel Pitch 0.312 mm x 0.310 mm Resolution Maximum Resolution 2560×1080 @ 75 Hz Recommended Resolution 2560×1080 @ 60 Hz Video Signal Horizontal Frequency 30 kHz to 90 kHz Vertical Frequency 56 Hz to 75 Hz Input Connector HDMI IN1, HDMI IN2, H/P Power input...


