
Owners Manual
Page 1
IPS LED Monitor (LED Monitor) Model List 25UM64 25UM65 34UM65 www.lg.com Owner's Manual IPS LED MONITOR (LED MONITOR) Please read the safety information carefully before using the product.
IPS LED Monitor (LED Monitor) Model List 25UM64 25UM65 34UM65 www.lg.com Owner's Manual IPS LED MONITOR (LED MONITOR) Please read the safety information carefully before using the product.

Owners Manual
Page 2
Input Connector 8 Moving and Lifting the Monitor 9 Installing the Monitor 9 - Adjusting the angle 17 - Connecting Headphones 24 INST ALLING THE LG MONIT OR SOFTW ARE 26 USER SETTINGS 26 Activating the Main Menu 26 - Function 30 - Detaching the Stand 15 - Installing on...Factory Support Mode (Preset Mode, DVI-D/HDMI/DisplayPort PC) 40 HDMI Timing (Video) 40 Power LED 41 PROPER POSTURE 41 Proper Posture for Using the Monitor WARNING : This product contains chemicals known to the State of Contents TABLE OF CONTENTS 3 LICENSE 4 ASSEMBLING AND PREPARING 4 Product Composition 5 Product and...
Input Connector 8 Moving and Lifting the Monitor 9 Installing the Monitor 9 - Adjusting the angle 17 - Connecting Headphones 24 INST ALLING THE LG MONIT OR SOFTW ARE 26 USER SETTINGS 26 Activating the Main Menu 26 - Function 30 - Detaching the Stand 15 - Installing on...Factory Support Mode (Preset Mode, DVI-D/HDMI/DisplayPort PC) 40 HDMI Timing (Video) 40 Power LED 41 PROPER POSTURE 41 Proper Posture for Using the Monitor WARNING : This product contains chemicals known to the State of Contents TABLE OF CONTENTS 3 LICENSE 4 ASSEMBLING AND PREPARING 4 Product Composition 5 Product and...

Owners Manual
Page 5
... illustrated here. yy Without prior notice, all product information and specifications contained in this manual are subject to change to improve the performance of the monitor.
... illustrated here. yy Without prior notice, all product information and specifications contained in this manual are subject to change to improve the performance of the monitor.
Owners Manual
Page 6
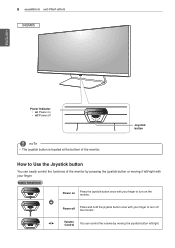
6 ASSEMBLING AND PREP ARING 34UM65 ENGLISH Power Indicator yy On Power on the monitor. Power off Press and hold the joystick button once with your finger to turn off Joystick Button NOTE yy The joystick button is located at the bottom of the monitor by moving it left /right. Basic Functions...Power on Press the joystick button once with your finger to turn on yy Off Power off the monitor. ◄/► Volume Control You can easily control the functions of the monitor. How to Use the Joystick Button You can control the volume by pressing the joystick button or ...
6 ASSEMBLING AND PREP ARING 34UM65 ENGLISH Power Indicator yy On Power on the monitor. Power off Press and hold the joystick button once with your finger to turn off Joystick Button NOTE yy The joystick button is located at the bottom of the monitor by moving it left /right. Basic Functions...Power on Press the joystick button once with your finger to turn on yy Off Power off the monitor. ◄/► Volume Control You can easily control the functions of the monitor. How to Use the Joystick Button You can control the volume by pressing the joystick button or ...

Owners Manual
Page 8
Do not hold the panel itself. CAUTION yy Avoid touching the monitor screen as much as possible. -- yy When transporting the monitor, do not expose the monitor to prevent it . yy When moving or lifting the monitor, disconnect the power cord and all other cables. This may cause the joystick ...ensure safe transportation, regardless of its shape or size. yy Place the monitor in damage to the screen or some of the monitor frame firmly. yy Before moving the monitor, keep it upright and never turn the monitor on its side or tilt it sideways. In addition, this may result...
Do not hold the panel itself. CAUTION yy Avoid touching the monitor screen as much as possible. -- yy When transporting the monitor, do not expose the monitor to prevent it . yy When moving or lifting the monitor, disconnect the power cord and all other cables. This may cause the joystick ...ensure safe transportation, regardless of its shape or size. yy Place the monitor in damage to the screen or some of the monitor frame firmly. yy Before moving the monitor, keep it upright and never turn the monitor on its side or tilt it sideways. In addition, this may result...

Owners Manual
Page 9
... become unstable and fall, resulting in this may cause damage to the monitor. Screw Cover Stand Hinge Stand Body CAUTION yy To protect the screen from scratches, cover the surface with a soft cloth. 2 Check the direction of the ... covered by the product warranty. Damage caused in damage to malfunction. 25UM65 25UM64 1 Place the screen face down. ENGLISH ASSEMBLING AND PREP ARING 9 Installing the Monitor Assembling the Stand CAUTION yy Applying excessive force when tightening screws may cause the joystick button to the...
... become unstable and fall, resulting in this may cause damage to the monitor. Screw Cover Stand Hinge Stand Body CAUTION yy To protect the screen from scratches, cover the surface with a soft cloth. 2 Check the direction of the ... covered by the product warranty. Damage caused in damage to malfunction. 25UM65 25UM64 1 Place the screen face down. ENGLISH ASSEMBLING AND PREP ARING 9 Installing the Monitor Assembling the Stand CAUTION yy Applying excessive force when tightening screws may cause the joystick button to the...

Owners Manual
Page 12
In addition, this document represent typical procedures, so they may look different from the actual product. The force applied to the monitor screen may cause the monitor to become unstable and fall off the stand and could result in personal injury. 12 ASSEMBLING AND PREP ARING ENGLISH Detaching the ...stand base from the stand body. yy Do not carry the monitor upside down . yy If you use the monitor panel without the stand base, its joystick button may cause damage to the monitor or human injury. This may cause the monitor to fall , resulting in damage to it. CAUTION yy ...
In addition, this document represent typical procedures, so they may look different from the actual product. The force applied to the monitor screen may cause the monitor to become unstable and fall off the stand and could result in personal injury. 12 ASSEMBLING AND PREP ARING ENGLISH Detaching the ...stand base from the stand body. yy Do not carry the monitor upside down . yy If you use the monitor panel without the stand base, its joystick button may cause damage to the monitor or human injury. This may cause the monitor to fall , resulting in damage to it. CAUTION yy ...

Owners Manual
Page 15
...ASSEMBLING AND PREP ARING 15 Installing on a Table 1 Lift the monitor and place it on the monitor. Place the monitor at least 10 cm away from the wall to ensure sufficient ventilation. 25UM65 25UM64 2 Connect the power adapter to the monitor and then plug the power cord into the wall outlet. 25UM65 25UM64... 10 cm (3.9 inch) 10 cm or 10 cm 10 cm 34UM65 10 cm (3.9 inch) 10 cm 10 cm 10 cm 34UM65 3 Press the joystick button on the bottom of electric...
...ASSEMBLING AND PREP ARING 15 Installing on a Table 1 Lift the monitor and place it on the monitor. Place the monitor at least 10 cm away from the wall to ensure sufficient ventilation. 25UM65 25UM64 2 Connect the power adapter to the monitor and then plug the power cord into the wall outlet. 25UM65 25UM64... 10 cm (3.9 inch) 10 cm or 10 cm 10 cm 34UM65 10 cm (3.9 inch) 10 cm 10 cm 10 cm 34UM65 3 Press the joystick button on the bottom of electric...

Owners Manual
Page 16
...when adjusting the angle of the screen. You may injure your fingers. 25UM65 25UM64 20 -5 34UM65 20 -5 20 -5 The angle of the screen can be adjusted forward or backward from -5° to ...20° for a comfortable viewing experience. 34UM65 15 -5 20 -5 yy Be careful not to 15° for a comfortable viewing experience. 25UM65 25UM64... upright position. 2 Adjust the angle of the monitor. 25UM65 25UM64 Rear Front 34UM65 ENGLISH 16 ASSEMBLING AND PREP ARING Adjusting the angle 1 Place the...
...when adjusting the angle of the screen. You may injure your fingers. 25UM65 25UM64 20 -5 34UM65 20 -5 20 -5 The angle of the screen can be adjusted forward or backward from -5° to ...20° for a comfortable viewing experience. 34UM65 15 -5 20 -5 yy Be careful not to 15° for a comfortable viewing experience. 25UM65 25UM64... upright position. 2 Adjust the angle of the monitor. 25UM65 25UM64 Rear Front 34UM65 ENGLISH 16 ASSEMBLING AND PREP ARING Adjusting the angle 1 Place the...

Owners Manual
Page 18
... inch) or more ** Use the wall mount plate and screws that conform to VESA standards. 2 If you use of the moni- LG Electronics is not liable for any accidents relating to the use screws longer than the standard length, it with respect to screw mounting interface dimensions... the clear sheet to the back of non-standard screws. 4 VESA compatible only with the screw holes. (Only 34UM65) Clear sheet (PET sheet) Installing on installation, refer to the monitor using a screwdriver. Alternatively, please refer to the manual for the wall mount plate or other compatible devices. 1 Place...
... inch) or more ** Use the wall mount plate and screws that conform to VESA standards. 2 If you use of the moni- LG Electronics is not liable for any accidents relating to the use screws longer than the standard length, it with respect to screw mounting interface dimensions... the clear sheet to the back of non-standard screws. 4 VESA compatible only with the screw holes. (Only 34UM65) Clear sheet (PET sheet) Installing on installation, refer to the monitor using a screwdriver. Alternatively, please refer to the manual for the wall mount plate or other compatible devices. 1 Place...

Owners Manual
Page 19
... of inappropriate components will not be covered by VESA standards. yy For more information, please refer to injury. Use an authorized LG wall mount and contact the local dealer or qualified personnel. yy Applying excessive force when tightening screws may result in this way will... VESA (A x B) Stand Screw Required Screws Wall Mount Plate (Optional) 25UM65 25UM64 34UM65 75 x 75 100 x 100 M4 4 RW120 yy VESA (A x B) AB CAUTION yy Unplug the power cord before moving or installing the monitor to VESA standards. You can obtain optional accessories from the back of the...
... of inappropriate components will not be covered by VESA standards. yy For more information, please refer to injury. Use an authorized LG wall mount and contact the local dealer or qualified personnel. yy Applying excessive force when tightening screws may result in this way will... VESA (A x B) Stand Screw Required Screws Wall Mount Plate (Optional) 25UM65 25UM64 34UM65 75 x 75 100 x 100 M4 4 RW120 yy VESA (A x B) AB CAUTION yy Unplug the power cord before moving or installing the monitor to VESA standards. You can obtain optional accessories from the back of the...
Owners Manual
Page 20
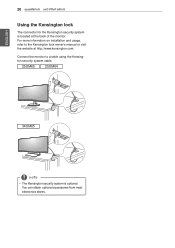
You can obtain optional accessories from most electronics stores. Connect the monitor to the Kensington lock owner's manual or visit the website at the back of the monitor. For more information on installation and usage, refer to a table using the Kensington security system cable. 25UM65 25UM64 34UM65 NOTE yy The Kensington security system is located at http://www.kensington.com. ENGLISH 20 ASSEMBLING AND PREP ARING Using the Kensington Lock The connector for the Kensington security system is optional.
You can obtain optional accessories from most electronics stores. Connect the monitor to the Kensington lock owner's manual or visit the website at the back of the monitor. For more information on installation and usage, refer to a table using the Kensington security system cable. 25UM65 25UM64 34UM65 NOTE yy The Kensington security system is located at http://www.kensington.com. ENGLISH 20 ASSEMBLING AND PREP ARING Using the Kensington Lock The connector for the Kensington security system is optional.

Owners Manual
Page 21
...IN 2 AUDIO IN(PC) Illustrations in the illustration. CAUTION yy Do not press the screen for a prolonged time. This is normal. Connect the monitor using the audio cable. Use a screensaver if possible. yy Sometimes red, green, or blue spots may cause compatibility issues. Press the joystick button..., go to the outlet, use a grounded (3-hole) power strip or a grounded power outlet. Connecting to a PC ENGLISH yy This monitor supports the *Plug and Play feature. * Plug and Play: A feature that allows you to add a device to your computer without having to the...
...IN 2 AUDIO IN(PC) Illustrations in the illustration. CAUTION yy Do not press the screen for a prolonged time. This is normal. Connect the monitor using the audio cable. Use a screensaver if possible. yy Sometimes red, green, or blue spots may cause compatibility issues. Press the joystick button..., go to the outlet, use a grounded (3-hole) power strip or a grounded power outlet. Connecting to a PC ENGLISH yy This monitor supports the *Plug and Play feature. * Plug and Play: A feature that allows you to add a device to your computer without having to the...
Owners Manual
Page 22
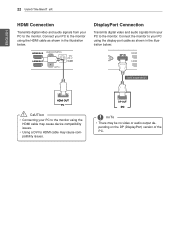
...) DisplayPort Connection TDrVaI-nI(sDm) OitsUTdigital video and audio sigAnUaDlsIOfOroUmT your PC to the monitor using the display port cable as shown in the illustration below . Connect the monitor PtoC your PC to the monitor. 22 Using the Monit or DVI-D IN ENGLISH HDMI Connection Transmits digital video and ... OUT NOTE yDy VTIh-DeIrNe may cause compatibility issues. C) pending on the DP (DisplayPort) version of the PC. yy Using a DVI to the monitor using the HDMI cable as shown in the illustration below : DVI-D IN DP IN HDMI IN 2 AUDIO IN(PC) HDMI IN 1 H/P DC-...
...) DisplayPort Connection TDrVaI-nI(sDm) OitsUTdigital video and audio sigAnUaDlsIOfOroUmT your PC to the monitor using the display port cable as shown in the illustration below . Connect the monitor PtoC your PC to the monitor. 22 Using the Monit or DVI-D IN ENGLISH HDMI Connection Transmits digital video and ... OUT NOTE yDy VTIh-DeIrNe may cause compatibility issues. C) pending on the DP (DisplayPort) version of the PC. yy Using a DVI to the monitor using the HDMI cable as shown in the illustration below : DVI-D IN DP IN HDMI IN 2 AUDIO IN(PC) HDMI IN 1 H/P DC-...

Owners Manual
Page 23
...-IN (19 V ) HDMI IN 1 DVI-D IN DP IN H/P HDMI IN 2 AUDIO IN(PC) HDMI IN 1 HDMI IN 1 H/P H/P DC-I (19 V NOTE yy Using a DVI to the monitor. Therefore, it may cause a problem with connecting another external device to HDMI cable may be limited. Connect your AV device to the... monitor using the HDMI cable as illustrated. Angled Straight yy Depending on the audio settings of the PC and external device, headphones and speaker functions may ...
...-IN (19 V ) HDMI IN 1 DVI-D IN DP IN H/P HDMI IN 2 AUDIO IN(PC) HDMI IN 1 HDMI IN 1 H/P H/P DC-I (19 V NOTE yy Using a DVI to the monitor. Therefore, it may cause a problem with connecting another external device to HDMI cable may be limited. Connect your AV device to the... monitor using the HDMI cable as illustrated. Angled Straight yy Depending on the audio settings of the PC and external device, headphones and speaker functions may ...

Owners Manual
Page 24
ENGLISH 24 Inst alling the LG Monit or Softw are INST ALLING THE LG MONIT OR SOFTW ARE Insert the Software CD included in the product packaging into your operating system or Internet Explorer version, the installation methods are ... Run. (Although the screen below may differ depending on your PC's CD drive and install the LG Monitor Software. 1 Set up Internet Explorer as the default web browser. 3 Follow the instructions to proceed with the installation. 2 Click LG Monitor Software on the License Agreement screen and then click the Next button. 5 Select the program...
ENGLISH 24 Inst alling the LG Monit or Softw are INST ALLING THE LG MONIT OR SOFTW ARE Insert the Software CD included in the product packaging into your operating system or Internet Explorer version, the installation methods are ... Run. (Although the screen below may differ depending on your PC's CD drive and install the LG Monitor Software. 1 Set up Internet Explorer as the default web browser. 3 Follow the instructions to proceed with the installation. 2 Click LG Monitor Software on the License Agreement screen and then click the Next button. 5 Select the program...

Owners Manual
Page 25
yy Auto Resolution: This is a program that automatically changes the resolution to the optimal settings when connecting the monitor to the PC in PBP mode. ※※This program is not supported in the system tray at the bottom right of the PC screen. .... ※※Extended Mode is complete, restart the system. NOTE yy When you selected on the FUNCTION page will install automatically. ENGLISH Inst alling the LG Monit or Softw are 25 NOTE yy Screen Split: This program automatically splits the program window as shown below: 8 When the installation is not supported...
yy Auto Resolution: This is a program that automatically changes the resolution to the optimal settings when connecting the monitor to the PC in PBP mode. ※※This program is not supported in the system tray at the bottom right of the PC screen. .... ※※Extended Mode is complete, restart the system. NOTE yy When you selected on the FUNCTION page will install automatically. ENGLISH Inst alling the LG Monit or Softw are 25 NOTE yy Screen Split: This program automatically splits the program window as shown below: 8 When the installation is not supported...

Owners Manual
Page 26
... menu enabled Enters the reader feature. Main menu disabled Enables the main menu. ▼ Main menu enabled Turns off the monitor. Displays the screens of the monitor. 2 Move the joystick up/down the button to exit the main menu. Exits the main menu. Adjusts color for comfortable... level. ► Main menu enabled Enters the PBP feature. Main Menu Features Reader Menu PBP Exit Monitor off Main Menu Menu Reader PBP Monitor off Long press: Monitor off Exit Description Configures the screen settings. Main menu enabled Exits the main menu (Holding down (▲/▼) and...
... menu enabled Enters the reader feature. Main menu disabled Enables the main menu. ▼ Main menu enabled Turns off the monitor. Displays the screens of the monitor. 2 Move the joystick up/down the button to exit the main menu. Exits the main menu. Adjusts color for comfortable... level. ► Main menu enabled Enters the PBP feature. Main Menu Features Reader Menu PBP Exit Monitor off Main Menu Menu Reader PBP Monitor off Long press: Monitor off Exit Description Configures the screen settings. Main menu enabled Exits the main menu (Holding down (▲/▼) and...

Owners Manual
Page 27
...of the screen. ENGLISH User Settings 27 User Settings Menu Settings 1 To view the OSD menu , press the joystick button at the bottom of the monitor and then enter the Menu. 2 Configure the options by moving the joystick up/down/left/right. 3 To return to the upper menu or set... pressing ( / OK) it. 4 If you want to exit the OSD menu, move the joystick to ◄ until you enter the menu, instructions on one monitor. yy When you exit. Menu Description Easy control Brightness Adjusts the color contrast and brightness of the screen. Restores the default settings. Adjusts Main Audio...
...of the screen. ENGLISH User Settings 27 User Settings Menu Settings 1 To view the OSD menu , press the joystick button at the bottom of the monitor and then enter the Menu. 2 Configure the options by moving the joystick up/down/left/right. 3 To return to the upper menu or set... pressing ( / OK) it. 4 If you want to exit the OSD menu, move the joystick to ◄ until you enter the menu, instructions on one monitor. yy When you exit. Menu Description Easy control Brightness Adjusts the color contrast and brightness of the screen. Restores the default settings. Adjusts Main Audio...

Owners Manual
Page 28
... Wide, Original, and 1:1 options at the recommended resolution (2560 x 1080). NOTE yy The display may look the same for subtitles. (at the bottom of the monitor and then enter the Menu. 2 Go to Easy control > Ratio by moving the joystick. 3 Configure the options following the instructions that appear in the interlaced...
... Wide, Original, and 1:1 options at the recommended resolution (2560 x 1080). NOTE yy The display may look the same for subtitles. (at the bottom of the monitor and then enter the Menu. 2 Go to Easy control > Ratio by moving the joystick. 3 Configure the options following the instructions that appear in the interlaced...


