Owners Manual
Page 1
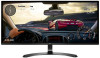
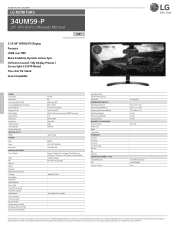
Please read the safety information carefully before using the product. Owner's Manual IPS LED MONITOR (LED MONITOR*) *LG LED Monitors are LCD Monitors with LED Backlighting. IPS LED Monitor (LED Monitor) Model List 34UM59 34UM59B 34UM59R www.lg.com
Please read the safety information carefully before using the product. Owner's Manual IPS LED MONITOR (LED MONITOR*) *LG LED Monitors are LCD Monitors with LED Backlighting. IPS LED Monitor (LED Monitor) Model List 34UM59 34UM59B 34UM59R www.lg.com
Owners Manual
Page 2
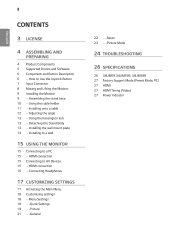
...Kensington lock 13 - Installing the wall mount plate 14 - Menu Settings 18 - -Quick Settings 19 - -Picture 21 - -General 22 - -Reset 23 - -Picture Mode 24 TROUBLESHOOTING 26 SPECIFICATIONS 26 34UM59 34UM59B 34UM59R 27 Factory Support Mode (Preset Mode, PC) 27 HDMI 27 HDMI Timing (Video) 27 Power Indicator Adjusting the angle 13 - Detaching the Stand Body 13 - HDMI connection 15 Connecting to Use the Joystick Button 7 Input Connector 8 Moving and Lifting the Monitor 9 Installing the Monitor 9 - How to AV Devices 15 - Installing to a wall 15 USING THE MONITOR 15 Connecting to...
...Kensington lock 13 - Installing the wall mount plate 14 - Menu Settings 18 - -Quick Settings 19 - -Picture 21 - -General 22 - -Reset 23 - -Picture Mode 24 TROUBLESHOOTING 26 SPECIFICATIONS 26 34UM59 34UM59B 34UM59R 27 Factory Support Mode (Preset Mode, PC) 27 HDMI 27 HDMI Timing (Video) 27 Power Indicator Adjusting the angle 13 - Detaching the Stand Body 13 - HDMI connection 15 Connecting to Use the Joystick Button 7 Input Connector 8 Moving and Lifting the Monitor 9 Installing the Monitor 9 - How to AV Devices 15 - Installing to a wall 15 USING THE MONITOR 15 Connecting to...

Owners Manual
Page 4
ENGLISH 4 ASSEMBLING AND PREPARING Product Components Please check whether all countries. ) Stand Body Cable Holder Stand Base CAUTION yyAlways use genuine components to improve the performance of counterfeit components. CD / Card Power Cord AC-DC Adapter (Depending on the country) or AC-DC Adapter (Depending on the country) or HDMI Cable (This cable is not included in this manual are subject to change to ensure safety and product performance...
ENGLISH 4 ASSEMBLING AND PREPARING Product Components Please check whether all countries. ) Stand Body Cable Holder Stand Base CAUTION yyAlways use genuine components to improve the performance of counterfeit components. CD / Card Power Cord AC-DC Adapter (Depending on the country) or AC-DC Adapter (Depending on the country) or HDMI Cable (This cable is not included in this manual are subject to change to ensure safety and product performance...
Owners Manual
Page 5
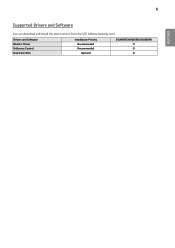
5 ENGLISH Supported Drivers and Software You can download and install the latest version from the LGE website (www.lg.com). Drivers and Software Monitor Driver OnScreen Control Dual Controller Installation Priority Recommended Recommended Optional 34UM59/34UM59B/34UM59R O O O
5 ENGLISH Supported Drivers and Software You can download and install the latest version from the LGE website (www.lg.com). Drivers and Software Monitor Driver OnScreen Control Dual Controller Installation Priority Recommended Recommended Optional 34UM59/34UM59B/34UM59R O O O

Owners Manual
Page 6
... Button Description ENGLISH Joystick Button Power LED yyOn: power is on yyOff: power is located at the bottom of the monitor by moving it left /right. NOTE yyThe joystick button is off How to Use the Joystick Button You can control the volume by pressing the joystick button or moving the joystick button left /right with your finger to turn off Press and hold the joystick button...
... Button Description ENGLISH Joystick Button Power LED yyOn: power is on yyOff: power is located at the bottom of the monitor by moving it left /right. NOTE yyThe joystick button is off How to Use the Joystick Button You can control the volume by pressing the joystick button or moving the joystick button left /right with your finger to turn off Press and hold the joystick button...

Owners Manual
Page 8
... monitor, keep it . yyBefore moving or lifting the monitor, disconnect the power cord and all cables. yyWhen moving the monitor, avoid any strong shock or vibrations to move it upright, never turn the monitor on its shape or size. ENGLISH 8 Moving and Lifting the Monitor When moving or lifting the monitor, follow these instructions to prevent the monitor from you use the monitor panel without the stand base, its joystick button...
... monitor, keep it . yyBefore moving or lifting the monitor, disconnect the power cord and all cables. yyWhen moving the monitor, avoid any strong shock or vibrations to move it upright, never turn the monitor on its shape or size. ENGLISH 8 Moving and Lifting the Monitor When moving or lifting the monitor, follow these instructions to prevent the monitor from you use the monitor panel without the stand base, its joystick button...

Owners Manual
Page 11
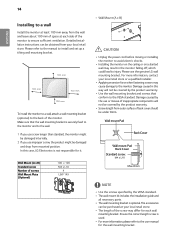
ENGLISH 11 Installing onto a table 1 Lift the monitor and place it to a grounded power outlet. CAUTION yyUnplug the power cord prior to ensure sufficient ventilation. Place at least 100 mm away from the wall to moving or installing the monitor. yyIf you need another power cord, please contact your local dealer or the nearest retail store. 2 Connect the power adapter to turn on the table in the...
ENGLISH 11 Installing onto a table 1 Lift the monitor and place it to a grounded power outlet. CAUTION yyUnplug the power cord prior to ensure sufficient ventilation. Place at least 100 mm away from the wall to moving or installing the monitor. yyIf you need another power cord, please contact your local dealer or the nearest retail store. 2 Connect the power adapter to turn on the table in the...
Owners Manual
Page 13
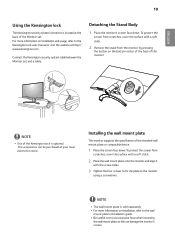
Connect the Kensington security system cable between the Monitor set . NOTE yyUse of the Kensington lock is sold separately. NOTE yyThe wall mount plate is optional. ENGLISH 13 Using the Kensington lock The Kensington security system connector is located at the back of the Monitor set and a table. The accessories can damage the monitor's screen. Detaching the Stand Body 1 Place the monitor's screen face down . To protect the screen from...
Connect the Kensington security system cable between the Monitor set . NOTE yyUse of the Kensington lock is sold separately. NOTE yyThe wall mount plate is optional. ENGLISH 13 Using the Kensington lock The Kensington security system connector is located at the back of the Monitor set and a table. The accessories can damage the monitor's screen. Detaching the Stand Body 1 Place the monitor's screen face down . To protect the screen from...
Owners Manual
Page 14
... the use the genuine LG wall mounting bracket. Damage caused in the monitor falling off, which could lead to avoid electric shocks. Detailed installation instructions can be covered by the product warranty. Please refer to the manual to install and set up a tilting wall mounting bracket. 100 mm 100 mm 100 mm 100 mm To install the monitor to a wall, attach a wall mounting bracket (optional) to the back of screws Wall Mount...
... the use the genuine LG wall mounting bracket. Damage caused in the monitor falling off, which could lead to avoid electric shocks. Detailed installation instructions can be covered by the product warranty. Please refer to the manual to install and set up a tilting wall mounting bracket. 100 mm 100 mm 100 mm 100 mm To install the monitor to a wall, attach a wall mounting bracket (optional) to the back of screws Wall Mount...
Owners Manual
Page 15
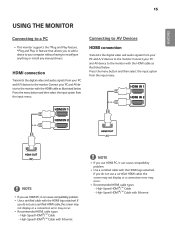
... you use a certified HDMI cable, the screen may not display or a connection error may occur. Connect your PC and AV device to reconfigure anything or install any manual drivers. HDMI connection Transmits the digital video and audio signals from the input menu. Press the menu button and then select the input option from your PC and A/V devices to the monitor with the HDMI cable as illustrated below . Connecting to AV Devices HDMI connection Transmits the digital video and audio signals from the input menu...
... you use a certified HDMI cable, the screen may not display or a connection error may occur. Connect your PC and AV device to reconfigure anything or install any manual drivers. HDMI connection Transmits the digital video and audio signals from the input menu. Press the menu button and then select the input option from your PC and A/V devices to the monitor with the HDMI cable as illustrated below . Connecting to AV Devices HDMI connection Transmits the digital video and audio signals from the input menu...
Owners Manual
Page 17
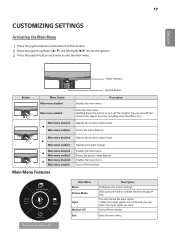
... the button to turn off the monitor: You can select the input signal you want. Turns off the monitor. Turns off the monitor. Select picture mode to achieve the best display effect. Operates the Input change. Enables the main menu. Enables the main menu. Main Menu Features Main Menu Menu Picture Mode Input Monitor off Exit Description Configures the screen settings. Enters the menu features. Exits the main menu. Power Indicator Joystick Button Button Menu Status Main menu disabled Main menu enabled Main menu disabled ◄ Main menu...
... the button to turn off the monitor: You can select the input signal you want. Turns off the monitor. Turns off the monitor. Select picture mode to achieve the best display effect. Operates the Input change. Enables the main menu. Enables the main menu. Main Menu Features Main Menu Menu Picture Mode Input Monitor off Exit Description Configures the screen settings. Enters the menu features. Exits the main menu. Power Indicator Joystick Button Button Menu Status Main menu disabled Main menu enabled Main menu disabled ◄ Main menu...
Owners Manual
Page 18
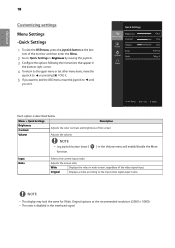
... Adjusts the color contrast and brightness of the video signal input. NOTE yyThe display may look the same for Wide, Original options at the bot- Each option is disabled in wide-screen, regardless of the screen. Wide Displays the video in the interlaced signal. yyThe ratio is described below. tom of the monitor and then enter the Menu. 2 Go to Quick Settings > Brightness by moving the joystick. 3 Configure the options following the instructions...
... Adjusts the color contrast and brightness of the video signal input. NOTE yyThe display may look the same for Wide, Original options at the bot- Each option is disabled in wide-screen, regardless of the screen. Wide Displays the video in the interlaced signal. yyThe ratio is described below. tom of the monitor and then enter the Menu. 2 Go to Quick Settings > Brightness by moving the joystick. 3 Configure the options following the instructions...

Owners Manual
Page 19
... can be adjusted. Each option is optimized for HDMI only). It is a mode that appear in Menu OSD. Optimizes the screen to the best for a video signal, this mode, users can display. In this is adjusted to improve the visual effects of the monitor and then enter the Menu. 2 Go to Picture by moving the joystick. 3 Configure the options following the instructions that the screen is the darkest color the monitor can...
... can be adjusted. Each option is optimized for HDMI only). It is a mode that appear in Menu OSD. Optimizes the screen to the best for a video signal, this mode, users can display. In this is adjusted to improve the visual effects of the monitor and then enter the Menu. 2 Go to Picture by moving the joystick. 3 Configure the options following the instructions that the screen is the darkest color the monitor can...
Owners Manual
Page 20
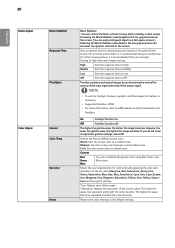
.... Cool: Sets the screen color to the default settings. Selects the factory default picture color. Medium: Sets the screen color between a red and blue tone. Returns the color settings to a bluish tone. The lower the value, less saturated and bright the colors become . 20 ENGLISH Game Adjust Color Adjust Black Stabilizer Response Time FreeSync Gamma Color Temp Six Color Reset Black Stabilizer : You can control the black contrast to High may cause image sticking. Sets a response time for colors through adjusting the color and saturation...
.... Cool: Sets the screen color to the default settings. Selects the factory default picture color. Medium: Sets the screen color between a red and blue tone. Returns the color settings to a bluish tone. The lower the value, less saturated and bright the colors become . 20 ENGLISH Game Adjust Color Adjust Black Stabilizer Response Time FreeSync Gamma Color Temp Six Color Reset Black Stabilizer : You can control the black contrast to High may cause image sticking. Sets a response time for colors through adjusting the color and saturation...

Owners Manual
Page 21
... incorrect key input. NOTE yySMART ENERGY SAVING: Conserve energy by moving the joystick. 3 Configure the options following the instructions that appear in which the control names are disabled. tion of the monitor on source. Menu > General Language SMART ENERGY SAVING Power LED Automatic Standby OSD Lock Description To choose the language in the bottom right corner. 4 To return to the upper menu or set other menu items, move...
... incorrect key input. NOTE yySMART ENERGY SAVING: Conserve energy by moving the joystick. 3 Configure the options following the instructions that appear in which the control names are disabled. tion of the monitor on source. Menu > General Language SMART ENERGY SAVING Power LED Automatic Standby OSD Lock Description To choose the language in the bottom right corner. 4 To return to the upper menu or set other menu items, move...

Owners Manual
Page 23
... of the monitor. 2 Go to Picture mode by moving the joystick button to adjust each element. Menu > Picture Mode Picture Mode Custom Reader Photo Cinema FPS 1 FPS 2 RTS Custom (Game) Description Allows the user to ▲. 3 Configure the options following the instructions that the screen is optimized for the newspaper. It has a higher Black Stabilizer value than FPS Game 1. The color mode of the main menu can customize...
... of the monitor. 2 Go to Picture mode by moving the joystick button to adjust each element. Menu > Picture Mode Picture Mode Custom Reader Photo Cinema FPS 1 FPS 2 RTS Custom (Game) Description Allows the user to ▲. 3 Configure the options following the instructions that the screen is optimized for the newspaper. It has a higher Black Stabilizer value than FPS Game 1. The color mode of the main menu can customize...

Owners Manual
Page 24
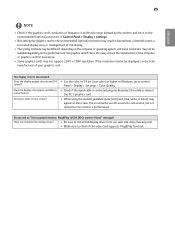
... the power LED displaying white? Is the OUT OF RANGE message being displayed. Please see the Product Specification section of this manual to switch the display on . yy Horizontal frequency The time it . Is the No Signal message being displayed? yyCheck if the computer is correctly plugged into the power outlet. Go to Menu > General and set the appropriate frequency. Change the resolution to display an image, the screen must be flickering. yyCheck that the connected input...
... the power LED displaying white? Is the OUT OF RANGE message being displayed. Please see the Product Specification section of this manual to switch the display on . yy Horizontal frequency The time it . Is the No Signal message being displayed? yyCheck if the computer is correctly plugged into the power outlet. Go to Menu > General and set the appropriate frequency. Change the resolution to display an image, the screen must be flickering. yyCheck that the connected input...
Owners Manual
Page 25
... (optimal) resolution in blurred text, a dimmed screen, a truncated display area, or misalignment of the graphics card. yySet the color to control Panel > Display > Settings > Color Quality. 25 ENGLISH NOTE yyCheck if the graphics card's resolution or frequency is within the range allowed by the monitor and set it related to the monitor's performance. yyMake sure to install the display driver from our web site: http://www.lg.com. yyBe sure to check if the video card supports Plug...
... (optimal) resolution in blurred text, a dimmed screen, a truncated display area, or misalignment of the graphics card. yySet the color to control Panel > Display > Settings > Color Quality. 25 ENGLISH NOTE yyCheck if the graphics card's resolution or frequency is within the range allowed by the monitor and set it related to the monitor's performance. yyMake sure to install the display driver from our web site: http://www.lg.com. yyBe sure to check if the video card supports Plug...
Owners Manual
Page 26
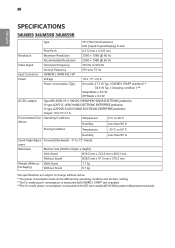
26 ENGLISH SPECIFICATIONS 34UM59 34UM59B 34UM59R Type TFT (Thin Film Transistor) LCD (Liquid Crystal Display) Screen Pixel Pitch 0.312 mm x 0.310 mm Resolution Maximum Resolution 2560 × 1080 @ 60 Hz Recommended Resolution 2560 × 1080 @ 60 Hz Video Signal Horizontal Frequency 30 kHz to 90 kHz Vertical Frequency 56 Hz to 60 °C Humidity Less than 80 % Storing Condition Temperature -20 °C to 75 Hz Input Connector HDMI IN1, HDMI IN2, H/P Power Voltage...
26 ENGLISH SPECIFICATIONS 34UM59 34UM59B 34UM59R Type TFT (Thin Film Transistor) LCD (Liquid Crystal Display) Screen Pixel Pitch 0.312 mm x 0.310 mm Resolution Maximum Resolution 2560 × 1080 @ 60 Hz Recommended Resolution 2560 × 1080 @ 60 Hz Video Signal Horizontal Frequency 30 kHz to 90 kHz Vertical Frequency 56 Hz to 60 °C Humidity Less than 80 % Storing Condition Temperature -20 °C to 75 Hz Input Connector HDMI IN1, HDMI IN2, H/P Power Voltage...
Specification
Page 1
... FEATURES PANEL Screen Size Panel Type Color Gamut (CIE 1931) Color Depth(Number of Colors) Pixel Pitch(mm) Response Time Refresh Rate Aspect Ratio Resolution Brightness Contrast Ratio Viewing Angle Surface Treatment INPUT/OUTPUT HDMI POWER Type Input Normal On SPECIAL FEATURES Picture Mode Ratio PIP DDC/CI HDCP Key Lock Response Time Control Freesync Game Mode DAS Mode Black Stabilizer Flicker Safe Smart Energy saving Automatic standby Reader Mode Six Axis Control Color Calibrated Dual controller Screen split2.0 (in OSC) My Display Preset (in Picture mode...
... FEATURES PANEL Screen Size Panel Type Color Gamut (CIE 1931) Color Depth(Number of Colors) Pixel Pitch(mm) Response Time Refresh Rate Aspect Ratio Resolution Brightness Contrast Ratio Viewing Angle Surface Treatment INPUT/OUTPUT HDMI POWER Type Input Normal On SPECIAL FEATURES Picture Mode Ratio PIP DDC/CI HDCP Key Lock Response Time Control Freesync Game Mode DAS Mode Black Stabilizer Flicker Safe Smart Energy saving Automatic standby Reader Mode Six Axis Control Color Calibrated Dual controller Screen split2.0 (in OSC) My Display Preset (in Picture mode...


