Owners Manual
Page 2
...2 TABLE OF CONTENTS CONTENTS ENGLISH 3 LICENSE 4 ASSEMBLING AND PREPAR- How to External Devices 17 - D-SUB connection 15 - HDMI connection 16 - Attaching the Stand Base 10 - Menu Settings 19 - -Quick Settings 20 - -Picture 23 - -General 24 - -Auto Configuration 25 - -Reset 26 - -Picture mode 27 TROUBLESHOOTING 29 SPECIFICATIONS 30 Preset Modes (Resolution) 30 Indicator ING 4 Unpacking 5 Supported Drivers and Software 6 Parts and buttons 6 - Input Connector 8 Moving and Lifting the Monitor 9 Setting up the Monitor set 9 - Using the cable holder 13 - Installing the wall mount 14 -
...2 TABLE OF CONTENTS CONTENTS ENGLISH 3 LICENSE 4 ASSEMBLING AND PREPAR- How to External Devices 17 - D-SUB connection 15 - HDMI connection 16 - Attaching the Stand Base 10 - Menu Settings 19 - -Quick Settings 20 - -Picture 23 - -General 24 - -Auto Configuration 25 - -Reset 26 - -Picture mode 27 TROUBLESHOOTING 29 SPECIFICATIONS 30 Preset Modes (Resolution) 30 Indicator ING 4 Unpacking 5 Supported Drivers and Software 6 Parts and buttons 6 - Input Connector 8 Moving and Lifting the Monitor 9 Setting up the Monitor set 9 - Using the cable holder 13 - Installing the wall mount 14 -
Owners Manual
Page 11
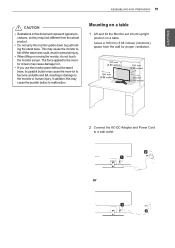
yyIf you use the monitor panel without the stand base, its upright position on a table 1 Lift and tilt the Monitor set into its joystick button may cause the moni-tor to become unstable and fall off the stand and could result in personal injury. This may cause damage to it. Mounting on a table. In addition, this document represent typical procedures, so they may...
yyIf you use the monitor panel without the stand base, its upright position on a table 1 Lift and tilt the Monitor set into its joystick button may cause the moni-tor to become unstable and fall off the stand and could result in personal injury. This may cause damage to it. Mounting on a table. In addition, this document represent typical procedures, so they may...
Owners Manual
Page 12
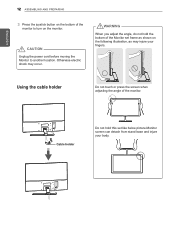
... power cord before moving the Monitor to turn on the following illustration, as shown on the monitor. Cable holder Do not hold the bottom of the monitor. WARNING When you adjust the angle, do not hold this set frame as may occur. Using the cable holder Do not touch or press the screen when adjusting the angle of the Monitor set like below picture.Monitor screen can detach from stand base...
... power cord before moving the Monitor to turn on the following illustration, as shown on the monitor. Cable holder Do not hold the bottom of the monitor. WARNING When you adjust the angle, do not hold this set frame as may occur. Using the cable holder Do not touch or press the screen when adjusting the angle of the Monitor set like below picture.Monitor screen can detach from stand base...
Owners Manual
Page 13
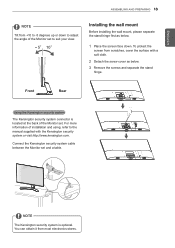
... wall mount Before installing the wall mount, please separate the stand hinge first as below . 1 Place the screen face down to adjust the angle of the Monitor set to the manual supplied with a soft cloth. 2 Detach the screw cover as below . 3 Remove the screws and separate the stand hinge. You can obtain it from +10 to -5 degrees up or down . For more information of the Monitor set and a table. Connect...
... wall mount Before installing the wall mount, please separate the stand hinge first as below . 1 Place the screen face down to adjust the angle of the Monitor set to the manual supplied with a soft cloth. 2 Detach the screw cover as below . 3 Remove the screws and separate the stand hinge. You can obtain it from +10 to -5 degrees up or down . For more information of the Monitor set and a table. Connect...
Owners Manual
Page 14
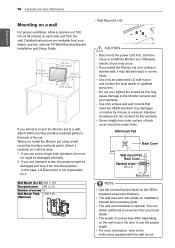
... install the Monitor set using an improper accessory are listed on the VESA standard screw specifications. Wall mount Pad Back Cover Wall mount Pad Back Cover Standard screw Max.8mm NOTE yyUse the screws that meet the VESA standard. yyThe length of the set. Detailed instructions are available from your dealer, see the optional Tilt Wall Mounting Bracket Installation and Setup Guide. 100 mm (3.94 inches) 100 mm (3.94 inches) 100 mm (3.94 inches) 100 mm (3.94 inches...
... install the Monitor set using an improper accessory are listed on the VESA standard screw specifications. Wall mount Pad Back Cover Wall mount Pad Back Cover Standard screw Max.8mm NOTE yyUse the screws that meet the VESA standard. yyThe length of the set. Detailed instructions are available from your dealer, see the optional Tilt Wall Mounting Bracket Installation and Setup Guide. 100 mm (3.94 inches) 100 mm (3.94 inches) 100 mm (3.94 inches) 100 mm (3.94 inches...
Owners Manual
Page 15
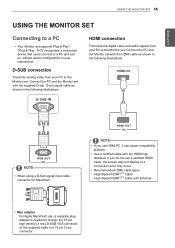
... the Monitor set . D-SUB connection Transmits analog video from your PC to the Monitor set with the HDMI cable as shown in the following illustrations. Connect the PC and the Monitor set supports Plug & Play*. *Plug & Play: A PC recognizes a connected device that users connect to a PC and turn on the supplied cable to a 15 pin 2 row connector. NOTE yyWhen using a D-Sub signal input cable connector for Macintosh NOTE yyIf you do not use a certified HDMI cable, the screen may not display or a connection error...
... the Monitor set . D-SUB connection Transmits analog video from your PC to the Monitor set with the HDMI cable as shown in the following illustrations. Connect the PC and the Monitor set supports Plug & Play*. *Plug & Play: A PC recognizes a connected device that users connect to a PC and turn on the supplied cable to a 15 pin 2 row connector. NOTE yyWhen using a D-Sub signal input cable connector for Macintosh NOTE yyIf you do not use a certified HDMI cable, the screen may not display or a connection error...
Owners Manual
Page 16
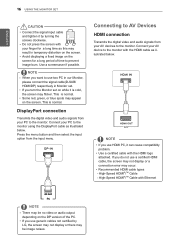
... the digital video and audio signals from the input menu. High-Speed HDMI®/TM Cable - yyIf you use a certified HDMI cable, the screen may not display or a connection error may flicker. High-Speed HDMI®/TM Cable with the HDMI logo attached. yySome red, green, or blue spots may be no video or audio output depending on the screen. NOTE yyIf you want to use HDMI PC, it can cause compatibility problem. yyAvoid displaying a fixed image on the screen. yyIf you turn the Monitor set...
... the digital video and audio signals from the input menu. High-Speed HDMI®/TM Cable - yyIf you use a certified HDMI cable, the screen may not display or a connection error may flicker. High-Speed HDMI®/TM Cable with the HDMI logo attached. yySome red, green, or blue spots may be no video or audio output depending on the screen. NOTE yyIf you want to use HDMI PC, it can cause compatibility problem. yyAvoid displaying a fixed image on the screen. yyIf you turn the Monitor set...
Owners Manual
Page 17
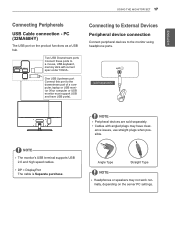
... plugs when possible. USB IN 1 USB IN 2 Two USB Downstream ports Connect these ports to the downstream port of a com- NOTE yyPeripheral devices are sold separately) NOTE yyThe monitor's USB terminal supports USB 2.0 and high speed cables. tor (Your computer or USB monitor must support USB and have clear- PC (32MA68HY) The USB port on the server PC settings. Angle Type Straight Type NOTE yyHeadphones or speakers may have USB ports). ENEGNLGISH USING THE MONITOR SET...
... plugs when possible. USB IN 1 USB IN 2 Two USB Downstream ports Connect these ports to the downstream port of a com- NOTE yyPeripheral devices are sold separately) NOTE yyThe monitor's USB terminal supports USB 2.0 and high speed cables. tor (Your computer or USB monitor must support USB and have clear- PC (32MA68HY) The USB port on the server PC settings. Angle Type Straight Type NOTE yyHeadphones or speakers may have USB ports). ENEGNLGISH USING THE MONITOR SET...
Owners Manual
Page 18
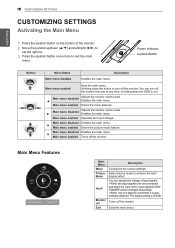
... Menu 1 Press the joystick button on .) ◄ Main menu disabled Adjusts the monitor volume level. Exits the main menu. Main menu enabled Enters the menu features. ► Main menu disabled Adjusts the monitor volume level. Turns off the monitor. Main menu enabled Operates the Input change of the monitor. 2 Move the joystick up/down the button to exit the main menu. Select picture mode to achieve the best display effect. The default setting is automatically detected. Main Menu Features Main Menu Menu Picture Mode Input Monitor...
... Menu 1 Press the joystick button on .) ◄ Main menu disabled Adjusts the monitor volume level. Exits the main menu. Main menu enabled Enters the menu features. ► Main menu disabled Adjusts the monitor volume level. Turns off the monitor. Main menu enabled Operates the Input change of the monitor. 2 Move the joystick up/down the button to exit the main menu. Select picture mode to achieve the best display effect. The default setting is automatically detected. Main Menu Features Main Menu Menu Picture Mode Input Monitor...
Owners Manual
Page 19
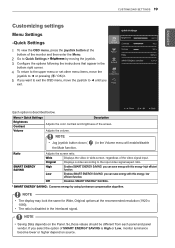
... the video signal input. So,those values should be different from each panel and panel vendor. Menu > Quick Settings Brightness Contrast Volume Description Adjusts the color contrast and brightness of the monitor and then enter the Menu. 2 Go to Quick Settings > Brightness by using luminance compensation algorithm. Off Disables SMART ENERGY SAVING . * SMART ENERGY SAVING : Conserve energy by moving the joystick. 3 Configure the options following the instructions that appear in wide-screen, regardless of SMART ENERGY SAVING is...
... the video signal input. So,those values should be different from each panel and panel vendor. Menu > Quick Settings Brightness Contrast Volume Description Adjusts the color contrast and brightness of the monitor and then enter the Menu. 2 Go to Quick Settings > Brightness by using luminance compensation algorithm. Off Disables SMART ENERGY SAVING . * SMART ENERGY SAVING : Conserve energy by moving the joystick. 3 Configure the options following the instructions that appear in wide-screen, regardless of SMART ENERGY SAVING is...

Owners Manual
Page 20
... is for color weakness user. Optimizes the screen to view photos. NOTE y yThis is adjusted to the best for gameplay. Therefore if you can control brightness in Menu OSD. The color mode of the main menu can 't distinguish some colors in some images. If you want screen more bright, you exit. If you want screen more bright, you feel uncomfortable with color weakness to easily distinguish between the two colors. Menu > Picture Picture Mode Custom Reader...
... is for color weakness user. Optimizes the screen to view photos. NOTE y yThis is adjusted to the best for gameplay. Therefore if you can control brightness in Menu OSD. The color mode of the main menu can 't distinguish some colors in some images. If you want screen more bright, you exit. If you want screen more bright, you feel uncomfortable with color weakness to easily distinguish between the two colors. Menu > Picture Picture Mode Custom Reader...
Owners Manual
Page 21
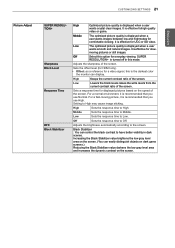
... darkest color the monitor can display. Adjusts the sharpness of the screen. High Keeps the current contrast ratio of the screen. Sets a response time for UCC or SD video. Increasing the Black Stabilizer value brightens the low gray level area on the screen. (You can control the black contrast to have better visibility in this option for everyday viewing. Middle The optimized picture quality is displayed when a user wants images between...
... darkest color the monitor can display. Adjusts the sharpness of the screen. High Keeps the current contrast ratio of the screen. Sets a response time for UCC or SD video. Increasing the Black Stabilizer value brightens the low gray level area on the screen. (You can control the black contrast to have better visibility in this option for everyday viewing. Middle The optimized picture quality is displayed when a user wants images between...
Owners Manual
Page 22
... darker the image becomes. The higher the value, the more saturated and dark the colors become . To minimize any horizontal noise and clear or sharpen the image of characters. Selects the factory default picture color. The lower the value, less saturated and bright the colors become . Cool: Sets the screen color to remove any vertical bars or stripes visible on the screen background.The horizontal screen size will also change.
... darker the image becomes. The higher the value, the more saturated and dark the colors become . To minimize any horizontal noise and clear or sharpen the image of characters. Selects the factory default picture color. The lower the value, less saturated and bright the colors become . Cool: Sets the screen color to remove any vertical bars or stripes visible on the screen background.The horizontal screen size will also change.
Owners Manual
Page 23
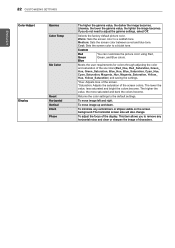
... is enabled only when the screen resolution on . NOTE All functions except for the OSD Lock mode and the Exit button for the auto-off . ENEGNLGISH -General 1 To view the OSD menu, press the joystick but- Off The power indicator is disabled. Feature that appear in which the control names are disabled. On Key input is turned off function. (Off, 4 H, 6 H, and 8 H) User can set to General by moving...
... is enabled only when the screen resolution on . NOTE All functions except for the OSD Lock mode and the Exit button for the auto-off . ENEGNLGISH -General 1 To view the OSD menu, press the joystick but- Off The power indicator is disabled. Feature that appear in which the control names are disabled. On Key input is turned off function. (Off, 4 H, 6 H, and 8 H) User can set to General by moving...
Owners Manual
Page 26
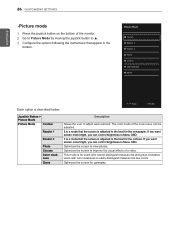
... adjusted. This mode is adjusted to the best for users who cannot distinguish between red and green.It enables users with color weakness to easily distinguish between the two colors. It is a mode that the screen is for the newspaper. Optimizes the screen to improve the visual effects of a video. Optimizes the screen to view photos. Optimizes the screen for the cartoon. It is a mode that the screen is described below. Joystick Button > Picture Mode Picture Mode...
... adjusted. This mode is adjusted to the best for users who cannot distinguish between red and green.It enables users with color weakness to easily distinguish between the two colors. It is a mode that the screen is for the newspaper. Optimizes the screen to improve the visual effects of a video. Optimizes the screen to view photos. Optimizes the screen for the cartoon. It is a mode that the screen is described below. Joystick Button > Picture Mode Picture Mode...
Owners Manual
Page 27
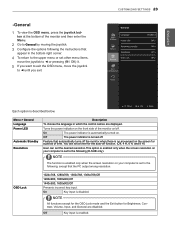
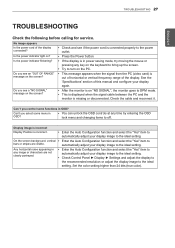
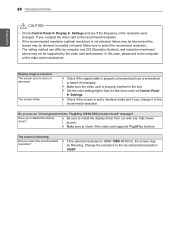
... the OSD lock menu and changing items to turn on the screen? y y Try to off. Do you select some functions in OSD? Check the cable and reconnect it. Can't you see a "NO SIGNAL" message on "NO SIGNAL", the monitor goes to the ideal setting. No image appears Is the power cord of this manual and configure your display image to DPM mode. y y Press the Power button. TROUBLESHOOTING 27 ENEGNLGISH TROUBLESHOOTING Check the following before calling for service. Display image...
... the OSD lock menu and changing items to turn on the screen? y y Try to off. Do you select some functions in OSD? Check the cable and reconnect it. Can't you see a "NO SIGNAL" message on "NO SIGNAL", the monitor goes to the ideal setting. No image appears Is the power cord of this manual and configure your display image to DPM mode. y y Press the Power button. TROUBLESHOOTING 27 ENEGNLGISH TROUBLESHOOTING Check the following before calling for service. Display image...
Owners Manual
Page 28
... color) at Control Panel ► Settings. Change the resolution to the recommend resolution. Did you installed the display driver? y y Check if the screen is properly connected and use a screwdriver to the recommend resolution. y yThe setting method can differ by the video card performance. 28 TROUBLESHOOTING ENEGNLGISH CAUTION y yCheck Control Panel ► Display ► Settings and see an "Unrecognized monitor, Plug&Play (VESA DDC) monitor found" message? If yes, readjust the video card to fasten if necessary. y y Check if the signal cable is set...
... color) at Control Panel ► Settings. Change the resolution to the recommend resolution. Did you installed the display driver? y y Check if the screen is properly connected and use a screwdriver to the recommend resolution. y yThe setting method can differ by the video card performance. 28 TROUBLESHOOTING ENEGNLGISH CAUTION y yCheck Control Panel ► Display ► Settings and see an "Unrecognized monitor, Plug&Play (VESA DDC) monitor found" message? If yes, readjust the video card to fasten if necessary. y y Check if the signal cable is set...
Owners Manual
Page 29
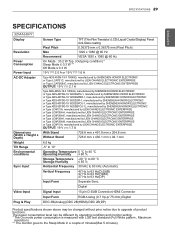
...) Separate Sync. The power consumption level can be changed without prior notice due to upgrade of minutes(Max 5 minutes). SPECIFICATIONS 29 ENEGNLGISH SPECIFICATIONS 32MA68HY Display Resolution Power Consumption Power Input AC-DC Adapter Dimensions (Width x Height x Depth) Weight Tilt Range Environmental conditions Sync Input Video Input Plug & Play Screen Type TFT (Thin Film Transistor) LCD (Liquid Crystal Display) Panel Anti-Glare coating Pixel Pitch 0.36375 mm x 0.36375 mm (Pixel Pitch) Max 1920 x 1080 @ 60 Hz Recommend VESA 1920...
...) Separate Sync. The power consumption level can be changed without prior notice due to upgrade of minutes(Max 5 minutes). SPECIFICATIONS 29 ENEGNLGISH SPECIFICATIONS 32MA68HY Display Resolution Power Consumption Power Input AC-DC Adapter Dimensions (Width x Height x Depth) Weight Tilt Range Environmental conditions Sync Input Video Input Plug & Play Screen Type TFT (Thin Film Transistor) LCD (Liquid Crystal Display) Panel Anti-Glare coating Pixel Pitch 0.36375 mm x 0.36375 mm (Pixel Pitch) Max 1920 x 1080 @ 60 Hz Recommend VESA 1920...

Owners Manual
Page 30
... ≤ 85 % Horizontal Frequency 30 kHz to 83 kHz (Automatic) Vertical Frequency Input Form 47 Hz to 63 Hz(D-SUB) 47 Hz to 63 Hz(HDMI) 47 Hz to 63 Hz(DP) Separate Sync. 30 SPECIFICATIONS ENEGNLGISH SPECIFICATIONS 32MA70HY Display Resolution Power Consumption Power Input AC-DC Adapter Dimensions (Width x Height x Depth) Weight Tilt Range Environmental conditions Sync Input Video Input Plug & Play Screen Type TFT (Thin Film Transistor) LCD (Liquid Crystal Display) Panel Anti-Glare coating Pixel Pitch 0.36375...
... ≤ 85 % Horizontal Frequency 30 kHz to 83 kHz (Automatic) Vertical Frequency Input Form 47 Hz to 63 Hz(D-SUB) 47 Hz to 63 Hz(HDMI) 47 Hz to 63 Hz(DP) Separate Sync. 30 SPECIFICATIONS ENEGNLGISH SPECIFICATIONS 32MA70HY Display Resolution Power Consumption Power Input AC-DC Adapter Dimensions (Width x Height x Depth) Weight Tilt Range Environmental conditions Sync Input Video Input Plug & Play Screen Type TFT (Thin Film Transistor) LCD (Liquid Crystal Display) Panel Anti-Glare coating Pixel Pitch 0.36375...
Specification
Page 1
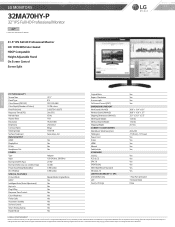
... Monitor CIE 1976 68% Color Gamut HDCP Compatable Height Adjustable Stand On Screen Control Screen Split KEY FEATURES FEATURES PICTURE QUALITY Screen Size Panel Type Color Gamut (CIE1931) Color Depth (Number of Colors) Pixel Pitch(mm) Response Time (GTG) Refresh Rate Aspect Ratio Resolution Brightness Contrast Ratio Viewing Angle Surface Treatment INPUT/OUTPUT HDMI DisplayPort D-Sub Headphone Out POWER Type Input Normal On (EPA Typ.) Normal On (factory out condition Typ.) Power Save/Sleep Mode (Max) DC Off (Max) SPECIAL FEATURES Picture Mode HDCP Intelligent Auto (Auto Adjustment...
... Monitor CIE 1976 68% Color Gamut HDCP Compatable Height Adjustable Stand On Screen Control Screen Split KEY FEATURES FEATURES PICTURE QUALITY Screen Size Panel Type Color Gamut (CIE1931) Color Depth (Number of Colors) Pixel Pitch(mm) Response Time (GTG) Refresh Rate Aspect Ratio Resolution Brightness Contrast Ratio Viewing Angle Surface Treatment INPUT/OUTPUT HDMI DisplayPort D-Sub Headphone Out POWER Type Input Normal On (EPA Typ.) Normal On (factory out condition Typ.) Power Save/Sleep Mode (Max) DC Off (Max) SPECIAL FEATURES Picture Mode HDCP Intelligent Auto (Auto Adjustment...


