
Owners Manual
Page 6
... 9 Front Panel Information 10 Back Panel Information 11 Stand Instruction 12 VESA Wall Mounting 14 Cable Management 15 Desktop Pedestal Installation 16 Swivel Stand 16 Kensington Security System 16 Attaching the TV to a Desk 17 Securing the TV to the wall to prevent falling when the TV is used on ...a stand 18 Antenna or Cable Connection 19 EXTERNAL EQUIPMENT SETUP HD Receiver Setup 20 DVD Setup 23 VCR Setup 25 Other A/V Source Setup 27 USB...
... 9 Front Panel Information 10 Back Panel Information 11 Stand Instruction 12 VESA Wall Mounting 14 Cable Management 15 Desktop Pedestal Installation 16 Swivel Stand 16 Kensington Security System 16 Attaching the TV to a Desk 17 Securing the TV to the wall to prevent falling when the TV is used on ...a stand 18 Antenna or Cable Connection 19 EXTERNAL EQUIPMENT SETUP HD Receiver Setup 20 DVD Setup 23 VCR Setup 25 Other A/V Source Setup 27 USB...
Owners Manual
Page 11
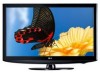
... cable for video & red and white for audio. 11 USB IN Used for external speaker jack. 10 COMPONENT IN Analog Connection. Supports HD video and Digital audio. Accepts DVI video using an adapter or HDMI to MP3s. 12 Power Cord Socket For operation with amps ... jack for analog PC audio input. 5 OPTICAL DIGITAL AUDIO OUT Digital optical audio output for Service or Hotel mode. 3 HDMI/DVI IN, HDMI IN Digital Connection. Uses a D-sub 15 pin cable (VGA cable). PREPARATION USB IN 12 1 2 RJP AV IN 1 VIDEO AUDIO 2 L(MONO) R 1 VIDEO COMPONENT IN L AUDIO R L R SPEAKER OUT 3...
... cable for video & red and white for audio. 11 USB IN Used for external speaker jack. 10 COMPONENT IN Analog Connection. Supports HD video and Digital audio. Accepts DVI video using an adapter or HDMI to MP3s. 12 Power Cord Socket For operation with amps ... jack for analog PC audio input. 5 OPTICAL DIGITAL AUDIO OUT Digital optical audio output for Service or Hotel mode. 3 HDMI/DVI IN, HDMI IN Digital Connection. Uses a D-sub 15 pin cable (VGA cable). PREPARATION USB IN 12 1 2 RJP AV IN 1 VIDEO AUDIO 2 L(MONO) R 1 VIDEO COMPONENT IN L AUDIO R L R SPEAKER OUT 3...
Owners Manual
Page 27
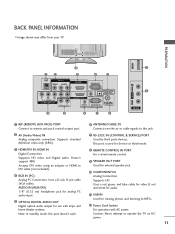
Match the jack colors. (Video = yellow, Audio Left = white, and Audio Right = red) 2. PREPARATION OTHER A/V SOURCE SETUP 1. USB IN Camcorder Video Game Set VIDEO L R 1 VIDEO L/MONO AUDIO R AV IN 2 27 How to connect 1 Connect the AUDIO/VIDEO jacks between TV and external equipment. I Select the A V 1 or A V 2 input source on the TV using the INPUT button on the remote control. How to use I Operate the corresponding external equipment.
Match the jack colors. (Video = yellow, Audio Left = white, and Audio Right = red) 2. PREPARATION OTHER A/V SOURCE SETUP 1. USB IN Camcorder Video Game Set VIDEO L R 1 VIDEO L/MONO AUDIO R AV IN 2 27 How to connect 1 Connect the AUDIO/VIDEO jacks between TV and external equipment. I Select the A V 1 or A V 2 input source on the TV using the INPUT button on the remote control. How to use I Operate the corresponding external equipment.
Owners Manual
Page 28
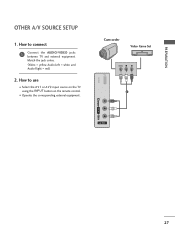
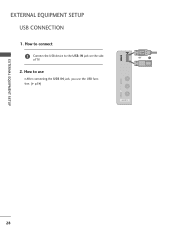
How to the USB I N jack, you use the USB function. (G p.54) VIDEO L/MONO AUDIO R USB IN or 1 Memory Key AV IN 2 EXTERNAL EQUIPMENT SETUP 28 EXTERNAL EQUIPMENT SETUP USB CONNECTION 1. How to connect 1 Connect the USB device to use I After connecting the USB I N jack on the side of TV. 2.
How to the USB I N jack, you use the USB function. (G p.54) VIDEO L/MONO AUDIO R USB IN or 1 Memory Key AV IN 2 EXTERNAL EQUIPMENT SETUP 28 EXTERNAL EQUIPMENT SETUP USB CONNECTION 1. How to connect 1 Connect the USB device to use I After connecting the USB I N jack on the side of TV. 2.
Owners Manual
Page 40
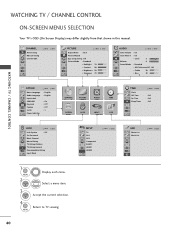
... Accept the current selection. 4 MENU Return to TV viewing. 40 CHANNEL Auto Tuning Manual Tuning Channel Edit Move Enter PICTURE Move Enter Aspect Ratio : 16:9 Picture Wizard Energy Saving : Off Picture Mode : Standard • Backlight 70 • Contrast 90 • Brightness 50 • Sharpness 70 E...Lock Caption Set ID Power Indicator E Move Enter : English : English : On : Off : Off : 1 CHANNEL PICTURE AUDIO TIME OPTION LOCK INPUT USB TIME Clock Off Time On Time Sleep Timer Move Enter : Off : Off : Off LOCK Move Enter Lock System : Off Set Password Block Channel ...
... Accept the current selection. 4 MENU Return to TV viewing. 40 CHANNEL Auto Tuning Manual Tuning Channel Edit Move Enter PICTURE Move Enter Aspect Ratio : 16:9 Picture Wizard Energy Saving : Off Picture Mode : Standard • Backlight 70 • Contrast 90 • Brightness 50 • Sharpness 70 E...Lock Caption Set ID Power Indicator E Move Enter : English : English : On : Off : Off : 1 CHANNEL PICTURE AUDIO TIME OPTION LOCK INPUT USB TIME Clock Off Time On Time Sleep Timer Move Enter : Off : Off : Off LOCK Move Enter Lock System : Off Set Password Block Channel ...
Owners Manual
Page 41
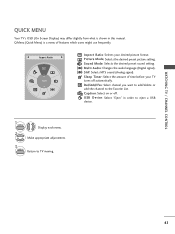
F Aspect Ratio G A 16:9 Aspect Ratio: Selects your TV turns off . SAP: Selects MTS sound (Analog signal). Sleep Timer: Select the amount of features which users might use frequently. Make appropriate adjustments. 3 Q.MENU Return to eject a USB device. 1 Q.MENU 2 Display each menu. USB Device: Select "Eject" in this manual. A Caption: Select on or off automatically...
F Aspect Ratio G A 16:9 Aspect Ratio: Selects your TV turns off . SAP: Selects MTS sound (Analog signal). Sleep Timer: Select the amount of features which users might use frequently. Make appropriate adjustments. 3 Q.MENU Return to eject a USB device. 1 Q.MENU 2 Display each menu. USB Device: Select "Eject" in this manual. A Caption: Select on or off automatically...

Owners Manual
Page 54
... a new folder or delete the existing folder. 1 Connect the USB device to the USB IN jacks on USB device could be recognized. USB Precautions when using the USB device G Only a USB storage device is not supported G A USB storage device using an automatic recogni- Excessively long cables are not ...supported. G In case of TV. I S T. 3 ENTER PHOTO LIST MUSIC LIST When removing the USB device Select the USB Device menu before removing the USB device. 1 MENU Select USB Device. 2 ENTER Select Eject. tion program may not be seen by the TV, try a different cable....
... a new folder or delete the existing folder. 1 Connect the USB device to the USB IN jacks on USB device could be recognized. USB Precautions when using the USB device G Only a USB storage device is not supported G A USB storage device using an automatic recogni- Excessively long cables are not ...supported. G In case of TV. I S T. 3 ENTER PHOTO LIST MUSIC LIST When removing the USB device Select the USB Device menu before removing the USB device. 1 MENU Select USB Device. 2 ENTER Select Eject. tion program may not be seen by the TV, try a different cable....

Owners Manual
Page 55
I You can view .JPG files from USB storage devices. USB PHOTO LIST You can play JPG files only. I Available JPG size: 64 pixel (width) x 64 pixel (height) ~ 15360 pixel (width) x 8640 pixel (height) Screen Components 1 .... Supported photo file: *.JPG I Only baseline scan is supported among JPG (not progressive). The On-Screen Display on 1 the remote control 3 4 Photo List Drive1 JMJ001 1366x768, 125KB Up Folder Page 2/3 No Marked Up Folder KY101 06/10/2008 KY102 04/03/2008 JMJ001 01/01/2000 JMJ002 06/15/2008 JMJ003...
I You can view .JPG files from USB storage devices. USB PHOTO LIST You can play JPG files only. I Available JPG size: 64 pixel (width) x 64 pixel (height) ~ 15360 pixel (width) x 8640 pixel (height) Screen Components 1 .... Supported photo file: *.JPG I Only baseline scan is supported among JPG (not progressive). The On-Screen Display on 1 the remote control 3 4 Photo List Drive1 JMJ001 1366x768, 125KB Up Folder Page 2/3 No Marked Up Folder KY101 06/10/2008 KY102 04/03/2008 JMJ001 01/01/2000 JMJ002 06/15/2008 JMJ003...

Owners Manual
Page 56
... menu is displayed. I Use the MARK button to navigation in the I Use the C H photo page. G View: Display the selected item. USB USB Photo Selection and Popup Menu Photo List Drive1 JMJ001 1366x768, 125KB Up Folder Page 2/3 No Marked Up Folder KY101 KY102 JMJ001 JMJ002 JMJ003 JMJ004 06/10/2008 04/03/2008 01... 05/13/2008 05/26/2008 02/18/2008 02/18/2008 Navigation Popup Menu CH Page Change MARK Mark Exit Photo List Drive1 JMJ001 1366x768, 125KB Up Folder Page 2/3 No Marked Up Folder KY101 KY102 JMJ001 JMJ002 JMJ003 JMJ004 06/10/2008 04/03/2008 01/01/2000 06/15...
... menu is displayed. I Use the MARK button to navigation in the I Use the C H photo page. G View: Display the selected item. USB USB Photo Selection and Popup Menu Photo List Drive1 JMJ001 1366x768, 125KB Up Folder Page 2/3 No Marked Up Folder KY101 KY102 JMJ001 JMJ002 JMJ003 JMJ004 06/10/2008 04/03/2008 01... 05/13/2008 05/26/2008 02/18/2008 02/18/2008 Navigation Popup Menu CH Page Change MARK Mark Exit Photo List Drive1 JMJ001 1366x768, 125KB Up Folder Page 2/3 No Marked Up Folder KY101 KY102 JMJ001 JMJ002 JMJ003 JMJ004 06/10/2008 04/03/2008 01/01/2000 06/15...

Owners Manual
Page 57
... the size of the photo displayed on the screen in full size. I Use the C H photo page. Photo List Drive1 JMJ001 1366x768, 125KB Up Folder Page 2/3 No Marked Up Folder KY101 KY102 JMJ001 JMJ002 JMJ003 JMJ004 06/10/2008 04/03/2008 01/01/2000 ... 05/26/2008 02/18/2008 02/18/2008 Navigation Popup Menu CH Page Change MARK Mark Exit Photo List Drive1 JMJ001 1366x768, 125KB Up Folder Page 2/3 No Marked Up Folder KY101 KY102 JMJ001 JMJ002 JMJ003 JMJ004 06/10/2008 04/03/2008 01... it fills the screen. button to navigation in full screen mode. More operations are available in the 57 USB
... the size of the photo displayed on the screen in full size. I Use the C H photo page. Photo List Drive1 JMJ001 1366x768, 125KB Up Folder Page 2/3 No Marked Up Folder KY101 KY102 JMJ001 JMJ002 JMJ003 JMJ004 06/10/2008 04/03/2008 01/01/2000 ... 05/26/2008 02/18/2008 02/18/2008 Navigation Popup Menu CH Page Change MARK Mark Exit Photo List Drive1 JMJ001 1366x768, 125KB Up Folder Page 2/3 No Marked Up Folder KY101 KY102 JMJ001 JMJ002 JMJ003 JMJ004 06/10/2008 04/03/2008 01... it fills the screen. button to navigation in full screen mode. More operations are available in the 57 USB

Owners Manual
Page 58
USB 6 1/17 Slideshow BGM Delete Option Hide ENTER Select the Slideshow, BGM, Delete, Option, or Hide. (Rotate), I Use button to display. G (Rotate): Rotate photos. I Set the ... is playing. G Delete: Delete photos. Slide Speed Fast Music Album ... I You cannot change Music Album while BGM is greater than the available supported resolution height. USB G Slideshow: Selected photos are displayed during the slide show . If no photo is selected, all photos in full size. I Rotates the photo 90°, 180...
USB 6 1/17 Slideshow BGM Delete Option Hide ENTER Select the Slideshow, BGM, Delete, Option, or Hide. (Rotate), I Use button to display. G (Rotate): Rotate photos. I Set the ... is playing. G Delete: Delete photos. Slide Speed Fast Music Album ... I You cannot change Music Album while BGM is greater than the available supported resolution height. USB G Slideshow: Selected photos are displayed during the slide show . If no photo is selected, all photos in full size. I Rotates the photo 90°, 180...

Owners Manual
Page 59
...Corresponding buttons on your model may be slightly different. USB MUSIC LIST You can use the Music List menu to...5 the remote control. 1 Music List Drive1 3 4 Page 2/3 No Marked Title Up Folder A 00:00 / 04:16 Up Folder Navigation Popup Menu CH Page Change 5 Duration MARK Mark Exit 59 Supported music file: *.MP3 Bit rate range... 32 Kbps - 320 Kbps • Sampling rate (Sampling Frequency) MPEG1 layer 3: 32 kHz, 44.1 kHz, 48 kHz MPEG2 layer 3: 16 kHz, 22.05 kHz, 24 kHz MPEG2.5 layer 3: 8 kHz, 11.025 kHz, 12 kHz Screen Components 1 MENU Select U S B. 2 ENTER ...
...Corresponding buttons on your model may be slightly different. USB MUSIC LIST You can use the Music List menu to...5 the remote control. 1 Music List Drive1 3 4 Page 2/3 No Marked Title Up Folder A 00:00 / 04:16 Up Folder Navigation Popup Menu CH Page Change 5 Duration MARK Mark Exit 59 Supported music file: *.MP3 Bit rate range... 32 Kbps - 320 Kbps • Sampling rate (Sampling Frequency) MPEG1 layer 3: 32 kHz, 44.1 kHz, 48 kHz MPEG2 layer 3: 16 kHz, 22.05 kHz, 24 kHz MPEG2.5 layer 3: 8 kHz, 11.025 kHz, 12 kHz Screen Components 1 MENU Select U S B. 2 ENTER ...

Owners Manual
Page 60
... folder and press the ENTER button, the current song in playback will be played in sequence. USB USB Music Selection and Popup Menu Music List Drive1 Page 2/3 No Marked Title Up Folder Duration A 00:00 / 04:16 Up Folder Navigation Popup Menu CH Page Change MARK Mark Exit Music List Drive1 Page 2/3 No... Marked Title Up Folder A 00:00 / 04:16 Up Folder Duration 3945 KB 128 Kbps Play Play with Photo: Start playing the selected songs and then move to the Photo List. G Play Marked: ...
... folder and press the ENTER button, the current song in playback will be played in sequence. USB USB Music Selection and Popup Menu Music List Drive1 Page 2/3 No Marked Title Up Folder Duration A 00:00 / 04:16 Up Folder Navigation Popup Menu CH Page Change MARK Mark Exit Music List Drive1 Page 2/3 No... Marked Title Up Folder A 00:00 / 04:16 Up Folder Duration 3945 KB 128 Kbps Play Play with Photo: Start playing the selected songs and then move to the Photo List. G Play Marked: ...

Owners Manual
Page 61
G Music files with copy-protection will automatically move across the screen when there is displayed in front of time. ! NOTE G When music is playing, is no user input to stop the screen saver. 61 G A damaged or corrupted music file that does not play displays 00:00 as shown below) will not play. G Press ENTER, A , or RETURN button to prevent a fixed image remaining on the screen for a extended period of the music play time. USB I The play information box (as the play time.
G Music files with copy-protection will automatically move across the screen when there is displayed in front of time. ! NOTE G When music is playing, is no user input to stop the screen saver. 61 G A damaged or corrupted music file that does not play displays 00:00 as shown below) will not play. G Press ENTER, A , or RETURN button to prevent a fixed image remaining on the screen for a extended period of the music play time. USB I The play information box (as the play time.
Owners Manual
Page 105
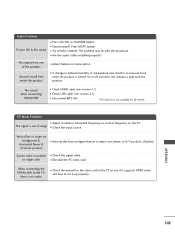
...card in menu option. APPENDIX 105 No output from inside the product I Check the input source. No sound when connecting HDMI/USB I Are the audio cables installed properly? The signal is unstable I Use normal MP3 file. *This feature is no audio. When connecting ...the HDMI cable to set it up properly. I Check the signal cable. I A change in an unusual noise when the product is turned on the PC. I Sound muted? I Check USB cable over version 1.3. I Adjust resolution, horizontal frequency, or vertical...
...card in menu option. APPENDIX 105 No output from inside the product I Check the input source. No sound when connecting HDMI/USB I Are the audio cables installed properly? The signal is unstable I Use normal MP3 file. *This feature is no audio. When connecting ...the HDMI cable to set it up properly. I Check the signal cable. I A change in an unusual noise when the product is turned on the PC. I Sound muted? I Check USB cable over version 1.3. I Adjust resolution, horizontal frequency, or vertical...


