
User Manual
Page 1
Record model number and serial number of the set . See the label attached on the back cover and quote this information to your set . This product qualifies for future reference. Retain it for ENERGY STAR in the "factory default (Home mode)" setting and this is the setting in which power savings will be achieved. (Only 32LG3DC model) P/NO : SAC30708026 (0810-REV08) www.lgcommercial.com LCD TV OWNER'S MANUAL 22LG3DCH 26LG3DCH 32LG3DCH 32LG3DC Please read this manual carefully before operating your dealer when you require service.
Record model number and serial number of the set . See the label attached on the back cover and quote this information to your set . This product qualifies for future reference. Retain it for ENERGY STAR in the "factory default (Home mode)" setting and this is the setting in which power savings will be achieved. (Only 32LG3DC model) P/NO : SAC30708026 (0810-REV08) www.lgcommercial.com LCD TV OWNER'S MANUAL 22LG3DCH 26LG3DCH 32LG3DCH 32LG3DC Please read this manual carefully before operating your dealer when you require service.

User Manual
Page 5
... DISCONNECTING DEVICE FROM MAINS Mains plug is , a single outlet circuit which powers only that is the disconnecting device. Periodically examine the cord of this owner's manual to prevent possible electric shock. (i.e. Do not touch the TV with liquids, such as this could result in electric shock or fire. Check the specification...
... DISCONNECTING DEVICE FROM MAINS Mains plug is , a single outlet circuit which powers only that is the disconnecting device. Periodically examine the cord of this owner's manual to prevent possible electric shock. (i.e. Do not touch the TV with liquids, such as this could result in electric shock or fire. Check the specification...

User Manual
Page 7
... Picture Improvement Settings 49 Advanced Control - Caption Option 66 TIME SETTING Clock Setting - Add / Delete Channel (Manual Tuning 38 - Preset 46 CONTENTS Manual Picture Adjustment - Black (Darkness) Level 50 Advanced Control - Auto Clock Setup 67 Manual Clock Setup 68 Auto On/Off Time Setting 69 Sleep Timer Setting 70 Auto Shut-off Setting...
... Picture Improvement Settings 49 Advanced Control - Caption Option 66 TIME SETTING Clock Setting - Add / Delete Channel (Manual Tuning 38 - Preset 46 CONTENTS Manual Picture Adjustment - Black (Darkness) Level 50 Advanced Control - Auto Clock Setup 67 Manual Clock Setup 68 Auto On/Off Time Setting 69 Sleep Timer Setting 70 Auto Shut-off Setting...

User Manual
Page 9
... signal interface cables with the TV. Wall Mounting Bracket (RW120) (Only 22LG3DCH) Wall Mounting Bracket Tilt Wall Mounting Bracket (RW230) (AW-47LG30M) (Only 26LG3DCH) (Only 32LG3DCH) 7 The installer remote control is not available for all models.) discoloration. 32LG3DC only PICTURE TV SOUND POWER 1 4 2 SAP INPUT RATIO 7 5 3 - 8 6 0...;4xL20 (Plastic Screw) Screw for stand fixing (Refer to maintain standards compliance. Excessive pressure may differ from the images below. 26/32LG3DCH, 32LG3DC only Owner's Manual Copyright© 2007 LGE, All Rights Reserved.
... signal interface cables with the TV. Wall Mounting Bracket (RW120) (Only 22LG3DCH) Wall Mounting Bracket Tilt Wall Mounting Bracket (RW230) (AW-47LG30M) (Only 26LG3DCH) (Only 32LG3DCH) 7 The installer remote control is not available for all models.) discoloration. 32LG3DC only PICTURE TV SOUND POWER 1 4 2 SAP INPUT RATIO 7 5 3 - 8 6 0...;4xL20 (Plastic Screw) Screw for stand fixing (Refer to maintain standards compliance. Excessive pressure may differ from the images below. 26/32LG3DCH, 32LG3DC only Owner's Manual Copyright© 2007 LGE, All Rights Reserved.

User Manual
Page 16
...needed depends on their specifications. G When purchasing our wall mount kit, a detailed installation manual and all parts necessary for wall mount kits are provided. Do not tighten the screws too much. G LG is not liable for these kinds of the screws may differ depending on the wall ... included with the installation instructions. 14 It may damage the TV or allow the TV to the wall in the table. A B PREPARATION Product LCD TV Model 26LG3DCH, 32LG3DCH 32LG3DC 22LG3DCH VESA (A * B) 200 * 100 100 * 100 Standard Screw M4 M4 Quantity 4 4 ! G Standard dimensions for assembly are...
...needed depends on their specifications. G When purchasing our wall mount kit, a detailed installation manual and all parts necessary for wall mount kits are provided. Do not tighten the screws too much. G LG is not liable for these kinds of the screws may differ depending on the wall ... included with the installation instructions. 14 It may damage the TV or allow the TV to the wall in the table. A B PREPARATION Product LCD TV Model 26LG3DCH, 32LG3DCH 32LG3DC 22LG3DCH VESA (A * B) 200 * 100 100 * 100 Standard Screw M4 M4 Quantity 4 4 ! G Standard dimensions for assembly are...

User Manual
Page 19
... SERVUCE ONLY RS-232C IN (SERVICE ONLY) 2. I Select Component input source using the INPUT button on the digital set-top box. (Refer to the owner's manual for 32LG3DC model. EXTERNAL EQUIPMENT SETUP Component Connection (Except 22LG3DCH) 1. Match the jack colors (Y = green, PB = blue, and PR = red). How to use I Turn on...
... SERVUCE ONLY RS-232C IN (SERVICE ONLY) 2. I Select Component input source using the INPUT button on the digital set-top box. (Refer to the owner's manual for 32LG3DC model. EXTERNAL EQUIPMENT SETUP Component Connection (Except 22LG3DCH) 1. Match the jack colors (Y = green, PB = blue, and PR = red). How to use I Turn on...

User Manual
Page 20
... supports both audio and video. 2. EXTERNAL EQUIPMENT SETUP EXTERNAL EQUIPMENT SETUP HDMI Connection 1. How to connect 1 Connect the digital set-top box to the owner's manual for the digital set -top box. (Refer to HDMI/DVI IN jack on the remote control. ( ) COMPONENT IN AV IN 1 S-VIDEO HDMI/DVI IN UPDATE...
... supports both audio and video. 2. EXTERNAL EQUIPMENT SETUP EXTERNAL EQUIPMENT SETUP HDMI Connection 1. How to connect 1 Connect the digital set-top box to the owner's manual for the digital set -top box. (Refer to HDMI/DVI IN jack on the remote control. ( ) COMPONENT IN AV IN 1 S-VIDEO HDMI/DVI IN UPDATE...

User Manual
Page 21
... set-top box to the HDMI/DVI IN jack on the TV. 2 Connect the audio output of the digital set-top box to the owner's manual for this connection. How to use I Turn on the digital set -top box.) I Select the H D M I input source on the TV using the INPUT button on... the TV. 2. COMPONENT IN AV IN 1 S-VIDEO 26/32LG3DCH, 32LG3DC model USB IN HDMI/DVI IN SERVUCE ONLY RS-232C IN (SERVICE ONLY) AUDIO (MONO) VIDEO RGB IN (PC) 1 VIDEO AUDIO AUDIO IN (RGB...
... set-top box to the HDMI/DVI IN jack on the TV. 2 Connect the audio output of the digital set-top box to the owner's manual for this connection. How to use I Turn on the digital set -top box.) I Select the H D M I input source on the TV using the INPUT button on... the TV. 2. COMPONENT IN AV IN 1 S-VIDEO 26/32LG3DCH, 32LG3DC model USB IN HDMI/DVI IN SERVUCE ONLY RS-232C IN (SERVICE ONLY) AUDIO (MONO) VIDEO RGB IN (PC) 1 VIDEO AUDIO AUDIO IN (RGB...

User Manual
Page 22
...) VIDEO AUDIO AUDIO IN (RGB/DVI) CO COMPONENT AV IN 1 Component Input ports To get better picture quality, connect a DVD player to the DVD player's manual for operating instructions. I Turn on the TV. 2. I Refer to the component input ports as shown below. Component ports on the TV Y Y Video output ports Y on...
...) VIDEO AUDIO AUDIO IN (RGB/DVI) CO COMPONENT AV IN 1 Component Input ports To get better picture quality, connect a DVD player to the DVD player's manual for operating instructions. I Turn on the TV. 2. I Refer to the component input ports as shown below. Component ports on the TV Y Y Video output ports Y on...

User Manual
Page 23
...the remote control. I Select the HDMI input source on the TV using the INPUT button on the remote control. How to the DVD player's manual for operating instructions. How to connect 1 Connect the HDMI output of the DVD to the HDMI/DVI IN jack on the DVD player, insert ...a DVD. I Refer to use I Turn on the TV. 2 No separate audio connection is necessary. How to the DVD player's manual for operating instructions. COMPONENT AAVV IN 1 IN COMPONENT IN AV IN 1 S-VIDEO S-VIDEO EXTERNAL EQUIPMENT SETUP HDMI/DVI IN USB IN SERVUCE ONLY AUDIO (MONO...
...the remote control. I Select the HDMI input source on the TV using the INPUT button on the remote control. How to the DVD player's manual for operating instructions. How to connect 1 Connect the HDMI output of the DVD to the HDMI/DVI IN jack on the DVD player, insert ...a DVD. I Refer to use I Turn on the TV. 2 No separate audio connection is necessary. How to the DVD player's manual for operating instructions. COMPONENT AAVV IN 1 IN COMPONENT IN AV IN 1 S-VIDEO S-VIDEO EXTERNAL EQUIPMENT SETUP HDMI/DVI IN USB IN SERVUCE ONLY AUDIO (MONO...
User Manual
Page 24
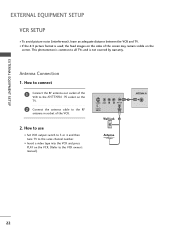
... to connect 1 Connect the RF antenna out socket of the screen may remain visible on the TV. 2 Connect the antenna cable to the VCR owner's manual.) 1 S-VIDEO VIDEO L R ANT OUT OUTPUT SWITCH ANT IN Wall Jack 2 ANTENNA IN M.P.I Set VCR output switch to 3 or 4 and then tune TV to all TVs...
... to connect 1 Connect the RF antenna out socket of the screen may remain visible on the TV. 2 Connect the antenna cable to the VCR owner's manual.) 1 S-VIDEO VIDEO L R ANT OUT OUTPUT SWITCH ANT IN Wall Jack 2 ANTENNA IN M.P.I Set VCR output switch to 3 or 4 and then tune TV to all TVs...

User Manual
Page 25
... event that you have a mono VCR, connect the audio cable from the VCR to the AUDIO L(MONO) jack of the VCR to the VCR owner's manual.) I Select the A V 1 input source on the TV using the INPUT button on the remote control. NOTE G If you connect both Video and S-Video at the... same time. How to use I Insert a video tape into the VCR and press PLAY on the VCR. (Refer to the VCR owner's manual.) I Select the A V or A V 1 input source on the TV using the INPUT button on the TV. 2. COMPONENT AAVV IN 1 COMPONENT AAVV INN11 S-VIDEO AUDIO (MONO) VIDEO...
... event that you have a mono VCR, connect the audio cable from the VCR to the AUDIO L(MONO) jack of the VCR to the VCR owner's manual.) I Select the A V 1 input source on the TV using the INPUT button on the remote control. NOTE G If you connect both Video and S-Video at the... same time. How to use I Insert a video tape into the VCR and press PLAY on the VCR. (Refer to the VCR owner's manual.) I Select the A V or A V 1 input source on the TV using the INPUT button on the TV. 2. COMPONENT AAVV IN 1 COMPONENT AAVV INN11 S-VIDEO AUDIO (MONO) VIDEO...
User Manual
Page 31
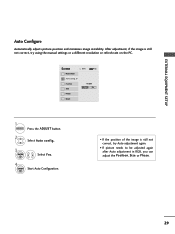
... picture position and minimizes image instability. G Position Size Phase Reset Move MENU Prev. After adjustment, if the image is still not correct, try using the manual settings or a different resolution or refresh rate on the PC. Screen Resolution Auto config. To Set Yes No 1 ADJUST Press the A D J U S T button. 2 Select Auto config...
... picture position and minimizes image instability. G Position Size Phase Reset Move MENU Prev. After adjustment, if the image is still not correct, try using the manual settings or a different resolution or refresh rate on the PC. Screen Resolution Auto config. To Set Yes No 1 ADJUST Press the A D J U S T button. 2 Select Auto config...
User Manual
Page 32
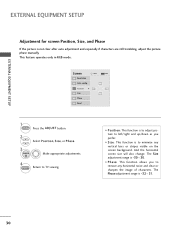
.../down as you to TV viewing. I S i z e: This function is not clear after auto adjustment and especially if characters are still trembling, adjust the picture phase manually. This feature operates only in RGB mode. Position G Size Phase Reset Move MENU Prev. D F G E 1 ADJUST Press the A D J U S T button. 2 Select Position, S i z e, or Phase. 3 ENTER Make appropriate...
.../down as you to TV viewing. I S i z e: This function is not clear after auto adjustment and especially if characters are still trembling, adjust the picture phase manually. This feature operates only in RGB mode. Position G Size Phase Reset Move MENU Prev. D F G E 1 ADJUST Press the A D J U S T button. 2 Select Position, S i z e, or Phase. 3 ENTER Make appropriate...
User Manual
Page 38
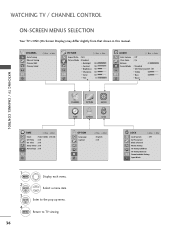
CHANNEL Auto Tuning Manual Tuning Channel Edit Channel Label Move Enter PICTURE Move Aspect Ratio : 16:9 Picture Mode : Standard • Backlight • Contrast • Brightness • Sharpness • Color &#... Rating Input Block WATCHING TV / CHANNEL CONTROL ON-SCREEN MENUS SELECTION Your TV's OSD (On Screen Display) may differ slightly from that shown in this manual.
CHANNEL Auto Tuning Manual Tuning Channel Edit Channel Label Move Enter PICTURE Move Aspect Ratio : 16:9 Picture Mode : Standard • Backlight • Contrast • Brightness • Sharpness • Color &#... Rating Input Block WATCHING TV / CHANNEL CONTROL ON-SCREEN MENUS SELECTION Your TV's OSD (On Screen Display) may differ slightly from that shown in this manual.
User Manual
Page 39
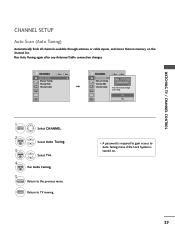
... No 1 MENU Select CHANNEL. 2 ENTER Select Auto Tuning. 3 ENTER Select Y e s. 4 ENTER Run A u t o t u n i n g. 5 RETURN Return to TV viewing. CHANNEL Auto Tuning Manual Tuning Channel Edit Channel Label Move Enter CHANNEL Auto Tuning Manual Tuning Channel Edit Channel Label Move Enter Press 'Yes' button to Auto Tuning menu if the Lock System is required...
... No 1 MENU Select CHANNEL. 2 ENTER Select Auto Tuning. 3 ENTER Select Y e s. 4 ENTER Run A u t o t u n i n g. 5 RETURN Return to TV viewing. CHANNEL Auto Tuning Manual Tuning Channel Edit Channel Label Move Enter CHANNEL Auto Tuning Manual Tuning Channel Edit Channel Label Move Enter Press 'Yes' button to Auto Tuning menu if the Lock System is required...
User Manual
Page 40
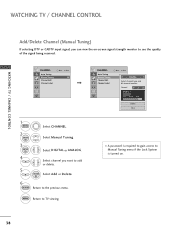
...Move Enter F DIGITAL G Select channel type and RF-channel number. Select Manual Tuning. 3 ENTER 4 5 Select DIGITAL or ANALOG. WATCHING TV / CHANNEL CONTROL WATCHING TV / CHANNEL CONTROL Add/Delete Channel (Manual Tuning) If selecting DTV or CADTV input signal, you want to see ... Close I A password is turned on -screen signal strength monitor to add or delete. MENU Return to Manual Tuning menu if the Lock System is required to gain access to TV viewing. CHANNEL Auto Tuning Manual Tuning Channel Edit Channel Label Move Enter 1 MENU 2 ENTER Select CHANNEL. ENTER Select A d d or...
...Move Enter F DIGITAL G Select channel type and RF-channel number. Select Manual Tuning. 3 ENTER 4 5 Select DIGITAL or ANALOG. WATCHING TV / CHANNEL CONTROL WATCHING TV / CHANNEL CONTROL Add/Delete Channel (Manual Tuning) If selecting DTV or CADTV input signal, you want to see ... Close I A password is turned on -screen signal strength monitor to add or delete. MENU Return to Manual Tuning menu if the Lock System is required to gain access to TV viewing. CHANNEL Auto Tuning Manual Tuning Channel Edit Channel Label Move Enter 1 MENU 2 ENTER Select CHANNEL. ENTER Select A d d or...

User Manual
Page 41
... The channels in the Custom List are displayed in black and the channels deleted from the Custom List are displayed in gray. CHANNEL Auto Tuning Manual Tuning Channel Edit Channel Label Move Enter Add/Delete Move CH + Move Page MENU Previous RETURN EXIT 1 MENU 2 ENTER Select CHANNEL. WATCHING TV / CHANNEL CONTROL...
... The channels in the Custom List are displayed in black and the channels deleted from the Custom List are displayed in gray. CHANNEL Auto Tuning Manual Tuning Channel Edit Channel Label Move Enter Add/Delete Move CH + Move Page MENU Previous RETURN EXIT 1 MENU 2 ENTER Select CHANNEL. WATCHING TV / CHANNEL CONTROL...
User Manual
Page 42
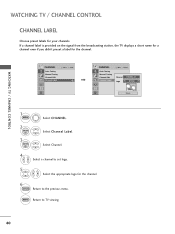
... for a channel even if you didn't preset a label for the channel. 6 RETURN Return to TV viewing. 40 CHANNEL Auto Tuning Manual Tuning Channel Edit Channel Label Move Enter CHANNEL Auto Tuning Manual Tuning Channel Edit Channel Label Move Enter Channel DIGITAL 2-1 Logo F Disney G Close 1 MENU 2 ENTER 3 ENTER Select CHANNEL. WATCHING TV / CHANNEL...
... for a channel even if you didn't preset a label for the channel. 6 RETURN Return to TV viewing. 40 CHANNEL Auto Tuning Manual Tuning Channel Edit Channel Label Move Enter CHANNEL Auto Tuning Manual Tuning Channel Edit Channel Label Move Enter Channel DIGITAL 2-1 Logo F Disney G Close 1 MENU 2 ENTER 3 ENTER Select CHANNEL. WATCHING TV / CHANNEL...

User Manual
Page 47
Preset There are factory presets for picture settings available in the PICTURE menu. 45 I You can use a preset, change each setting manually. You can also adjust Picture Mode in the user menus. Vivid 1 PICTURE Press the PICTURE button repeatedly to select the picture options : Vivid, Standard, Cinema, Sport, Game and Expert1-2. 2 RETURN Return to TV viewing. PICTURE CONTROL PRESET PICTURE SETTINGS Picture Mode -
Preset There are factory presets for picture settings available in the PICTURE menu. 45 I You can use a preset, change each setting manually. You can also adjust Picture Mode in the user menus. Vivid 1 PICTURE Press the PICTURE button repeatedly to select the picture options : Vivid, Standard, Cinema, Sport, Game and Expert1-2. 2 RETURN Return to TV viewing. PICTURE CONTROL PRESET PICTURE SETTINGS Picture Mode -


