

Owner's Manual (English)
Page 2
... the cable ground shall be of sufficient magnitude to which can radiate radio frequency energy and, if not installed and used in the literature accompanying the appliance. COMPLIANCE: The responsible party for compliance could void the user's authority to operate this equipment does cause harmful interference to Part 15 of the following measures: - The code provides guidelines for help...
... the cable ground shall be of sufficient magnitude to which can radiate radio frequency energy and, if not installed and used in the literature accompanying the appliance. COMPLIANCE: The responsible party for compliance could void the user's authority to operate this equipment does cause harmful interference to Part 15 of the following measures: - The code provides guidelines for help...

Owner's Manual (English)
Page 5
... a wall Desktop Pedestal Installation Basic Connection Antenna or Cable Connection VCR Setup External AV Source Setup DVD Setup HDSTB Setup AV Out Setup Digital Audio Output PC Setup 29 29 29 29 30 31 31 32 33 33 34 35 35~36 37 38 39 40 41 41~42 43 43 Turning on the TV Volume Adjustment Channel Selection On Screen Menus Language Selection On Screen Menus Selection and Adjustment EZ Scan (Channel Search) Manual Scan Channel Edit DTV Signal Strength Input Source Input Label Auto Picture Control(EZ Picture) Color Temperature Control...
... a wall Desktop Pedestal Installation Basic Connection Antenna or Cable Connection VCR Setup External AV Source Setup DVD Setup HDSTB Setup AV Out Setup Digital Audio Output PC Setup 29 29 29 29 30 31 31 32 33 33 34 35 35~36 37 38 39 40 41 41~42 43 43 Turning on the TV Volume Adjustment Channel Selection On Screen Menus Language Selection On Screen Menus Selection and Adjustment EZ Scan (Channel Search) Manual Scan Channel Edit DTV Signal Strength Input Source Input Label Auto Picture Control(EZ Picture) Color Temperature Control...

Owner's Manual (English)
Page 7
... a cushioned surface that excessive power may cause scratch or discoloration. TV AUDIO PO CABMLEODDEVD 1.5VMENU GUIDE ENTER STB DAY+ RATIO TIMER EXIT VOL MUTE CC PAGE INFO 1 FAV 4 7 2 PAGE CH 5 EZ ADJUST PIC EZ APM SOUND 0 SAP 8 9 FLASHBK 6 3 FREEZE Remote Control / For 42PC3D/3DC/3DV, For 32/37/42LC2D, 32LC2DU Batteries 50PC3D 42LC2D only 32LC2D/U only 2-Wall brackets 2-eye-bolts 42PC3D/3DC/3DV...
... a cushioned surface that excessive power may cause scratch or discoloration. TV AUDIO PO CABMLEODDEVD 1.5VMENU GUIDE ENTER STB DAY+ RATIO TIMER EXIT VOL MUTE CC PAGE INFO 1 FAV 4 7 2 PAGE CH 5 EZ ADJUST PIC EZ APM SOUND 0 SAP 8 9 FLASHBK 6 3 FREEZE Remote Control / For 42PC3D/3DC/3DV, For 32/37/42LC2D, 32LC2DU Batteries 50PC3D 42LC2D only 32LC2D/U only 2-Wall brackets 2-eye-bolts 42PC3D/3DC/3DV...

Owner's Manual (English)
Page 9
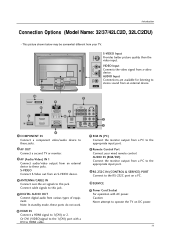
...digital audio from an external device. Connect cable signals to these jacks. This picture shown below may be somewhat different from an external device to this jack. COMPONENT IN AV OUT AV IN 1 COMPONENT IN AV OUT AV IN 1 10 SERVICE 6 4 ANTENNA/ CABLE IN HDMI IN 2 1(DVI) 7 RGB IN 5 8 (CONTROL & SERVICE) 9 OPTICAL OUT 1 VIDEO AUDIO VIDEO AUDIO 2 (MONO) 3 S-VIDEO VIDEO AUDIO S-VIDEO VIDEO ( ) AUDIO 1 COMPONENT IN Connect a component video/audio device to the RS-232C port on DC power. AUDIO IN (RGB/DVI) Connect the monitor output from a PC to the appropriate input...
...digital audio from an external device. Connect cable signals to these jacks. This picture shown below may be somewhat different from an external device to this jack. COMPONENT IN AV OUT AV IN 1 COMPONENT IN AV OUT AV IN 1 10 SERVICE 6 4 ANTENNA/ CABLE IN HDMI IN 2 1(DVI) 7 RGB IN 5 8 (CONTROL & SERVICE) 9 OPTICAL OUT 1 VIDEO AUDIO VIDEO AUDIO 2 (MONO) 3 S-VIDEO VIDEO AUDIO S-VIDEO VIDEO ( ) AUDIO 1 COMPONENT IN Connect a component video/audio device to the RS-232C port on DC power. AUDIO IN (RGB/DVI) Connect the monitor output from a PC to the appropriate input...
Owner's Manual (English)
Page 11
... 2 ANTENNA/ 1(DVI) OPTICAL CABLE IN RS-232C IN (CONTROL & SERVICE) DIGITAL AUDIO OUT S-VIDEO VIDEO (MONO) AUDIO 3 AV OUT 1 COMPONENT IN Connect a component these jacks. 9 video/audio device toS-VIDEO VIDEO AV IN 1 7 RGB IN (PC) ( ) AUDIO Connect the monitor output from a PC to the appropriate input port. 2 AV OUT Connect a second TV or monitor. 3 AV (Audio/Video) IN 1 Connect audio/video output from a PC to the appropriate input port. 9 RS-232C IN (CONTROL & SERVICE) PORT Connect to the RS-232C port on DC power. 6 HDMI IN Connect a HDMI signal to these ports do not work...
... 2 ANTENNA/ 1(DVI) OPTICAL CABLE IN RS-232C IN (CONTROL & SERVICE) DIGITAL AUDIO OUT S-VIDEO VIDEO (MONO) AUDIO 3 AV OUT 1 COMPONENT IN Connect a component these jacks. 9 video/audio device toS-VIDEO VIDEO AV IN 1 7 RGB IN (PC) ( ) AUDIO Connect the monitor output from a PC to the appropriate input port. 2 AV OUT Connect a second TV or monitor. 3 AV (Audio/Video) IN 1 Connect audio/video output from a PC to the appropriate input port. 9 RS-232C IN (CONTROL & SERVICE) PORT Connect to the RS-232C port on DC power. 6 HDMI IN Connect a HDMI signal to these ports do not work...
Owner's Manual (English)
Page 19
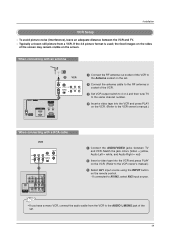
... & SERVICE) AUDIO IN REMOTE (RGB/DVI) CONTROL IN HDMI / DVI IN ANTENNA/ CABLE IN RS-232C IN When connecting with a (CONTROL&SERVICE) RCA cable 1 Connect the RF antenna out socket of the VCR to the Antenna socket on the set. 2 Connect the antenna cable to the RF antenna in socket of the set. If the 4:3 picture format is used; Match the jack colors (Video = yellow, Audio Left = white, and Audio Right = red) 2 Insert a video tape into the VCR and press PLAY on the screen. VIDEO AUDIO OPTICAL DIGITAL AUDIO VIDEOS-VIDEO OUT ( ) VIDAEUODIO AUDIO...
... & SERVICE) AUDIO IN REMOTE (RGB/DVI) CONTROL IN HDMI / DVI IN ANTENNA/ CABLE IN RS-232C IN When connecting with a (CONTROL&SERVICE) RCA cable 1 Connect the RF antenna out socket of the VCR to the Antenna socket on the set. 2 Connect the antenna cable to the RF antenna in socket of the set. If the 4:3 picture format is used; Match the jack colors (Video = yellow, Audio Left = white, and Audio Right = red) 2 Insert a video tape into the VCR and press PLAY on the screen. VIDEO AUDIO OPTICAL DIGITAL AUDIO VIDEOS-VIDEO OUT ( ) VIDAEUODIO AUDIO...

Owner's Manual (English)
Page 20
...RCA cable) input. 2 Connect the audio outputs of the VCR to the SVIDEO input on the set . 3 Insert a video tape into the VCR and press PLAY on the VCR. (Refer to the VCR owner's manual.) 4 Select AV1 input source with using the INPUT button on the remote control. - If connected to AV IN1 input, select AV1 input source. 3 Operate the corresponding external equipment. External AV Source Setup Camcorder Video Game Set 1 L AUDIO R VIDEO 1 Connect the AUDIO/VIDEO jacks between TV and external equipment. Installation COMPONENT IN AV OUT AV IN 1 VIDEO AUDIO OPTICAL DIGITAL AUDIO...
...RCA cable) input. 2 Connect the audio outputs of the VCR to the SVIDEO input on the set . 3 Insert a video tape into the VCR and press PLAY on the VCR. (Refer to the VCR owner's manual.) 4 Select AV1 input source with using the INPUT button on the remote control. - If connected to AV IN1 input, select AV1 input source. 3 Operate the corresponding external equipment. External AV Source Setup Camcorder Video Game Set 1 L AUDIO R VIDEO 1 Connect the AUDIO/VIDEO jacks between TV and external equipment. Installation COMPONENT IN AV OUT AV IN 1 VIDEO AUDIO OPTICAL DIGITAL AUDIO...
Owner's Manual (English)
Page 21
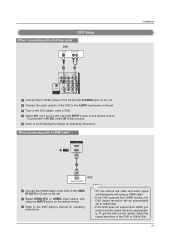
... 2 jack on the set. 2 Select HDMI1/DVI or HDMI2 input source with using the INPUT button on the remote control. - To get the best picture quality, adjust the output resolution of the DVD to set the output resolution appropriately. VIDEO AUDIO COMPONENT IN AV OUT AV IN 1 OPTICAL DIGITAL AUDIO OUT S-VIDEO VIDEO ( ) AUDIO • TV can receive the video and audio signal simultaneously with using a HDMI cable. • If the DVD supports Auto HDMI function, the DVD output resolution will be automatically set to 1280x720p. • If the DVD does not support Auto HDMI, you need...
... 2 jack on the set. 2 Select HDMI1/DVI or HDMI2 input source with using the INPUT button on the remote control. - To get the best picture quality, adjust the output resolution of the DVD to set the output resolution appropriately. VIDEO AUDIO COMPONENT IN AV OUT AV IN 1 OPTICAL DIGITAL AUDIO OUT S-VIDEO VIDEO ( ) AUDIO • TV can receive the video and audio signal simultaneously with using a HDMI cable. • If the DVD supports Auto HDMI function, the DVD output resolution will be automatically set to 1280x720p. • If the DVD does not support Auto HDMI, you need...

Owner's Manual (English)
Page 23
... audio signal simultaneously using the INPUT button on the set -top box or other digital external device, refer to 1280x720p. To get the best picture quality, adjust the output resolution of the digital set-top box will be automatically set to the COMPONENT IN AUDIO jacks on the remote control. - When connecting with using a HDMI cable. • If the digital set-top box supports Auto HDMI function, output resolution of the digital set -top box. However, if you need to set -top box to 1280x720p. • If the digital set-top box does not support Auto HDMI...
... audio signal simultaneously using the INPUT button on the set -top box or other digital external device, refer to 1280x720p. To get the best picture quality, adjust the output resolution of the digital set-top box will be automatically set to the COMPONENT IN AUDIO jacks on the remote control. - When connecting with using a HDMI cable. • If the digital set-top box supports Auto HDMI function, output resolution of the digital set -top box. However, if you need to set -top box to 1280x720p. • If the digital set-top box does not support Auto HDMI...

Owner's Manual (English)
Page 24
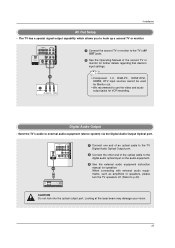
Installation VIDEO AUDIO OPTICAL DIGITAL AUDIO OUT S-VIDEO VIDEO ( ) AUDIO When connecting with using the INPUT button on the digital set-top box. (Refer to set the output resolution appropriately. RGB IN 3 Turn on the remote control. To get the best picture quality, adjust the output resolution of the set-top box to the AUDIO IN(RGB/DVI) jack on the set -top box.) REMORTEGBAIUNDIO IN CONTROL IN (RGB/DVI) 4 Select HDMI1/DVI input source with a HDMI to DVI cable SERVICE HDMI IN 2 1(DVI) 1 RGB IN (PC) AUDIO IN REMOTE (RGB/DVI) CONTROL IN RS-232C IN (CONTROL & SERVICE) 2 ...
Installation VIDEO AUDIO OPTICAL DIGITAL AUDIO OUT S-VIDEO VIDEO ( ) AUDIO When connecting with using the INPUT button on the digital set-top box. (Refer to set the output resolution appropriately. RGB IN 3 Turn on the remote control. To get the best picture quality, adjust the output resolution of the set-top box to the AUDIO IN(RGB/DVI) jack on the set -top box.) REMORTEGBAIUNDIO IN CONTROL IN (RGB/DVI) 4 Select HDMI1/DVI input source with a HDMI to DVI cable SERVICE HDMI IN 2 1(DVI) 1 RGB IN (PC) AUDIO IN REMOTE (RGB/DVI) CONTROL IN RS-232C IN (CONTROL & SERVICE) 2 ...
Owner's Manual (English)
Page 25
... optical cable to the TV Digital Audio Optical Output port. 2 Connect the other end of the second TV or monitor for further details regarding that device's input settings. 1/2 S-VIDEO IN (R) AUDIO (L) VIDEO • Component 1-2, RGB-PC, HDMI1/DVI, HDMI2, DTV input sources cannot be used for Monitor out. • We recommend to use the video and audio output jacks for operation. Digital Audio Output - Installation AV Out Setup - Send the TV's audio to the digital audio optical input on the audio equipment. 3 See the external audio equipment instruction manual for VCR...
... optical cable to the TV Digital Audio Optical Output port. 2 Connect the other end of the second TV or monitor for further details regarding that device's input settings. 1/2 S-VIDEO IN (R) AUDIO (L) VIDEO • Component 1-2, RGB-PC, HDMI1/DVI, HDMI2, DTV input sources cannot be used for Monitor out. • We recommend to use the video and audio output jacks for operation. Digital Audio Output - Installation AV Out Setup - Send the TV's audio to the digital audio optical input on the audio equipment. 3 See the external audio equipment instruction manual for VCR...
Owner's Manual (English)
Page 26
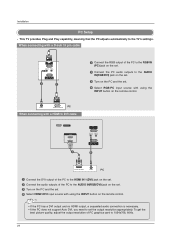
... not support Auto DVI, you need to the TV's settings. This TV provides Plug and Play capability, meaning that the PC adjusts automatically to set . 4 Select HDMI1/DVI input source with using the INPUT button on the remote control. AUDIO RGB-PC OUTPUT PC When connecting with a HDMI to DVI cable SERVICE HDMI IN 2 1(DVI) 1 RGB IN (PC) AUDIO IN REMOTE (RGB/DVI) CONTROL IN RS-232C IN (CONTROL & SERVICE) 2 DVI-PC OUTPUT AUDIO PC 1 Connect the DVI output of the PC to the HDMI IN 1(DVI) jack on the set. 2 Connect the audio outputs...
... not support Auto DVI, you need to the TV's settings. This TV provides Plug and Play capability, meaning that the PC adjusts automatically to set . 4 Select HDMI1/DVI input source with using the INPUT button on the remote control. AUDIO RGB-PC OUTPUT PC When connecting with a HDMI to DVI cable SERVICE HDMI IN 2 1(DVI) 1 RGB IN (PC) AUDIO IN REMOTE (RGB/DVI) CONTROL IN RS-232C IN (CONTROL & SERVICE) 2 DVI-PC OUTPUT AUDIO PC 1 Connect the DVI output of the PC to the HDMI IN 1(DVI) jack on the set. 2 Connect the audio outputs...
Owner's Manual (English)
Page 27
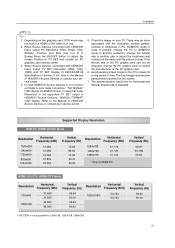
... SET Resolution (480p, 720p, 1080i) and TV SET Display fit EIA/CEA-861-B Specification to adjust the screen Position of the PC graphic card. 6. In case HDMI/DVI Source Devices is not supported TV SET output in HDMI/DVI Input. In case that Video Resolution is not connected Cable or poor cable connection, "NO SIGNAL" OSD display in HDMI/DVI Source Devices, "INVALID FORMAT" OSD display. There may become permanently imprinted on your TV. The fixed image may be changed, change...
... SET Resolution (480p, 720p, 1080i) and TV SET Display fit EIA/CEA-861-B Specification to adjust the screen Position of the PC graphic card. 6. In case HDMI/DVI Source Devices is not supported TV SET output in HDMI/DVI Input. In case that Video Resolution is not connected Cable or poor cable connection, "NO SIGNAL" OSD display in HDMI/DVI Source Devices, "INVALID FORMAT" OSD display. There may become permanently imprinted on your TV. The fixed image may be changed, change...
Owner's Manual (English)
Page 28
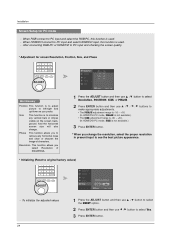
... the image of characters. Installation Screen Setup for screen Resolution, Position, Size, and Phase 4 5 6 7 8 9 0 FLASHBK EZ PIC EZ SOUND SAP CC ADJUST ADJUST Mini Glossary Position This function is to original factory values) 1 2 3 4 5 6 7 8 9 0 FLASHBK EZ PIC EZ SOUND SAP CC ADJUST ADJUST - After connecting RGB-PC or HDMI/DVI to PC input and checking the screen quality. * Adjustment for PC mode - To initialize the adjusted values 28 1 Press the ADJUST button and then use D / E button to select the RESET option...
... the image of characters. Installation Screen Setup for screen Resolution, Position, Size, and Phase 4 5 6 7 8 9 0 FLASHBK EZ PIC EZ SOUND SAP CC ADJUST ADJUST Mini Glossary Position This function is to original factory values) 1 2 3 4 5 6 7 8 9 0 FLASHBK EZ PIC EZ SOUND SAP CC ADJUST ADJUST - After connecting RGB-PC or HDMI/DVI to PC input and checking the screen quality. * Adjustment for PC mode - To initialize the adjusted values 28 1 Press the ADJUST button and then use D / E button to select the RESET option...
Owner's Manual (English)
Page 29
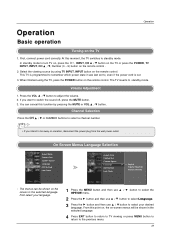
... use D / E button to adjust the volume. 2. When finished using TV INPUT, INPUT button on vacation, disconnect the power plug from the wall power outlet. Press the VOL D / E button to select your desired language. If you intend to switch the sound off, press the MUTE button. 3. Channel Selection Press the CH D / E or NUMBER buttons to select a channel number. • If you want to be away on the remote control. First, connect power cord correctly. The TV reverts to the previous menu...
... use D / E button to adjust the volume. 2. When finished using TV INPUT, INPUT button on vacation, disconnect the power plug from the wall power outlet. Press the VOL D / E button to select your desired language. If you intend to switch the sound off, press the MUTE button. 3. Channel Selection Press the CH D / E or NUMBER buttons to select a channel number. • If you want to be away on the remote control. First, connect power cord correctly. The TV reverts to the previous menu...

Owner's Manual (English)
Page 30
Press the MENU button and then D / E button to display the available menus. EZ Scan Manual Scan Channel Edit DTV Signal Input Source Input Label Set ID EZ Picture Color Temperature XD Advanced Video Reset Lock System Set Password Block Channel Movie Rating TV Rating-Children TV Rating-General Input Block Audio Language EZ Sound Balance TV Speaker Aspect Ratio Caption/Text Caption Option Language ISM Method Low Power Auto Clock Manual Clock Off Timer On Timer Sleep Timer Auto Off • Your TV's OSD (On Screen Display) may differ...
Press the MENU button and then D / E button to display the available menus. EZ Scan Manual Scan Channel Edit DTV Signal Input Source Input Label Set ID EZ Picture Color Temperature XD Advanced Video Reset Lock System Set Password Block Channel Movie Rating TV Rating-Children TV Rating-General Input Block Audio Language EZ Sound Balance TV Speaker Aspect Ratio Caption/Text Caption Option Language ISM Method Low Power Auto Clock Manual Clock Off Timer On Timer Sleep Timer Auto Off • Your TV's OSD (On Screen Display) may differ...

Owner's Manual (English)
Page 51
...default setting is used to block specific channels, ratings and other viewing sources. Movies that have been shown at the theaters or direct-to TV-PG, TV14, TV-MA) • Sex- sexual situations (applies to TV-PG, TV-14, TV-MA) • Violence (applies to TV-PG, TV-14, TV-MA) Input Block • AV1, 2 (On, Off) • Component...-MA) • Dialogue- adult language (applies to -video movies use this function, the following must be done : 1. Operation Lock Menu Options Parental Control can be used to block program viewing based on the ratings sent by the broadcasting station.
...default setting is used to block specific channels, ratings and other viewing sources. Movies that have been shown at the theaters or direct-to TV-PG, TV14, TV-MA) • Sex- sexual situations (applies to TV-PG, TV-14, TV-MA) • Violence (applies to TV-PG, TV-14, TV-MA) Input Block • AV1, 2 (On, Off) • Component...-MA) • Dialogue- adult language (applies to -video movies use this function, the following must be done : 1. Operation Lock Menu Options Parental Control can be used to block program viewing based on the ratings sent by the broadcasting station.

Owner's Manual (English)
Page 52
... by inputting a new password twice. • Block Channel: Select a channel number that the movie ratings limit only applies to movies shown on TV, not TV programs, such as requested. • The TV is selected, change the settings to your children can set up . sub menu, your preference. • Lock System: Activates or disables the blocking scheme you to select a source to block specific channels, ratings, and external viewing...
... by inputting a new password twice. • Block Channel: Select a channel number that the movie ratings limit only applies to movies shown on TV, not TV programs, such as requested. • The TV is selected, change the settings to your children can set up . sub menu, your preference. • Lock System: Activates or disables the blocking scheme you to select a source to block specific channels, ratings, and external viewing...

Owner's Manual (English)
Page 61
... Remote G The remote control is blinked at a time. Programming code numbers for 20 seconds, the button selected component will turn off . 5 Press the MENU button to see if the component responds properly. Note that the remote control may not control all models of other brands. If not, repeat from step 2. 4 Enter a code number using the number buttons on the following pages. MENU BRIGHT + ENTER EXIT TIMER RATIO INFO VOL MUTE FAV CH 1 2 3 4 5 6 7 8 9 0 FLASHBK EZ PIC EZ SOUND SAP CC ADJUST...
... Remote G The remote control is blinked at a time. Programming code numbers for 20 seconds, the button selected component will turn off . 5 Press the MENU button to see if the component responds properly. Note that the remote control may not control all models of other brands. If not, repeat from step 2. 4 Enter a code number using the number buttons on the following pages. MENU BRIGHT + ENTER EXIT TIMER RATIO INFO VOL MUTE FAV CH 1 2 3 4 5 6 7 8 9 0 FLASHBK EZ PIC EZ SOUND SAP CC ADJUST...

Owner's Manual (English)
Page 64
... another channel. Horizontal/vertical bars or pic- The remote control doesn't work • Check to see if there is any function to -)? • Correct remote operating mode set ? • Check the power control settings. ture shaking • Check for sources of the antenna). 64 No or poor color or poor picture • Adjust Color in pictures • Check antenna (Change the direction of possible interference. Reference Troubleshooting Checklist The operation does not work .
... another channel. Horizontal/vertical bars or pic- The remote control doesn't work • Check to see if there is any function to -)? • Correct remote operating mode set ? • Check the power control settings. ture shaking • Check for sources of the antenna). 64 No or poor color or poor picture • Adjust Color in pictures • Check antenna (Change the direction of possible interference. Reference Troubleshooting Checklist The operation does not work .


