Owners Manual
Page 2
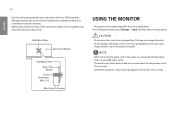
... on a Table Adjusting the Stand Height Adjusting the Angle Pivot Feature Using the Kensington Lock Installing the Wall Mount Plate Installing on the Wall USING THE MONITOR 14 --Connecting to a PC 15 HDMI Connection DisplayPort Connection --Connecting AV Devices 16 HDMI Connection --Connecting Peripherals 16 USB Device connection Connecting Headphones USER SETTINGS 18 --Activating the Main Menu 18 Main Menu Features --User Settings 20 Menu Settings TROUBLESHOOTING 32 PRODUCT SPECIFICATION....... 36 --Factory Support Mode 38 --HDMI Timing (Video 39 --Power LED 40 --Beep Guide 41
... on a Table Adjusting the Stand Height Adjusting the Angle Pivot Feature Using the Kensington Lock Installing the Wall Mount Plate Installing on the Wall USING THE MONITOR 14 --Connecting to a PC 15 HDMI Connection DisplayPort Connection --Connecting AV Devices 16 HDMI Connection --Connecting Peripherals 16 USB Device connection Connecting Headphones USER SETTINGS 18 --Activating the Main Menu 18 Main Menu Features --User Settings 20 Menu Settings TROUBLESHOOTING 32 PRODUCT SPECIFICATION....... 36 --Factory Support Mode 38 --HDMI Timing (Video 39 --Power LED 40 --Beep Guide 41
Owners Manual
Page 4
.... Please use genuine LG components to the source code, all product information and specifications contained in personal injury. •• When lifting or moving the monitor, do not touch the monitor screen. This offer is no peeled-off the stand and could result in this product, please visit http://opensource.lge.com. With no problem in this manual are subject to change to...
.... Please use genuine LG components to the source code, all product information and specifications contained in personal injury. •• When lifting or moving the monitor, do not touch the monitor screen. This offer is no peeled-off the stand and could result in this product, please visit http://opensource.lge.com. With no problem in this manual are subject to change to...
Owners Manual
Page 5
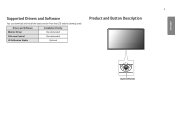
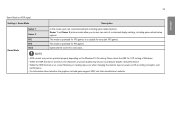
ENGLISH 5 Supported Drivers and Software You can download and install the latest version from the LGE website (www.lg.com). Drivers and Software Monitor Driver OnScreen Control LG Calibration Studio Installation Priority Recommended Recommended Optional Product and Button Description Joystick Button
ENGLISH 5 Supported Drivers and Software You can download and install the latest version from the LGE website (www.lg.com). Drivers and Software Monitor Driver OnScreen Control LG Calibration Studio Installation Priority Recommended Recommended Optional Product and Button Description Joystick Button
Owners Manual
Page 6
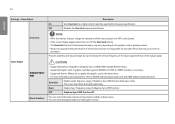
6 ENGLISH How to Use the Joystick Button You can control the volume by pressing the joystick button or moving it left / right. Power off Press and hold the panel itself. •• When holding the monitor, the screen should face away from you to prevent it from being scratched. •• When transporting the monitor, do not expose the monitor to shock or...
6 ENGLISH How to Use the Joystick Button You can control the volume by pressing the joystick button or moving it left / right. Power off Press and hold the panel itself. •• When holding the monitor, the screen should face away from you to prevent it from being scratched. •• When transporting the monitor, do not expose the monitor to shock or...
Owners Manual
Page 8
ENGLISH 8 CAUTION •• Unplug the power cord before moving or installing the monitor. There is risk of electric shock. •• Make sure to use the power cord that is provided in an upright position. 2 Handle the monitor with both hands for safety. Max. 110.0 mm (4.3 inches) WARNING •• When adjusting the screen height, do not place your hand on the stand base in the product...
ENGLISH 8 CAUTION •• Unplug the power cord before moving or installing the monitor. There is risk of electric shock. •• Make sure to use the power cord that is provided in an upright position. 2 Handle the monitor with both hands for safety. Max. 110.0 mm (4.3 inches) WARNING •• When adjusting the screen height, do not place your hand on the stand base in the product...
Owners Manual
Page 11
... you may injure your Windows operating system. You can be rotated easily using the Kensington security system cable. Connect the monitor to the Kensington lock owner's manual or visit the website at http://www.kensington.com. Note that some Windows versions and some graphics card drivers may use different settings for the Kensington security system is optional. ENGLISH 4 Complete the installation by jamming it between...
... you may injure your Windows operating system. You can be rotated easily using the Kensington security system cable. Connect the monitor to the Kensington lock owner's manual or visit the website at http://www.kensington.com. Note that some Windows versions and some graphics card drivers may use different settings for the Kensington security system is optional. ENGLISH 4 Complete the installation by jamming it between...
Owners Manual
Page 12
... the screen. Detailed installation instructions can be obtained from the wall and leave about 100 mm (3.94 inches) of the monitor to ensure sufficient ventilation. Installing on the Wall Install the monitor at each side of space at least 100 mm (3.94 inches) away from your local retail store. ENGLISH 12 Installing the Wall Mount Plate This monitor meets the specifications for how to install and set up a tilting wall mounting bracket...
... the screen. Detailed installation instructions can be obtained from the wall and leave about 100 mm (3.94 inches) of the monitor to ensure sufficient ventilation. Installing on the Wall Install the monitor at each side of space at least 100 mm (3.94 inches) away from your local retail store. ENGLISH 12 Installing the Wall Mount Plate This monitor meets the specifications for how to install and set up a tilting wall mounting bracket...
Owners Manual
Page 14
...; Use the wall mounting bracket and screws that conform to Settings → Input, and then select the input option. This is normal. •• Sometimes red, green, or blue spots may appear on the screen. Damage caused by the product warranty. •• When measured from the back of the monitor, the length of the Monitor Screw Dimensions : M4 x L10 Max. 8 mm (0.3 inches) USING THE MONITOR •...
...; Use the wall mounting bracket and screws that conform to Settings → Input, and then select the input option. This is normal. •• Sometimes red, green, or blue spots may appear on the screen. Damage caused by the product warranty. •• When measured from the back of the monitor, the length of the Monitor Screw Dimensions : M4 x L10 Max. 8 mm (0.3 inches) USING THE MONITOR •...
Owners Manual
Page 15
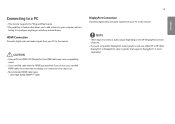
...; If you are using a Mini DisplayPort output graphics card, use a certified HDMI cable, the screen may not display or a connection error may occur. •• Recommended HDMI cable types -- HDMI Connection Transmits digital video and audio signals from your PC to HDMI cable may cause compatibility issues. •• Use a certified cable with the HDMI logo attached. Connecting to a PC •• This monitor supports the *Plug and Play feature. * Plug and Play: A feature that supports DisplayPort1.4. (sold separately) ENGLISH
...; If you are using a Mini DisplayPort output graphics card, use a certified HDMI cable, the screen may not display or a connection error may occur. •• Recommended HDMI cable types -- HDMI Connection Transmits digital video and audio signals from your PC to HDMI cable may cause compatibility issues. •• Use a certified cable with the HDMI logo attached. Connecting to a PC •• This monitor supports the *Plug and Play feature. * Plug and Play: A feature that supports DisplayPort1.4. (sold separately) ENGLISH
Owners Manual
Page 16
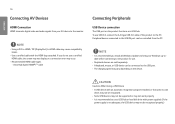
... install all Windows Updates to keep your AV device to HDMI cable may cause compatibility issues. •• Use a certified cable with power supplied. (If the power supply is recommended you do not use a certified HDMI cable, the screen may not display or a connection error may not be supported or may not work properly. •• It is recommended to use USB 3.0, connect the A-B type USB 3.0 cable of the product to the USB IN port can be connected to the USB port...
... install all Windows Updates to keep your AV device to HDMI cable may cause compatibility issues. •• Use a certified cable with power supplied. (If the power supply is recommended you do not use a certified HDMI cable, the screen may not display or a connection error may not be supported or may not work properly. •• It is recommended to use USB 3.0, connect the A-B type USB 3.0 cable of the product to the USB IN port can be connected to the USB port...
Owners Manual
Page 21
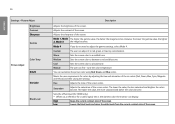
... the input mode. Sets Language, Hexagon Lighting, User-defined Key 1, User-defined Key 2, DTS Headphone:X, SMART ENERGY SAVING, Deep Sleep Mode, Power LED, Automatic Standby, Input Compatibility Version, Buzzer, OSD Lock, Information and Reset to the one optimized for a given feature. Adjusts the Brightness, Contrast, Sharpness, Gamma, Color Temp, R/G/B, Six Color, Black Level, Local Dimming, DFC and Picture Reset. Adjusts the Overclock, Adaptive-Sync/VRR, Black Stabilizer, Response Time, Crosshair, FPS Counter and Game Reset. Adjusts the aspect ratio of the screen. CAUTION...
... the input mode. Sets Language, Hexagon Lighting, User-defined Key 1, User-defined Key 2, DTS Headphone:X, SMART ENERGY SAVING, Deep Sleep Mode, Power LED, Automatic Standby, Input Compatibility Version, Buzzer, OSD Lock, Information and Reset to the one optimized for a given feature. Adjusts the Brightness, Contrast, Sharpness, Gamma, Color Temp, R/G/B, Six Color, Black Level, Local Dimming, DFC and Picture Reset. Adjusts the Overclock, Adaptive-Sync/VRR, Black Stabilizer, Response Time, Crosshair, FPS Counter and Game Reset. Adjusts the aspect ratio of the screen. CAUTION...
Owners Manual
Page 23
... vivid colors. Gamer 1 and Gamer 2 picture modes allow you to save two sets of Windows. •• When the HDR function is turned on, the characters or picture quality may be operated properly depending on the Windows10 OS setting. NOTE •• HDR content may occur when changing the monitor input or power on HDR signal. This mode is optimized for FPS games. It is on, screen flickering...
... vivid colors. Gamer 1 and Gamer 2 picture modes allow you to save two sets of Windows. •• When the HDR function is turned on, the characters or picture quality may be operated properly depending on the Windows10 OS setting. NOTE •• HDR content may occur when changing the monitor input or power on HDR signal. This mode is optimized for FPS games. It is on, screen flickering...
Owners Manual
Page 24
...;• Supported Version: Make sure to update the graphic card to the latest driver. •• For more information and requirement, refer to have better visibility in the GPU control panel. •• If the screen display appears abnormal, turn off . Off Disables the Overclock improvement feature. Basic Off Enables basic frequency range of the output signal. Provides seamless and natural images by the panel specification. Adaptive-Sync/VRR...
...;• Supported Version: Make sure to update the graphic card to the latest driver. •• For more information and requirement, refer to have better visibility in the GPU control panel. •• If the screen display appears abnormal, turn off . Off Disables the Overclock improvement feature. Basic Off Enables basic frequency range of the output signal. Provides seamless and natural images by the panel specification. Adaptive-Sync/VRR...
Owners Manual
Page 26
... Color Black Level Description Adjusts the brightness of the screen. Warm Sets the screen color to between a red and blue tone. Meets the user requirements for a video signal, this is the darkest color the monitor can adjust it to red, green, or blue by adjusting the hue and saturation of the screen colors. Adjusts the contrast of the screen. Medium Sets the screen color to a reddish tone. Cool Sets the screen color to adjust the gamma settings, select Mode 4. Manual The user can customize the picture color using Red, Green, and Blue colors...
... Color Black Level Description Adjusts the brightness of the screen. Warm Sets the screen color to between a red and blue tone. Meets the user requirements for a video signal, this is the darkest color the monitor can adjust it to red, green, or blue by adjusting the hue and saturation of the screen colors. Adjusts the contrast of the screen. Medium Sets the screen color to a reddish tone. Cool Sets the screen color to adjust the gamma settings, select Mode 4. Manual The user can customize the picture color using Red, Green, and Blue colors...
Owners Manual
Page 29
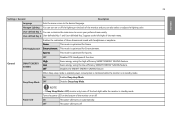
... the main menu to the desired language. User-defined Key 1 You can also select or adjust the lighting color. When Deep sleep mode is enabled, power consumption is minimized while the monitor is optimized for Sports. Power LED NOTE •• If Deep Sleep Mode is standby mode. Off The power LED turns off the lighting on or off the back light while the monitor is Off, monitor only turns off . Saves energy using the high...
... the main menu to the desired language. User-defined Key 1 You can also select or adjust the lighting color. When Deep sleep mode is enabled, power consumption is minimized while the monitor is optimized for Sports. Power LED NOTE •• If Deep Sleep Mode is standby mode. Off The power LED turns off the lighting on or off the back light while the monitor is Off, monitor only turns off . Saves energy using the high...
Owners Manual
Page 30
... turns off function. (8H, 6H, 4H and Off) Please set the sound generated from Buzzer when your monitor powers on the screen for the auto-off the monitor when there is no movement on . Off Disables your monitor's Buzzer. You can set a timer for a period of the connected external device. Input Compatibility HDMI Version DisplayPort 2.1(PC)/2.1(AV)/1.4 If you want to use the HDR, select the Input Compatibility...
... turns off function. (8H, 6H, 4H and Off) Please set the sound generated from Buzzer when your monitor powers on the screen for the auto-off the monitor when there is no movement on . Off Disables your monitor's Buzzer. You can set a timer for a period of the connected external device. Input Compatibility HDMI Version DisplayPort 2.1(PC)/2.1(AV)/1.4 If you want to use the HDR, select the Input Compatibility...
Owners Manual
Page 32
... power outlet. •• Check the power cable connection and press the power button. •• Check that the connected input is enabled (Settings > Input). •• If the monitor is in sleep mode, move the mouse, or press any key on the keyboard, to Off. Is the monitor's power cord plugged in the product owner's manual." Some features are out of the recommended horizontal or vertical frequency range of this manual to check if the graphics card supports Plug...
... power outlet. •• Check the power cable connection and press the power button. •• Check that the connected input is enabled (Settings > Input). •• If the monitor is in sleep mode, move the mouse, or press any key on the keyboard, to Off. Is the monitor's power cord plugged in the product owner's manual." Some features are out of the recommended horizontal or vertical frequency range of this manual to check if the graphics card supports Plug...
Owners Manual
Page 33
...;• Displaying a still image for a prolonged time may be flickering. monitor is not available in HDMI. (240 Hz or Higher) Is it is connected with HDMI input, set the option to On. (For 260 Hz) •• Check if the graphics card supports the DSC (Display Stream Compression). •• Check if the graphics card driver has been updated to the latest version. 2560 x 1440 resolution is turned off...
...;• Displaying a still image for a prolonged time may be flickering. monitor is not available in HDMI. (240 Hz or Higher) Is it is connected with HDMI input, set the option to On. (For 260 Hz) •• Check if the graphics card supports the DSC (Display Stream Compression). •• Check if the graphics card driver has been updated to the latest version. 2560 x 1440 resolution is turned off...
Owners Manual
Page 35
... use .) Are images displayed using DP (DisplayPort) or HDMI input without sound? •• Make sure that the headphone port connections are made properly. •• Try increasing the volume with the joystick. •• Set the audio output of the PC to the monitor's performance. No sound from the headphone port. monochrome? 35 ENGLISH The display color is connected properly. In Windows, go to Control Panel > Hardware and Sound > Sound > set the Monitor as default device. (The settings...
... use .) Are images displayed using DP (DisplayPort) or HDMI input without sound? •• Make sure that the headphone port connections are made properly. •• Try increasing the volume with the joystick. •• Set the audio output of the PC to the monitor's performance. No sound from the headphone port. monochrome? 35 ENGLISH The display color is connected properly. In Windows, go to Control Panel > Hardware and Sound > Sound > set the Monitor as default device. (The settings...

Owners Manual
Page 37
The symbol means alternating current, and the symbol means direct current. The Power Consumption level can be different by operating condition and monitor setting. * The On mode power consumption is measured with LGE test standard (Full White pattern , Maximum resolution). ** The monitor goes to change without notice. 37 ENGLISH Weight (Without Packaging) With Stand Without Stand 8.4 kg (18.5 lbs) 6.1 kg (13.4 lbs) Specifications are subject to the Sleep Mode in a couple of minutes (Max 5 minutes).
The symbol means alternating current, and the symbol means direct current. The Power Consumption level can be different by operating condition and monitor setting. * The On mode power consumption is measured with LGE test standard (Full White pattern , Maximum resolution). ** The monitor goes to change without notice. 37 ENGLISH Weight (Without Packaging) With Stand Without Stand 8.4 kg (18.5 lbs) 6.1 kg (13.4 lbs) Specifications are subject to the Sleep Mode in a couple of minutes (Max 5 minutes).


