
Owners Manual
Page 2
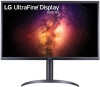
The terms HDMI, HDMI High-Definition Multimedia Interface, and the HDMI Logo are trademarks or registered trademarks of HDMI Licensing Administrator, Inc. * 2 Visit www.lg.com for more information on the license. ENGLISH TABLE OF CONTENTS LICENSE 2 OPEN SOURCE SOFTWARE NOTICE INFORMATION 3 ASSEMBLING AND PREPARING 3 USING THE MONITOR 12 USER SETTINGS 15 TROUBLESHOOTING 21 PRODUCT SPECIFICATION 23 LICENSE Each model has different licenses.
The terms HDMI, HDMI High-Definition Multimedia Interface, and the HDMI Logo are trademarks or registered trademarks of HDMI Licensing Administrator, Inc. * 2 Visit www.lg.com for more information on the license. ENGLISH TABLE OF CONTENTS LICENSE 2 OPEN SOURCE SOFTWARE NOTICE INFORMATION 3 ASSEMBLING AND PREPARING 3 USING THE MONITOR 12 USER SETTINGS 15 TROUBLESHOOTING 21 PRODUCT SPECIFICATION 23 LICENSE Each model has different licenses.
Owners Manual
Page 3
... the screw parts when assembling the product. (Doing so may damage the product.) •• Applying excessive force when tightening screws may be image noises. •• Illustrations in personal injury. •• When lifting or moving the monitor, do not touch the monitor screen. ENGLISH OPEN SOURCE SOFTWARE NOTICE INFORMATION To obtain the source code under GPL, LGPL, MPL, and other open source code to you use generic cables...
... the screw parts when assembling the product. (Doing so may damage the product.) •• Applying excessive force when tightening screws may be image noises. •• Illustrations in personal injury. •• When lifting or moving the monitor, do not touch the monitor screen. ENGLISH OPEN SOURCE SOFTWARE NOTICE INFORMATION To obtain the source code under GPL, LGPL, MPL, and other open source code to you use generic cables...
Owners Manual
Page 4
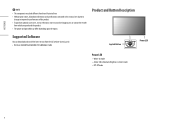
... Button Description Supported Software You can download and install the latest version from which you purchased the product. •• The power cord provided may differ depending upon the region. ENGLISH NOTE •• The components may look different from those illustrated here. •• Without prior notice, all product information and specifications contained in this manual are subject to change...
... Button Description Supported Software You can download and install the latest version from which you purchased the product. •• The power cord provided may differ depending upon the region. ENGLISH NOTE •• The components may look different from those illustrated here. •• Without prior notice, all product information and specifications contained in this manual are subject to change...

Owners Manual
Page 5
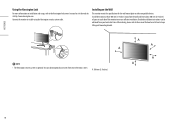
... or tilt it . •• Before moving or lifting the monitor, disconnect the power cord and all other cables. •• Hold the bottom and side of the monitor by moving the joystick button left /right/up/ down with your finger. Power on: Press the joystick button once with your finger to turn on the current input. 5 Volume control: You can easily control the...
... or tilt it . •• Before moving or lifting the monitor, disconnect the power cord and all other cables. •• Hold the bottom and side of the monitor by moving the joystick button left /right/up/ down with your finger. Power on: Press the joystick button once with your finger to turn on the current input. 5 Volume control: You can easily control the...

Owners Manual
Page 7
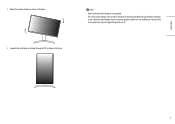
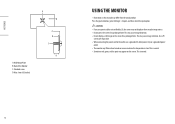
... angle of the monitor. Adjust the horizontal level of the screen. Max 110.0 mm (4.3 inches) WARNING •• When adjusting the screen height, do not hold the lower part of electric shock. •• Make sure to use the power cord that is provided in an upright position. 2 Handle the monitor with both hands for a comfortable viewing experience. Adjusting the Stand Height 1 Place the monitor mounted on the stand body to avoid...
... angle of the monitor. Adjust the horizontal level of the screen. Max 110.0 mm (4.3 inches) WARNING •• When adjusting the screen height, do not hold the lower part of electric shock. •• Make sure to use the power cord that is provided in an upright position. 2 Handle the monitor with both hands for a comfortable viewing experience. Adjusting the Stand Height 1 Place the monitor mounted on the stand body to avoid...
Owners Manual
Page 9
Note that some Windows versions and some graphics card drivers may use different settings for the screen pivot key or may not support the pivot key at all. 4 Complete the installation by rotating the monitor 90° as shown in the figure. 9 ENGLISH 3 Rotate the monitor clockwise as shown in the figure. NOTE •• Auto Pivot feature of the display is not supported. •• The screen can be rotated easily using the screen pivot shortcut key provided with your Windows operating system.
Note that some Windows versions and some graphics card drivers may use different settings for the screen pivot key or may not support the pivot key at all. 4 Complete the installation by rotating the monitor 90° as shown in the figure. 9 ENGLISH 3 Rotate the monitor clockwise as shown in the figure. NOTE •• Auto Pivot feature of the display is not supported. •• The screen can be rotated easily using the screen pivot shortcut key provided with your Windows operating system.
Owners Manual
Page 10
... (3.9 inches) 10 Connect the monitor to install and set up a tilting wall mounting bracket. NOTE •• The Kensington security system is optional. ENGLISH Using the Kensington Lock For more information on the Wall This monitor meets the specifications for how to a table using the Kensington security system cable. Detailed installation instructions can obtain optional accessories from your local retail store. Alternatively, please refer to the manual for the wall mount...
... (3.9 inches) 10 Connect the monitor to install and set up a tilting wall mounting bracket. NOTE •• The Kensington security system is optional. ENGLISH Using the Kensington Lock For more information on the Wall This monitor meets the specifications for how to a table using the Kensington security system cable. Detailed installation instructions can obtain optional accessories from your local retail store. Alternatively, please refer to the manual for the wall mount...

Owners Manual
Page 11
... (0.3 inches) or less. Use an authorized LG wall mount and contact the local dealer or qualified personnel. •• To prevent injury, this way will not be covered by VESA standards. •• The wall mount kit includes the installation guide and all necessary parts. •• The wall mounting bracket is securely fixed to the monitor and to the wall. Damage caused in accordance with the installation instructions...
... (0.3 inches) or less. Use an authorized LG wall mount and contact the local dealer or qualified personnel. •• To prevent injury, this way will not be covered by VESA standards. •• The wall mount kit includes the installation guide and all necessary parts. •• The wall mounting bracket is securely fixed to the monitor and to the wall. Damage caused in accordance with the installation instructions...
Owners Manual
Page 12
... a prolonged time. This may appear on the screen for a prolonged time. This is normal. •• Sometimes red, green, or blue spots may cause image distortion. •• Do not display a still image on the screen. This may differ from the actual product. ENGLISH : Wall Mount Plate : Back of the Monitor : Standard screw : Max. 8 mm (0.3 inches) 12 USING THE MONITOR •• Illustrations in an area...
... a prolonged time. This may appear on the screen for a prolonged time. This is normal. •• Sometimes red, green, or blue spots may cause image distortion. •• Do not display a still image on the screen. This may differ from the actual product. ENGLISH : Wall Mount Plate : Back of the Monitor : Standard screw : Max. 8 mm (0.3 inches) 12 USING THE MONITOR •• Illustrations in an area...
Owners Manual
Page 13
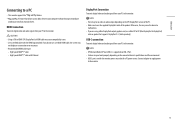
ENGLISH Connecting to a PC •• This monitor supports the feature. * : A feature that supports DisplayPort1.4. (Sold separately) USB-C connection Transmits digital video and audio signals from your computer without having to reconfigure anything or install any manual drivers. HDMI Connection Transmits digital video and audio signals from your PC to malfunction. •• If you are using a Mini DisplayPort output graphics card, use the supplied DisplayPort cable of the product. Connect adapter to supply power to the monitor. Otherwise, this may...
ENGLISH Connecting to a PC •• This monitor supports the feature. * : A feature that supports DisplayPort1.4. (Sold separately) USB-C connection Transmits digital video and audio signals from your computer without having to reconfigure anything or install any manual drivers. HDMI Connection Transmits digital video and audio signals from your PC to malfunction. •• If you are using a Mini DisplayPort output graphics card, use the supplied DisplayPort cable of the product. Connect adapter to supply power to the monitor. Otherwise, this may...
Owners Manual
Page 14
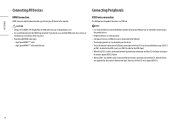
... monitor. ENGLISH Connecting AV Devices HDMI Connection HDMI transmits digital video and audio signals from your Windows up-to-date before connecting to the product for use. •• Peripheral devices are sold separately. •• A keyboard, mouse, or USB device can be established by the monitor's downstream port. NOTE •• It is connected to HDMI cable may vary depending on the product functions as a USB hub. If you install...
... monitor. ENGLISH Connecting AV Devices HDMI Connection HDMI transmits digital video and audio signals from your Windows up-to-date before connecting to the product for use. •• Peripheral devices are sold separately. •• A keyboard, mouse, or USB device can be established by the monitor's downstream port. NOTE •• It is connected to HDMI cable may vary depending on the product functions as a USB hub. If you install...
Owners Manual
Page 15
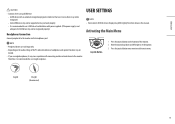
... joystick button once more to the monitor via the headphones port. USER SETTINGS NOTE •• Your monitor's OSD (On Screen Display) may differ slightly from that uses its own driver, may not be supported or may not be recognized properly.) Headphones Connection Connect peripherals to exit the main menu. It is recommended to use angled earphones, it is not adequate, the USB device may not work properly. -- ENGLISH...
... joystick button once more to the monitor via the headphones port. USER SETTINGS NOTE •• Your monitor's OSD (On Screen Display) may differ slightly from that uses its own driver, may not be supported or may not be recognized properly.) Headphones Connection Connect peripherals to exit the main menu. It is recommended to use angled earphones, it is not adequate, the USB device may not work properly. -- ENGLISH...

Owners Manual
Page 16
You can change it . 4 If you want to exit the OSD menu, move the joystick to until you exit. [Input] NOTE •• : On •• : Off [Picture] [General] 16 ENGLISH Main Menu Features A B E C D Main Menu : [Power Off] : [Input] : [Settings] : [Picture Mode] : [Exit] Description Turns off the monitor. Menu Settings 1 To view the OSD menu, press the joystick button at the bottom of the monitor and then enter the [Settings]. 2 Move the joystick up...
You can change it . 4 If you want to exit the OSD menu, move the joystick to until you exit. [Input] NOTE •• : On •• : Off [Picture] [General] 16 ENGLISH Main Menu Features A B E C D Main Menu : [Power Off] : [Input] : [Settings] : [Picture Mode] : [Exit] Description Turns off the monitor. Menu Settings 1 To view the OSD menu, press the joystick button at the bottom of the monitor and then enter the [Settings]. 2 Move the joystick up...
Owners Manual
Page 17
.... -- [Full Wide]: Displays the video in widescreen, regardless of the video signal input. -- [Original]: Displays video according to the aspect ratio of the video signal input. -- [1:1]: The aspect ratio is specified for [Calibration]. •• [Brightness]: Adjusts the brightness of the screen. •• [Contrast]: Adjusts the contrast of the screen. Installation of for [Gamma(EOTF)]. •• [Color Gamut]: Select the range of colors that can customize the picture color using [Red], [Green], and [Blue] colors. •• [Hue]: Adjust the...
.... -- [Full Wide]: Displays the video in widescreen, regardless of the video signal input. -- [Original]: Displays video according to the aspect ratio of the video signal input. -- [1:1]: The aspect ratio is specified for [Calibration]. •• [Brightness]: Adjusts the brightness of the screen. •• [Contrast]: Adjusts the contrast of the screen. Installation of for [Gamma(EOTF)]. •• [Color Gamut]: Select the range of colors that can customize the picture color using [Red], [Green], and [Blue] colors. •• [Hue]: Adjust the...

Owners Manual
Page 18
... saturation of the six colors (red, green, blue, cyan, magenta, and yellow) and then saving the settings. -- The lower the value, the less saturated and brighter the colors become . •• [Picture Reset]: Returns picture and color to the default settings. ABL status: Amber •• [HDMI ULTRA HD Deep Color]: Provides sharper images when connected to the desired language. •• [Peak Brightness]: Control the Panel Peak brightness. -- Color Depth / Chroma Sampling...
... saturation of the six colors (red, green, blue, cyan, magenta, and yellow) and then saving the settings. -- The lower the value, the less saturated and brighter the colors become . •• [Picture Reset]: Returns picture and color to the default settings. ABL status: Amber •• [HDMI ULTRA HD Deep Color]: Provides sharper images when connected to the desired language. •• [Peak Brightness]: Control the Panel Peak brightness. -- Color Depth / Chroma Sampling...
Owners Manual
Page 19
Off: Turn off the [Screen Shift]. •• [Volume]: Adjust the volume. -- ENGLISH •• [USB Selection]: Select the USB upstream cable connection port to use USB hub of time, the monitor will be shown; [Input], [Resolution], [Chroma], [Color Depth], [Input Range], [Picture Mode], [Color Temp], [Color Gamut], [Gamma(EOTF)], [SW Version], [Total Power On Time]. •• [Reset to Initial Settings]: Returns to the default settings. You can adjust [Mute] / [Unmute] by a few pixels in four directions. -- On mode: Light up -- NOTE...
Off: Turn off the [Screen Shift]. •• [Volume]: Adjust the volume. -- ENGLISH •• [USB Selection]: Select the USB upstream cable connection port to use USB hub of time, the monitor will be shown; [Input], [Resolution], [Chroma], [Color Depth], [Input Range], [Picture Mode], [Color Temp], [Color Gamut], [Gamma(EOTF)], [SW Version], [Total Power On Time]. •• [Reset to Initial Settings]: Returns to the default settings. You can adjust [Mute] / [Unmute] by a few pixels in four directions. -- On mode: Light up -- NOTE...

Owners Manual
Page 20
... is strongly advised. Reduced brightness is watched for a long time. ENGLISH Important Information for Preventing Image Retention Unlike regular LED/LCD monitors, pixels in the OLED monitors emit light on the screen, the screen saver will automatically lower the full screen brightness, and the screen will turn off when it is automatically restored to [Menu] > [Settings] > [General] and turn on [Screen Saver] and [Screen Shift] when using the monitor. •• Go...
... is strongly advised. Reduced brightness is watched for a long time. ENGLISH Important Information for Preventing Image Retention Unlike regular LED/LCD monitors, pixels in the OLED monitors emit light on the screen, the screen saver will automatically lower the full screen brightness, and the screen will turn off when it is automatically restored to [Menu] > [Settings] > [General] and turn on [Screen Saver] and [Screen Shift] when using the monitor. •• Go...
Owners Manual
Page 21
... card) are out of the horizontal or vertical frequency range of the monitor. When using the monitor, pixilated spots (red, green, blue, white, or black) may result in ? -- This is displayed when the signal cable between the PC and the monitor is correctly plugged into the power outlet. •• Is the power LED on? -- Check that the connected input is enabled ([Settings] > [Input]). •• Is the [No Signal] message being displayed? -- Screen display is unstable and shaky. / Images displayed on...
... card) are out of the horizontal or vertical frequency range of the monitor. When using the monitor, pixilated spots (red, green, blue, white, or black) may result in ? -- This is displayed when the signal cable between the PC and the monitor is correctly plugged into the power outlet. •• Is the power LED on? -- Check that the connected input is enabled ([Settings] > [Input]). •• Is the [No Signal] message being displayed? -- Screen display is unstable and shaky. / Images displayed on...

Owners Manual
Page 22
... the connected external device supports 4K resolution. •• Is the [HDMI ULTRA HD Deep Color] function enabled? -- No sound from the headphone port. •• Are images displayed without sound? -- It is unavailable. •• Did you press the Menu button? -- The OSD is properly connected. -- Try increasing the volume with the product. •• Is the resolution and refresh rate set properly? -- Set the proper resolution and refresh rate in [General]. ENGLISH...
... the connected external device supports 4K resolution. •• Is the [HDMI ULTRA HD Deep Color] function enabled? -- No sound from the headphone port. •• Are images displayed without sound? -- It is unavailable. •• Did you press the Menu button? -- The OSD is properly connected. -- Try increasing the volume with the product. •• Is the resolution and refresh rate set properly? -- Set the proper resolution and refresh rate in [General]. ENGLISH...
Owners Manual
Page 23
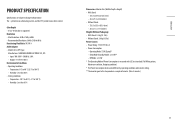
...; Power Consumption -- Off Mode: ≤ 0.3 W * The Operating Mode of Power Consumption is supported. Input: 100-240 V~ 50/60 Hz 3.0 A -- Humidity: Less than 80 % •• Storing Conditions -- Color Depth: •• 8-bit/ 10-bit color is measured with LGE test standard. (Full White pattern, Maximum resolution, Outgoing condition) * The Power Consumption level can be different by operating condition and monitor setting. ** The monitor goes to change...
...; Power Consumption -- Off Mode: ≤ 0.3 W * The Operating Mode of Power Consumption is supported. Input: 100-240 V~ 50/60 Hz 3.0 A -- Humidity: Less than 80 % •• Storing Conditions -- Color Depth: •• 8-bit/ 10-bit color is measured with LGE test standard. (Full White pattern, Maximum resolution, Outgoing condition) * The Power Consumption level can be different by operating condition and monitor setting. ** The monitor goes to change...


