
Owners Manual
Page 1
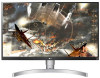
Please read the safety information carefully before using the product. IPS LED Monitor (LED Monitor) Model List 27UK650 27UK600 www.lg.com Owner's Manual IPS LED MONITOR (LED MONITOR*) *LG LED Monitors are LCD Monitors with LED Backlighting.
Please read the safety information carefully before using the product. IPS LED Monitor (LED Monitor) Model List 27UK650 27UK600 www.lg.com Owner's Manual IPS LED MONITOR (LED MONITOR*) *LG LED Monitors are LCD Monitors with LED Backlighting.
Owners Manual
Page 2
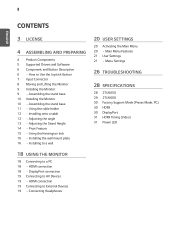
... the cable holder 12 - Pivot Feature 15 - Installing to Use the Joystick Button 7 Input Connector 8 Moving and Lifting the Monitor 9 Installing the Monitor 9 - How to a wall 20 USER SETTINGS 20 Activating the Main Menu 20 - Installing onto a table 12 - DisplayPort connection 19 Connecting to a PC 18 - Assembling the stand base 11 - Adjusting the angle 13 - Connecting Headphones Adjusting the Stand Height 14 - Using the Kensington lock 16 - HDMI connection 18 - Menu Settings 26 TROUBLESHOOTING 28 SPECIFICATIONS 28 27UK650 29 27UK600 30 Factory Support Mode (Preset Mode...
... the cable holder 12 - Pivot Feature 15 - Installing to Use the Joystick Button 7 Input Connector 8 Moving and Lifting the Monitor 9 Installing the Monitor 9 - How to a wall 20 USER SETTINGS 20 Activating the Main Menu 20 - Installing onto a table 12 - DisplayPort connection 19 Connecting to a PC 18 - Assembling the stand base 11 - Adjusting the angle 13 - Connecting Headphones Adjusting the Stand Height 14 - Using the Kensington lock 16 - HDMI connection 18 - Menu Settings 26 TROUBLESHOOTING 28 SPECIFICATIONS 28 27UK650 29 27UK600 30 Factory Support Mode (Preset Mode...

Owners Manual
Page 3
... set to be disabled, change the option to display. * To make this setting be turned off automatically in OSD menu of "Automatic Standby". VESA, VESA logo, DisplayPort compliance logo and DisplayPort compliance logo for more information on display if there is no adjustment to 'Off' in 4 hours after you turned on the license. ENEGNLGISH 3 LICENSE Each model has different licenses. Visit www.lg.com for dual-mode source...
... set to be disabled, change the option to display. * To make this setting be turned off automatically in OSD menu of "Automatic Standby". VESA, VESA logo, DisplayPort compliance logo and DisplayPort compliance logo for more information on display if there is no adjustment to 'Off' in 4 hours after you turned on the license. ENEGNLGISH 3 LICENSE Each model has different licenses. Visit www.lg.com for dual-mode source...

Owners Manual
Page 5
.... Drivers and Software Monitor Driver OnScreen Control Dual Controller Installation Priority Recommended Recommended Optional 27UK650 27UK600 O O O ENEGNLGISH 5 CAUTION y yAlways use genuine components to improve the performance of counterfeit components. y yIt is recommend that the components may be image noises. y yWithout prior notice, all information and specifications in this manual are subject to change to ensure safety and product performance. Supported Drivers and Software You can download and install...
.... Drivers and Software Monitor Driver OnScreen Control Dual Controller Installation Priority Recommended Recommended Optional 27UK650 27UK600 O O O ENEGNLGISH 5 CAUTION y yAlways use genuine components to improve the performance of counterfeit components. y yIt is recommend that the components may be image noises. y yWithout prior notice, all information and specifications in this manual are subject to change to ensure safety and product performance. Supported Drivers and Software You can download and install...
Owners Manual
Page 6
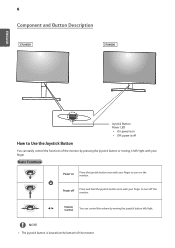
... Button Description 27UK650 27UK600 ENEGNLGISH Joystick Button Power LED y yOn: power is on the monitor. NOTE y y The joystick button is off the monitor. ◄/► Volume Control You can easily control the functions of the monitor. Basic Functions Power on Press the joystick button once with your finger to turn off How to Use the Joystick Button You can control the volume by pressing the joystick button or moving the joystick button...
... Button Description 27UK650 27UK600 ENEGNLGISH Joystick Button Power LED y yOn: power is on the monitor. NOTE y y The joystick button is off the monitor. ◄/► Volume Control You can easily control the functions of the monitor. Basic Functions Power on Press the joystick button once with your finger to turn off How to Use the Joystick Button You can control the volume by pressing the joystick button or moving the joystick button...
Owners Manual
Page 13
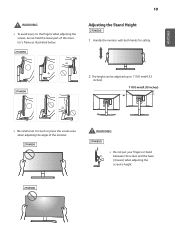
ENEGNLGISH 13 WARNING y yTo avoid injury to the fingers when adjusting the screen, do not hold the lower part of the monitor's frame as illustrated below. 27UK650 Adjusting the Stand Height 27UK650 1 Handle the monitor with both hands for safety. 27UK600 27UK600 2 The height can be adjusted up to 110.0 mm(4.33 inches). 110.0 mm(4.33 inches) y yBe careful not to touch or press the screen area when adjusting the angle of the monitor. 27UK650 WARNING 27UK650 27UK600 y yDo not put your fingers or hand between the screen and the base (chassis) when adjusting the screen's height. 27UK600
ENEGNLGISH 13 WARNING y yTo avoid injury to the fingers when adjusting the screen, do not hold the lower part of the monitor's frame as illustrated below. 27UK650 Adjusting the Stand Height 27UK650 1 Handle the monitor with both hands for safety. 27UK600 27UK600 2 The height can be adjusted up to 110.0 mm(4.33 inches). 110.0 mm(4.33 inches) y yBe careful not to touch or press the screen area when adjusting the angle of the monitor. 27UK650 WARNING 27UK650 27UK600 y yDo not put your fingers or hand between the screen and the base (chassis) when adjusting the screen's height. 27UK600

Owners Manual
Page 14
... the monitor 90° as shown in the direction of the display is not supported. y yThe screen can be rotated easily using the pivot feature, the stand does not make sure that some Windows versions and some graphics card drivers may use different settings for the screen pivot key or may not support the pivot key at all. Stand WARNING y yTo avoid scratching the stand base, make contact...
... the monitor 90° as shown in the direction of the display is not supported. y yThe screen can be rotated easily using the pivot feature, the stand does not make sure that some Windows versions and some graphics card drivers may use different settings for the screen pivot key or may not support the pivot key at all. Stand WARNING y yTo avoid scratching the stand base, make contact...

Owners Manual
Page 15
... purchased at your fingers between the Monitor set . For more information on installation and usage, refer to 3°). Connect the Kensington security system cable between the display and the stand base. 27UK650 27UK600 NOTE y yUse of the Kensington lock is optional. Adjust the horizontal level of the monitor head. 27UK650 Monitor head Using the Kensington lock The Kensington security system connector is connected. ENEGNLGISH 15 WARNING y yTake care when...
... purchased at your fingers between the Monitor set . For more information on installation and usage, refer to 3°). Connect the Kensington security system cable between the display and the stand base. 27UK650 27UK600 NOTE y yUse of the Kensington lock is optional. Adjust the horizontal level of the monitor head. 27UK650 Monitor head Using the Kensington lock The Kensington security system connector is connected. ENEGNLGISH 15 WARNING y yTake care when...
Owners Manual
Page 16
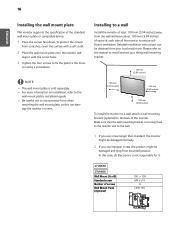
... local retail store. NOTE y yThe wall mount plate is sold separately. Installing to ensure sufficient ventilation. 16 ENEGNLGISH Installing the wall mount plate This monitor supports the specification of the monitor. Please refer to the manual to install and set up a tilting wall mounting bracket. 100 mm (3.94 inches) 100 mm (3.94 inches) 100 mm (3.94 inches) 100 mm (3.94 inches) To install the monitor to a wall, attach a wall mounting bracket (optional) to the wall mount plate's installation guide.
... local retail store. NOTE y yThe wall mount plate is sold separately. Installing to ensure sufficient ventilation. 16 ENEGNLGISH Installing the wall mount plate This monitor supports the specification of the monitor. Please refer to the manual to install and set up a tilting wall mounting bracket. 100 mm (3.94 inches) 100 mm (3.94 inches) 100 mm (3.94 inches) 100 mm (3.94 inches) To install the monitor to a wall, attach a wall mounting bracket (optional) to the wall mount plate's installation guide.

Owners Manual
Page 18
... by LG, the screen may not display or there may occur. y y For using the Displayport cable as illustrated below . ENEGNLGISH 18 USING THE MONITOR Connecting to a PC y yThis monitor supports the *Plug and Play feature. *Plug and Play: A feature that you use DisplayPort 1.2 cable. Press the menu button and then select the input option from the input menu. y y If you use a certified HDMI cable, the screen may not display or a connection error may be no video or audio...
... by LG, the screen may not display or there may occur. y y For using the Displayport cable as illustrated below . ENEGNLGISH 18 USING THE MONITOR Connecting to a PC y yThis monitor supports the *Plug and Play feature. *Plug and Play: A feature that you use DisplayPort 1.2 cable. Press the menu button and then select the input option from the input menu. y y If you use a certified HDMI cable, the screen may not display or a connection error may be no video or audio...
Owners Manual
Page 20
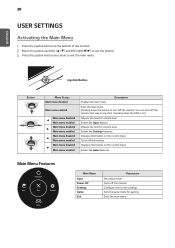
...Adjusts the monitor volume level. Joystick Button Button Menu Status Main menu disabled Main menu enabled Main menu disabled ◄ Main menu enabled Main menu disabled ► Main menu enabled Main menu disabled ▲ Main menu enabled Main menu disabled ▼ Main menu enabled Enables the main menu. Enters the Settings features. Exits the main menu. Adjusts the monitor volume level. Turns off the monitor. Configures the screen settings. Displays information on the current input. ENEGNLGISH 20 USER SETTINGS Activating the Main Menu 1 Press the joystick button...
...Adjusts the monitor volume level. Joystick Button Button Menu Status Main menu disabled Main menu enabled Main menu disabled ◄ Main menu enabled Main menu disabled ► Main menu enabled Main menu disabled ▲ Main menu enabled Main menu disabled ▼ Main menu enabled Enables the main menu. Enters the Settings features. Exits the main menu. Adjusts the monitor volume level. Turns off the monitor. Configures the screen settings. Displays information on the current input. ENEGNLGISH 20 USER SETTINGS Activating the Main Menu 1 Press the joystick button...
Owners Manual
Page 21
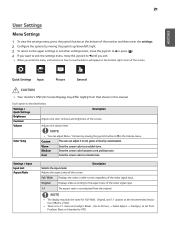
... the video signal input. 1:1 The aspect ratio is not adjusted from that shown in the Volume menu. Original Displays video according to Off) Each option is no 1:1 menu on how to a reddish tone. y y There is described below. Sets the screen color between a red and blue tone. NOTE y y The display may differ slightly from the original. ENEGNLGISH 21 User Settings Menu Settings 1 To view the settings menu, press the joystick button at the recommended resolution...
... the video signal input. 1:1 The aspect ratio is not adjusted from that shown in the Volume menu. Original Displays video according to Off) Each option is no 1:1 menu on how to a reddish tone. y y There is described below. Sets the screen color between a red and blue tone. NOTE y y The display may differ slightly from the original. ENEGNLGISH 21 User Settings Menu Settings 1 To view the settings menu, press the joystick button at the recommended resolution...
Owners Manual
Page 22
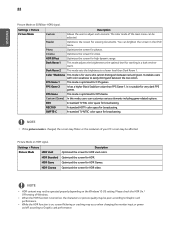
... may occur when changing the monitor input or power on/off according to a lower level than FPS Game 1. The color mode of the main menu can be operated properly depending on HDR signal. Cinema Optimizes the screen for broadcasting. Dark Room 2 This mode sets the brightness to Graphic card performance. It enables users with color weakness to adjust each element. Settings > Picture Picture Mode HDR Vivid Description Optimized the screen for HDR vivid...
... may occur when changing the monitor input or power on/off according to a lower level than FPS Game 1. The color mode of the main menu can be operated properly depending on HDR signal. Cinema Optimizes the screen for broadcasting. Dark Room 2 This mode sets the brightness to Graphic card performance. It enables users with color weakness to adjust each element. Settings > Picture Picture Mode HDR Vivid Description Optimized the screen for HDR vivid...

Owners Manual
Page 23
... Optimized picture quality is displayed when a user wants smooth and natural im- y y If a problem occurs, set for slow-moving pictures or still images. Doing so may not work properly. 23 ENEGNLGISH Picture Adjust Brightness Contrast Sharpness SUPER RESOLUTION+ Adjusts the brightness of the screen. Adjusts the contrast of low resolution pictures, it is effective for each HDMI port (HDMI IN 1, HDMI IN 2) separately. y y HDMI ULTRA HD Deep Color option must be changed with SET OSD Menu. (Settings - RGB - 4K@30 Hz Support Format (HDMI ULTRA...
... Optimized picture quality is displayed when a user wants smooth and natural im- y y If a problem occurs, set for slow-moving pictures or still images. Doing so may not work properly. 23 ENEGNLGISH Picture Adjust Brightness Contrast Sharpness SUPER RESOLUTION+ Adjusts the brightness of the screen. Adjusts the contrast of low resolution pictures, it is effective for each HDMI port (HDMI IN 1, HDMI IN 2) separately. y y HDMI ULTRA HD Deep Color option must be changed with SET OSD Menu. (Settings - RGB - 4K@30 Hz Support Format (HDMI ULTRA...

Owners Manual
Page 24
... frequency range of FreeSync function than basic mode. The higher the value, the more information and requirement, refer to Picture reset your settings? Normal Sets the response time to the default settings. Cool Sets the screen color to fast. Fast Sets the response time to a bluish tone. Off FreeSync function off. Red You can control the black contrast to adjust the gamma settings, select Mode 4. Green Blue Six Color Meets the user requirements for displayed pictures based...
... frequency range of FreeSync function than basic mode. The higher the value, the more information and requirement, refer to Picture reset your settings? Normal Sets the response time to the default settings. Cool Sets the screen color to fast. Fast Sets the response time to a bluish tone. Off FreeSync function off. Red You can control the black contrast to adjust the gamma settings, select Mode 4. Green Blue Six Color Meets the user requirements for displayed pictures based...

Owners Manual
Page 25
... automatically turns off . NOTE y y All features are disabled except Brightness, Contrast, Volume, Input List, Aspect Ratio, OSD Lock and Information. ENEGNLGISH 25 Settings > General Language SMART ENERGY SAVING Power LED Automatic Standby DisplayPort 1.2 Buzzer OSD Lock OSD Size Information Reset Description Sets the menu screen to reset your monitor powers on the Panel. High Saves energy using the low-efficiency SMART ENERGY SAVING feature. Turns the power LED on the bottom of the monitor on the screen for the auto-off . Off The power LED turns off...
... automatically turns off . NOTE y y All features are disabled except Brightness, Contrast, Volume, Input List, Aspect Ratio, OSD Lock and Information. ENEGNLGISH 25 Settings > General Language SMART ENERGY SAVING Power LED Automatic Standby DisplayPort 1.2 Buzzer OSD Lock OSD Size Information Reset Description Sets the menu screen to reset your monitor powers on the Panel. High Saves energy using the low-efficiency SMART ENERGY SAVING feature. Turns the power LED on the bottom of the monitor on the screen for the auto-off . Off The power LED turns off...

Owners Manual
Page 26
... power LED displaying white? Is the power on the screen. y yCheck the power cable connection and press the power button. Go to display an image, the screen must be flickering. y yThis occurs when signals transferred from the PC (graphics card) are out of the horizontal or vertical frequency range of the monitor, use a screensaver. Please see the Product Specification section of this manual to set OSD Lock to the screen, resulting in ? you select the appropriate resolution? y yIf the selected resolution...
... power LED displaying white? Is the power on the screen. y yCheck the power cable connection and press the power button. Go to display an image, the screen must be flickering. y yThis occurs when signals transferred from the PC (graphics card) are out of the horizontal or vertical frequency range of the monitor, use a screensaver. Please see the Product Specification section of this manual to set OSD Lock to the screen, resulting in ? you select the appropriate resolution? y yIf the selected resolution...

Owners Manual
Page 27
... resolution. The display color is connected properly. Does the display appear discolored (16 colors)? Are images displayed using . y yTry increasing the volume using the monitor, pixilated spots (red, green, blue, white, or black) may not be displayed, contact the manufacturer of the PC to Control Panel > Hardware and Sound > Sound > set it related to Control Panel > Display > Settings > Color Quality. ENEGNLGISH 27 NOTE y yCheck if the graphics card's resolution or frequency is within the range allowed by the monitor and set the monitor as default device...
... resolution. The display color is connected properly. Does the display appear discolored (16 colors)? Are images displayed using . y yTry increasing the volume using the monitor, pixilated spots (red, green, blue, white, or black) may not be displayed, contact the manufacturer of the PC to Control Panel > Hardware and Sound > Sound > set it related to Control Panel > Display > Settings > Color Quality. ENEGNLGISH 27 NOTE y yCheck if the graphics card's resolution or frequency is within the range allowed by the monitor and set the monitor as default device...
Owners Manual
Page 28
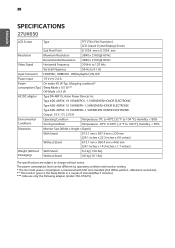
... following adapter (model : DA-65G19) 28 ENEGNLGISH SPECIFICATIONS 27UK650 LCD Screen Type TFT (Thin Film Transistor) LCD (Liquid Crystal Display) Screen Sub Pixel Pitch 0.1554 mm x 0.1554 mm Resolution Maximum Resolution 3840 x 2160 @ 60 Hz Recommended Resolution 3840 x 2160 @ 60 Hz Video Signal Horizontal Frequency 30 kHz to 135 kHz Vertical Frequency 56 Hz to 140 °F); Humidity: < 80% Temperature: -20°C to 60°C (-4 °F to 61 Hz Input Connector HDMI IN1, HDMI...
... following adapter (model : DA-65G19) 28 ENEGNLGISH SPECIFICATIONS 27UK650 LCD Screen Type TFT (Thin Film Transistor) LCD (Liquid Crystal Display) Screen Sub Pixel Pitch 0.1554 mm x 0.1554 mm Resolution Maximum Resolution 3840 x 2160 @ 60 Hz Recommended Resolution 3840 x 2160 @ 60 Hz Video Signal Horizontal Frequency 30 kHz to 135 kHz Vertical Frequency 56 Hz to 140 °F); Humidity: < 80% Temperature: -20°C to 60°C (-4 °F to 61 Hz Input Connector HDMI IN1, HDMI...
Owners Manual
Page 29
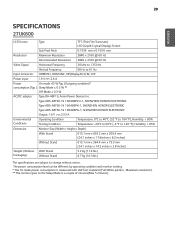
... SPECIFICATIONS 27UK600 LCD Screen Type TFT (Thin Film Transistor) LCD (Liquid Crystal Display) Screen Sub Pixel Pitch 0.1554 mm x 0.1554 mm Resolution Maximum Resolution 3840 x 2160 @ 60 Hz Recommended Resolution 3840 x 2160 @ 60 Hz Video Signal Horizontal Frequency 30 kHz to 135 kHz Vertical Frequency 56 Hz to the Sleep Mode in a couple of minutes(Max 5 minutes). The power consumption level can be different by operating condition and monitor setting. * The On mode power...
... SPECIFICATIONS 27UK600 LCD Screen Type TFT (Thin Film Transistor) LCD (Liquid Crystal Display) Screen Sub Pixel Pitch 0.1554 mm x 0.1554 mm Resolution Maximum Resolution 3840 x 2160 @ 60 Hz Recommended Resolution 3840 x 2160 @ 60 Hz Video Signal Horizontal Frequency 30 kHz to 135 kHz Vertical Frequency 56 Hz to the Sleep Mode in a couple of minutes(Max 5 minutes). The power consumption level can be different by operating condition and monitor setting. * The On mode power...


