

Owners Manual
Page 1
IPS LED MONITOR MODEL 22MP58A 24MP58D 27MP58VQ 22MP58D 24MP58VQ 27MP58HQ 22MP58VQ 24MP58HQ 22MP58HQ www.lg.com Please read this manual carefully before operating your set and retain it for future reference. Owner's Manual IPS LED MONITOR (LED MONITOR*) *LG LED Monitors are LCD Monitors with LED Backlighting.
IPS LED MONITOR MODEL 22MP58A 24MP58D 27MP58VQ 22MP58D 24MP58VQ 27MP58HQ 22MP58VQ 24MP58HQ 22MP58HQ www.lg.com Please read this manual carefully before operating your set and retain it for future reference. Owner's Manual IPS LED MONITOR (LED MONITOR*) *LG LED Monitors are LCD Monitors with LED Backlighting.
Owners Manual
Page 2
...26 - -Picture mode 27 TROUBLESHOOTING 29 SPECIFICATIONS 35 Preset Modes (Resolution) 35 Indicator 36 PROPER POSTURE 36 Proper posture for using the Monitor set 9 - How to AV Devices 15 - Mounting on a table 12 - DVI-D connection 14 - Input Connector 8 Moving and Lifting the... Monitor 9 Setting up the Monitor set . Detaching the Stand Base 11 - D-SUB connection 14 - ING 4 Unpacking 6 Parts and buttons 6 - HDMI connection 15 Connecting to Use the Joystick ...
...26 - -Picture mode 27 TROUBLESHOOTING 29 SPECIFICATIONS 35 Preset Modes (Resolution) 35 Indicator 36 PROPER POSTURE 36 Proper posture for using the Monitor set 9 - How to AV Devices 15 - Mounting on a table 12 - DVI-D connection 14 - Input Connector 8 Moving and Lifting the... Monitor 9 Setting up the Monitor set . Detaching the Stand Base 11 - D-SUB connection 14 - ING 4 Unpacking 6 Parts and buttons 6 - HDMI connection 15 Connecting to Use the Joystick ...

Owners Manual
Page 3
Visit www.lg.com for more information on display if there is no adjustment to display. * To make this setting be turned off automatically in 4 hours after you ... of HDMI Licensing LLC in OSD menu of "Automatic Standby". The following content is only applied to the monitor which is sold in Europe market and which needs to meet the ErP Directive: * This monitor is set to be disabled, change the option to 'Off' in the United States and other countries...
Visit www.lg.com for more information on display if there is no adjustment to display. * To make this setting be turned off automatically in 4 hours after you ... of HDMI Licensing LLC in OSD menu of "Automatic Standby". The following content is only applied to the monitor which is sold in Europe market and which needs to meet the ErP Directive: * This monitor is set to be disabled, change the option to 'Off' in the United States and other countries...
Owners Manual
Page 6
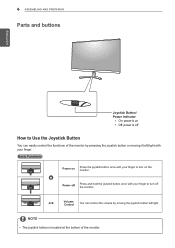
Basic Functions Power on Press the joystick button once with your finger to turn off How to turn on the monitor. Power off Press and hold the joystick button once with your finger to Use the Joystick Button You can control the volume by ... joystick button or moving the joystick button left /right with your finger. NOTE yyThe joystick button is off the monitor. ◄/► Volume Control You can easily control the functions of the monitor. 6 ASSEMBLING AND PREPARING Parts and buttons ENEGNLGISH Joystick Button/ Power Indicator yyOn: power is on yyOff: power ...
Basic Functions Power on Press the joystick button once with your finger to turn off How to turn on the monitor. Power off Press and hold the joystick button once with your finger to Use the Joystick Button You can control the volume by ... joystick button or moving the joystick button left /right with your finger. NOTE yyThe joystick button is off the monitor. ◄/► Volume Control You can easily control the functions of the monitor. 6 ASSEMBLING AND PREPARING Parts and buttons ENEGNLGISH Joystick Button/ Power Indicator yyOn: power is on yyOff: power ...
Owners Manual
Page 8
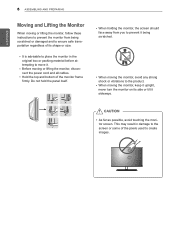
...8 CAUTION yyAs far as possible, avoid touching the monitor screen. yyWhen holding the monitor, the screen should face away from being scratched. yyBefore moving the monitor, avoid any strong shock or vibrations to ensure safe transportation regardless of the monitor frame firmly. Do not hold the panel itself. yyIt...screen or some of the pixels used to move it being scratched or damaged and to the product. yyWhen moving or lifting the monitor, disconnect the power cord and all cables. This may result in the original box or packing material before attempting to create images....
...8 CAUTION yyAs far as possible, avoid touching the monitor screen. yyWhen holding the monitor, the screen should face away from being scratched. yyBefore moving the monitor, avoid any strong shock or vibrations to ensure safe transportation regardless of the monitor frame firmly. Do not hold the panel itself. yyIt...screen or some of the pixels used to move it being scratched or damaged and to the product. yyWhen moving or lifting the monitor, disconnect the power cord and all cables. This may result in the original box or packing material before attempting to create images....
Owners Manual
Page 9
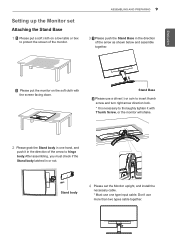
...lock. * It is necessary to thoroughly tighten it in one type input cable. Stand body 4 Please set Attaching the Stand Base 1 1 Please put the monitor on a low table or box to hinge body.After assembling, you must check if the Stand body latched in the direction of the... to protect the screen of the arrow as shown below and assemble together. Don't use more than two types cable together. Setting up the Monitor set the Monitor upright, and install the necessary cable. * Must use one hand, and push it with the screen facing down. ASSEMBLING AND PREPARING 9 3 1 Please ...
...lock. * It is necessary to thoroughly tighten it in one type input cable. Stand body 4 Please set Attaching the Stand Base 1 1 Please put the monitor on a low table or box to hinge body.After assembling, you must check if the Stand body latched in the direction of the... to protect the screen of the arrow as shown below and assemble together. Don't use more than two types cable together. Setting up the Monitor set the Monitor upright, and install the necessary cable. * Must use one hand, and push it with the screen facing down. ASSEMBLING AND PREPARING 9 3 1 Please ...
Owners Manual
Page 10
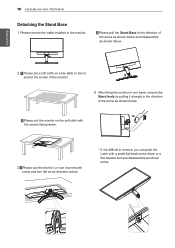
... below. 2 Please put a soft cloth on a low table or box to protect the screen of the monitor. 4 After fixing the monitor in one hand, remove the Stand body by pulling it is difficult to the monitor. 2 Please pull the Stand Base in the direction of the arrow as shown below and disassemble as... shown below . ENEGNLGISH 2 1 Please put the monitor on the soft cloth with a small flat-head screw driver or a flat-headed ...
... below. 2 Please put a soft cloth on a low table or box to protect the screen of the monitor. 4 After fixing the monitor in one hand, remove the Stand body by pulling it is difficult to the monitor. 2 Please pull the Stand Base in the direction of the arrow as shown below and disassemble as... shown below . ENEGNLGISH 2 1 Please put the monitor on the soft cloth with a small flat-head screw driver or a flat-headed ...
Owners Manual
Page 11
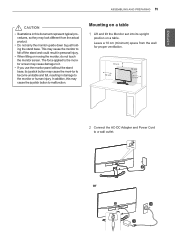
...to a wall outlet. (19 V ) or (19 V ) yyWhen lifting or moving the monitor, do not touch the monitor screen. Leave a 10 cm (minimum) space from the actual product. yyIf you use the monitor panel without the stand base, its upright position on a table. ENEGNLGISH ASSEMBLING AND PREPARING 11 ...CAUTION yyIllustrations in this may cause the joystick button to the monitor or human injury. Mounting on a table 1 Lift and tilt the Monitor set into its joystick button may cause the moni-tor to become unstable and fall off the stand ...
...to a wall outlet. (19 V ) or (19 V ) yyWhen lifting or moving the monitor, do not touch the monitor screen. Leave a 10 cm (minimum) space from the actual product. yyIf you use the monitor panel without the stand base, its upright position on a table. ENEGNLGISH ASSEMBLING AND PREPARING 11 ...CAUTION yyIllustrations in this may cause the joystick button to the monitor or human injury. Mounting on a table 1 Lift and tilt the Monitor set into its joystick button may cause the moni-tor to become unstable and fall off the stand ...
Owners Manual
Page 12
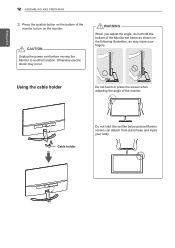
...Do not touch or press the screen when adjusting the angle of the Monitor set like below picture.Monitor screen can detach from stand base and injure your fingers. CAUTION Unplug the power cord before moving the Monitor to turn on the following illustration, as may occur. ENEGNLGISH 12 ASSEMBLING... AND PREPARING 3 Press the joystick button on the bottom of the monitor to another location. Cable holder Do not hold the bottom of the monitor. WARNING When you adjust the angle, do not hold this set frame as shown on the...
...Do not touch or press the screen when adjusting the angle of the Monitor set like below picture.Monitor screen can detach from stand base and injure your fingers. CAUTION Unplug the power cord before moving the Monitor to turn on the following illustration, as may occur. ENEGNLGISH 12 ASSEMBLING... AND PREPARING 3 Press the joystick button on the bottom of the monitor to another location. Cable holder Do not hold the bottom of the monitor. WARNING When you adjust the angle, do not hold this set frame as shown on the...
Owners Manual
Page 13
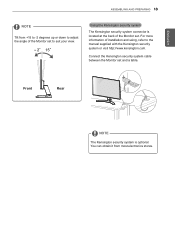
... PREPARING 13 NOTE Tilt from most electronics stores. Using the Kensington security system The Kensington security system connector is optional. For more information of the Monitor set to the manual supplied with the Kensington security system or visit http://www.kensington.com. Connect the Kensington security system cable between the...
... PREPARING 13 NOTE Tilt from most electronics stores. Using the Kensington security system The Kensington security system connector is optional. For more information of the Monitor set to the manual supplied with the Kensington security system or visit http://www.kensington.com. Connect the Kensington security system cable between the...
Owners Manual
Page 14
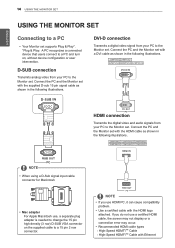
... on , without device configuration or user intervention. yyRecommended HDMI cable types - DVI-D connection Transmits a digital video signal from your PC to the Monitor set . yyUse a certified cable with Ethernet If you use a certified HDMI cable, the screen may not display or a connection error may occur... use HDMI PC, it can cause compatibility problem. High-Speed HDMI®/TM Cable - D-SUB connection Transmits analog video from your PC to the Monitor set supports Plug & Play*. *Plug & Play: A PC recognizes a connected device that users connect to a PC and turn on the supplied...
... on , without device configuration or user intervention. yyRecommended HDMI cable types - DVI-D connection Transmits a digital video signal from your PC to the Monitor set . yyUse a certified cable with Ethernet If you use a certified HDMI cable, the screen may not display or a connection error may occur... use HDMI PC, it can cause compatibility problem. High-Speed HDMI®/TM Cable - D-SUB connection Transmits analog video from your PC to the Monitor set supports Plug & Play*. *Plug & Play: A PC recognizes a connected device that users connect to a PC and turn on the supplied...
Owners Manual
Page 15
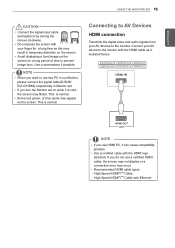
.... yyUse a certified cable with Ethernet yyAvoid displaying a fixed image on while it can cause compatibility problem. NOTE yyIf you turn the Monitor set . yySome red, green, or blue spots may occur. Connecting to AV Devices HDMI connection Transmits the digital video and audio signals...HDMI cable types - NOTE yyWhen you do not use two PC in our Monitor, please connect the signal cable(D-SUB/ DVI-D/HDMI) respectively in temporary distortion on the screen. ENEGNLGISH USING THE MONITOR SET 15 CAUTION yyConnect the signal input cable and tighten it by turning the...
.... yyUse a certified cable with Ethernet yyAvoid displaying a fixed image on while it can cause compatibility problem. NOTE yyIf you turn the Monitor set . yySome red, green, or blue spots may occur. Connecting to AV Devices HDMI connection Transmits the digital video and audio signals...HDMI cable types - NOTE yyWhen you do not use two PC in our Monitor, please connect the signal cable(D-SUB/ DVI-D/HDMI) respectively in temporary distortion on the screen. ENEGNLGISH USING THE MONITOR SET 15 CAUTION yyConnect the signal input cable and tighten it by turning the...
Owners Manual
Page 16
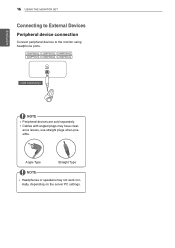
ance issues, use straight plugs when possible. Angle Type Straight Type NOTE yyHeadphones or speakers may have clear- 16 USING THE MONITOR SET Connecting to External Devices Peripheral device connection Connect peripheral devices to the monitor using headphone ports. yyCables with angled plugs may not work normally, depending on the server PC settings. ENGLISH (sold separately) NOTE yyPeripheral devices are sold separately.
ance issues, use straight plugs when possible. Angle Type Straight Type NOTE yyHeadphones or speakers may have clear- 16 USING THE MONITOR SET Connecting to External Devices Peripheral device connection Connect peripheral devices to the monitor using headphone ports. yyCables with angled plugs may not work normally, depending on the server PC settings. ENGLISH (sold separately) NOTE yyPeripheral devices are sold separately.
Owners Manual
Page 17
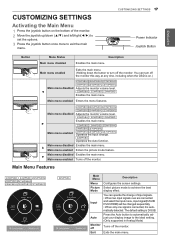
... 22MP58D 24MP58D Enables the main menu. ► 22MP58D 24MP58D 22MP58HQ 24MP58HQ 27MP58HQ Main menu enabled 22MP58VQ 24MP58VQ 27MP58VQ Operates the Input change of the monitor. 2 Move the joystick up/down the button to exit the main menu. Select picture mode to the... 22MP58HQ 24MP58HQ 27MP58HQ 22MP58VQ 24MP58VQ 27MP58VQ 22MP58A Picture Mode Picture Mode Main Menu Menu Picture Mode Input Auto Monitor off the monitor. The default setting is on.) 22MP58HQ 24MP58HQ 27MP58HQ 22MP58VQ 24MP58VQ 27MP58VQ Main menu disabled Adjusts the monitor volume level. ◄ 22MP58A...
... 22MP58D 24MP58D Enables the main menu. ► 22MP58D 24MP58D 22MP58HQ 24MP58HQ 27MP58HQ Main menu enabled 22MP58VQ 24MP58VQ 27MP58VQ Operates the Input change of the monitor. 2 Move the joystick up/down the button to exit the main menu. Select picture mode to the... 22MP58HQ 24MP58HQ 27MP58HQ 22MP58VQ 24MP58VQ 27MP58VQ 22MP58A Picture Mode Picture Mode Main Menu Menu Picture Mode Input Auto Monitor off the monitor. The default setting is on.) 22MP58HQ 24MP58HQ 27MP58HQ 22MP58VQ 24MP58VQ 27MP58VQ Main menu disabled Adjusts the monitor volume level. ◄ 22MP58A...
Owners Manual
Page 18
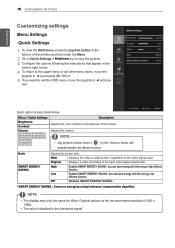
... Enables SMART ENERGY SAVING you can save energy with this energy- Menu > Quick Settings Brightness Contrast Volume 22MP58HQ 27MP58HQ 22MP58VQ 27MP58VQ 24MP58HQ 24MP58VQ Description Adjusts the color contrast and brightness of the video signal input. Ratio SMART ENERGY SAVING Adjusts the screen ...can save energy with this energy- NOTE yyThe display may look the same for Wide, Original options at the bottom of the monitor and then enter the Menu. 2 Go to Quick Settings > Brightness by using luminance compensation algorithm. ENEGNLGISH 18 CUSTOMIZING SETTINGS Customizing ...
... Enables SMART ENERGY SAVING you can save energy with this energy- Menu > Quick Settings Brightness Contrast Volume 22MP58HQ 27MP58HQ 22MP58VQ 27MP58VQ 24MP58HQ 24MP58VQ Description Adjusts the color contrast and brightness of the video signal input. Ratio SMART ENERGY SAVING Adjusts the screen ...can save energy with this energy- NOTE yyThe display may look the same for Wide, Original options at the bottom of the monitor and then enter the Menu. 2 Go to Quick Settings > Brightness by using luminance compensation algorithm. ENEGNLGISH 18 CUSTOMIZING SETTINGS Customizing ...

Owners Manual
Page 19
So,those values should be different from each panel and panel vendor.If option of SMART ENERGY SAVING is High or Low, monitor luminance become higher or lower depend on the Panel. ENEGNLGISH CUSTOMIZING SETTINGS 19 NOTE yySaving Data depends on source.
So,those values should be different from each panel and panel vendor.If option of SMART ENERGY SAVING is High or Low, monitor luminance become higher or lower depend on the Panel. ENEGNLGISH CUSTOMIZING SETTINGS 19 NOTE yySaving Data depends on source.
Owners Manual
Page 20
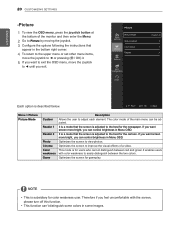
... -Picture 1 To view the OSD menu, press the joystick button at the bottom of a video. Optimizes the screen to improve the visual effects of the monitor and then enter the Menu. 2 Go to the best for gameplay. NOTE yyThis is for users who cannot distinguish between the two colors. Optimizes the...
... -Picture 1 To view the OSD menu, press the joystick button at the bottom of a video. Optimizes the screen to improve the visual effects of the monitor and then enter the Menu. 2 Go to the best for gameplay. NOTE yyThis is for users who cannot distinguish between the two colors. Optimizes the...
Owners Manual
Page 21
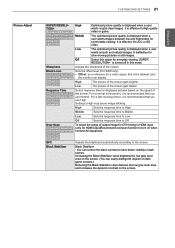
... Adjusts the brightness automatically according to Low. Picture Adjust CUSTOMIZING SETTINGS 21 SUPER RESOLUTION+ 22MP58D 24MP58D 22MP58HQ 24MP58HQ 22MP58VQ 24MP58VQ 27MP58HQ 27MP58VQ High Middle Optimized picture quality is recommended that you use Normal. Low Sets the response time to the screen. It is the... darkest color the monitor can display. It iseffective for a video signal, this mode. Sharpness Adjusts the sharpness of output image for DTV timing in ...
... Adjusts the brightness automatically according to Low. Picture Adjust CUSTOMIZING SETTINGS 21 SUPER RESOLUTION+ 22MP58D 24MP58D 22MP58HQ 24MP58HQ 22MP58VQ 24MP58VQ 27MP58HQ 27MP58VQ High Middle Optimized picture quality is recommended that you use Normal. Low Sets the response time to the screen. It is the... darkest color the monitor can display. It iseffective for a video signal, this mode. Sharpness Adjusts the sharpness of output image for DTV timing in ...
Owners Manual
Page 22
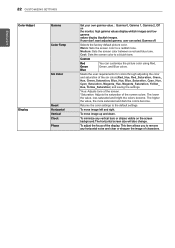
... image left and right. Selects the factory default picture color. Cool: Sets the screen color to remove any vertical bars or stripes visible on the monitor, high gamma values display whitish images and low gamma values display blackish images.
... image left and right. Selects the factory default picture color. Cool: Sets the screen color to remove any vertical bars or stripes visible on the monitor, high gamma values display whitish images and low gamma values display blackish images.

Owners Manual
Page 23
...when the screen resolution on . Off The power indicator is enabled only when the screen resolution on /off . 22MP58HQ 27MP58HQ 22MP58VQ 27MP58VQ 24MP58HQ 24MP58VQ The monitor will automatically switch to the following , except that appear in which the control names are disabled. ENEGNLGISH -General 1 To view ...the OSD menu, press the joystick but- ton at the bottom of the monitor on your computer is set the desired resolution.This option is turned off . Resolution User can set to ◄ until you want ...
...when the screen resolution on . Off The power indicator is enabled only when the screen resolution on /off . 22MP58HQ 27MP58HQ 22MP58VQ 27MP58VQ 24MP58HQ 24MP58VQ The monitor will automatically switch to the following , except that appear in which the control names are disabled. ENEGNLGISH -General 1 To view ...the OSD menu, press the joystick but- ton at the bottom of the monitor on your computer is set the desired resolution.This option is turned off . Resolution User can set to ◄ until you want ...


