Owners Manual
Page 2
LICENSE 2 OPEN SOURCE SOFTWARE NOTICE INFORMATION 3 The terms HDMI, HDMI High-Definition Multimedia Interface, and the HDMI Logo are trademarks or registered trademarks of HDMI Licensing Administrator, Inc. Visit www.lg.com for more information on the license. ASSEMBLING AND PREPARING 3 USING THE MONITOR 13 USING THE REMOTE CONTROL 16 http://patents.dts.com USER SETTINGS 17 TROUBLESHOOTING 22 PRODUCT SPECIFICATION 24 2 ENGLISH TABLE OF CONTENTS LICENSE Each model has different licenses.
LICENSE 2 OPEN SOURCE SOFTWARE NOTICE INFORMATION 3 The terms HDMI, HDMI High-Definition Multimedia Interface, and the HDMI Logo are trademarks or registered trademarks of HDMI Licensing Administrator, Inc. Visit www.lg.com for more information on the license. ASSEMBLING AND PREPARING 3 USING THE MONITOR 13 USING THE REMOTE CONTROL 16 http://patents.dts.com USER SETTINGS 17 TROUBLESHOOTING 22 PRODUCT SPECIFICATION 24 2 ENGLISH TABLE OF CONTENTS LICENSE Each model has different licenses.
Owners Manual
Page 3
... touch the monitor screen. ENGLISH OPEN SOURCE SOFTWARE NOTICE INFORMATION To obtain the source code that is contained in this way will not be covered by the product warranty. •• Do not carry the monitor upside down by the use of media, shipping, and handling) upon email request to the monitor. LG Electronics will not cover damage or injury caused by just holding the base...
... touch the monitor screen. ENGLISH OPEN SOURCE SOFTWARE NOTICE INFORMATION To obtain the source code that is contained in this way will not be covered by the product warranty. •• Do not carry the monitor upside down by the use of media, shipping, and handling) upon email request to the monitor. LG Electronics will not cover damage or injury caused by just holding the base...
Owners Manual
Page 4
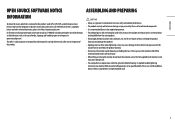
... information and specifications contained in this manual are subject to change to improve the performance of the product. •• To purchase optional accessories, visit an electronics store or an online shopping site, or contact the retailer from the LGE website (www.lg.com). -- Monitor Driver / / A C B : Remote control receptor : Power button : Lighting 4 Product and Button Description Supported Drivers and Software You can download and install the latest...
... information and specifications contained in this manual are subject to change to improve the performance of the product. •• To purchase optional accessories, visit an electronics store or an online shopping site, or contact the retailer from the LGE website (www.lg.com). -- Monitor Driver / / A C B : Remote control receptor : Power button : Lighting 4 Product and Button Description Supported Drivers and Software You can download and install the latest...
Owners Manual
Page 5
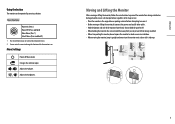
Changes the external input. / Adjusts the volume. / Adjusts the brightness. ENGLISH Using the button The monitor can enter the menu to move it. •• Before moving the monitor, keep it upright and never turn the monitor on its shape or size. •• Place the monitor in the original box or packing material before attempting to change the function while the monitor is on. Menu Settings Power off the monitor. Moving and Lifting...
Changes the external input. / Adjusts the volume. / Adjusts the brightness. ENGLISH Using the button The monitor can enter the menu to move it. •• Before moving the monitor, keep it upright and never turn the monitor on its shape or size. •• Place the monitor in the original box or packing material before attempting to change the function while the monitor is on. Menu Settings Power off the monitor. Moving and Lifting...
Owners Manual
Page 6
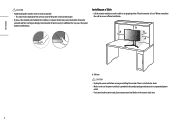
... damage to the screen or some of electric shock. •• Make sure to the monitor or human injury. ENGLISH : 100 mm CAUTION •• Unplug the power cord before moving or installing the monitor. In addition, this may result in an upright position. There is risk of the pixels used to create images. •• If you need another power cord, please contact your...
... damage to the screen or some of electric shock. •• Make sure to the monitor or human injury. ENGLISH : 100 mm CAUTION •• Unplug the power cord before moving or installing the monitor. In addition, this may result in an upright position. There is risk of the pixels used to create images. •• If you need another power cord, please contact your...
Owners Manual
Page 7
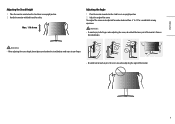
...;• When adjusting the screen height, do not hold the lower part of the monitor. 7 Max. 110.0 mm Adjusting the Angle 1 Place the monitor mounted on the stand base in an upright position. 2 Handle the monitor with both hands for a comfortable viewing experience. ENGLISH Adjusting the Stand Height 1 Place the monitor mounted on the stand base in an upright position. 2 Adjust the angle of the screen. The angle of the screen can be adjusted forward or...
...;• When adjusting the screen height, do not hold the lower part of the monitor. 7 Max. 110.0 mm Adjusting the Angle 1 Place the monitor mounted on the stand base in an upright position. 2 Handle the monitor with both hands for a comfortable viewing experience. ENGLISH Adjusting the Stand Height 1 Place the monitor mounted on the stand base in an upright position. 2 Adjust the angle of the screen. The angle of the screen can be adjusted forward or...
Owners Manual
Page 9
... stores. 9 Using the Kensington Lock For more information on installation and usage, refer to a table using the screen pivot shortcut key provided with your finger by rotating the monitor 90° as you may not support the pivot key at http://www.kensington.com. Note that some Windows versions and some graphics card drivers may use different settings for the screen pivot key...
... stores. 9 Using the Kensington Lock For more information on installation and usage, refer to a table using the screen pivot shortcut key provided with your finger by rotating the monitor 90° as you may not support the pivot key at http://www.kensington.com. Note that some Windows versions and some graphics card drivers may use different settings for the screen pivot key...
Owners Manual
Page 10
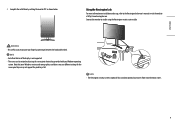
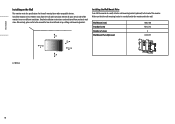
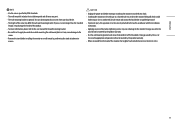
... monitor. Detailed installation instructions can be obtained from the wall and leave about 100 mm of space at each side of screws Wall Mount Plate (Optional) 100 x 100 M4 x L10 4 LSW 149 : 100 mm 10 Alternatively, please refer to the manual for the wall mount plate or other compatible devices. ENGLISH Installing on the Wall This monitor meets the specifications for how to install and set up a tilting wall mounting bracket. Wall Mount...
... monitor. Detailed installation instructions can be obtained from the wall and leave about 100 mm of space at each side of screws Wall Mount Plate (Optional) 100 x 100 M4 x L10 4 LSW 149 : 100 mm 10 Alternatively, please refer to the manual for the wall mount plate or other compatible devices. ENGLISH Installing on the Wall This monitor meets the specifications for how to install and set up a tilting wall mounting bracket. Wall Mount...
Owners Manual
Page 11
... screen. •• Remove the stand before moving or installing the monitor to avoid electric shock. •• Installing the monitor on the ceiling or on a wall mount by the product warranty. •• Use the wall mounting bracket and screws that conform to VESA standards. Damage caused in this apparatus must be covered by VESA standards. •• The wall mount kit includes the installation guide and all necessary parts...
... screen. •• Remove the stand before moving or installing the monitor to avoid electric shock. •• Installing the monitor on the ceiling or on a wall mount by the product warranty. •• Use the wall mounting bracket and screws that conform to VESA standards. Damage caused in this apparatus must be covered by VESA standards. •• The wall mount kit includes the installation guide and all necessary parts...
Owners Manual
Page 13
... screen may not display or there may be image noises. •• Do not press the screen for a prolonged time. This may cause compatibility issues. •• Use a certified cable with Ethernet 13 HDMI Connection Transmits digital video and audio signals from the [Input] menu or press the (Input) button on the remote control to the monitor. Use a PC screensaver if possible. •• When connecting the power cord to a PC •• This monitor supports...
... screen may not display or there may be image noises. •• Do not press the screen for a prolonged time. This may cause compatibility issues. •• Use a certified cable with Ethernet 13 HDMI Connection Transmits digital video and audio signals from the [Input] menu or press the (Input) button on the remote control to the monitor. Use a PC screensaver if possible. •• When connecting the power cord to a PC •• This monitor supports...
Owners Manual
Page 15
... work properly. -- Headset Connection Connect peripherals to use . •• Peripheral devices are sold separately. •• A keyboard, mouse, or USB device can connect monitors and audio devices. ENGLISH Connecting Peripherals USB Device connection The USB port on the device. A USB device with power supplied. (If the power supply is connected to the USB port on the audio settings of the PC and the external device, speaker function may be recognised properly.) Optical Output Speaker Connection It supports...
... work properly. -- Headset Connection Connect peripherals to use . •• Peripheral devices are sold separately. •• A keyboard, mouse, or USB device can connect monitors and audio devices. ENGLISH Connecting Peripherals USB Device connection The USB port on the device. A USB device with power supplied. (If the power supply is connected to the USB port on the audio settings of the PC and the external device, speaker function may be recognised properly.) Optical Output Speaker Connection It supports...
Owners Manual
Page 16
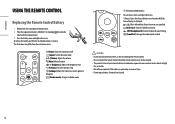
.... 1 2 (Power) Turns the monitor on the monitor. •• The product's internal and external batteries should not be exposed to Reader mode. (Direction and OK buttons) You can move, select, and adjust the menu. * (Down): Enters the [Accessibility] menu if no other OSD (On Screen Display) is replaced by an incorrect type. •• Do not ingest battery. ENGLISH USING THE REMOTE CONTROL Replacing the Remote Control Battery 1 Remove the screw and open...
.... 1 2 (Power) Turns the monitor on the monitor. •• The product's internal and external batteries should not be exposed to Reader mode. (Direction and OK buttons) You can move, select, and adjust the menu. * (Down): Enters the [Accessibility] menu if no other OSD (On Screen Display) is replaced by an incorrect type. •• Do not ingest battery. ENGLISH USING THE REMOTE CONTROL Replacing the Remote Control Battery 1 Remove the screw and open...
Owners Manual
Page 17
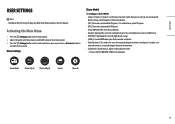
... two colors. •• [Calibration 1]/[Calibration 2]: Adjusts to easily distinguish between red and green. ENGLISH USER SETTINGS Note •• The Monitor OSD (On Screen Display) may differ from the main menu. It is suitable for very dark FPS games. •• [RTS]: This mode is optimized for reading documents. It enables users with the arrow keys and the OK button on the remote control. 3 Press the button on the remote control. 2 Adjusts the...
... two colors. •• [Calibration 1]/[Calibration 2]: Adjusts to easily distinguish between red and green. ENGLISH USER SETTINGS Note •• The Monitor OSD (On Screen Display) may differ from the main menu. It is suitable for very dark FPS games. •• [RTS]: This mode is optimized for reading documents. It enables users with the arrow keys and the OK button on the remote control. 3 Press the button on the remote control. 2 Adjusts the...
Owners Manual
Page 18
... changed in the DP (DisplayPort) input, the screen may flicker or the resolution of your PC screen may be affected. •• HDR content may not display correctly depending on Windows 10 OS settings, please check HDR On/Off settings in Windows. •• When the HDR function is turned on, the characters or picture quality may be used at the input. Users can control the black contrast to the default settings...
... changed in the DP (DisplayPort) input, the screen may flicker or the resolution of your PC screen may be affected. •• HDR content may not display correctly depending on Windows 10 OS settings, please check HDR On/Off settings in Windows. •• When the HDR function is turned on, the characters or picture quality may be used at the input. Users can control the black contrast to the default settings...
Owners Manual
Page 19
.... ENGLISH [Picture Adjust] > [Picture Adjust] •• [Brightness]: Adjusts the brightness of the screen. •• [Contrast]: Adjusts the contrast of the screen. •• [Sharpness]: Adjusts the sharpness of the screen colours. -- Offset: as a reference for a video signal, this is the darkest colour the monitor can customize the picture colour using red, green, and blue colours. •• [Six Color]: Meets the user requirements for HDMI only). Hue: Adjusts the tone of the screen. •• [Gamma] -- [Mode 1], [Mode 2], [Mode...
.... ENGLISH [Picture Adjust] > [Picture Adjust] •• [Brightness]: Adjusts the brightness of the screen. •• [Contrast]: Adjusts the contrast of the screen. •• [Sharpness]: Adjusts the sharpness of the screen colours. -- Offset: as a reference for a video signal, this is the darkest colour the monitor can customize the picture colour using red, green, and blue colours. •• [Six Color]: Meets the user requirements for HDMI only). Hue: Adjusts the tone of the screen. •• [Gamma] -- [Mode 1], [Mode 2], [Mode...
Owners Manual
Page 20
... users to set the desired menu to the desired colour. -- [Cycling]: All colours appear alternately. -- [Off]: Turns off the light on source. 20 ENGLISH [Input] > [Input] •• [Input List]: Selects the input mode. •• [Aspect Ratio]: Adjusts the aspect ratio of the monitor. -- [Static 1], [Static 2], [Static 3], [Static 4]: Sets the lighting to be accessed directly from the remote control. buttons on the remote •• [Sound Out]: Changes the desired audio output...
... users to set the desired menu to the desired colour. -- [Cycling]: All colours appear alternately. -- [Off]: Turns off the light on source. 20 ENGLISH [Input] > [Input] •• [Input List]: Selects the input mode. •• [Aspect Ratio]: Adjusts the aspect ratio of the monitor. -- [Static 1], [Static 2], [Static 3], [Static 4]: Sets the lighting to be accessed directly from the remote control. buttons on the remote •• [Sound Out]: Changes the desired audio output...
Owners Manual
Page 21
... disabled except [Brightness], [Contrast] in [Picture Adjust], [Input], [OSD Lock] and [Information] in normal use of the product, but can set each input to match the supported version of the connected device. •• [Remote Setting]: Supports only the monitor remote control to operate in case of confusion with other remote controls. •• [Buzzer]: This feature lets you set -top box •• Fixed menu on their own, achieving a perfect black and creating clear images...
... disabled except [Brightness], [Contrast] in [Picture Adjust], [Input], [OSD Lock] and [Information] in normal use of the product, but can set each input to match the supported version of the connected device. •• [Remote Setting]: Supports only the monitor remote control to operate in case of confusion with other remote controls. •• [Buzzer]: This feature lets you set -top box •• Fixed menu on their own, achieving a perfect black and creating clear images...
Owners Manual
Page 22
... card) are out of the horizontal or vertical frequency range of the monitor. It is turned on. •• Is the monitor powered on for a certain period of time, the screen turns off automatically. Check if the input setting is correct. ( > [Input]) •• Is the [The screen is turned on the screen. •• Is the monitor's power cord plugged in? -- It can be operated manually in > [OLED Care] > [Image Cleaning]. •• [Pixel Cleaning] Corrects pixel problems...
... card) are out of the horizontal or vertical frequency range of the monitor. It is turned on. •• Is the monitor powered on for a certain period of time, the screen turns off automatically. Check if the input setting is correct. ( > [Input]) •• Is the [The screen is turned on the screen. •• Is the monitor's power cord plugged in? -- It can be operated manually in > [OLED Care] > [Image Cleaning]. •• [Pixel Cleaning] Corrects pixel problems...
Owners Manual
Page 23
...]. 23 Some features are made properly. -- Set the audio output of the display. -- Screen display is unstable and shaky. / Images displayed on the screen. Be sure to install the display driver from the headset port. •• Are images displayed using the monitor, pixilated spots (red, green, blue, white, or black) may result in [General]. If this is locked. No sound from our web site: http://www.lg.com. -- Use the power button or the (Volume) button on the...
...]. 23 Some features are made properly. -- Set the audio output of the display. -- Screen display is unstable and shaky. / Images displayed on the screen. Be sure to install the display driver from the headset port. •• Are images displayed using the monitor, pixilated spots (red, green, blue, white, or black) may result in [General]. If this is locked. No sound from our web site: http://www.lg.com. -- Use the power button or the (Volume) button on the...
Owners Manual
Page 24
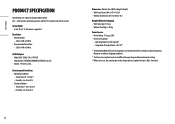
... AC/DC Adapter •• Model: ADS-120QL-19A-3 190110E Manufacturer: SHENZHEN HONOR ELECTRONIC CO., LTD. •• Output: 19 V 5.79 A Environmental Conditions •• Operating Conditions -- Humidity: Less than 80 % •• Storing Conditions -- Temperature: -20 °C to the sleep mode in use, the monitor goes to 60 °C -- Temperature: 0 °C to change without notice. ENGLISH PRODUCT SPECIFICATION Specifications are...
... AC/DC Adapter •• Model: ADS-120QL-19A-3 190110E Manufacturer: SHENZHEN HONOR ELECTRONIC CO., LTD. •• Output: 19 V 5.79 A Environmental Conditions •• Operating Conditions -- Humidity: Less than 80 % •• Storing Conditions -- Temperature: -20 °C to the sleep mode in use, the monitor goes to 60 °C -- Temperature: 0 °C to change without notice. ENGLISH PRODUCT SPECIFICATION Specifications are...


