
Owners Manual
Page 2
... code provides guidelines for compliance could void the CAUTION: Do not attempt to persons. The exctamafJon point within an equi_atetaJ triangle is : LG Electronics U,S.A., }nc. 1000 Sy_v_ Avenue, Englewood Cliffs, NJ 07632 Phone: 1-201-816-2000 ht_4a:i/www.lgu_.com 2 U.S.A. This ...with the in_ructions, may cause harmful interference to provide reasonable protection against harmfu_ interference in a particular insteHation. NOTE TO CABLE/TV |NSTALLER: This reminder is connected. Any chants or modifications not expressly approved by the pa_ user's authority to operate ...
... code provides guidelines for compliance could void the CAUTION: Do not attempt to persons. The exctamafJon point within an equi_atetaJ triangle is : LG Electronics U,S.A., }nc. 1000 Sy_v_ Avenue, Englewood Cliffs, NJ 07632 Phone: 1-201-816-2000 ht_4a:i/www.lgu_.com 2 U.S.A. This ...with the in_ructions, may cause harmful interference to provide reasonable protection against harmfu_ interference in a particular insteHation. NOTE TO CABLE/TV |NSTALLER: This reminder is connected. Any chants or modifications not expressly approved by the pa_ user's authority to operate ...
Owners Manual
Page 4
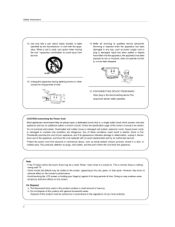
... must be placed upon , Pay particular attention to ptugs, wall outlets, and the point where the cord exits the appliance f Note If the TV fee_s cold to be a small "flicker _ when when it is damaged, liquid has been spilled or obje_ have the cord replaced with the ...when the apparatus has been damaged in accordance to rain or moisture, does not operate normally, or has been dropped. 13, Unplug this product with TV, - On Disposal a. The fluorescent lamp used , use of mercury. Check the specification page of this product contains a stroll amount of the appliance_...
... must be placed upon , Pay particular attention to ptugs, wall outlets, and the point where the cord exits the appliance f Note If the TV fee_s cold to be a small "flicker _ when when it is damaged, liquid has been spilled or obje_ have the cord replaced with the ...when the apparatus has been damaged in accordance to rain or moisture, does not operate normally, or has been dropped. 13, Unplug this product with TV, - On Disposal a. The fluorescent lamp used , use of mercury. Check the specification page of this product contains a stroll amount of the appliance_...
Owners Manual
Page 5
... Extras 8 Controls 9 Connection Options 10~1i Remote Control Key Function 12 13 14 15 16~ ! 7 18~ ! 9 20-21 22 22 23 24--26 Attaching the TV to a wall Desktop Pedestal Installation Basic Connection Antenna or Cable Connection VC R Setup DVD Setup HDSTB Setup External AV Source Setup AV Out Setup Digital... 27 27 27 28 29 29 30 31 31 32 33 33~34 35 36 36 37 38 38 39 40 40 Turning on the TV 'volume Adjustment Channel Selection On Screen Menus Language Selection On Screen Menus Selection and Adjustment EZ Scan (Channel Search) Manual Scan Channei Edit DTV Signal...
... Extras 8 Controls 9 Connection Options 10~1i Remote Control Key Function 12 13 14 15 16~ ! 7 18~ ! 9 20-21 22 22 23 24--26 Attaching the TV to a wall Desktop Pedestal Installation Basic Connection Antenna or Cable Connection VC R Setup DVD Setup HDSTB Setup External AV Source Setup AV Out Setup Digital... 27 27 27 28 29 29 30 31 31 32 33 33~34 35 36 36 37 38 38 39 40 40 Turning on the TV 'volume Adjustment Channel Selection On Screen Menus Language Selection On Screen Menus Selection and Adjustment EZ Scan (Channel Search) Manual Scan Channei Edit DTV Signal...
Owners Manual
Page 7
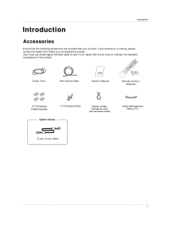
User must use shield signat interface cable (D*sub 15 pin cable) with the twister holden Cable Management (Refer p.14) D-sub 15 pin Cabte 7 Power Cord 75_ Round Cable Owners Manual Remote Control / Batteries 2oTV brackets 2-Wall brackets 2-TV Bracket BoiLs Option Extras Twister Holder Arrange the wires with ferrite cores to maintain the standard compliance for the 3roduct. int n Introduction Ensure that the following a_essories are included with your product, if any accessory is missing, please contact the dealer from where you purchased the product.
User must use shield signat interface cable (D*sub 15 pin cable) with the twister holden Cable Management (Refer p.14) D-sub 15 pin Cabte 7 Power Cord 75_ Round Cable Owners Manual Remote Control / Batteries 2oTV brackets 2-Wall brackets 2-TV Bracket BoiLs Option Extras Twister Holder Arrange the wires with ferrite cores to maintain the standard compliance for the 3roduct. int n Introduction Ensure that the following a_essories are included with your product, if any accessory is missing, please contact the dealer from where you purchased the product.
Owners Manual
Page 8
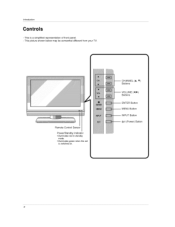
VOLUME (_i,!_) Buttons -- ENTER Button MENU Button INPUT Button Oil (Power) Button 8 Introduction - CHANNEL (A, T) Buttons -- This is switched on. This picture shown below may be somewhat different from your TV, Remote Control Sensor Power/Standby Indicator t illuminates red in standby mode. • illuminates green when _e set is a simplified representation of front panel -
VOLUME (_i,!_) Buttons -- ENTER Button MENU Button INPUT Button Oil (Power) Button 8 Introduction - CHANNEL (A, T) Buttons -- This is switched on. This picture shown below may be somewhat different from your TV, Remote Control Sensor Power/Standby Indicator t illuminates red in standby mode. • illuminates green when _e set is a simplified representation of front panel -
Owners Manual
Page 9
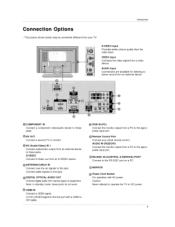
...types of equipment. video/audio device to these ports do not work. @ HDMI IN Connect a HDMt signal. Note: In standby mode, these Connect a second TV or monitor. @AV (Audio/Video) IN 1 Connect audio/video output from an external device to the appro° pnate input port. @ Remote Control Port...CABLE IN Connect over-the air signals to this jack, Connect cable signals to this port with AC power, Caution: Never attempt to operate the TV on DC power. 9 S-VIDEO Input Provides better picture quality than the video, input, VIDEO Input Connects the video signai from your wired remote ...
...types of equipment. video/audio device to these ports do not work. @ HDMI IN Connect a HDMt signal. Note: In standby mode, these Connect a second TV or monitor. @AV (Audio/Video) IN 1 Connect audio/video output from an external device to the appro° pnate input port. @ Remote Control Port...CABLE IN Connect over-the air signals to this jack, Connect cable signals to this port with AC power, Caution: Never attempt to operate the TV on DC power. 9 S-VIDEO Input Provides better picture quality than the video, input, VIDEO Input Connects the video signai from your wired remote ...
Owners Manual
Page 10
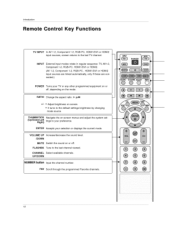
.... 1o Adjust brightness on or off , depending on the mode, RATIO Change the aspect ratio, _ pA4 +/- e it turns to the last TV channel. ENTER Accepts your TV or any other programmed equipment on or off , FLASHBK Tune to you r preference. Introduction Remote Control Key Functions...onoscreen menus and adjust the system set- (Up/Down/Left Right) tings to the last channel viewed. INPUT External input modes rotate in regular sequence: TV, AVl-2, Component 1-2, RGB-PC, HDMI1iDVl or HDMI2. (AV 1-2_ Component 1-2, RGB-PC, HDMI1!DVt or HDMI2 input sources are linked automatically, only...
.... 1o Adjust brightness on or off , depending on the mode, RATIO Change the aspect ratio, _ pA4 +/- e it turns to the last TV channel. ENTER Accepts your TV or any other programmed equipment on or off , FLASHBK Tune to you r preference. Introduction Remote Control Key Functions...onoscreen menus and adjust the system set- (Up/Down/Left Right) tings to the last channel viewed. INPUT External input modes rotate in regular sequence: TV, AVl-2, Component 1-2, RGB-PC, HDMI1iDVl or HDMI2. (AV 1-2_ Component 1-2, RGB-PC, HDMI1!DVt or HDMI2 input sources are linked automatically, only...
Owners Manual
Page 11
... EXiT CC MENU SAP TIMER Ctear all on the viewing environment.(red) _ p.33 Setect the appropriate type of sound for the remote to TV viewing from any menu. Select the amount of the screen (blue) VCRiDVD Control video cassette recorders or DVD players. Select a closed caption ...(*in PC mode.(yellow) _ p.26 Disptay information at the top of time before your TV turns off automatically. _ p.42 11 RGB-PC Directly; Select other operating modes, for type of program.(green) _ p.38 Adjust the screen position, ...
... EXiT CC MENU SAP TIMER Ctear all on the viewing environment.(red) _ p.33 Setect the appropriate type of sound for the remote to TV viewing from any menu. Select the amount of the screen (blue) VCRiDVD Control video cassette recorders or DVD players. Select a closed caption ...(*in PC mode.(yellow) _ p.26 Disptay information at the top of time before your TV turns off automatically. _ p.42 11 RGB-PC Directly; Select other operating modes, for type of program.(green) _ p.38 Adjust the screen position, ...
Owners Manual
Page 12
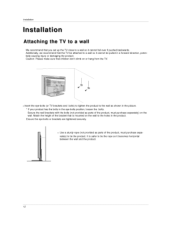
.... Caution: Please make sure that is safer to a wall so it cannot faii over if pushed backwards. on or hang from the TV. We recommend that the TV be attached to tie the rope so it becomes horizontal between the wall and the product. !2 f o Insert the eye-bolts (or...so it cannot be pulled in the eye-bolts position, loosen the bolts. direction, poten- Installation Attaching the TV to tie the product. Additionally, we recommend that you set up the TV close to the wall as parts of the product, must purchase separately) wall. Secure the wall brackets with...
.... Caution: Please make sure that is safer to a wall so it cannot faii over if pushed backwards. on or hang from the TV. We recommend that the TV be attached to tie the rope so it becomes horizontal between the wall and the product. !2 f o Insert the eye-bolts (or...so it cannot be pulled in the eye-bolts position, loosen the bolts. direction, poten- Installation Attaching the TV to tie the product. Additionally, we recommend that you set up the TV close to the wall as parts of the product, must purchase separately) wall. Secure the wall brackets with...
Owners Manual
Page 13
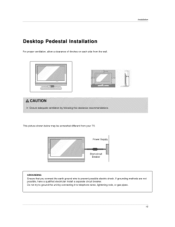
Desktop Pedestal Installation For proper ventilation, allow a clearance of 4inches on each side from the wall, lnsL_flation This picture shown below may be somewhat different from your TV Power Supply ShoRocircuit Breaker GROUNDING Ensure that you connect the earth ground wire to telephone wires, lightening rods, or gas pipes. If grounding methods possible, have a qualified e_ectdcian install a separate circuit breaker_ Do not try to ground the unit by connecting it to prevent possibte electric shock. are not 13
Desktop Pedestal Installation For proper ventilation, allow a clearance of 4inches on each side from the wall, lnsL_flation This picture shown below may be somewhat different from your TV Power Supply ShoRocircuit Breaker GROUNDING Ensure that you connect the earth ground wire to telephone wires, lightening rods, or gas pipes. If grounding methods possible, have a qualified e_ectdcian install a separate circuit breaker_ Do not try to ground the unit by connecting it to prevent possibte electric shock. are not 13
Owners Manual
Page 15
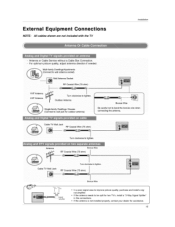
Externa I Eq uipment Connect ons NOTE: All cables shown are not included with the TV lnsL_flation Turn cE_kw!se to _gh_n . £ BIroRze Wite _i I_._ _ sig#a amplifier * In a poor signa_ area to improve picture quality, purchase and install a signat amplifier. • ff the antenna needs to be split for assistance. 15 If the antenna is not installed properly, contact your dea_er for two TV_s, install a '_2_Way Signat Splitter" in the connections -
Externa I Eq uipment Connect ons NOTE: All cables shown are not included with the TV lnsL_flation Turn cE_kw!se to _gh_n . £ BIroRze Wite _i I_._ _ sig#a amplifier * In a poor signa_ area to improve picture quality, purchase and install a signat amplifier. • ff the antenna needs to be split for assistance. 15 If the antenna is not installed properly, contact your dea_er for two TV_s, install a '_2_Way Signat Splitter" in the connections -
Owners Manual
Page 16
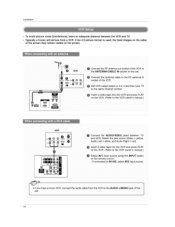
... input source using the iNPUT button on the screen. To avoid picture noise (interference), leave an adequate distance between TV and VCR. VCR [] O Connect the AUDIO/VIDEO lacks between the VCR and TV. - Typically a frozen still picture from a VCR. select AV2 input source, 16 Insert a video Lape into the VCR and press...
... input source using the iNPUT button on the screen. To avoid picture noise (interference), leave an adequate distance between TV and VCR. VCR [] O Connect the AUDIO/VIDEO lacks between the VCR and TV. - Typically a frozen still picture from a VCR. select AV2 input source, 16 Insert a video Lape into the VCR and press...
Owners Manual
Page 20
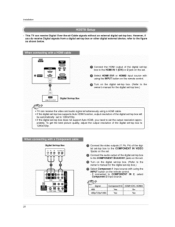
Turn on the set owner!s manual for the digital set4op boX.) Digital Set-top Box • TV can receive Digital Over-the-air/Cable signals without an external digital set4op box. Installation This TV can receive the video and audio signal simultaneously using the INPUT button on the remote control. priately. To get...
Turn on the set owner!s manual for the digital set4op boX.) Digital Set-top Box • TV can receive Digital Over-the-air/Cable signals without an external digital set4op box. Installation This TV can receive the video and audio signal simultaneously using the INPUT button on the remote control. priately. To get...
Owners Manual
Page 22
If connected to external equipment operating guide. and HDMI2 sources are - Q Operate the corresponding external equipment. Refer to AM IN1 input, select AV1 input source. The TV has a special signal output capability which allows you to hook up a second TV or monitor. 22 RGB, HDMtl/DVl connected. Match the iack co$ors (Video = yellow, Audio Left = white, and Audio Right = red), Select AV2 input source with using the INPUT button on the remote control - Installation Connect the AUDIO!VIDEO jacks between TV and external equipment.
If connected to external equipment operating guide. and HDMI2 sources are - Q Operate the corresponding external equipment. Refer to AM IN1 input, select AV1 input source. The TV has a special signal output capability which allows you to hook up a second TV or monitor. 22 RGB, HDMtl/DVl connected. Match the iack co$ors (Video = yellow, Audio Left = white, and Audio Right = red), Select AV2 input source with using the INPUT button on the remote control - Installation Connect the AUDIO!VIDEO jacks between TV and external equipment.

Owners Manual
Page 23
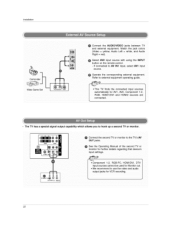
lnsL_flation - Connect the other end of an optical cable to the digital audio optical input on the audio equipment. See the external audio equipment instruction manual for operation. When connecting with external audio equipments, such as amplifiers or speakers, please turn the TV speakers off. (Refer to external; Send the TV's audio to p.40) 23 audio equipment (stereo system) via the Digital Audio Output Optical port, 0 Connect one end of the optical cable to the TV Digital Audio Optical Output port.
lnsL_flation - Connect the other end of an optical cable to the digital audio optical input on the audio equipment. See the external audio equipment instruction manual for operation. When connecting with external audio equipments, such as amplifiers or speakers, please turn the TV speakers off. (Refer to external; Send the TV's audio to p.40) 23 audio equipment (stereo system) via the Digital Audio Output Optical port, 0 Connect one end of the optical cable to the TV Digital Audio Optical Output port.
Owners Manual
Page 24
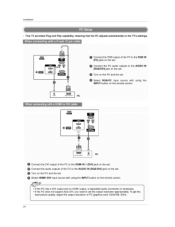
Connect the audio ou_uts of the PC to the HDM_ IN 1 (DVI) jack on the set . Turn on the PC and the se[ Select HDMH/DMI input source with using the INPUT button on the set . PC Connect the DVI output of the PC to the TV's settings. ! Installation This TV provides Plug and Play capability, meaning that the PC adjusts automatically to the AUDIO JN (RGBiDVI) jack on the remote control 24
Connect the audio ou_uts of the PC to the HDM_ IN 1 (DVI) jack on the set . Turn on the PC and the se[ Select HDMH/DMI input source with using the INPUT button on the set . PC Connect the DVI output of the PC to the TV's settings. ! Installation This TV provides Plug and Play capability, meaning that the PC adjusts automatically to the AUDIO JN (RGBiDVI) jack on the remote control 24

Owners Manual
Page 25
... to another resolution, change the PC graphic card or consult the manufacturer of the PC graphic card. 6 Avoid keeping a fixed image on the TV's screen for Horizontal and Vertical frequencies is clear, If the refresh rate of = HDMI/DVl Source Devices or contact your service center. 4. if... graphic card can not be noise associated with the resofution, vertical pattern, contrast or brightness in PC, HDMtiDVl mode. Refer to the Manual of TV SET and contact an PC graphics card service center. 3 When Source Devices connected with HDMt/DVl Input, output PC Resolution (VGA, SVGA, XGA...
... to another resolution, change the PC graphic card or consult the manufacturer of the PC graphic card. 6 Avoid keeping a fixed image on the TV's screen for Horizontal and Vertical frequencies is clear, If the refresh rate of = HDMI/DVl Source Devices or contact your service center. 4. if... graphic card can not be noise associated with the resofution, vertical pattern, contrast or brightness in PC, HDMtiDVl mode. Refer to the Manual of TV SET and contact an PC graphics card service center. 3 When Source Devices connected with HDMt/DVl Input, output PC Resolution (VGA, SVGA, XGA...

Owners Manual
Page 27
... you want to standby mode. 1. The menus can cancel this moment, the TV switches to the previous menu. 27 Operatio_ Basic operation 1. In standby mode to turn TV on, press the _/I, INPUT, CH A / f button on the TV or press the POWER, TV INPUT, INPUT, CH A / 'V, Number (0 ~ 9) button on the remote control. ... From this point on, the on°screen menus wNI be shown on the remote control This TV is programmed to remember which power state it was last set to select a channel number. - The TV reverts to switch the sound off, press the MUTE button, 3. Press the VOL ,i I V or NUMBER...
... you want to standby mode. 1. The menus can cancel this moment, the TV switches to the previous menu. 27 Operatio_ Basic operation 1. In standby mode to turn TV on, press the _/I, INPUT, CH A / f button on the TV or press the POWER, TV INPUT, INPUT, CH A / 'V, Number (0 ~ 9) button on the remote control. ... From this point on, the on°screen menus wNI be shown on the remote control This TV is programmed to remember which power state it was last set to select a channel number. - The TV reverts to switch the sound off, press the MUTE button, 3. Press the VOL ,i I V or NUMBER...
Owners Manual
Page 29
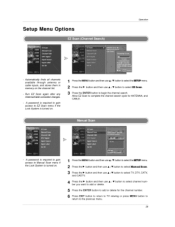
... SETUP menu. 2 Press the I_ button and then use ,I_ / V button to select Memua! 8¢_. 3 Press the I_ button and then use A / I' button to select TV, DTV, CATV, and CADTV. 4 Press the t_ button and then use A / • button to select £Z Scan. 3 Press the ENTER button to begin the channel... search. Ailow EZ Scan to complete the channel search cycle for the channel number. 6 Press EXIT button to return to TV viewing or press MENU button to return to Manual Scan menu if the Lock System is turned on the channel list. Setup Menu Optioins - Run...
... SETUP menu. 2 Press the I_ button and then use ,I_ / V button to select Memua! 8¢_. 3 Press the I_ button and then use A / I' button to select TV, DTV, CATV, and CADTV. 4 Press the t_ button and then use A / • button to select £Z Scan. 3 Press the ENTER button to begin the channel... search. Ailow EZ Scan to complete the channel search cycle for the channel number. 6 Press EXIT button to return to TV viewing or press MENU button to return to Manual Scan menu if the Lock System is turned on the channel list. Setup Menu Optioins - Run...
Owners Manual
Page 30
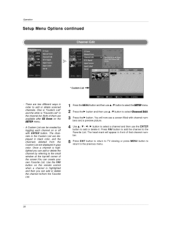
..." n s conti "n ued - There are displayed in gray color: Once a channel is "Favorite List" in front of that channel number 5 Press EXIT button to return to TV viewing or press MENU button to return to the small window at the topqeft corner of them are available after' EZ Scan on the SJ_T...
..." n s conti "n ued - There are displayed in gray color: Once a channel is "Favorite List" in front of that channel number 5 Press EXIT button to return to TV viewing or press MENU button to return to the small window at the topqeft corner of them are available after' EZ Scan on the SJ_T...


