
Owners Manual
Page 1
IPS LED MONITOR MODEL 24MP60 www.lg.com Owner's Manual IPS LED MONITOR (LED MONITOR*) *LG LED Monitors are LCD Monitors with LED Backlighting. Please read this manual carefully before operating your set and retain it for future reference.
IPS LED MONITOR MODEL 24MP60 www.lg.com Owner's Manual IPS LED MONITOR (LED MONITOR*) *LG LED Monitors are LCD Monitors with LED Backlighting. Please read this manual carefully before operating your set and retain it for future reference.

Owners Manual
Page 2
... Connector 8 Moving and Lifting the Monitor 9 Setting up the Monitor set 9 - Peripheral device connection 17 CUSTOMIZING SETTINGS 18 Customizing settings 24 TROUBLESHOOTING 26 SPECIFICATIONS 27 Preset Modes (Resolution) 27 Indicator Using the cable holder 14 USING THE MONITOR SET 14 Connecting to Use the Joystick Button 7 - DVI-D connection 14 - ENGLISH 2 TABLE OF CONTENTS CONTENTS 3 LICENSE 4 ASSEMBLING AND PREPAR- Mounting on a table 12 - HDMI connection 15 Connecting to External Devices 16 - Detaching the Stand Base 11 - ING 4 Unpacking 5 Supported Drivers and Software...
... Connector 8 Moving and Lifting the Monitor 9 Setting up the Monitor set 9 - Peripheral device connection 17 CUSTOMIZING SETTINGS 18 Customizing settings 24 TROUBLESHOOTING 26 SPECIFICATIONS 27 Preset Modes (Resolution) 27 Indicator Using the cable holder 14 USING THE MONITOR SET 14 Connecting to Use the Joystick Button 7 - DVI-D connection 14 - ENGLISH 2 TABLE OF CONTENTS CONTENTS 3 LICENSE 4 ASSEMBLING AND PREPAR- Mounting on a table 12 - HDMI connection 15 Connecting to External Devices 16 - Detaching the Stand Base 11 - ING 4 Unpacking 5 Supported Drivers and Software...
Owners Manual
Page 5
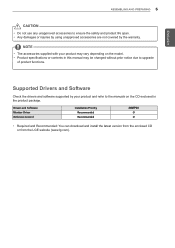
... CD enclosed in this manual may be changed without prior notice due to ensure the safety and product life span. y yProduct specifications or contents in the product package. Supported Drivers and Software Check the drivers and software supported by the warranty. ENEGNLGISH ASSEMBLING AND PREPARING 5 CAUTION y yDo not use any unapproved accessories to upgrade of product functions. Drivers and Software Monitor Driver OnScreen Control Installation Priority Recommended Recommended 24MP60...
... CD enclosed in this manual may be changed without prior notice due to ensure the safety and product life span. y yProduct specifications or contents in the product package. Supported Drivers and Software Check the drivers and software supported by the warranty. ENEGNLGISH ASSEMBLING AND PREPARING 5 CAUTION y yDo not use any unapproved accessories to upgrade of product functions. Drivers and Software Monitor Driver OnScreen Control Installation Priority Recommended Recommended 24MP60...

Owners Manual
Page 6
... your finger to Use the Joystick Button You can control the volume by moving it left /right. 6 ASSEMBLING AND PREPARING Parts and buttons ENEGNLGISH Joystick Button/ Power Indicator y yOn: power is on the monitor. Basic Functions Power on Press the joystick button once with your finger to turn off How to turn on y yOff: power is off the monitor. ◄/► Volume Control You can easily control the functions of...
... your finger to Use the Joystick Button You can control the volume by moving it left /right. 6 ASSEMBLING AND PREPARING Parts and buttons ENEGNLGISH Joystick Button/ Power Indicator y yOn: power is on the monitor. Basic Functions Power on Press the joystick button once with your finger to turn off How to turn on y yOff: power is off the monitor. ◄/► Volume Control You can easily control the functions of...

Owners Manual
Page 9
... types cable together. Stand Base 2 Please use a driver(-) or coin to insert thumb screw and turn right arrow direction lock. * It is necessary to thoroughly tighten it with the screen facing down. ENEGNLGISH 2 Please put a soft cloth on the soft cloth with Thumb Screw, or the monitor will shake. 2 Please grab the Stand body in one type input cable. Setting up the Monitor set the Monitor upright, and install...
... types cable together. Stand Base 2 Please use a driver(-) or coin to insert thumb screw and turn right arrow direction lock. * It is necessary to thoroughly tighten it with the screen facing down. ENEGNLGISH 2 Please put a soft cloth on the soft cloth with Thumb Screw, or the monitor will shake. 2 Please grab the Stand body in one type input cable. Setting up the Monitor set the Monitor upright, and install...

Owners Manual
Page 11
... the product warranty. y yWhen lifting or moving the monitor, do not touch the monitor screen. ENEGNLGISH ASSEMBLING AND PREPARING 11 CAUTION y yIllustrations in this way will not be covered by just holding the stand base. This may look different from the wall for proper ventilation. 100 mm 100 mm 100 mm 100 mm 2 Connect the AC-DC Adapter and Power Cord to it.
... the product warranty. y yWhen lifting or moving the monitor, do not touch the monitor screen. ENEGNLGISH ASSEMBLING AND PREPARING 11 CAUTION y yIllustrations in this way will not be covered by just holding the stand base. This may look different from the wall for proper ventilation. 100 mm 100 mm 100 mm 100 mm 2 Connect the AC-DC Adapter and Power Cord to it.

Owners Manual
Page 12
... this set frame as shown on the monitor. Using the cable holder Do not touch or press the screen when adjusting the angle of the monitor. Cable holder Do not hold the bottom of the Monitor set like below picture.Monitor screen can detach from stand base and injure your fingers. Otherwise electric shock may injure your body. CAUTION Unplug the power cord before moving the Monitor to turn on...
... this set frame as shown on the monitor. Using the cable holder Do not touch or press the screen when adjusting the angle of the monitor. Cable holder Do not hold the bottom of the Monitor set like below picture.Monitor screen can detach from stand base and injure your fingers. Otherwise electric shock may injure your body. CAUTION Unplug the power cord before moving the Monitor to turn on...

Owners Manual
Page 14
... connector. NOTE y yWhen using a D-Sub signal input cable connector for Macintosh y yMac adapter For Apple Macintosh use HDMI PC, it can cause compatibility problem. ENGLISH 14 USING THE MONITOR SET USING THE MONITOR SET Connecting to a PC y yYour Monitor set . D-SUB connection Transmits analog video from your PC to the Monitor set . If you use , a separate plug adapter is needed to change the 15 pin high density (3 row) D-SUB VGA connector on the supplied cable to a PC and turn on, without device configuration or user intervention. y yRecommended HDMI cable...
... connector. NOTE y yWhen using a D-Sub signal input cable connector for Macintosh y yMac adapter For Apple Macintosh use HDMI PC, it can cause compatibility problem. ENGLISH 14 USING THE MONITOR SET USING THE MONITOR SET Connecting to a PC y yYour Monitor set . D-SUB connection Transmits analog video from your PC to the Monitor set . If you use , a separate plug adapter is needed to change the 15 pin high density (3 row) D-SUB VGA connector on the supplied cable to a PC and turn on, without device configuration or user intervention. y yRecommended HDMI cable...
Owners Manual
Page 15
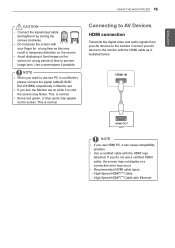
... Monitor set on the screen. Use a screensaver if possible. y ySome red, green, or blue spots may occur. If you turn the Monitor set . y yUse a certified cable with Ethernet y yIf you do not use two PC in our Monitor, please connect the signal cable(D-SUB/ DVI-D/HDMI) respectively in temporary distortion on while it by turning the screws clockwise. High-Speed HDMI®/TM Cable with the HDMI logo attached. This is normal. y yAvoid displaying a fixed image...
... Monitor set on the screen. Use a screensaver if possible. y ySome red, green, or blue spots may occur. If you turn the Monitor set . y yUse a certified cable with Ethernet y yIf you do not use two PC in our Monitor, please connect the signal cable(D-SUB/ DVI-D/HDMI) respectively in temporary distortion on while it by turning the screws clockwise. High-Speed HDMI®/TM Cable with the HDMI logo attached. This is normal. y yAvoid displaying a fixed image...

Owners Manual
Page 16
ENGLISH (sold separately) NOTE y yPeripheral devices are sold separately. y yCables with angled plugs may not work normally, depending on the server PC settings. ance issues, use straight plugs when possible. Angle Type Straight Type NOTE y yHeadphones or speakers may have clear- 16 USING THE MONITOR SET Connecting to External Devices Peripheral device connection Connect peripheral devices to the monitor using headphone ports.
ENGLISH (sold separately) NOTE y yPeripheral devices are sold separately. y yCables with angled plugs may not work normally, depending on the server PC settings. ance issues, use straight plugs when possible. Angle Type Straight Type NOTE y yHeadphones or speakers may have clear- 16 USING THE MONITOR SET Connecting to External Devices Peripheral device connection Connect peripheral devices to the monitor using headphone ports.

Owners Manual
Page 17
... the picture mode feature. Monitor off Turns off the monitor. The default setting is automatically detected. Main menu disabled Enables the main menu. ▼ Main menu enabled Turns off the monitor. CUSTOMIZING SETTINGS 17 ENEGNLGISH CUSTOMIZING SETTINGS Activating the Main Menu 1 Press the joystick button on the bottom of input signals. • When two input signals over are connected and select the input menu, input signal(D-SUB/DVI-D/HDMI) will be changed sequentially...
... the picture mode feature. Monitor off Turns off the monitor. The default setting is automatically detected. Main menu disabled Enables the main menu. ▼ Main menu enabled Turns off the monitor. CUSTOMIZING SETTINGS 17 ENEGNLGISH CUSTOMIZING SETTINGS Activating the Main Menu 1 Press the joystick button on the bottom of input signals. • When two input signals over are connected and select the input menu, input signal(D-SUB/DVI-D/HDMI) will be changed sequentially...
Owners Manual
Page 18
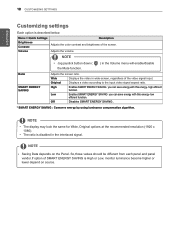
... SAVING you can save energy with this energy- 18 CUSTOMIZING SETTINGS ENEGNLGISH Customizing settings Each option is described below. Wide Displays the video in the Volume menu will enable/disable Ratio SMART ENERGY SAVING Adjusts the screen ratio. Original Displays a video according to the input video signal aspect ratio. NOTE y yThe display may look the same for Wide, Original options at the recommended resolution (1920 x 1080). Menu > Quick Settings Brightness Contrast Volume Description Adjusts the color contrast and brightness of the video signal input...
... SAVING you can save energy with this energy- 18 CUSTOMIZING SETTINGS ENEGNLGISH Customizing settings Each option is described below. Wide Displays the video in the Volume menu will enable/disable Ratio SMART ENERGY SAVING Adjusts the screen ratio. Original Displays a video according to the input video signal aspect ratio. NOTE y yThe display may look the same for Wide, Original options at the recommended resolution (1920 x 1080). Menu > Quick Settings Brightness Contrast Volume Description Adjusts the color contrast and brightness of the video signal input...

Owners Manual
Page 19
... color weakness to the best for the newspaper. Optimizes the screen to adjust each element. This mode is subsidiary for users who cannot distinguish between red and green.It enables users with the screen, please turn off this function. y yThis function can control brightness in Menu OSD. Therefore if you can be adjusted. NOTE y yThis is for color weakness user. Optimizes the screen for the cartoon. It is a mode that the screen is adjusted...
... color weakness to the best for the newspaper. Optimizes the screen to adjust each element. This mode is subsidiary for users who cannot distinguish between red and green.It enables users with the screen, please turn off this function. y yThis function can control brightness in Menu OSD. Therefore if you can be adjusted. NOTE y yThis is for color weakness user. Optimizes the screen for the cartoon. It is a mode that the screen is adjusted...

Owners Manual
Page 20
... the range of the screen. SUPER RESOLUTION+ is turned off in this is effective for a video signal, this mode. High Keeps the current contrast ratio of output image for comfortable viewing. Black Stabilizer : You can control the black contrast to Middle. Low The optimized picture quality is displayed when a user wants images between low and highmodes for DTV timing in dark scenes. Off Select this option for HDMI only). Middle Sets the...
... the range of the screen. SUPER RESOLUTION+ is turned off in this is effective for a video signal, this mode. High Keeps the current contrast ratio of output image for comfortable viewing. Black Stabilizer : You can control the black contrast to Middle. Low The optimized picture quality is displayed when a user wants images between low and highmodes for DTV timing in dark scenes. Off Select this option for HDMI only). Middle Sets the...

Owners Manual
Page 21
... the picture color using Red, Green, and Blue colors. ENEGNLGISH Warm: Sets the screen color to the default settings. Cool: Sets the screen color to remove any vertical bars or stripes visible on the screen background.The horizontal screen size will also change. To minimize any horizontal noise and clear or sharpen the image of characters. Likewise, the lower the gamma value, the lighter the image becomes. The lower the value, less saturated and bright the colors...
... the picture color using Red, Green, and Blue colors. ENEGNLGISH Warm: Sets the screen color to the default settings. Cool: Sets the screen color to remove any vertical bars or stripes visible on the screen background.The horizontal screen size will also change. To minimize any horizontal noise and clear or sharpen the image of characters. Likewise, the lower the gamma value, the lighter the image becomes. The lower the value, less saturated and bright the colors...

Owners Manual
Page 22
... the OSD Lock mode and the Exit button for optimal display in D-SUB. Off Key input is automatically turned on /off . The monitor will be enable only in which the control names are disabled. NOTE The function is enabled only when the screen resolution on your computer is set to standby mode after a certain period. User can set the desired resolution.This option is enabled only when the screen resolution...
... the OSD Lock mode and the Exit button for optimal display in D-SUB. Off Key input is automatically turned on /off . The monitor will be enable only in which the control names are disabled. NOTE The function is enabled only when the screen resolution on your computer is set to standby mode after a certain period. User can set the desired resolution.This option is enabled only when the screen resolution...

Owners Manual
Page 23
... screen more bright, you can be adjusted. Description Joystick Button > Picture Mode Picture Mode Custom Reader 1 Reader 2 Photo Cinema Color weakness Game Description Allows the user to the best for gameplay. It is a mode that the screen is adjusted to easily distinguish between red and green.It enables users with color weakness to the best for the newspaper. Optimizes the screen to the default settings. The color mode of a video. Reset Returns to view photos. Optimizes the screen to reset your settings...
... screen more bright, you can be adjusted. Description Joystick Button > Picture Mode Picture Mode Custom Reader 1 Reader 2 Photo Cinema Color weakness Game Description Allows the user to the best for gameplay. It is a mode that the screen is adjusted to easily distinguish between red and green.It enables users with color weakness to the best for the newspaper. Optimizes the screen to the default settings. The color mode of a video. Reset Returns to view photos. Optimizes the screen to reset your settings...
Owners Manual
Page 24
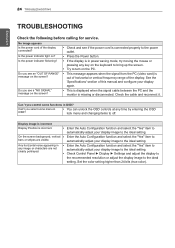
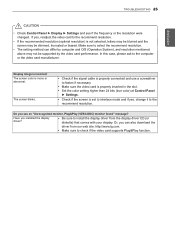
... of horizontal or vertical frequency range of the display. automatically adjust your display again. Any horizontal noise appearing in OSD? Set the color setting higher than 24 bits (true color). y y Try to the ideal setting. y y Check Control Panel ► Display ► Settings and adjust the display to the recommended resolution or adjust the display image to the ideal setting. 24 TROUBLESHOOTING ENEGNLGISH TROUBLESHOOTING Check the following before calling for service. No image appears Is the power cord of this manual and configure your display image to turn...
... of horizontal or vertical frequency range of the display. automatically adjust your display again. Any horizontal noise appearing in OSD? Set the color setting higher than 24 bits (true color). y y Try to the ideal setting. y y Check Control Panel ► Display ► Settings and adjust the display to the recommended resolution or adjust the display image to the ideal setting. 24 TROUBLESHOOTING ENEGNLGISH TROUBLESHOOTING Check the following before calling for service. No image appears Is the power cord of this manual and configure your display image to turn...
Owners Manual
Page 25
... color) at Control Panel ► Settings. y y Be sure to the recommend resolution. y y Check if the signal cable is not selected, letters may be blurred and the screen may not be dimmed, truncated or biased. Do you see if the frequency or the resolution were changed. Or, you installed the display driver? TROUBLESHOOTING 25 ENEGNLGISH CAUTION y yCheck Control Panel ► Display ► Settings and see an "Unrecognized monitor, Plug&Play (VESA DDC) monitor found" message? Make...
... color) at Control Panel ► Settings. y y Be sure to the recommend resolution. y y Check if the signal cable is not selected, letters may be blurred and the screen may not be dimmed, truncated or biased. Do you see if the frequency or the resolution were changed. Or, you installed the display driver? TROUBLESHOOTING 25 ENEGNLGISH CAUTION y yCheck Control Panel ► Display ► Settings and see an "Unrecognized monitor, Plug&Play (VESA DDC) monitor found" message? Make...

Owners Manual
Page 26
26 SPECIFICATIONS ENEGNLGISH SPECIFICATIONS Display Resolution Power Consumption Power Input AC-DC Adapter Dimensions (Width x Height x Depth) Weight Environmental conditions Screen Type Flat Panel Active matrix-TFT LCD Anti-Glare coating Pixel Pitch Max 0.2745 mm x 0.2745 mm (Pixel Pitch) 1920 x 1080 @ 60 Hz Recommend VESA 1920 x 1080 @ 60 Hz On Mode : 17.1 W Typ. (ENERGY STAR® standard 24.6 W Typ. (Outgoing condition) ** Sleep Mode ≤ 0.3 W Off Mode ≤ 0.3 W 19 V 1.3 A Type ADS-40SG...
26 SPECIFICATIONS ENEGNLGISH SPECIFICATIONS Display Resolution Power Consumption Power Input AC-DC Adapter Dimensions (Width x Height x Depth) Weight Environmental conditions Screen Type Flat Panel Active matrix-TFT LCD Anti-Glare coating Pixel Pitch Max 0.2745 mm x 0.2745 mm (Pixel Pitch) 1920 x 1080 @ 60 Hz Recommend VESA 1920 x 1080 @ 60 Hz On Mode : 17.1 W Typ. (ENERGY STAR® standard 24.6 W Typ. (Outgoing condition) ** Sleep Mode ≤ 0.3 W Off Mode ≤ 0.3 W 19 V 1.3 A Type ADS-40SG...


