
Owners Manual - English
Page 2
...Stand Base 10 - ING 4 Unpacking 6 Parts and buttons 7 - HDMI connection 14 Connecting to External Devices 15 - TOR SOFTWARE 16 Installing The Screen Split 18 CUSTOMIZING SETTINGS 19 Customizing settings 19 - Attaching the Stand Base 9 - DVI-D connection 13 - Menu Settings 19 - -Quick Settings 21 - -Picture 23 - -General 24 - -Auto Configuration 25 - -Reset 26 - -Picture mode 27 TROUBLESHOOTING 29 SPECIFICATIONS 35 Preset Modes (Resolution) 35 Indicator 36 PROPER POSTURE 36 Proper posture for using the Monitor set 9 - 2 TABLE OF CONTENTS CONTENTS ENGLISH 3 LICENSE 4 ASSEMBLING...
...Stand Base 10 - ING 4 Unpacking 6 Parts and buttons 7 - HDMI connection 14 Connecting to External Devices 15 - TOR SOFTWARE 16 Installing The Screen Split 18 CUSTOMIZING SETTINGS 19 Customizing settings 19 - Attaching the Stand Base 9 - DVI-D connection 13 - Menu Settings 19 - -Quick Settings 21 - -Picture 23 - -General 24 - -Auto Configuration 25 - -Reset 26 - -Picture mode 27 TROUBLESHOOTING 29 SPECIFICATIONS 35 Preset Modes (Resolution) 35 Indicator 36 PROPER POSTURE 36 Proper posture for using the Monitor set 9 - 2 TABLE OF CONTENTS CONTENTS ENGLISH 3 LICENSE 4 ASSEMBLING...
Owners Manual - English
Page 6
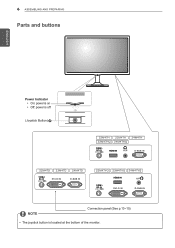
ENEGNLGISH 6 ASSEMBLING AND PREPARING Parts and buttons Power Indicator yyOn: power is on yyOff: power is off (Joystick Button) NOTE Connection panel (See p.13~15) yyThe joystick button is located at the bottom of the monitor.
ENEGNLGISH 6 ASSEMBLING AND PREPARING Parts and buttons Power Indicator yyOn: power is on yyOff: power is off (Joystick Button) NOTE Connection panel (See p.13~15) yyThe joystick button is located at the bottom of the monitor.
Owners Manual - English
Page 7
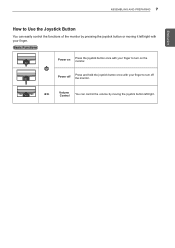
Basic Functions Power on the monitor. Power off the monitor. ◄/► Volume Control You can easily control the functions of the monitor by moving it left /right. ASSEMBLING AND PREPARING 7 ENEGNLGISH How to turn on Press the joystick button once with your finger to turn off Press and hold the joystick button once with your finger to Use the Joystick Button You can control the volume by pressing the joystick button or moving the joystick button left /right with your finger.
Basic Functions Power on the monitor. Power off the monitor. ◄/► Volume Control You can easily control the functions of the monitor by moving it left /right. ASSEMBLING AND PREPARING 7 ENEGNLGISH How to turn on Press the joystick button once with your finger to turn off Press and hold the joystick button once with your finger to Use the Joystick Button You can control the volume by pressing the joystick button or moving the joystick button left /right with your finger.

Owners Manual - English
Page 11
... can detach from stand base and injure your view. Do not touch or press the screen when adjusting the angle of installation and using, refer to adjust the angle of the Monitor set like below picture.Monitor screen can obtain it from +20 to -5 degrees up or down to the manual supplied with the Kensington security system or visit http://www.kensington.com. ASSEMBLING AND PREPARING 11...
... can detach from stand base and injure your view. Do not touch or press the screen when adjusting the angle of installation and using, refer to adjust the angle of the Monitor set like below picture.Monitor screen can obtain it from +20 to -5 degrees up or down to the manual supplied with the Kensington security system or visit http://www.kensington.com. ASSEMBLING AND PREPARING 11...

Owners Manual - English
Page 12
... 23M47H 24M47D 24M47VQ 24M47H 24M47HQ Wall Mount (A x B) Standard screw Number of screws Wall Mount Plate (Optional) 75 x 75 M4 x L10 4 RW120 yyVESA (A x B) AB CAUTION yyDisconnect the power cord first, and then move or install the Monitor set on a ceiling or slanted wall, it will include an installation manual and necessary parts. You can obtain additional accessories from the wall. Detailed instructions are not covered by misuse or using a wall mounting interface (optional parts), attach...
... 23M47H 24M47D 24M47VQ 24M47H 24M47HQ Wall Mount (A x B) Standard screw Number of screws Wall Mount Plate (Optional) 75 x 75 M4 x L10 4 RW120 yyVESA (A x B) AB CAUTION yyDisconnect the power cord first, and then move or install the Monitor set on a ceiling or slanted wall, it will include an installation manual and necessary parts. You can obtain additional accessories from the wall. Detailed instructions are not covered by misuse or using a wall mounting interface (optional parts), attach...

Owners Manual - English
Page 13
... can cause compatibility problem. NOTE yyIf you use , a separate plug adapter is needed to change the 15 pin high density (3 row) D-SUB VGA connector on , without device configuration or user intervention. Connect the PC and the Monitor set . ENEGNLGISH USING THE MONITOR SET 13 USING THE MONITOR SET Connecting to a PC yyYour Monitor set supports Plug & Play*. *Plug & Play: A PC recognizes a connected device that users connect to a PC and turn on the supplied cable to a 15 pin 2 row connector. D-SUB connection Transmits analog video from...
... can cause compatibility problem. NOTE yyIf you use , a separate plug adapter is needed to change the 15 pin high density (3 row) D-SUB VGA connector on , without device configuration or user intervention. Connect the PC and the Monitor set . ENEGNLGISH USING THE MONITOR SET 13 USING THE MONITOR SET Connecting to a PC yyYour Monitor set supports Plug & Play*. *Plug & Play: A PC recognizes a connected device that users connect to a PC and turn on the supplied cable to a 15 pin 2 row connector. D-SUB connection Transmits analog video from...

Owners Manual - English
Page 14
... screen for a long time as illustrated below. yySome red, green, or blue spots may flicker. yyDo not press the screen with your AV devices to AV Devices HDMI connection Transmits the digital video and audio signals from your finger for a long period of time to the monitor with the HDMI cable as this may result in Monitor set on while it by turning the screws clockwise. yyAvoid displaying a fixed image on the screen...
... screen for a long time as illustrated below. yySome red, green, or blue spots may flicker. yyDo not press the screen with your AV devices to AV Devices HDMI connection Transmits the digital video and audio signals from your finger for a long period of time to the monitor with the HDMI cable as this may result in Monitor set on while it by turning the screws clockwise. yyAvoid displaying a fixed image on the screen...
Owners Manual - English
Page 15
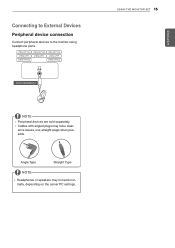
ance issues, use straight plugs when possible. USING THE MONITOR SET 15 ENEGNLGISH yyCables with angled plugs may not work normally, depending on the server PC settings. Angle Type Straight Type NOTE yyHeadphones or speakers may have clear- Connecting to External Devices Peripheral device connection Connect peripheral devices to the monitor using headphone ports. (sold separately) NOTE yyPeripheral devices are sold separately.
ance issues, use straight plugs when possible. USING THE MONITOR SET 15 ENEGNLGISH yyCables with angled plugs may not work normally, depending on the server PC settings. Angle Type Straight Type NOTE yyHeadphones or speakers may have clear- Connecting to External Devices Peripheral device connection Connect peripheral devices to the monitor using headphone ports. (sold separately) NOTE yyPeripheral devices are sold separately.

Owners Manual - English
Page 18
... menu disabled Adjusts the monitor volume level. 22M47D 23M47D 24M47D Enables the navigation OSD. Select picture mode to turn off the monitor. Main menu enabled Exits the main menu. (Holding down (▲/▼) and left/right(◄/►) to set the options. 3 Press the joystick button once more to exit the main menu. Exits the main menu. Turns off the monitor: You can select the input signal (D-SUB/DVI-D/HDMI) you can turn...
... menu disabled Adjusts the monitor volume level. 22M47D 23M47D 24M47D Enables the navigation OSD. Select picture mode to turn off the monitor. Main menu enabled Exits the main menu. (Holding down (▲/▼) and left/right(◄/►) to set the options. 3 Press the joystick button once more to exit the main menu. Exits the main menu. Turns off the monitor: You can select the input signal (D-SUB/DVI-D/HDMI) you can turn...

Owners Manual - English
Page 19
Menu > Quick Settings Brightness Contrast Volume 22M47VQ 23M47VQ 24M47VQ 22M47H 23M47H 24M47H 22M47HQ 24M47HQ Description Adjusts the color contrast and brightness of the video signal input. high efficient function. NOTE yyThe display may look the same for Wide, Original options at the bottom of the monitor and then enter the Menu. 2 Go to Quick Settings > Brightness by moving the joystick. 3 Configure the options following the instructions that appear in the Volume menu will enable/disable the...
Menu > Quick Settings Brightness Contrast Volume 22M47VQ 23M47VQ 24M47VQ 22M47H 23M47H 24M47H 22M47HQ 24M47HQ Description Adjusts the color contrast and brightness of the video signal input. high efficient function. NOTE yyThe display may look the same for Wide, Original options at the bottom of the monitor and then enter the Menu. 2 Go to Quick Settings > Brightness by moving the joystick. 3 Configure the options following the instructions that appear in the Volume menu will enable/disable the...
Owners Manual - English
Page 21
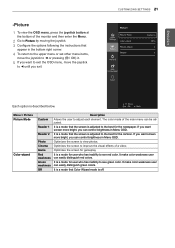
... adjusted. Optimizes the screen for user who has inability to see red color. It is adjusted to the best for the newspaper. It is a mode that the screen is a mode for the cartoon. If you want screen more bright, you can control brightness in Menu OSD. It is adjusted to the best for user who has inability to see green color. ENEGNLGISH -Picture 1 To view the OSD menu, press the joystick button at the bottom of the monitor...
... adjusted. Optimizes the screen for user who has inability to see red color. It is adjusted to the best for the newspaper. It is a mode that the screen is a mode for the cartoon. If you want screen more bright, you can control brightness in Menu OSD. It is adjusted to the best for user who has inability to see green color. ENEGNLGISH -Picture 1 To view the OSD menu, press the joystick button at the bottom of the monitor...
Owners Manual - English
Page 22
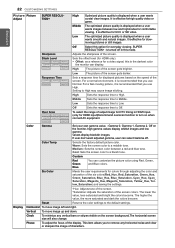
..., user can customize the picture color using Red, Green, and Blue colors. The optimized picture quality is recommended that you use High. Low The picture of the display. Warm: Sets the screen color to the default settings. The lower the value, less saturated and bright the colors become . 22 CUSTOMIZING SETTINGS ENEGNLGISH P i c t u r e Picture Adjust SUPER RESOLUTION+ High Middle Optimized picture quality is effective forhigh quality video or game. Setting to Low. Custom Red Green Blue You can select Gamma off in HDMI input...
..., user can customize the picture color using Red, Green, and Blue colors. The optimized picture quality is recommended that you use High. Low The picture of the display. Warm: Sets the screen color to the default settings. The lower the value, less saturated and bright the colors become . 22 CUSTOMIZING SETTINGS ENEGNLGISH P i c t u r e Picture Adjust SUPER RESOLUTION+ High Middle Optimized picture quality is effective forhigh quality video or game. Setting to Low. Custom Red Green Blue You can select Gamma off in HDMI input...
Owners Manual - English
Page 23
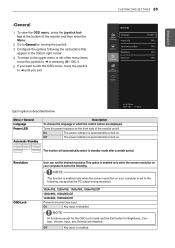
... the bottom of the monitor on . Resolution OSD Lock User can set the desired resolution.This option is enabled only when the screen resolution on your computer is automatically turned on /off. NOTE All functions except for the OSD Lock mode and the Exit button for Brightness, Contrast, Volume, Input, and General are displayed. ENEGNLGISH -General 1 To view the OSD menu, press the joystick but- On Key input is automatically turned on the front...
... the bottom of the monitor on . Resolution OSD Lock User can set the desired resolution.This option is enabled only when the screen resolution on your computer is automatically turned on /off. NOTE All functions except for the OSD Lock mode and the Exit button for Brightness, Contrast, Volume, Input, and General are displayed. ENEGNLGISH -General 1 To view the OSD menu, press the joystick but- On Key input is automatically turned on the front...
Owners Manual - English
Page 24
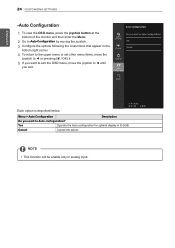
... SETTINGS -Auto Configuration 1 To view the OSD menu, press the joystick button at the bottom of the monitor and then enter the Menu. 2 Go to Auto Configuration by moving the joystick. 3 Configure the options following the instructions ...menu or set other menu items, move the joystick to ◄ or pressing ( / OK) it. 5 If you want to ◄ until you want to exit the OSD menu, move the joystick to Auto confuguration? Each option is described below. Menu > Auto Configuration Description Do you exit. Yes Operate the Auto configuration for optimal display in analog input...
... SETTINGS -Auto Configuration 1 To view the OSD menu, press the joystick button at the bottom of the monitor and then enter the Menu. 2 Go to Auto Configuration by moving the joystick. 3 Configure the options following the instructions ...menu or set other menu items, move the joystick to ◄ or pressing ( / OK) it. 5 If you want to ◄ until you want to exit the OSD menu, move the joystick to Auto confuguration? Each option is described below. Menu > Auto Configuration Description Do you exit. Yes Operate the Auto configuration for optimal display in analog input...
Owners Manual - English
Page 26
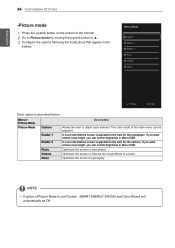
... of Picture Mode is described below. ENEGNLGISH Each option is non-Custom , SMART ENERGY SAVING and Color Wizard will automatically be adjusted. Optimizes the screen to adjust each element. NOTE yyIf option of a video. Menu > Picture Mode Picture Mode Custom Reader 1 Reader 2 Photo Cinema Game Description Allows the user to view photos. If you want screen more bright, you can control brightness in Menu OSD. Optimizes the screen to the best for gameplay. Optimizes the screen for...
... of Picture Mode is described below. ENEGNLGISH Each option is non-Custom , SMART ENERGY SAVING and Color Wizard will automatically be adjusted. Optimizes the screen to adjust each element. NOTE yyIf option of a video. Menu > Picture Mode Picture Mode Custom Reader 1 Reader 2 Photo Cinema Game Description Allows the user to view photos. If you want screen more bright, you can control brightness in Menu OSD. Optimizes the screen to the best for gameplay. Optimizes the screen for...

Owners Manual - English
Page 27
... control settings, so that they cannot be inadvertently changed. Do you see if the power cord is connected properly to off. yy Check Control Panel ► Display ► Settings and adjust the display to the recommended resolution or adjust the display image to turn on the screen? yy This message appears when the signal from the PC (video card) is incorrect. Display image is incorrect Display Position is out of horizontal or vertical frequency range of the display. yy Enter the Auto...
... control settings, so that they cannot be inadvertently changed. Do you see if the power cord is connected properly to off. yy Check Control Panel ► Display ► Settings and adjust the display to the recommended resolution or adjust the display image to turn on the screen? yy This message appears when the signal from the PC (video card) is incorrect. Display image is incorrect Display Position is out of horizontal or vertical frequency range of the display. yy Enter the Auto...

Owners Manual - English
Page 28
... sure to check if the video card supports Plug&Play function. 22M47VQ 23M47VQ 24M47VQ 22M47H 23M47H 24M47H 22M47HQ 24M47HQ The screen is flickering. yyIf the recommended resolution (optimal resolution) is set to interlace mode and if yes, change it to the recommend resolution. yy Set the color setting higher than 24 bits (true color) at Control Panel ► Settings. yy Make sure to install the display driver from our web site: http://www.lg.com. The screen blinks. Or...
... sure to check if the video card supports Plug&Play function. 22M47VQ 23M47VQ 24M47VQ 22M47H 23M47H 24M47H 22M47HQ 24M47HQ The screen is flickering. yyIf the recommended resolution (optimal resolution) is set to interlace mode and if yes, change it to the recommend resolution. yy Set the color setting higher than 24 bits (true color) at Control Panel ► Settings. yy Make sure to install the display driver from our web site: http://www.lg.com. The screen blinks. Or...

Owners Manual - English
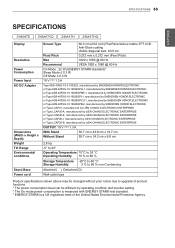
Page 29
SPECIFICATIONS 29 ENEGNLGISH SPECIFICATIONS 22M47D 22M47VQ 22M47H 22M47HQ Display Resolution Power Consumption Power Input AC-DC Adapter Dimensions (Width x Height x Depth) Weight Tilt Range Environmental conditions Stand Base Power cord Screen Type 54.6 cm (21.5 inch) Flat Panel Active matrix-TFT LCD Anti-Glare coating Visible diagonal size: 54.6 cm Pixel Pitch Max 0.248 mm x 0.248 mm (Pixel Pitch) 1920 x 1080 @ 60 Hz Recommend VESA 1920 x 1080 @ 60 Hz On Mode : 20 W (ENERGY STAR® standard)* Sleep Mode ≤...
SPECIFICATIONS 29 ENEGNLGISH SPECIFICATIONS 22M47D 22M47VQ 22M47H 22M47HQ Display Resolution Power Consumption Power Input AC-DC Adapter Dimensions (Width x Height x Depth) Weight Tilt Range Environmental conditions Stand Base Power cord Screen Type 54.6 cm (21.5 inch) Flat Panel Active matrix-TFT LCD Anti-Glare coating Visible diagonal size: 54.6 cm Pixel Pitch Max 0.248 mm x 0.248 mm (Pixel Pitch) 1920 x 1080 @ 60 Hz Recommend VESA 1920 x 1080 @ 60 Hz On Mode : 20 W (ENERGY STAR® standard)* Sleep Mode ≤...
Owners Manual - English
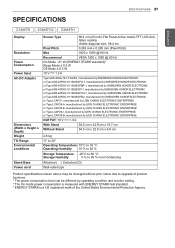
Page 31
SPECIFICATIONS 31 SPECIFICATIONS ENEGNLGISH 23M47D 23M47VQ 23M47H Display Resolution Power Consumption Power Input AC-DC Adapter Dimensions (Width x Height x Depth) Weight Tilt Range Environmental conditions Stand Base Power cord Screen Type 58.4 cm (23 inch) Flat Panel Active matrix-TFT LCD AntiGlare coating Visible diagonal size: 58.4 cm Pixel Pitch 0.265 mm x 0.265 mm (Pixel Pitch) Max 1920 x 1080 @ 60 Hz Recommend VESA 1920 x 1080 @ 60 Hz On Mode : 21 W (ENERGY STAR® standard)* Sleep Mode ≤ 0.3 W Off Mode ≤...
SPECIFICATIONS 31 SPECIFICATIONS ENEGNLGISH 23M47D 23M47VQ 23M47H Display Resolution Power Consumption Power Input AC-DC Adapter Dimensions (Width x Height x Depth) Weight Tilt Range Environmental conditions Stand Base Power cord Screen Type 58.4 cm (23 inch) Flat Panel Active matrix-TFT LCD AntiGlare coating Visible diagonal size: 58.4 cm Pixel Pitch 0.265 mm x 0.265 mm (Pixel Pitch) Max 1920 x 1080 @ 60 Hz Recommend VESA 1920 x 1080 @ 60 Hz On Mode : 21 W (ENERGY STAR® standard)* Sleep Mode ≤ 0.3 W Off Mode ≤...
Owners Manual - English
Page 33
SPECIFICATIONS 33 ENEGNLGISH SPECIFICATIONS 24M47D 24M47VQ 24M47H 24M47HQ Display Resolution Power Consumption Power Input AC-DC Adapter Dimensions (Width x Height x Depth) Weight Tilt Range Environmental conditions Stand Base Power cord Screen Type 60.0 cm (23.6 inch) Flat Panel Active matrix-TFT LCD Anti-Glare coating Visible diagonal size: 60.0 cm Pixel Pitch Max Recommend 0.272 mm x 0.272 mm (Pixel Pitch) 1920 x 1080 @ 60 Hz VESA 1920 x 1080 @ 60 Hz On Mode : 22 W (ENERGY STAR® standard)* Sleep Mode ≤ 0.3 W Off...
SPECIFICATIONS 33 ENEGNLGISH SPECIFICATIONS 24M47D 24M47VQ 24M47H 24M47HQ Display Resolution Power Consumption Power Input AC-DC Adapter Dimensions (Width x Height x Depth) Weight Tilt Range Environmental conditions Stand Base Power cord Screen Type 60.0 cm (23.6 inch) Flat Panel Active matrix-TFT LCD Anti-Glare coating Visible diagonal size: 60.0 cm Pixel Pitch Max Recommend 0.272 mm x 0.272 mm (Pixel Pitch) 1920 x 1080 @ 60 Hz VESA 1920 x 1080 @ 60 Hz On Mode : 22 W (ENERGY STAR® standard)* Sleep Mode ≤ 0.3 W Off...


