Owners Manual
Page 2
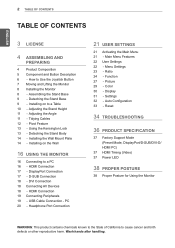
... - HDMI Connection 17 - PC 20 - Settings 32 - DisplayPort Connection 17 - DVI Connection 18 Connecting AV Devices 18 - Assembling the Stand Base 9 - Reset 34 TROUBLESHOOTING 36 PRODUCT SPECIFICATION 37 Factory Support Mode (Preset Mode, DisplayPort/D-SUB/DVI-D/ HDMI PC) 37 HDMI Timing (Video) 37 Power LED 38 PROPER POSTURE 38 Proper Posture for Using the Monitor WARNING: This product contains chemicals known to a Table 10 - Tidying Cables 12 - Menu Settings 23 - Installing on the Wall 16 USING THE MONITOR 16 Connecting to Use the Joystick Button...
... - HDMI Connection 17 - PC 20 - Settings 32 - DisplayPort Connection 17 - DVI Connection 18 Connecting AV Devices 18 - Assembling the Stand Base 9 - Reset 34 TROUBLESHOOTING 36 PRODUCT SPECIFICATION 37 Factory Support Mode (Preset Mode, DisplayPort/D-SUB/DVI-D/ HDMI PC) 37 HDMI Timing (Video) 37 Power LED 38 PROPER POSTURE 38 Proper Posture for Using the Monitor WARNING: This product contains chemicals known to a Table 10 - Tidying Cables 12 - Menu Settings 23 - Installing on the Wall 16 USING THE MONITOR 16 Connecting to Use the Joystick Button...
Owners Manual
Page 8
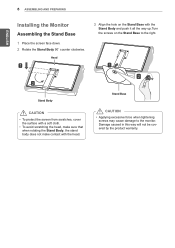
... rotating the Stand Body, the stand body does not make contact with a soft cloth. ENEGNLGISH 8 ASSEMBLING AND PREPARING Installing the Monitor Assembling the Stand Base 1 Place the screen face down. 2 Rotate the Stand Body 90˚ counter clockwise. Head 3 Align the hole on the Stand Base with the Stand Body and push it all the way up.Turn the screws on the Stand Base to the monitor. Stand Base CAUTION yy...
... rotating the Stand Body, the stand body does not make contact with a soft cloth. ENEGNLGISH 8 ASSEMBLING AND PREPARING Installing the Monitor Assembling the Stand Base 1 Place the screen face down. 2 Rotate the Stand Body 90˚ counter clockwise. Head 3 Align the hole on the Stand Base with the Stand Body and push it all the way up.Turn the screws on the Stand Base to the monitor. Stand Base CAUTION yy...

Owners Manual
Page 9
... Power Cord before moving the monitor, only hold the stand or the plastic cover. CAUTION yy The components in an upright position. yy To avoid damaging the screen when lifting or moving or installing the monitor. Installing on to fall off its stand and result in damage or injury. yy Do not carry the monitor upside down . ENEGNLGISH ASSEMBLING AND PREPARING 9 Detaching the Stand Base...
... Power Cord before moving the monitor, only hold the stand or the plastic cover. CAUTION yy The components in an upright position. yy To avoid damaging the screen when lifting or moving or installing the monitor. Installing on to fall off its stand and result in damage or injury. yy Do not carry the monitor upside down . ENEGNLGISH ASSEMBLING AND PREPARING 9 Detaching the Stand Base...
Owners Manual
Page 10
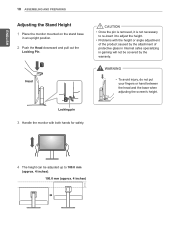
... (approx. 4 inches) yy Problems with both hands for safety. 4 The height can be covered by the attachment of protective glass in Internet cafes specializing in an upright position. 2 Push the Head downward and pull out the Locking Pin. ENEGNLGISH 10 ASSEMBLING AND PREPARING Adjusting the Stand Height 1 Place the monitor mounted on the stand base in gaming will not be adjusted up to adjust the height. Locking pin...
... (approx. 4 inches) yy Problems with both hands for safety. 4 The height can be covered by the attachment of protective glass in Internet cafes specializing in an upright position. 2 Push the Head downward and pull out the Locking Pin. ENEGNLGISH 10 ASSEMBLING AND PREPARING Adjusting the Stand Height 1 Place the monitor mounted on the stand base in gaming will not be adjusted up to adjust the height. Locking pin...
Owners Manual
Page 13
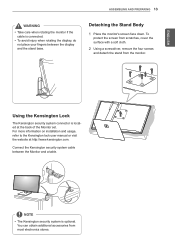
... screen from scratches, cover the surface with a soft cloth. 2 Using a screwdriver, remove the four screws and detach the stand from most electronics stores. For more information on installation and usage, refer to the Kensington lock user manual or visit the website at the back of the Monitor set. ENEGNLGISH ASSEMBLING AND PREPARING 13 WARNING yy Take care when rotating the monitor if the cable is connected...
... screen from scratches, cover the surface with a soft cloth. 2 Using a screwdriver, remove the four screws and detach the stand from most electronics stores. For more information on installation and usage, refer to the Kensington lock user manual or visit the website at the back of the Monitor set. ENEGNLGISH ASSEMBLING AND PREPARING 13 WARNING yy Take care when rotating the monitor if the cable is connected...

Owners Manual
Page 16
... connecting the power cord to the monitor. pear on the screen for a prolonged period of low temperature. This may cause compatibility issues. let, use a certified HDMI cable, the screen may not display or a connection error may ap- D-SUB IN yy The monitor may flicker when turned on the screen for a prolonged period of time. yy Using a DVI to HDMI / DP(DisplayPort) to reconfigure anything or install any manual drivers. High-Speed HDMI®/TM Cable - Connect...
... connecting the power cord to the monitor. pear on the screen for a prolonged period of low temperature. This may cause compatibility issues. let, use a certified HDMI cable, the screen may not display or a connection error may ap- D-SUB IN yy The monitor may flicker when turned on the screen for a prolonged period of time. yy Using a DVI to HDMI / DP(DisplayPort) to reconfigure anything or install any manual drivers. High-Speed HDMI®/TM Cable - Connect...

Owners Manual
Page 17
... CAUTION yy Connect the input signal cable and turn inDtPheINdirectiDon-SoUfBthINe arrow. Connect the monitor to the PC using a Mini DP to DP (Mini DisplayPort to DisplayPort) cable, a cable with DisplayPort 1.1a specifications or above is required. 5 V 0.9 A USB 1 USB 2 5 V 0.9 A USB 1 USB 2 USING THE MONITOR 17 DisplayPort Connection Transmits digital video and audio signals from your PC to the monitor. To prevent disconnection secure the cable firmly, do not over tighten. DP IN DVI-D IN HDMI IN...
... CAUTION yy Connect the input signal cable and turn inDtPheINdirectiDon-SoUfBthINe arrow. Connect the monitor to the PC using a Mini DP to DP (Mini DisplayPort to DisplayPort) cable, a cable with DisplayPort 1.1a specifications or above is required. 5 V 0.9 A USB 1 USB 2 5 V 0.9 A USB 1 USB 2 USING THE MONITOR 17 DisplayPort Connection Transmits digital video and audio signals from your PC to the monitor. To prevent disconnection secure the cable firmly, do not over tighten. DP IN DVI-D IN HDMI IN...
Owners Manual
Page 18
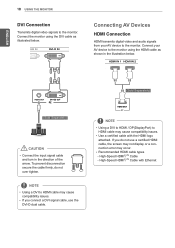
... IN DVI-D IN nection error may not display or a con- NOTE yy Using a DVI to HDMI cable may cause compatibility issues. DP IN D-SUB IN DVI-D IN HDMI IN 1 HDMI IN 2 USB UP yy Use a certified cable with Ethernet arrow. To prevent disconnection secure the cable firmly, do not use the DVI-D dual cable. If you connect a DVI signal cable, use a certified HDMI cable, the screen may occur. Connect the monitor using the HDMI cable as HDMI Connection illustrated below . HDMI transmits digital video and audio signals from...
... IN DVI-D IN nection error may not display or a con- NOTE yy Using a DVI to HDMI cable may cause compatibility issues. DP IN D-SUB IN DVI-D IN HDMI IN 1 HDMI IN 2 USB UP yy Use a certified cable with Ethernet arrow. To prevent disconnection secure the cable firmly, do not use the DVI-D dual cable. If you connect a DVI signal cable, use a certified HDMI cable, the screen may occur. Connect the monitor using the HDMI cable as HDMI Connection illustrated below . HDMI transmits digital video and audio signals from...
Owners Manual
Page 19
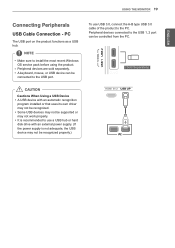
... recognition program installed or that uses its own driver may not work properly. DP IN D-SUB 5 V 0.9 A USB 1 USB 2 (Sold Separately) CAUTDIPOINN D-SUB IN DVI-D IN Cautions When Using a USB Device yy A USB device with an external power supply. (If the power supply is recommended to install the most recent Windows OS service pack before using the product. USING THE MONITOR 19 Connecting Peripherals USB Cable Connection - yy Some USB devices may not be supported or may...
... recognition program installed or that uses its own driver may not work properly. DP IN D-SUB 5 V 0.9 A USB 1 USB 2 (Sold Separately) CAUTDIPOINN D-SUB IN DVI-D IN Cautions When Using a USB Device yy A USB device with an external power supply. (If the power supply is recommended to install the most recent Windows OS service pack before using the product. USING THE MONITOR 19 Connecting Peripherals USB Cable Connection - yy Some USB devices may not be supported or may...
Owners Manual
Page 21
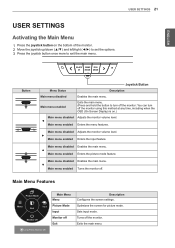
... menu. USER SETTINGS 21 ENEGNLGISH USER SETTINGS Activating the Main Menu 1 Press the joystick button on .) Main menu disabled Adjusts the monitor volume level. ◄ Main menu enabled Enters the menu features. Main menu disabled Adjusts the monitor volume level. ► Main menu enabled Enters the input feature. Main Menu Features  Picture Mode Menu Exit Input Monitor off . Sets input mode. Turns off Exit Description Configures the screen settings. Optimizes the screen for picture mode. Main Menu Menu Picture Mode Input Monitor off the monitor...
... menu. USER SETTINGS 21 ENEGNLGISH USER SETTINGS Activating the Main Menu 1 Press the joystick button on .) Main menu disabled Adjusts the monitor volume level. ◄ Main menu enabled Enters the menu features. Main menu disabled Adjusts the monitor volume level. ► Main menu enabled Enters the input feature. Main Menu Features  Picture Mode Menu Exit Input Monitor off . Sets input mode. Turns off Exit Description Configures the screen settings. Optimizes the screen for picture mode. Main Menu Menu Picture Mode Input Monitor off the monitor...
Owners Manual
Page 22
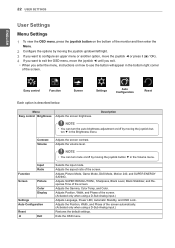
Menu Easy control Brightness Adjusts the screen brightness. Contrast Volume Adjusts the screen contrast. Function Input Ratio Screen Picture Color Display Settings Auto Configuration Reset ◄ Exit Selects the input mode. Adjusts Picture Mode, Game Mode, DAS Mode, Motion 240, and SUPER ENERGY SAVING. Exits the OSD menu. Adjusts the volume level. Adjusts the Gamma, Color Temp, and Color. 22 USER SETTINGS ENEGNLGISH User Settings Menu Settings 1 To view the OSD menu, press the joystick button on the bottom of the monitor and then enter the Menu. 2 Configure the ...
Menu Easy control Brightness Adjusts the screen brightness. Contrast Volume Adjusts the screen contrast. Function Input Ratio Screen Picture Color Display Settings Auto Configuration Reset ◄ Exit Selects the input mode. Adjusts Picture Mode, Game Mode, DAS Mode, Motion 240, and SUPER ENERGY SAVING. Exits the OSD menu. Adjusts the volume level. Adjusts the Gamma, Color Temp, and Color. 22 USER SETTINGS ENEGNLGISH User Settings Menu Settings 1 To view the OSD menu, press the joystick button on the bottom of the monitor and then enter the Menu. 2 Configure the ...
Owners Manual
Page 23
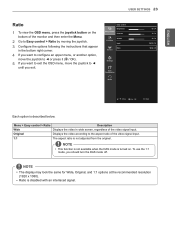
Easy control Easy control Brightness Contrast Function Volume Input Screen Ratio Settings Auto Configuration Reset 60 > 70 > 30 > DVI-D > Wide > ▲ / ▼ : Move / ► : OK ◄ : Back Each option is turned on the bottom of the monitor and then enter the Menu. 2 Go to Easy control > Ratio by moving the joystick. 3 Configure the options following the instructions that appear in wide screen, regardless of the video signal input. 1:1 The aspect ratio is disabled with...
Easy control Easy control Brightness Contrast Function Volume Input Screen Ratio Settings Auto Configuration Reset 60 > 70 > 30 > DVI-D > Wide > ▲ / ▼ : Move / ► : OK ◄ : Back Each option is turned on the bottom of the monitor and then enter the Menu. 2 Go to Easy control > Ratio by moving the joystick. 3 Configure the options following the instructions that appear in wide screen, regardless of the video signal input. 1:1 The aspect ratio is disabled with...
Owners Manual
Page 25
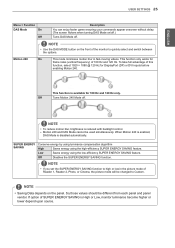
... picture mode will be changed to quickly select and switch between the options. When Motion 240 is enabled, DAS Mode is High or Low, monitor luminance become higher or lower depend upon source. ENEGNLGISH USER SETTINGS 25 Menu > Function DAS Mode On Off  Description You can enjoy faster game ensuring your commands appear onscreen without delay. (The screen flickers when turning DAS Mode on/off.) Turns...
... picture mode will be changed to quickly select and switch between the options. When Motion 240 is enabled, DAS Mode is High or Low, monitor luminance become higher or lower depend upon source. ENEGNLGISH USER SETTINGS 25 Menu > Function DAS Mode On Off  Description You can enjoy faster game ensuring your commands appear onscreen without delay. (The screen flickers when turning DAS Mode on/off.) Turns...
Owners Manual
Page 27
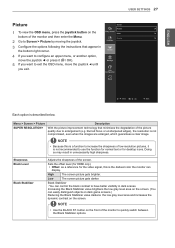
... use the function for normal text or for desktop icons. button on the front of the monitor and then enter the Menu. NOTE yyBecause this is a function to increase the sharpness of the screen. Screen 4 If you exit. Display > 2 Go to quickly switch between the Black Stabilizer options. Sets the offset level (for the video signal, this is the darkest color the monitor can control the black contrast...
... use the function for normal text or for desktop icons. button on the front of the monitor and then enter the Menu. NOTE yyBecause this is a function to increase the sharpness of the screen. Screen 4 If you exit. Display > 2 Go to quickly switch between the Black Stabilizer options. Sets the offset level (for the video signal, this is the darkest color the monitor can control the black contrast...
Owners Manual
Page 29
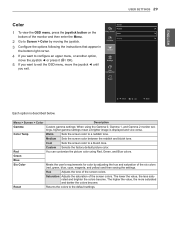
... darker the colors become . Medium Sets the screen color between the reddish and bluish tone. Display > 2 Go to a bluish tone. Menu > Screen > Color Gamma Color Temp Red Green Blue Six Color Reset Description Custom gamma settings: When using Red, Green, and Blue colors. You can customize the picture color using the Gamma 0, Gamma 1, and Gamma 2 monitor settings, higher gamma settings mean a brighter image is described below. Warm Sets the screen color to the default settings. Returns the colors to a reddish tone. Screen 4 If you...
... darker the colors become . Medium Sets the screen color between the reddish and bluish tone. Display > 2 Go to a bluish tone. Menu > Screen > Color Gamma Color Temp Red Green Blue Six Color Reset Description Custom gamma settings: When using Red, Green, and Blue colors. You can customize the picture color using the Gamma 0, Gamma 1, and Gamma 2 monitor settings, higher gamma settings mean a brighter image is described below. Warm Sets the screen color to the default settings. Returns the colors to a reddish tone. Screen 4 If you...
Owners Manual
Page 30
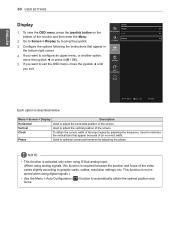
... cards, cables, resolution settings, etc. ENEGNLGISH 30 USER SETTINGS Display Screen Picture > 1 To view the OSD menu, press the joystick button on the Easy control Color > bottom of the screen. Settings Auto Configuration Reset ▲ / ▼ : Move / ► : OK ◄ : Back Each option is required because the position and focus of the input signal by adjusting the phase. Clock To obtain the correct width of the video varies slightly according to adjust the vertical position of the monitor...
... cards, cables, resolution settings, etc. ENEGNLGISH 30 USER SETTINGS Display Screen Picture > 1 To view the OSD menu, press the joystick button on the Easy control Color > bottom of the screen. Settings Auto Configuration Reset ▲ / ▼ : Move / ► : OK ◄ : Back Each option is required because the position and focus of the input signal by adjusting the phase. Clock To obtain the correct width of the video varies slightly according to adjust the vertical position of the monitor...
Owners Manual
Page 31
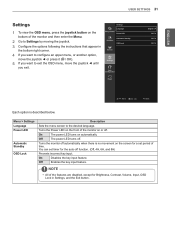
... want to the desired language. You can set period of time. ENEGNLGISH USER SETTINGS 31 Settings 1 To view the OSD menu, press the joystick button on the bottom of the monitor and then enter the Menu. 2 Go to Settings by moving the joystick. 3 Configure the options following the instructions that appear in Settings, and the Exit button. Settings Easy control Language Power LED Function Automatic Standby OSD Lock Screen Settings Auto Configuration Reset English > Off > Off > Off...
... want to the desired language. You can set period of time. ENEGNLGISH USER SETTINGS 31 Settings 1 To view the OSD menu, press the joystick button on the bottom of the monitor and then enter the Menu. 2 Go to Settings by moving the joystick. 3 Configure the options following the instructions that appear in Settings, and the Exit button. Settings Easy control Language Power LED Function Automatic Standby OSD Lock Screen Settings Auto Configuration Reset English > Off > Off > Off...

Owners Manual
Page 34
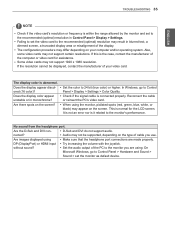
... the signal cable between the PC and the ing displayed? yy Confirm there is HDMI 1080i 60/50 Hz (interlaced), the resolution? Input). yy Horizontal Frequency: The time it takes to 1080P or the recommended resolution. Is the power LED on . button? yy This occurs when signals transferred from the PC (video card) are out of the horizontal or vertical frequency range of the monitor, use a screensaver. Change the resolution to display one by plugging...
... the signal cable between the PC and the ing displayed? yy Confirm there is HDMI 1080i 60/50 Hz (interlaced), the resolution? Input). yy Horizontal Frequency: The time it takes to 1080P or the recommended resolution. Is the power LED on . button? yy This occurs when signals transferred from the PC (video card) are out of the horizontal or vertical frequency range of the monitor, use a screensaver. Change the resolution to display one by plugging...
Owners Manual
Page 35
... (red, green, blue, white, or black) may appear on your video card. without sound? yy Set the color to the monitor's performance. In Windows, go to Control Panel > Hardware and Sound > Sound > set the monitor as default device. nected? DP (DisplayPort) or HDMI input yy Try increasing the volume with the joystick. Reconnect the cable unstable or in Control Panel > Display > Settings. yy Set the audio output of the PC to the monitor you use. TROUBLESHOOTING 35 ENEGNLGISH NOTE yy Check if the video card's resolution...
... (red, green, blue, white, or black) may appear on your video card. without sound? yy Set the color to the monitor's performance. In Windows, go to Control Panel > Hardware and Sound > Sound > set the monitor as default device. nected? DP (DisplayPort) or HDMI input yy Try increasing the volume with the joystick. Reconnect the cable unstable or in Control Panel > Display > Settings. yy Set the audio output of the PC to the monitor you use. TROUBLESHOOTING 35 ENEGNLGISH NOTE yy Check if the video card's resolution...

Owners Manual
Page 40
... ENERGY STAR program. ENERGY STAR is intended for technical support. Refer to the product provides information for home usage. This device can be used in all regions. Read the owner's manual (CD) carefully and keep it at hand. As an ENERGY STAR Partner LGE...this product meets the ENERGY STAR guidelines for home appliances (Class B) and is a set of Conformity Trade Name: LG Model: 24GM77 Responsible Party: LG Electronics Inc. A., Inc. Model Serial No. Address: 1000 Sylvan Ave. Declaration of power-saving guidelines issued by the U.S.Environmental Protection Agency(EPA).
... ENERGY STAR program. ENERGY STAR is intended for technical support. Refer to the product provides information for home usage. This device can be used in all regions. Read the owner's manual (CD) carefully and keep it at hand. As an ENERGY STAR Partner LGE...this product meets the ENERGY STAR guidelines for home appliances (Class B) and is a set of Conformity Trade Name: LG Model: 24GM77 Responsible Party: LG Electronics Inc. A., Inc. Model Serial No. Address: 1000 Sylvan Ave. Declaration of power-saving guidelines issued by the U.S.Environmental Protection Agency(EPA).


