
User Manual
Page 7
Chapter 1 Before Use 1. 1 Installation Requirements 1. 2 Originals Prohibited from Duplication 1. 3 Features 1. 4 Specifications 1. 4. 1 General 1. 4. 2 Printer part 1. 4. 3 Scanner part 1. 5 Appearance 1. 5. 1 Front view 1. 5. 2 Rear view 1. 6 Specifications for the Scan Original 1. 7 Specifications for the Printing Paper 1. 7. 1 Papers not available to use 1. 7. 2 Keeping the paper in the custody 1. 7. 3 Treatment against environmental condition 1-1 Page 1- 2 1- 3 1- 4 1- 5 1- 5 1- 6 1- 8 1- 9 1- 9 1-10 1-11 1-14 1-14 1-15 1-16 Chapter 1 Before Use
Chapter 1 Before Use 1. 1 Installation Requirements 1. 2 Originals Prohibited from Duplication 1. 3 Features 1. 4 Specifications 1. 4. 1 General 1. 4. 2 Printer part 1. 4. 3 Scanner part 1. 5 Appearance 1. 5. 1 Front view 1. 5. 2 Rear view 1. 6 Specifications for the Scan Original 1. 7 Specifications for the Printing Paper 1. 7. 1 Papers not available to use 1. 7. 2 Keeping the paper in the custody 1. 7. 3 Treatment against environmental condition 1-1 Page 1- 2 1- 3 1- 4 1- 5 1- 5 1- 6 1- 8 1- 9 1- 9 1-10 1-11 1-14 1-14 1-15 1-16 Chapter 1 Before Use
User Manual
Page 10
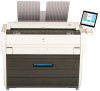
...to provide efficient productivity by using "File to Print" / "Scan to USB" (option). (7) 2-way print delivery (front, up to 600dpi print resolutions with 36" paper) or, and the minimum is 11" (279mm). Advanced drivers and comprehensive print utilities make the KIP 7170 an advanced, easy to use system. (some functions may be... of plain paper / rear) suits the preference of the user's print handling. (rear stacking requires a stacking device, option) (8) Various media source; 1. 3 Features (1) The KIP 7170 is a single footprint Multi-Function Printer which can copy, scan and print.
...to provide efficient productivity by using "File to Print" / "Scan to USB" (option). (7) 2-way print delivery (front, up to 600dpi print resolutions with 36" paper) or, and the minimum is 11" (279mm). Advanced drivers and comprehensive print utilities make the KIP 7170 an advanced, easy to use system. (some functions may be... of plain paper / rear) suits the preference of the user's print handling. (rear stacking requires a stacking device, option) (8) Various media source; 1. 3 Features (1) The KIP 7170 is a single footprint Multi-Function Printer which can copy, scan and print.

User Manual
Page 14
... dpi, normal quality) (max) Monochrome : 65mm/s Grayscale : 65mm/s Color : 22mm/s The actual speed may vary by the scan software. 1. 4. 3 Scanner part Subject Scanning method Light source Setting of original Starting point of scan Scan width Scan length Margin area Optical resolution Digital resolution Original transportation Transportable original thickness Specification Contact Image Sensor (CIS) (5 pieces of...
... dpi, normal quality) (max) Monochrome : 65mm/s Grayscale : 65mm/s Color : 22mm/s The actual speed may vary by the scan software. 1. 4. 3 Scanner part Subject Scanning method Light source Setting of original Starting point of scan Scan width Scan length Margin area Optical resolution Digital resolution Original transportation Transportable original thickness Specification Contact Image Sensor (CIS) (5 pieces of...
User Manual
Page 15
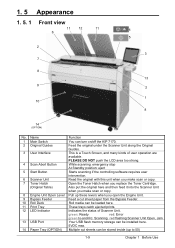
... and then feed it into the Scanner Unit when you make scan or copy. 7 Toner Hatch (Original Table) Open the Toner Hatch when you open the Engine Unit. 9 Bypass Feeder Feed a cut sheets can turn on/off the KIP 7170. 2 Original Guides Feed the original under the Scanner Unit along... the Original Guides. 3 User Interface 4 Scan Abort Button This is a Touch Screen, and many kinds of Scanner Unit. green: Ready red: Error...
... and then feed it into the Scanner Unit when you make scan or copy. 7 Toner Hatch (Original Table) Open the Toner Hatch when you open the Engine Unit. 9 Bypass Feeder Feed a cut sheets can turn on/off the KIP 7170. 2 Original Guides Feed the original under the Scanner Unit along... the Original Guides. 3 User Interface 4 Scan Abort Button This is a Touch Screen, and many kinds of Scanner Unit. green: Ready red: Error...

User Manual
Page 17
... must satisfy the following kinds of 80 mm or less) 1-11 Chapter 1 Before Use Do not scan the following specifications. Image quality for an original over 6,000mm in length is guaranteed only in a standard size even the scanner physically accepts it. *2. The ...
... must satisfy the following kinds of 80 mm or less) 1-11 Chapter 1 Before Use Do not scan the following specifications. Image quality for an original over 6,000mm in length is guaranteed only in a standard size even the scanner physically accepts it. *2. The ...
User Manual
Page 23
Chapter 2 Basic Operation 2. 1 Turning on KIP 7170 2. 2 Turning off KIP 7170 2. 3 Replacing Roll Media 2. 4 Replacing Toner Cartridge 2. 5 Cut Sheet Media 2. 6 Copying 2. 7 Emergency Stop of Scan or Copy 2. 8 Canceling Sleep Mode 2. 9 Dehumidifying Roll Media 2-1 Page 2- 2 2- 4 2- 5 2-11 2-15 2-16 2-18 2-19 2-20 Chapter 2 Basic Operation
Chapter 2 Basic Operation 2. 1 Turning on KIP 7170 2. 2 Turning off KIP 7170 2. 3 Replacing Roll Media 2. 4 Replacing Toner Cartridge 2. 5 Cut Sheet Media 2. 6 Copying 2. 7 Emergency Stop of Scan or Copy 2. 8 Canceling Sleep Mode 2. 9 Dehumidifying Roll Media 2-1 Page 2- 2 2- 4 2- 5 2-11 2-15 2-16 2-18 2-19 2-20 Chapter 2 Basic Operation
User Manual
Page 40
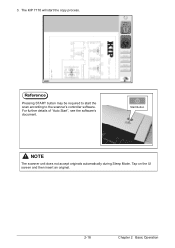
3. The KIP 7170 will start the scan according to the scanner's controller software. Reference Pressing START button may be required to start the copy process. For further details of "Auto Start", see the software's document. Tap on the UI screen and then insert an original. 2-18 Chapter 2 Basic Operation Start Button NOTE The scanner unit does not accept originals automatically during Sleep Mode.
3. The KIP 7170 will start the scan according to the scanner's controller software. Reference Pressing START button may be required to start the copy process. For further details of "Auto Start", see the software's document. Tap on the UI screen and then insert an original. 2-18 Chapter 2 Basic Operation Start Button NOTE The scanner unit does not accept originals automatically during Sleep Mode.

User Manual
Page 42
The current printing is stopped as an attempt to immediately stop feeding it through Scanner Unit. 2-20 Chapter 2 Basic Operation NOTE Do not pull back or hold down the original on the Scanner Unit to stop the original while making a copy or scan. If necessary, press the Scan Abort Button on Original Table as well and is ejected. red flashing Scan Abort Button Pressing the button stops the current reading a document immediately. The LED Indicator flashes red. 2. 7 Stop of Scan or Copy 1.
The current printing is stopped as an attempt to immediately stop feeding it through Scanner Unit. 2-20 Chapter 2 Basic Operation NOTE Do not pull back or hold down the original on the Scanner Unit to stop the original while making a copy or scan. If necessary, press the Scan Abort Button on Original Table as well and is ejected. red flashing Scan Abort Button Pressing the button stops the current reading a document immediately. The LED Indicator flashes red. 2. 7 Stop of Scan or Copy 1.

User Manual
Page 58
Gently press Scanner Unit down and firmly close it by pressing only one side down Scanner Unit on both sides (1) of the Scanner Unit, and then remove the original. 1 1 2. 3. 1. 6 Original Jam The scanner may stop feeding the original in the scanner. Do not close it. Lift up both the sides to close it . Pressing Scan Abort Button during scanning also stops the original in the scanner if the original skews. NOTE Press down . 3-14 Chapter 3 Error Correction red flashing Scan Abort Button 1. In both cases, LED Indicator flashes red.
Gently press Scanner Unit down and firmly close it by pressing only one side down Scanner Unit on both sides (1) of the Scanner Unit, and then remove the original. 1 1 2. 3. 1. 6 Original Jam The scanner may stop feeding the original in the scanner. Do not close it. Lift up both the sides to close it . Pressing Scan Abort Button during scanning also stops the original in the scanner if the original skews. NOTE Press down . 3-14 Chapter 3 Error Correction red flashing Scan Abort Button 1. In both cases, LED Indicator flashes red.
User Manual
Page 63
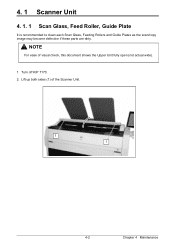
4. 1 Scanner Unit 4. 1. 1 Scan Glass, Feed Roller, Guide Plate It is recommended to clean each Scan Glass, Feeding Rollers and Guide Plates as the scan/copy image may become defective if these parts are dirty. Lift up both sides (1) of visual check, this document shows the Upper Unit fully open (not actual wide). 1. NOTE For ease of the Scanner Unit. 1 1 4-2 Chapter 4 Maintenance Turn off KIP 7170. 2.
4. 1 Scanner Unit 4. 1. 1 Scan Glass, Feed Roller, Guide Plate It is recommended to clean each Scan Glass, Feeding Rollers and Guide Plates as the scan/copy image may become defective if these parts are dirty. Lift up both sides (1) of visual check, this document shows the Upper Unit fully open (not actual wide). 1. NOTE For ease of the Scanner Unit. 1 1 4-2 Chapter 4 Maintenance Turn off KIP 7170. 2.

User Manual
Page 64
Wipe the Feed Rollers (rubber) (4) with a soft cloth. Wipe dry the Feeding Rollers. 4-3 4 4 4 4 Chapter 4 Maintenance Equal mixture of water and neutral detergent can be used. 2 3 NOTE Do not use organic solvent, glass cleaner and anti-static spray for the cleaning. 4. 3. Gently wipe the Scan Glass (2) and Feed Rollers (white) (3) with a dry cloth. 5.
Wipe the Feed Rollers (rubber) (4) with a soft cloth. Wipe dry the Feeding Rollers. 4-3 4 4 4 4 Chapter 4 Maintenance Equal mixture of water and neutral detergent can be used. 2 3 NOTE Do not use organic solvent, glass cleaner and anti-static spray for the cleaning. 4. 3. Gently wipe the Scan Glass (2) and Feed Rollers (white) (3) with a dry cloth. 5.


