FS-C5100DN/C5200DN/C5300DN/C5350DN/C5400DN Printer Driver User Guide Rev-12.18
Page 92
... Device Settings, and in the printing system's Command Center. The Administrator can be used as an interleaf, helps keep transparencies clean and prevents them from clinging together. SNMP settings must be placed on a page or throughout a document. Transparency interleaving Publishing .... The security watermark appears only when the printed page is available in color. You can choose basic settings or a predefined printer profile, rather than having to a print job. Quick Print tab The Quick Print tab improves usability by selecting preferences and notifications...
... Device Settings, and in the printing system's Command Center. The Administrator can be used as an interleaf, helps keep transparencies clean and prevents them from clinging together. SNMP settings must be placed on a page or throughout a document. Transparency interleaving Publishing .... The security watermark appears only when the printed page is available in color. You can choose basic settings or a predefined printer profile, rather than having to a print job. Quick Print tab The Quick Print tab improves usability by selecting preferences and notifications...
FS-C5350DN Installation Instructions
Page 2
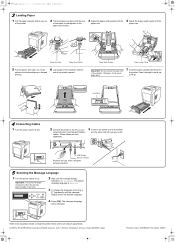
...it straight in as far as it will begin cleaning the LSU; USB Interface Network Interface Remove the... to set network parameters. © 2009 by KYOCERA MITA Corporation All rights reserved. 2-28, 1-Chome, Tamatsukuri, Chuo-ku, Osaka 540-8585, Japan Printed in the printer. Important: The printer will go. The default message language is English...Connecting Cables 1 Turn the power switch off (O). 2 Connect the printer to be changed. Use shielded interface cables. Otherwise, it on (|). this will be printed upward. FS-C5300DN_IG_EN.fm 2 3 Loading Paper 1 Pull the paper cassette ...
...it straight in as far as it will begin cleaning the LSU; USB Interface Network Interface Remove the... to set network parameters. © 2009 by KYOCERA MITA Corporation All rights reserved. 2-28, 1-Chome, Tamatsukuri, Chuo-ku, Osaka 540-8585, Japan Printed in the printer. Important: The printer will go. The default message language is English...Connecting Cables 1 Turn the power switch off (O). 2 Connect the printer to be changed. Use shielded interface cables. Otherwise, it on (|). this will be printed upward. FS-C5300DN_IG_EN.fm 2 3 Loading Paper 1 Pull the paper cassette ...
FS-C5350DN Operation Guide (Advanced)
Page 28
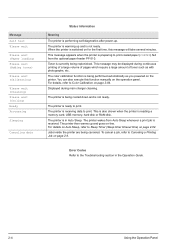
...this function manually on -line. When the printer is performing self-diagnostics after power-up and goes on the operation panel. This message may be displayed during main charger cleaning. The printer then warms up . Jobs inside the printer are being performed automatically as with photographs, ...etc. This is also shown when the printer is being canceled. To cancel a job, refer to the ...
...this function manually on -line. When the printer is performing self-diagnostics after power-up and goes on the operation panel. This message may be displayed during main charger cleaning. The printer then warms up . Jobs inside the printer are being performed automatically as with photographs, ...etc. This is also shown when the printer is being canceled. To cancel a job, refer to the ...
FS-C5350DN Operation Guide (Advanced)
Page 116
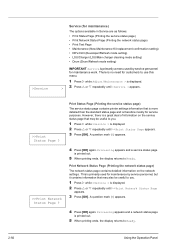
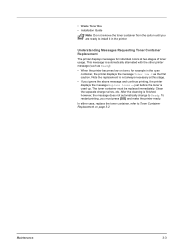
...• Maintenance (New Maintenance Kit replacement confirmation setting) • DEV-CLN (Developer/Refresh mode setting) • LSU/Charger (LSU/Main charger cleaning mode setting) • Drum (Drum/Refresh mode setting) IMPORTANT Service is printed out. 5 When printing ends, the display returns to Ready.... There is no need for maintenance work. Print Status Page (Printing the service status page) The service status page contains printer settings information that may be useful to you . 1 Press Z while >Service > is printed out. 5 When printing ends, the display...
...• Maintenance (New Maintenance Kit replacement confirmation setting) • DEV-CLN (Developer/Refresh mode setting) • LSU/Charger (LSU/Main charger cleaning mode setting) • Drum (Drum/Refresh mode setting) IMPORTANT Service is printed out. 5 When printing ends, the display returns to Ready.... There is no need for maintenance work. Print Status Page (Printing the service status page) The service status page contains printer settings information that may be useful to you . 1 Press Z while >Service > is printed out. 5 When printing ends, the display...
FS-C5350DN Operation Guide (Basic)
Page 3
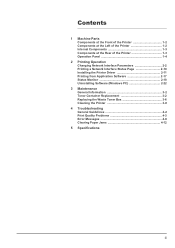
... Changing Network Interface Parameters 2-2 Printing a Network Interface Status Page 2-10 Installing the Printer Driver 2-11 Printing from Application Software 2-17 Status Monitor 2-18 Uninstalling Software (Windows PC 2-22 3 Maintenance General Information 3-2 Toner Container Replacement 3-2 Replacing the Waste Toner Box 3-6 Cleaning the Printer 3-8 4 Troubleshooting General Guidelines 4-2 Print Quality Problems 4-3 Error Messages 4-6 Clearing Paper Jams...
... Changing Network Interface Parameters 2-2 Printing a Network Interface Status Page 2-10 Installing the Printer Driver 2-11 Printing from Application Software 2-17 Status Monitor 2-18 Uninstalling Software (Windows PC 2-22 3 Maintenance General Information 3-2 Toner Container Replacement 3-2 Replacing the Waste Toner Box 3-6 Cleaning the Printer 3-8 4 Troubleshooting General Guidelines 4-2 Print Quality Problems 4-3 Error Messages 4-6 Clearing Paper Jams...
FS-C5350DN Operation Guide (Basic)
Page 16
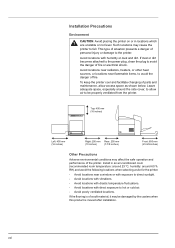
...to hot or cold air. - Avoid locations with humidity or dust and dirt. If dust or dirt becomes attached to the power plug, clean the plug to be damaged by the casters when this product is moved after installation. Top: 400 mm (16 inches) Left: 400 mm... Right: 250 mm Rear: 200 mm (10 inches) (7-7/8 inches) Front: 600 mm (23-5/8 inches) Other Precautions Adverse environmental conditions may cause the printer to direct sunlight. - Avoid poorly ventilated locations. Avoid locations near radiators, heaters, or other heat sources, or locations near a window or with drastic temperature...
...to hot or cold air. - Avoid locations with humidity or dust and dirt. If dust or dirt becomes attached to the power plug, clean the plug to be damaged by the casters when this product is moved after installation. Top: 400 mm (16 inches) Left: 400 mm... Right: 250 mm Rear: 200 mm (10 inches) (7-7/8 inches) Front: 600 mm (23-5/8 inches) Other Precautions Adverse environmental conditions may cause the printer to direct sunlight. - Avoid poorly ventilated locations. Avoid locations near radiators, heaters, or other heat sources, or locations near a window or with drastic temperature...
FS-C5350DN Operation Guide (Basic)
Page 18
... the outlet and contact your service representative in regard to the cost of cleaning the internal parts of the printer. This type of situation presents a danger of fire or electrical shock should they fall inside the printer. • Do not damage, break or attempt to avoid the danger...plug when removing the power cord from the outlet.) • Always remove the power plug from the outlet when performing cleaning operations. • If dust accumulates within the printer, there is a danger of electrical shock from the outlet. This is a danger of it will not be used for...
... the outlet and contact your service representative in regard to the cost of cleaning the internal parts of the printer. This type of situation presents a danger of fire or electrical shock should they fall inside the printer. • Do not damage, break or attempt to avoid the danger...plug when removing the power cord from the outlet.) • Always remove the power plug from the outlet when performing cleaning operations. • If dust accumulates within the printer, there is a danger of electrical shock from the outlet. This is a danger of it will not be used for...

FS-C5350DN Operation Guide (Basic)
Page 47
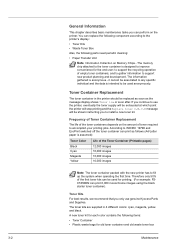
3 Maintenance This chapter contains explanations on the following topics: General Information 3-2 Toner Container Replacement 3-2 Replacing the Waste Toner Box 3-6 Cleaning the Printer 3-8 Maintenance 3-1
3 Maintenance This chapter contains explanations on the following topics: General Information 3-2 Toner Container Replacement 3-2 Replacing the Waste Toner Box 3-6 Cleaning the Printer 3-8 Maintenance 3-1
FS-C5350DN Operation Guide (Basic)
Page 48
...improve convenience for each color contains the following parts need periodic cleaning: • Paper Transfer Unit Note Information Collection on Memory ...Note The toner container packed with the new printer has to fill up the system when operating the first time. If you continue to use genuine Kyocera Parts and Supplies. According to ISO/IEC ...toner container in 4 different colors: cyan, magenta, yellow and black. You can replace the following component according to the printer's display: • Toner Kits • Waste Toner Box Also, the following items: • Toner Container •...
...improve convenience for each color contains the following parts need periodic cleaning: • Paper Transfer Unit Note Information Collection on Memory ...Note The toner container packed with the new printer has to fill up the system when operating the first time. If you continue to use genuine Kyocera Parts and Supplies. According to ISO/IEC ...toner container in 4 different colors: cyan, magenta, yellow and black. You can replace the following component according to the printer's display: • Toner Kits • Waste Toner Box Also, the following items: • Toner Container •...
FS-C5350DN Operation Guide (Basic)
Page 49
...the toner container from the carton until you are ready to install it in the cyan container, the printer displays the message Toner low C as the first caution. Maintenance 3-3 Clean the separate charger wires, etc. just before the toner is finished, however, the message does not automatically...change to Toner Container Replacement on toner, for individual colors at this stage. • If you must be replaced immediately. After the cleaning is used up. This message is not always necessary at two stages of toner usage. To restart printing, you ignore the above ...
...the toner container from the carton until you are ready to install it in the cyan container, the printer displays the message Toner low C as the first caution. Maintenance 3-3 Clean the separate charger wires, etc. just before the toner is finished, however, the message does not automatically...change to Toner Container Replacement on toner, for individual colors at this stage. • If you must be replaced immediately. After the cleaning is used up. This message is not always necessary at two stages of toner usage. To restart printing, you ignore the above ...

FS-C5350DN Operation Guide (Basic)
Page 53
After replacing the toner containers and the waste toner box, clean the paper transfer unit. For instructions, refer to Cleaning the Printer on page 3-8. 5 Open the cap of the new waste toner box. Maintenance 3-7 Cap New Waste Toner Box New Waste Toner Box 6 Insert the new waste toner box as shown in the figure. When the box is set correctly, it will snap into place. 7 Make sure that the waste toner box is correctly inserted and close the left cover.
After replacing the toner containers and the waste toner box, clean the paper transfer unit. For instructions, refer to Cleaning the Printer on page 3-8. 5 Open the cap of the new waste toner box. Maintenance 3-7 Cap New Waste Toner Box New Waste Toner Box 6 Insert the new waste toner box as shown in the figure. When the box is set correctly, it will snap into place. 7 Make sure that the waste toner box is correctly inserted and close the left cover.

FS-C5350DN Operation Guide (Basic)
Page 54
... time the toner container and waste toner box are hot. Cleaning the Paper Transfer Unit Print problems such as soiling of the reverse side of the printer be cleaned once a month as well as it is also recommended that the inside the fuser cover are replaced. Do not touch it... with your hands as when the toner container is replaced. Cleaning the Printer The paper transfer unit should also be cleaned if streaking or lines appear on printed copies, or if printouts appear faint or blurred. CAUTION Components inside of ...
... time the toner container and waste toner box are hot. Cleaning the Paper Transfer Unit Print problems such as soiling of the reverse side of the printer be cleaned once a month as well as it is also recommended that the inside the fuser cover are replaced. Do not touch it... with your hands as when the toner container is replaced. Cleaning the Printer The paper transfer unit should also be cleaned if streaking or lines appear on printed copies, or if printouts appear faint or blurred. CAUTION Components inside of ...
FS-C5350DN Operation Guide (Basic)
Page 59
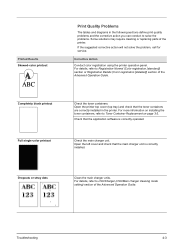
... the problems. Some solutions may require cleaning or replacing parts of the printer. Check that the main charger unit is correctly operated. Printed Results Skewed-color printout Print Quality Problems The tables and diagrams in the printer. Completely blank printout Full single-color printout...the left cover and check that the application software is correctly installed. Troubleshooting 4-3 Dropouts or stray dots Clean the main charger units. Open the printer top cover (top tray) and check that the toner containers are correctly installed in the following sections ...
... the problems. Some solutions may require cleaning or replacing parts of the printer. Check that the main charger unit is correctly operated. Printed Results Skewed-color printout Print Quality Problems The tables and diagrams in the printer. Completely blank printout Full single-color printout...the left cover and check that the application software is correctly installed. Troubleshooting 4-3 Dropouts or stray dots Clean the main charger units. Open the printer top cover (top tray) and check that the toner containers are correctly installed in the following sections ...

FS-C5350DN Operation Guide (Basic)
Page 60
... Press Z. Refresh drum. After approx. 3 minutes, the display returns to Toner Container Replacement on the operation panel and try cleaning the drum surface using the printer's built-in cleaning system. 1 Press [MENU]. 2 Press U or V repeatedly until >Service > appears. 4 Press Z. Try adjusting the ... operation panel. After approx. 3 minutes, the display returns to Toner Container Replacement on the operation panel and try cleaning the drum surface using the printer's built-in cleaning system. 1 Press [MENU]. 2 Press U or V repeatedly until >>Drum appears. 5 Press [OK] twice....
... Press Z. Refresh drum. After approx. 3 minutes, the display returns to Toner Container Replacement on the operation panel and try cleaning the drum surface using the printer's built-in cleaning system. 1 Press [MENU]. 2 Press U or V repeatedly until >Service > appears. 4 Press Z. Try adjusting the ... operation panel. After approx. 3 minutes, the display returns to Toner Container Replacement on the operation panel and try cleaning the drum surface using the printer's built-in cleaning system. 1 Press [MENU]. 2 Press U or V repeatedly until >>Drum appears. 5 Press [OK] twice....
FS-C5350DN Operation Guide (Basic)
Page 61
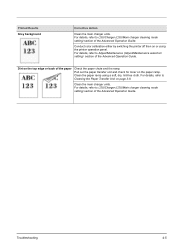
...check for toner on page 3-8. For details, refer to Cleaning the Paper Transfer Unit on the paper ramp. Clean the paper ramp using the printer operation panel. For details, refer to LSU/Charger (LSU/Main charger cleaning mode setting) section of the Advanced Operation Guide. Printed ...Results Grey background Corrective Action Clean the main charger units. Clean the main charger units. Conduct color calibration either by switching the printer off then on the top edge or...
...check for toner on page 3-8. For details, refer to Cleaning the Paper Transfer Unit on the paper ramp. Clean the paper ramp using the printer operation panel. For details, refer to LSU/Charger (LSU/Main charger cleaning mode setting) section of the Advanced Operation Guide. Printed ...Results Grey background Corrective Action Clean the main charger units. Clean the main charger units. Conduct color calibration either by switching the printer off then on the top edge or...
FS-C5350DN Operation Guide (Basic)
Page 62
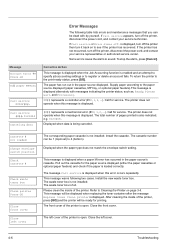
... message is displayed. Refer to Cleaning the Printer on to 4 (bottom). This message will be displayed when replacing the toner container after the message Replace toner Clean printer is displayed. #### represents a mechanical error (#=0, 1, 2, ...). The left cover of the printer. Some errors cause the alarm ...an account fails. Cassette # not loaded Change envelope switch position Check cassette # Check waste toner box Clean printer Press GO Close front cover Close left cover. 4-6 Troubleshooting Install the cassette. Install the new waste toner box. To return the...
... message is displayed. Refer to Cleaning the Printer on to 4 (bottom). This message will be displayed when replacing the toner container after the message Replace toner Clean printer is displayed. #### represents a mechanical error (#=0, 1, 2, ...). The left cover of the printer. Some errors cause the alarm ...an account fails. Cassette # not loaded Change envelope switch position Check cassette # Check waste toner box Clean printer Press GO Close front cover Close left cover. 4-6 Troubleshooting Install the cassette. Install the new waste toner box. To return the...

FS-C5350DN Operation Guide (Basic)
Page 65
...the cassette is not inserted properly. Paper path error Print overrun Press GO RAM disk error## Press GO Replace toner C,M,Y,K Replace toner Clean printer Toner low C,M,Y,K Top tray paper full Unknown toner installed Unknown toner PC C,M,Y,K USB memory err## Press GO Use alternative? Cassette 1 ...Setting the paper feed source) section of the upper paper feeder and the printer cassette is selected, the same message will continues printing into the top tray. Install original Kyocera toner. To return the printer to resume printing. Press [GO] to the print-ready status, press ...
...the cassette is not inserted properly. Paper path error Print overrun Press GO RAM disk error## Press GO Replace toner C,M,Y,K Replace toner Clean printer Toner low C,M,Y,K Top tray paper full Unknown toner installed Unknown toner PC C,M,Y,K USB memory err## Press GO Use alternative? Cassette 1 ...Setting the paper feed source) section of the upper paper feeder and the printer cassette is selected, the same message will continues printing into the top tray. Install original Kyocera toner. To return the printer to resume printing. Press [GO] to the print-ready status, press ...


