KM-NET ADMIN Operation Guide for Ver 2.0
Page 5
Create Report Subscriptions 3-34 Search ...3-34 Searching for Printing Devices 3-34 Chapter 4 Accounting Manager Console Settings ...4-1 Selecting Device and Account IDs 4-1 View Devices and Accounts ...4-2 List View ...4-2 Form View ...4-2 Diagram View ...4-3 Subscription View ...4-3 Manage Views ...4-3 Managing the List View ...4-3 Managing the Diagram View 4-4 Groups... ...5-2 Navigation Area Shortcut Menus 5-3 Navigation Area Toolbar ...5-3 List View ...5-3 List View Shortcut Menus ...5-4 List View Toolbar ...5-4 Authentication and Purge Policy Configuration 5-4 KMnet Admin 2.0 iii
Create Report Subscriptions 3-34 Search ...3-34 Searching for Printing Devices 3-34 Chapter 4 Accounting Manager Console Settings ...4-1 Selecting Device and Account IDs 4-1 View Devices and Accounts ...4-2 List View ...4-2 Form View ...4-2 Diagram View ...4-3 Subscription View ...4-3 Manage Views ...4-3 Managing the List View ...4-3 Managing the Diagram View 4-4 Groups... ...5-2 Navigation Area Shortcut Menus 5-3 Navigation Area Toolbar ...5-3 List View ...5-3 List View Shortcut Menus ...5-4 List View Toolbar ...5-4 Authentication and Purge Policy Configuration 5-4 KMnet Admin 2.0 iii
KM-NET ADMIN Operation Guide for Ver 2.0
Page 55
... Save Report Template dialog box, type a template name. 4 Under Format, select HTML or PDF as the report format. 5 Click OK to the Selected IDs or Selected Properties list. KMnet Admin 2.0 3-33 Creating a Report Template You can rename or remove a report template. 1 Click Manage. 2 In the Manage Report Template dialog box, change the...
... Save Report Template dialog box, type a template name. 4 Under Format, select HTML or PDF as the report format. 5 Click OK to the Selected IDs or Selected Properties list. KMnet Admin 2.0 3-33 Creating a Report Template You can rename or remove a report template. 1 Click Manage. 2 In the Manage Report Template dialog box, change the...

KM-NET ADMIN Operation Guide for Ver 2.0
Page 59
... One account: Accounting information and printing device information for all navigation area selections. KMnet Admin 2.0 4-2 Allowed variables: "ModelName," "IPAddress," "HostName," "SerialNumber," "AssetNumber" Account ID - The following information is available for all printing devices associated with one or more ..., if any, for all accounts or accounts in the navigation area. The Console Settings dialog box opens. 2 Select custom IDs: Device ID - Allowed variables: "AccountName," "AccountSubName," or "AccountCode" 3 Click Options to view its information. If there are too...
... One account: Accounting information and printing device information for all navigation area selections. KMnet Admin 2.0 4-2 Allowed variables: "ModelName," "IPAddress," "HostName," "SerialNumber," "AssetNumber" Account ID - The following information is available for all printing devices associated with one or more ..., if any, for all accounts or accounts in the navigation area. The Console Settings dialog box opens. 2 Select custom IDs: Device ID - Allowed variables: "AccountName," "AccountSubName," or "AccountCode" 3 Click Options to view its information. If there are too...

KM-NET ADMIN Operation Guide for Ver 2.0
Page 61
The top position appears as the leftmost tab. 5 To remove an item from available options: KMnet Admin 2.0 4-4 These groups are the same model. Adding or Editing a Printing Device Group You can select the Diagram View options to the original settings, click ... the navigation area, select All devices or an existing device group. 2 Click Add Group, or select an existing group and click Edit Group. Device ID and Account ID cannot be generated based on a specified group. Creating a group for one printing device lets you can create a group for the Accounting Manager console. ...
The top position appears as the leftmost tab. 5 To remove an item from available options: KMnet Admin 2.0 4-4 These groups are the same model. Adding or Editing a Printing Device Group You can select the Diagram View options to the original settings, click ... the navigation area, select All devices or an existing device group. 2 Click Add Group, or select an existing group and click Edit Group. Device ID and Account ID cannot be generated based on a specified group. Creating a group for one printing device lets you can create a group for the Accounting Manager console. ...
KM-NET ADMIN Operation Guide for Ver 2.0
Page 67
...Copy accounting management Scan accounting management FAX accounting management Cancel on Account Error: Select whether to "On." Cancel from KMnet Admin or at the device. Cancel Stops the current print job. Auto Reset Counters Displays the current counter renewal schedule. Manual ...Account function restriction and balance limit remain unchanged. KMnet Admin 2.0 Accounting Manager Prohibit Print jobs without a valid Account ID are cancelled. Accounting Mode: Select check boxes to print a one-page error report when the user...
...Copy accounting management Scan accounting management FAX accounting management Cancel on Account Error: Select whether to "On." Cancel from KMnet Admin or at the device. Cancel Stops the current print job. Auto Reset Counters Displays the current counter renewal schedule. Manual ...Account function restriction and balance limit remain unchanged. KMnet Admin 2.0 Accounting Manager Prohibit Print jobs without a valid Account ID are cancelled. Accounting Mode: Select check boxes to print a one-page error report when the user...
KM-NET ADMIN Operation Guide for Ver 2.0
Page 100
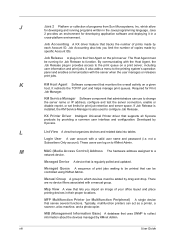
...that administrators can be running programs written in to configure Job Release. The Host Agent must be added by each Account ID. K KM Host Agent Software component that monitors the overall activity on the print server. Login User A user account ...User Guide which devices must be controlled using KMnet Admin. Typically, multifunction printers can log on a print server, including user information and print jobs. MIB (Management Information Base) A database that supports all Kyocera products by Kyocera. J Java 2 Platform or collection of your office...
...that administrators can be running programs written in to configure Job Release. The Host Agent must be added by each Account ID. K KM Host Agent Software component that monitors the overall activity on the print server. Login User A user account ...User Guide which devices must be controlled using KMnet Admin. Typically, multifunction printers can log on a print server, including user information and print jobs. MIB (Management Information Base) A database that supports all Kyocera products by Kyocera. J Java 2 Platform or collection of your office...

FS-2020D/3920DN/4020DN Operation Guide (Advanced)
Page 82
... numbers. 4 Press [OK]. For information on page 2-78. 1 Press Z while Security > is displayed. ID 2 The message display shows ID and a blinking cursor (_). _ 3 Press U or V to Admin (Administrator settings) on how to set up to protect printer operation and the print data. ID (Administrator ID input) To use the Security function, you must enter an administrator...
... numbers. 4 Press [OK]. For information on page 2-78. 1 Press Z while Security > is displayed. ID 2 The message display shows ID and a blinking cursor (_). _ 3 Press U or V to Admin (Administrator settings) on how to set up to protect printer operation and the print data. ID (Administrator ID input) To use the Security function, you must enter an administrator...
FS-2020D/3920DN/4020DN Operation Guide (Advanced)
Page 83
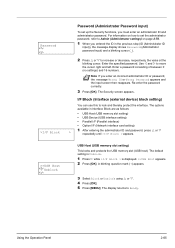
...(?) appears. 3 Select Block or Unblock using U or V. 4 Press [OK]. 5 Press [MENU]. The options available in the previous step (ID (Administrator ID input)), the message display shows Password (Administrator password input) and a blinking cursor (_). 2 Press U or V to increase or decrease, respectively,...2 Press [OK]. Password _ >I/F Block Password (Administrator Password input) To set the administrator password, refer to Admin (Administrator settings) on page 2-78. 1 When you entered the ID in Interface Block are as follows: • USB Host (USB memory slot setting) • USB Device (...
...(?) appears. 3 Select Block or Unblock using U or V. 4 Press [OK]. 5 Press [MENU]. The options available in the previous step (ID (Administrator ID input)), the message display shows Password (Administrator password input) and a blinking cursor (_). 2 Press U or V to increase or decrease, respectively,...2 Press [OK]. Password _ >I/F Block Password (Administrator Password input) To set the administrator password, refer to Admin (Administrator settings) on page 2-78. 1 When you entered the ID in Interface Block are as follows: • USB Host (USB memory slot setting) • USB Device (...

FS-2020D/3920DN/4020DN Operation Guide (Advanced)
Page 90
...) To set the administrator ID, refer to Admin (Administrator settings) on page -78. 1 Press Z while Job Accounting > is a function that allows the number of pages used to be managed by each department •... of pages used for each department to 99999999 • Collective print management for individual departments The options available in Job Accounting are as follows: • ID (Administrator ID input) • Password (Administrator Password input) • Job Accounting (Job Accounting selection/setting) • Select Account (Department-specific settings) • Add Account (...
...) To set the administrator ID, refer to Admin (Administrator settings) on page -78. 1 Press Z while Job Accounting > is a function that allows the number of pages used to be managed by each department •... of pages used for each department to 99999999 • Collective print management for individual departments The options available in Job Accounting are as follows: • ID (Administrator ID input) • Password (Administrator Password input) • Job Accounting (Job Accounting selection/setting) • Select Account (Department-specific settings) • Add Account (...
FS-2020D/3920DN/4020DN Operation Guide (Advanced)
Page 91
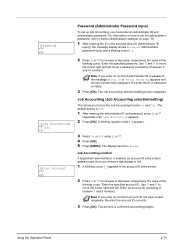
... On and Off. Note If you to move the cursor right and left . The account is Off. 1 After entering the administrator ID and password, press U or V repeatedly until >Job Accounting appears. 2 Press [OK]. Off Enter Account _ Password (Administrator Password ...input) To set the administrator password, refer to Admin (Administrator settings) on how to set up Job Accounting, you retrieve a status page or list. 1 A blinking cursor (_) appears in the previous step (ID (Administrator ID input)), the message display shows Password (Administrator password input) and...
... On and Off. Note If you to move the cursor right and left . The account is Off. 1 After entering the administrator ID and password, press U or V repeatedly until >Job Accounting appears. 2 Press [OK]. Off Enter Account _ Password (Administrator Password ...input) To set the administrator password, refer to Admin (Administrator settings) on how to set up Job Accounting, you retrieve a status page or list. 1 A blinking cursor (_) appears in the previous step (ID (Administrator ID input)), the message display shows Password (Administrator password input) and...
FS-2020D/3920DN/4020DN Operation Guide (Advanced)
Page 96
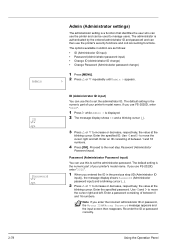
If you use FS-2020D, enter "2020". 1 Press Z while Admin > is displayed. 2 The message display shows ID and a blinking cursor (_). 3 Press U or V to increase or decrease, respectively, the value at the blinking cursor. Enter the specified ID. Use Y and Z to move the cursor right and left . The default setting is the numeric part of between...
If you use FS-2020D, enter "2020". 1 Press Z while Admin > is displayed. 2 The message display shows ID and a blinking cursor (_). 3 Press U or V to increase or decrease, respectively, the value at the blinking cursor. Enter the specified ID. Use Y and Z to move the cursor right and left . The default setting is the numeric part of between...

FS-2020D/3920DN/4020DN Operation Guide (Advanced)
Page 97
...Administrator Password change) You can use this to change the administrator ID. 1 In step 3 in Password (Administrator Password input) above , press U or V while the Admin (Change) screen is displayed until >Change ID appears. (E.g.: Where the administrator ID is 001) >Change ID _ OK? 002 2 When you press [OK], a ...OK]. Use Y and Z to move the cursor right and left . >Change ID 00000001 >Change ID 001 3 Once you enter the correct ID and password, the Admin (change) screen appears. (E.g.: Where the administrator ID is 00000001) Each time you press U or V, the following settings to be...
...Administrator Password change) You can use this to change the administrator ID. 1 In step 3 in Password (Administrator Password input) above , press U or V while the Admin (Change) screen is displayed until >Change ID appears. (E.g.: Where the administrator ID is 001) >Change ID _ OK? 002 2 When you press [OK], a ...OK]. Use Y and Z to move the cursor right and left . >Change ID 00000001 >Change ID 001 3 Once you enter the correct ID and password, the Admin (change) screen appears. (E.g.: Where the administrator ID is 00000001) Each time you press U or V, the following settings to be...
FS-2020D/3920DN/4020DN Operation Guide (Basic)
Page 77
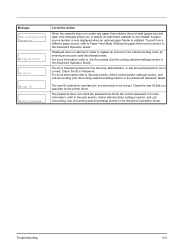
...on the printer driver. Message Use alternative? The user ID entered for the Security, Administrator, or Job Accounting function is installed. To print from a different paper source, refer to Security section, Admin (Administrator settings) section, and Job Accounting (Job ...Accounting selection/setting) section in the Advanced Operation Guide. Check the ID or Password. For more information, refer to Security section, Admin (Administrator settings) section, and Job Accounting (Job Accounting selection/setting) section in the Advanced Operation...
...on the printer driver. Message Use alternative? The user ID entered for the Security, Administrator, or Job Accounting function is installed. To print from a different paper source, refer to Security section, Admin (Administrator settings) section, and Job Accounting (Job ...Accounting selection/setting) section in the Advanced Operation Guide. Check the ID or Password. For more information, refer to Security section, Admin (Administrator settings) section, and Job Accounting (Job Accounting selection/setting) section in the Advanced Operation...


