FS-1028MFP/1128MFP Operation Guide Rev-3
Page 22
... cover MFPs or accessories which: (a) have become damaged due to province. Warranty (USA) FS-1028MFP/FS-1128MFP MULTIFUNCTIONAL PRODUCT LIMITED WARRANTY Kyocera Mita America, Inc. THIS WARRANTY SHALL NOT EXTEND TO, AND KYOCERA SHALL NOT BE LIABLE FOR, ANY INCIDENTAL OR CONSEQUENTIAL DAMAGES WHICH MAY ARISE OUT OF THE...Customer's new Multifunctional Product (referred to as the "Customer") of a new Kyocera MFP in material and workmanship for the name and address of this warranty on behalf of the developing unit, the drum unit, the transfer belt, and the fixing unit. In the event the ...
... cover MFPs or accessories which: (a) have become damaged due to province. Warranty (USA) FS-1028MFP/FS-1128MFP MULTIFUNCTIONAL PRODUCT LIMITED WARRANTY Kyocera Mita America, Inc. THIS WARRANTY SHALL NOT EXTEND TO, AND KYOCERA SHALL NOT BE LIABLE FOR, ANY INCIDENTAL OR CONSEQUENTIAL DAMAGES WHICH MAY ARISE OUT OF THE...Customer's new Multifunctional Product (referred to as the "Customer") of a new Kyocera MFP in material and workmanship for the name and address of this warranty on behalf of the developing unit, the drum unit, the transfer belt, and the fixing unit. In the event the ...
FS-1028MFP/1128MFP Operation Guide Rev-3
Page 345
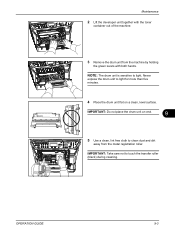
...with the toner container out of the machine. 3 Remove the drum unit from the metal registration roller. NOTE: The drum unit is sensitive to touch the transfer roller (black) during cleaning. IMPORTANT: Take care not to light. IMPORTANT: Do not place the drum unit on end. 9 5 Use a clean, lint free cloth... to light for more than five minutes. 4 Place the drum unit flat on a clean, level surface. Never expose the drum unit to clean dust and dirt away from the machine by holding...
...with the toner container out of the machine. 3 Remove the drum unit from the metal registration roller. NOTE: The drum unit is sensitive to touch the transfer roller (black) during cleaning. IMPORTANT: Take care not to light. IMPORTANT: Do not place the drum unit on end. 9 5 Use a clean, lint free cloth... to light for more than five minutes. 4 Place the drum unit flat on a clean, level surface. Never expose the drum unit to clean dust and dirt away from the machine by holding...
FS-1028MFP/1128MFP Operation Guide Rev-3
Page 346
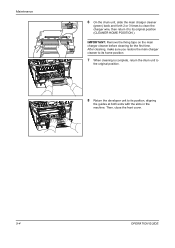
...cover. 9-4 OPERATION GUIDE After cleaning, make sure you restore the main charger cleaner to its home position. 7 When cleaning is complete, return the drum unit to the original position. 8 Return the developer unit to its position, aligning the guides at both ends with the slots in the machine. ...Maintenance 6 On the drum unit, slide the main charger cleaner (green) back and forth 2 or 3 times to clean the charger wire, then return it to its original ...
...cover. 9-4 OPERATION GUIDE After cleaning, make sure you restore the main charger cleaner to its home position. 7 When cleaning is complete, return the drum unit to the original position. 8 Return the developer unit to its position, aligning the guides at both ends with the slots in the machine. ...Maintenance 6 On the drum unit, slide the main charger cleaner (green) back and forth 2 or 3 times to clean the charger wire, then return it to its original ...
FS-1028MFP/1128MFP Operation Guide Rev-3
Page 349
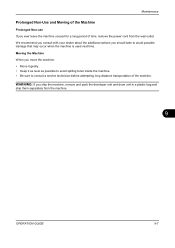
... you ever leave the machine unused for a long period of the machine. WARNING: If you ship the machine, remove and pack the developer unit and drum unit in a plastic bag and ship them separately from the wall outlet. We recommend you consult with your dealer about the additional actions you move...
... you ever leave the machine unused for a long period of the machine. WARNING: If you ship the machine, remove and pack the developer unit and drum unit in a plastic bag and ship them separately from the wall outlet. We recommend you consult with your dealer about the additional actions you move...
FS-1028MFP/1128MFP Operation Guide Rev-3
Page 354
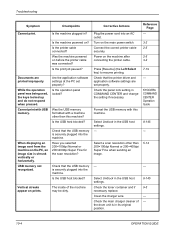
... Check that the USB memory is shrunk vertically or horizontally. Select Unblock in ? Is the USB host blocked? The inside of the drum unit is securely plugged into an AC outlet. Format the USB memory with USB memory. Checkpoints Is the machine plugged in the USB host... settings. Are the application software settings at the PC set properly. KYOCERA COMMAND CENTER Operation Guide 8-145 - 5-14 - 8-145 9-5 - - 10-4 OPERATION GUIDE USB memory not recognized. Is the print job paused? Check that...
... Check that the USB memory is shrunk vertically or horizontally. Select Unblock in ? Is the USB host blocked? The inside of the drum unit is securely plugged into an AC outlet. Format the USB memory with USB memory. Checkpoints Is the machine plugged in the USB host... settings. Are the application software settings at the PC set properly. KYOCERA COMMAND CENTER Operation Guide 8-145 - 5-14 - 8-145 9-5 - - 10-4 OPERATION GUIDE USB memory not recognized. Is the print job paused? Check that...

FS-1028MFP/1128MFP Operation Guide Rev-3
Page 364
CAUTION: The fuser unit inside the machine is sensitive to light for more than five minutes. 10-14 OPERATION GUIDE Do not touch it, as it may result in burn injury. NOTE: The drum is hot. Never expose the drum unit to light. Remove any partially fed paper. 2 Open the front cover, and lift the developer unit together with the toner container out of the machine. Troubleshooting Inside the Machine 1 Pull the paper cassette all the way out of the machine. 3 Remove the drum unit from the machine by holding the green levers with both hands.
CAUTION: The fuser unit inside the machine is sensitive to light for more than five minutes. 10-14 OPERATION GUIDE Do not touch it, as it may result in burn injury. NOTE: The drum is hot. Never expose the drum unit to light. Remove any partially fed paper. 2 Open the front cover, and lift the developer unit together with the toner container out of the machine. Troubleshooting Inside the Machine 1 Pull the paper cassette all the way out of the machine. 3 Remove the drum unit from the machine by holding the green levers with both hands.
FS-1028MFP/1128MFP Operation Guide Rev-3
Page 365
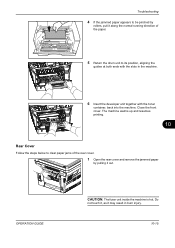
... in burn injury. 10-15 Close the front cover. Do not touch it, as it along the normal running direction of the paper. 5 Return the drum unit to clear paper jams of the rear cover. 1 Open the rear cover and remove the jammed paper by rollers, pull it may result in...
... in burn injury. 10-15 Close the front cover. Do not touch it, as it along the normal running direction of the paper. 5 Return the drum unit to clear paper jams of the rear cover. 1 Open the rear cover and remove the jammed paper by rollers, pull it may result in...

FS-1028MFP/1128MFP Operation Guide Rev-3
Page 420
... of these conditions will not only deliver poor copies but may also cause jams and shorten the useful life of printing and may damage the drum. Multi Purpose Tray Cassette or Multi Purpose Tray B6 (128 × 182 mm) Letter ISO B5 (176 × 250 mm) Legal Envelope #10 (...the standard paper that contains plastic or carbon. Choosing the Appropriate Paper This section describes guidelines for length and width. These paper may damage the drum or fusing unit. however, avoid coated paper or paper with a smooth and even surface; Do not use paper such as it may produce harmful...
... of these conditions will not only deliver poor copies but may also cause jams and shorten the useful life of printing and may damage the drum. Multi Purpose Tray Cassette or Multi Purpose Tray B6 (128 × 182 mm) Letter ISO B5 (176 × 250 mm) Legal Envelope #10 (...the standard paper that contains plastic or carbon. Choosing the Appropriate Paper This section describes guidelines for length and width. These paper may damage the drum or fusing unit. however, avoid coated paper or paper with a smooth and even surface; Do not use paper such as it may produce harmful...
FS-1028MFP/1128MFP Operation Guide Rev-3
Page 424
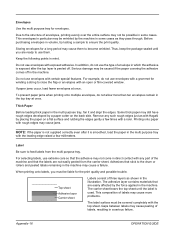
... an open or film-covered window. To prevent paper jams when printing onto multiple envelopes, do not use extreme care so that stick to the drum or rollers and peeled labels remaining in some cases. This composition of envelope in a serious failure. Serious damage may still have rough edges developed by...
... an open or film-covered window. To prevent paper jams when printing onto multiple envelopes, do not use extreme care so that stick to the drum or rollers and peeled labels remaining in some cases. This composition of envelope in a serious failure. Serious damage may still have rough edges developed by...
FS-1028MFP/1128MFP Operation Guide Rev-3
Page 426
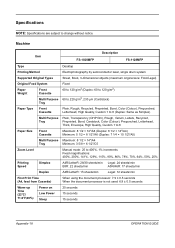
... processor is not used: 6.9 ± 0.5 seconds 20 seconds 15 seconds 15 seconds Appendix-18 OPERATION GUIDE Machine Item FS-1028MFP Description FS-1128MFP Type Printing Method Supported Original Types Desktop Electrophotography by semiconductor laser, single drum system Sheet, Book, 3-dimensional objects (maximum original size: Folio/Legal) Original Feed System Paper Weight Front Cassette Multi...
... processor is not used: 6.9 ± 0.5 seconds 20 seconds 15 seconds 15 seconds Appendix-18 OPERATION GUIDE Machine Item FS-1028MFP Description FS-1128MFP Type Printing Method Supported Original Types Desktop Electrophotography by semiconductor laser, single drum system Sheet, Book, 3-dimensional objects (maximum original size: Folio/Legal) Original Feed System Paper Weight Front Cassette Multi...

FS-1028MFP/1128MFP Quick Guide
Page 16
Never expose the developer unit to light. Remove the drum unit from the printer by holding the green levers with the toner container out of the machine. Pull the paper cassette all the way out of the machine. 3. IMPORTANT: The drum is sensitive to light for more than five minutes. 16 Open the front cover, and lift the developer unit together with both hands. Inside the Machine 1. Remove any partially fed paper. 2.
Never expose the developer unit to light. Remove the drum unit from the printer by holding the green levers with the toner container out of the machine. Pull the paper cassette all the way out of the machine. 3. IMPORTANT: The drum is sensitive to light for more than five minutes. 16 Open the front cover, and lift the developer unit together with both hands. Inside the Machine 1. Remove any partially fed paper. 2.
FS-1028MFP/1128MFP Quick Guide
Page 17
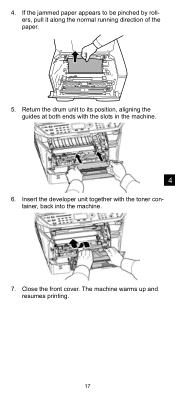
Close the front cover. The machine warms up and resumes printing. 17 Insert the developer unit together with the slots in the machine. 4 6. Return the drum unit to be pinched by rollers, pull it along the normal running direction of the paper. 5. 4. If the jammed paper appears to its position, aligning the guides at both ends with the toner container, back into the machine. 7.
Close the front cover. The machine warms up and resumes printing. 17 Insert the developer unit together with the slots in the machine. 4 6. Return the drum unit to be pinched by rollers, pull it along the normal running direction of the paper. 5. 4. If the jammed paper appears to its position, aligning the guides at both ends with the toner container, back into the machine. 7.

FS-1028MFP/1128MFP Quick Guide
Page 22
... flat on end. 5. Never expose the developer unit to its original position (CLEANER HOME POSITION). 22 On the drum unit, slide the charger cleaner (green) back and forth 2 or 3 times to clean the charger wire, then return it to light for more than five ... the printer by holding the green levers with both hands. Use a clean, lint free cloth to touch the transfer roller (black) during cleaning. 6. NOTE: The drum is sensitive to light. Do not place the...
... flat on end. 5. Never expose the developer unit to its original position (CLEANER HOME POSITION). 22 On the drum unit, slide the charger cleaner (green) back and forth 2 or 3 times to clean the charger wire, then return it to light for more than five ... the printer by holding the green levers with both hands. Use a clean, lint free cloth to touch the transfer roller (black) during cleaning. 6. NOTE: The drum is sensitive to light. Do not place the...

FS-1028MFP/1128MFP Quick Guide
Page 23
Then, close the front cover. 5 23 Return the developer unit to its home position. 7. When cleaning is complete, return the drum unit to its position, aligning the guides at both ends with the slots in the printer. After cleaning, make sure you restore the charger cleaner to the original position. 8. IMPORTANT: Remove the fixing tape on the charger cleaner before cleaning for the first time.
Then, close the front cover. 5 23 Return the developer unit to its home position. 7. When cleaning is complete, return the drum unit to its position, aligning the guides at both ends with the slots in the printer. After cleaning, make sure you restore the charger cleaner to the original position. 8. IMPORTANT: Remove the fixing tape on the charger cleaner before cleaning for the first time.

Service Manual
Page 9
... the parts, screws, connectors and wires that should be paid to any , from the wall outlet immediately...3.Miscellaneous WARNING • Never attempt to heat the drum or expose it may cause sparks when exposed directly to fire in fire. Wipe spills off completely. Special attention should be stood on or trapped...
... the parts, screws, connectors and wires that should be paid to any , from the wall outlet immediately...3.Miscellaneous WARNING • Never attempt to heat the drum or expose it may cause sparks when exposed directly to fire in fire. Wipe spills off completely. Special attention should be stood on or trapped...
Service Manual
Page 12
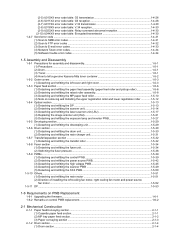
...trouble error codes ...1-4-34 1-5 Assembly and Disassembly 1-5-1 Precautions for assembly and disassembly 1-5-1 (1) Precautions ...1-5-1 (2) Drum...1-5-1 (3) Toner ...1-5-1 (4) How to tell a genuine Kyocera Mita toner container 1-5-2 1-5-2 Outer covers ...1-5-3 (1) Detaching and refitting the left cover and right cover 1-5-3...PWB 1-5-27 1-5-5 Developing section...1-5-29 (1) Detaching and refitting the developing unit 1-5-29 1-5-6 Drum section...1-5-30 (1) Detaching and refitting the drum unit 1-5-30 (2) Detaching and refitting the main charger unit 1-5-31 1-5-7 Transfer/separation section...
...trouble error codes ...1-4-34 1-5 Assembly and Disassembly 1-5-1 Precautions for assembly and disassembly 1-5-1 (1) Precautions ...1-5-1 (2) Drum...1-5-1 (3) Toner ...1-5-1 (4) How to tell a genuine Kyocera Mita toner container 1-5-2 1-5-2 Outer covers ...1-5-3 (1) Detaching and refitting the left cover and right cover 1-5-3...PWB 1-5-27 1-5-5 Developing section...1-5-29 (1) Detaching and refitting the developing unit 1-5-29 1-5-6 Drum section...1-5-30 (1) Detaching and refitting the drum unit 1-5-30 (2) Detaching and refitting the main charger unit 1-5-31 1-5-7 Transfer/separation section...
Service Manual
Page 15
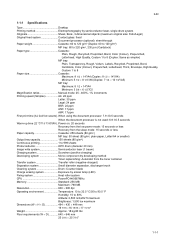
...mm 25 3/16 × 25 7/16" 1-1-1 2JN 1-1 Specifications 1-1-1 Specifications Type Desktop Printing method Electrophotography by semiconductor laser, single drum system Originals Sheet, Book, 3-dimensional objects (maximum original size: Folio/Legal) Original feed system Contact glass: fixed Document processor (optional):...Operating environment Temperature: 10 to 32.5 °C/50 to 90.5 °F Humidity: 15 to 999 sheets Photoconductor OPC drum (diameter 30 mm) Image write system Semiconductor laser (1 beam) Charging system Scorotron (positive charging) Developing system Mono ...
...mm 25 3/16 × 25 7/16" 1-1-1 2JN 1-1 Specifications 1-1-1 Specifications Type Desktop Printing method Electrophotography by semiconductor laser, single drum system Originals Sheet, Book, 3-dimensional objects (maximum original size: Folio/Legal) Original feed system Contact glass: fixed Document processor (optional):...Operating environment Temperature: 10 to 32.5 °C/50 to 90.5 °F Humidity: 15 to 999 sheets Photoconductor OPC drum (diameter 30 mm) Image write system Semiconductor laser (1 beam) Charging system Scorotron (positive charging) Developing system Mono ...
Service Manual
Page 20
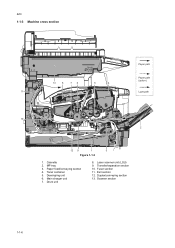
Main charger unit 7. 2JN 1-1-3 Machine cross section Paper path 13 8 76 5 4 Paper path (option) 11 Light path 10 2 12 9 1 3 Figure 1-1-3 1. MP tray 3. Toner container 5. Drum unit 8. Transfer/separation section 10. Duplex/conveying section 13. Scanner section 1-1-6 Cassette 2. Paper feed/conveying section 4. Developing unit 6. Laser scanner unit (LSU) 9. Fuser section 11. Exit section 12.
Main charger unit 7. 2JN 1-1-3 Machine cross section Paper path 13 8 76 5 4 Paper path (option) 11 Light path 10 2 12 9 1 3 Figure 1-1-3 1. MP tray 3. Toner container 5. Drum unit 8. Transfer/separation section 10. Duplex/conveying section 13. Scanner section 1-1-6 Cassette 2. Paper feed/conveying section 4. Developing unit 6. Laser scanner unit (LSU) 9. Fuser section 11. Exit section 12.
Service Manual
Page 30
... reading position modification operation Outputting a MIP-PG pattern Setting the main high voltage Setting the voltage for the primary transfer Checking/clearing the drum drive time Performing drum refresh operation Initial setting for the developing unit Setting toner loading operation Checking the developing drive time Setting the fuser control temperature Checking the...
... reading position modification operation Outputting a MIP-PG pattern Setting the main high voltage Setting the voltage for the primary transfer Checking/clearing the drum drive time Performing drum refresh operation Initial setting for the developing unit Setting toner loading operation Checking the developing drive time Setting the fuser control temperature Checking the...

Service Manual
Page 56
... is output. 6. Description U089 Outputting a MIP-PG pattern Description Selects and outputs the MIP-PG pattern created in printing. Method 1. Mono-Level To check the drum quality. 256-Level 1 dot-Level To check resolution reproducibility in the machine. Select [HTFM1], [HTFM2], [Dither1] or [Dither2] using the cursor up/down keys and...
... is output. 6. Description U089 Outputting a MIP-PG pattern Description Selects and outputs the MIP-PG pattern created in printing. Method 1. Mono-Level To check the drum quality. 256-Level 1 dot-Level To check resolution reproducibility in the machine. Select [HTFM1], [HTFM2], [Dither1] or [Dither2] using the cursor up/down keys and...


