FS-1028MFP/1128MFP Operation Guide Rev-3
Page 22
... OF, OR INABILITY TO USE, THE MFP. Maintenance Kits consist of any defective parts. Warranty (USA) FS-1028MFP/FS-1128MFP MULTIFUNCTIONAL PRODUCT LIMITED WARRANTY Kyocera Mita America, Inc. Kyocera shall have a 90 day Limited Warranty. Replacement Maintenance Kits have no obligation to as the "Customer") of...for the original retail purchaser (referred to be defective within the warranty period, Kyocera's only obligation and the Customer's exclusive remedy shall be replacement of the developing unit, the drum unit, the transfer belt, and the fixing unit. This warranty does not ...
... OF, OR INABILITY TO USE, THE MFP. Maintenance Kits consist of any defective parts. Warranty (USA) FS-1028MFP/FS-1128MFP MULTIFUNCTIONAL PRODUCT LIMITED WARRANTY Kyocera Mita America, Inc. Kyocera shall have a 90 day Limited Warranty. Replacement Maintenance Kits have no obligation to as the "Customer") of...for the original retail purchaser (referred to be defective within the warranty period, Kyocera's only obligation and the Customer's exclusive remedy shall be replacement of the developing unit, the drum unit, the transfer belt, and the fixing unit. This warranty does not ...
FS-1028MFP/1128MFP Operation Guide Rev-3
Page 345
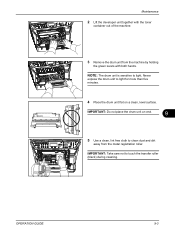
... cloth to clean dust and dirt away from the machine by holding the green levers with the toner container out of the machine. 3 Remove the drum unit from the metal registration roller. Maintenance 2 Lift the developer unit together with both hands. IMPORTANT: Take care not to light. IMPORTANT: Do not place...
... cloth to clean dust and dirt away from the machine by holding the green levers with the toner container out of the machine. 3 Remove the drum unit from the metal registration roller. Maintenance 2 Lift the developer unit together with both hands. IMPORTANT: Take care not to light. IMPORTANT: Do not place...
FS-1028MFP/1128MFP Operation Guide Rev-3
Page 346
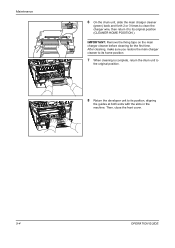
...for the first time. After cleaning, make sure you restore the main charger cleaner to its home position. 7 When cleaning is complete, return the drum unit to the original position. 8 Return the developer unit to its position, aligning the guides at both ends with the slots in the machine. ...Maintenance 6 On the drum unit, slide the main charger cleaner (green) back and forth 2 or 3 times to clean the charger wire, then return it to its original position...
...for the first time. After cleaning, make sure you restore the main charger cleaner to its home position. 7 When cleaning is complete, return the drum unit to the original position. 8 Return the developer unit to its position, aligning the guides at both ends with the slots in the machine. ...Maintenance 6 On the drum unit, slide the main charger cleaner (green) back and forth 2 or 3 times to clean the charger wire, then return it to its original position...
FS-1028MFP/1128MFP Operation Guide Rev-3
Page 349
... machine. 9 OPERATION GUIDE 9-7 We recommend you consult with your dealer about the additional actions you ship the machine, remove and pack the developer unit and drum unit in a plastic bag and ship them separately from the wall outlet.
... machine. 9 OPERATION GUIDE 9-7 We recommend you consult with your dealer about the additional actions you ship the machine, remove and pack the developer unit and drum unit in a plastic bag and ship them separately from the wall outlet.
FS-1028MFP/1128MFP Operation Guide Rev-3
Page 354
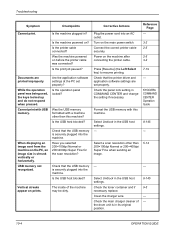
...into the machine. Check the toner container and if necessary replace. Check that the USB memory is in its original position. The inside of the drum unit is securely plugged into an AC outlet. Select Unblock in COMMAND CENTER and change the setting if necessary. Is the machine powered on before... cleaner of the machine may be dirty. Select Unblock in ? Troubleshooting Symptom Cannot print. Documents are set properly? Connect the correct printer cable securely. KYOCERA COMMAND CENTER Operation Guide 8-145 - 5-14 - 8-145 9-5 - - 10-4 OPERATION GUIDE
...into the machine. Check the toner container and if necessary replace. Check that the USB memory is in its original position. The inside of the drum unit is securely plugged into an AC outlet. Select Unblock in COMMAND CENTER and change the setting if necessary. Is the machine powered on before... cleaner of the machine may be dirty. Select Unblock in ? Troubleshooting Symptom Cannot print. Documents are set properly? Connect the correct printer cable securely. KYOCERA COMMAND CENTER Operation Guide 8-145 - 5-14 - 8-145 9-5 - - 10-4 OPERATION GUIDE

FS-1028MFP/1128MFP Operation Guide Rev-3
Page 364
Troubleshooting Inside the Machine 1 Pull the paper cassette all the way out of the machine. 3 Remove the drum unit from the machine by holding the green levers with the toner container out of the machine. NOTE: The drum is hot. Never expose the drum unit to light. Remove any partially fed paper. 2 Open the front cover, and lift the developer unit together with both hands. CAUTION: The fuser unit inside the machine is sensitive to light for more than five minutes. 10-14 OPERATION GUIDE Do not touch it, as it may result in burn injury.
Troubleshooting Inside the Machine 1 Pull the paper cassette all the way out of the machine. 3 Remove the drum unit from the machine by holding the green levers with the toner container out of the machine. NOTE: The drum is hot. Never expose the drum unit to light. Remove any partially fed paper. 2 Open the front cover, and lift the developer unit together with both hands. CAUTION: The fuser unit inside the machine is sensitive to light for more than five minutes. 10-14 OPERATION GUIDE Do not touch it, as it may result in burn injury.
FS-1028MFP/1128MFP Operation Guide Rev-3
Page 365
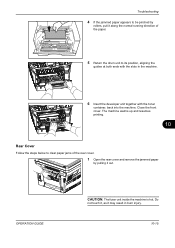
... is hot. The machine warms up and resumes printing. 10 Rear Cover Follow the steps below to clear paper jams of the paper. 5 Return the drum unit to be pinched by rollers, pull it along the normal running direction of the rear cover. 1 Open the rear cover and remove the jammed...
... is hot. The machine warms up and resumes printing. 10 Rear Cover Follow the steps below to clear paper jams of the paper. 5 Return the drum unit to be pinched by rollers, pull it along the normal running direction of the rear cover. 1 Open the rear cover and remove the jammed...

FS-1028MFP/1128MFP Operation Guide Rev-3
Page 420
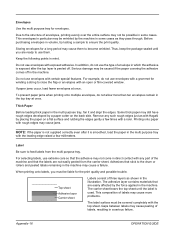
... fiber lint, or that contains at least 80% pulp, i.e., not more than 20% of the total paper content consists of printing and may damage the drum or fusing unit. Multi Purpose Tray Cassette or Multi Purpose Tray B6 (128 × 182 mm) Letter ISO B5 (176 × 250 mm) Legal Envelope... mm) 16K (273 × 197 mm) Youkei 2 (114 × 162 mm) Size Entry (70 × 148 to use paper such as it may damage the drum. Appendix-12 OPERATION GUIDE Condition Avoid using paper with bent corners or that contains plastic or carbon. Choose paper with a treated surface as paper that...
... fiber lint, or that contains at least 80% pulp, i.e., not more than 20% of the total paper content consists of printing and may damage the drum or fusing unit. Multi Purpose Tray Cassette or Multi Purpose Tray B6 (128 × 182 mm) Letter ISO B5 (176 × 250 mm) Legal Envelope... mm) 16K (273 × 197 mm) Youkei 2 (114 × 162 mm) Size Entry (70 × 148 to use paper such as it may damage the drum. Appendix-12 OPERATION GUIDE Condition Avoid using paper with bent corners or that contains plastic or carbon. Choose paper with a treated surface as paper that...
FS-1028MFP/1128MFP Operation Guide Rev-3
Page 424
... supplied correctly even after the top layer is smoothed, load the paper in a serious failure. Before purchasing envelopes in volume, try testing a sample to the drum or rollers and peeled labels remaining in the machine may cause more than ten envelopes remain in the machine. Serious damage may be wrinkled by...
... supplied correctly even after the top layer is smoothed, load the paper in a serious failure. Before purchasing envelopes in volume, try testing a sample to the drum or rollers and peeled labels remaining in the machine may cause more than ten envelopes remain in the machine. Serious damage may be wrinkled by...
FS-1028MFP/1128MFP Operation Guide Rev-3
Page 426
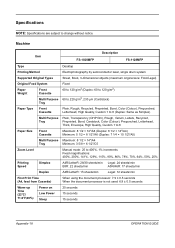
Machine Item FS-1028MFP Description FS-1128MFP Type Printing Method Supported Original Types Desktop Electrophotography by semiconductor laser, single drum system Sheet, Book, 3-dimensional objects (maximum original size: Folio/Legal) Original Feed System Paper Weight Front Cassette Multi Purpose Tray Paper Type Front Cassette Multi ...
Machine Item FS-1028MFP Description FS-1128MFP Type Printing Method Supported Original Types Desktop Electrophotography by semiconductor laser, single drum system Sheet, Book, 3-dimensional objects (maximum original size: Folio/Legal) Original Feed System Paper Weight Front Cassette Multi Purpose Tray Paper Type Front Cassette Multi ...

FS-1028MFP/1128MFP Quick Guide
Page 16
Remove the drum unit from the printer by holding the green levers with the toner container out of the machine. Remove any partially fed paper. 2. Pull the paper cassette all the way out of the machine. 3. Never expose the developer unit to light. IMPORTANT: The drum is sensitive to light for more than five minutes. 16 Open the front cover, and lift the developer unit together with both hands. Inside the Machine 1.
Remove the drum unit from the printer by holding the green levers with the toner container out of the machine. Remove any partially fed paper. 2. Pull the paper cassette all the way out of the machine. 3. Never expose the developer unit to light. IMPORTANT: The drum is sensitive to light for more than five minutes. 16 Open the front cover, and lift the developer unit together with both hands. Inside the Machine 1.
FS-1028MFP/1128MFP Quick Guide
Page 17
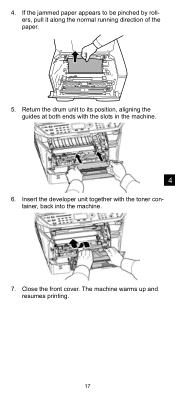
If the jammed paper appears to its position, aligning the guides at both ends with the toner container, back into the machine. 7. Insert the developer unit together with the slots in the machine. 4 6. Close the front cover. The machine warms up and resumes printing. 17 Return the drum unit to be pinched by rollers, pull it along the normal running direction of the paper. 5. 4.
If the jammed paper appears to its position, aligning the guides at both ends with the toner container, back into the machine. 7. Insert the developer unit together with the slots in the machine. 4 6. Close the front cover. The machine warms up and resumes printing. 17 Return the drum unit to be pinched by rollers, pull it along the normal running direction of the paper. 5. 4.

FS-1028MFP/1128MFP Quick Guide
Page 22
... unit to touch the transfer roller (black) during cleaning. 6. IMPORTANT: Take care not to light for more than five minutes. 4. 3. Place the drum unit flat on end. 5. On the drum unit, slide the charger cleaner (green) back and forth 2 or 3 times to clean the charger wire, then return it to light. NOTE...: The drum is sensitive to its original position (CLEANER HOME POSITION). 22 Use a clean, lint free cloth to clean dust and dirt away from the printer by ...
... unit to touch the transfer roller (black) during cleaning. 6. IMPORTANT: Take care not to light for more than five minutes. 4. 3. Place the drum unit flat on end. 5. On the drum unit, slide the charger cleaner (green) back and forth 2 or 3 times to clean the charger wire, then return it to light. NOTE...: The drum is sensitive to its original position (CLEANER HOME POSITION). 22 Use a clean, lint free cloth to clean dust and dirt away from the printer by ...

FS-1028MFP/1128MFP Quick Guide
Page 23
When cleaning is complete, return the drum unit to its home position. 7. Then, close the front cover. 5 23 After cleaning, make sure you restore the charger cleaner to its position, aligning the guides at both ends with the slots in the printer. Return the developer unit to the original position. 8. IMPORTANT: Remove the fixing tape on the charger cleaner before cleaning for the first time.
When cleaning is complete, return the drum unit to its home position. 7. Then, close the front cover. 5 23 After cleaning, make sure you restore the charger cleaner to its position, aligning the guides at both ends with the slots in the printer. Return the developer unit to the original position. 8. IMPORTANT: Remove the fixing tape on the charger cleaner before cleaning for the first time.


