
P3145dn/P3150dn/P3155dn Operation Guide
Page 46
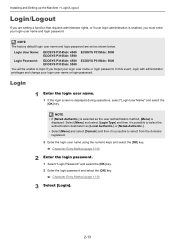
...-9) 2 Enter the login password. 1 Select "Login Password" and select the [OK] key. 2 Enter the login password and select the [OK] key. Character Entry Method (page 11-9) 3 Select [Login]. 2-13 NOTE The factory default login user name and login password are setting a function that...operations, select "Login User Name" and select the [OK] key. Login User Name: ECOSYS P3145dn: 4500 ECOSYS P3150dn: 5000 ECOSYS P3155dn: 5500 Login Password: ECOSYS P3145dn: 4500 ECOSYS P3150dn: 5000 ECOSYS P3155dn: 5500 You will be unable to select from the domains registered. 2 Enter the ...
...-9) 2 Enter the login password. 1 Select "Login Password" and select the [OK] key. 2 Enter the login password and select the [OK] key. Character Entry Method (page 11-9) 3 Select [Login]. 2-13 NOTE The factory default login user name and login password are setting a function that...operations, select "Login User Name" and select the [OK] key. Login User Name: ECOSYS P3145dn: 4500 ECOSYS P3150dn: 5000 ECOSYS P3155dn: 5500 Login Password: ECOSYS P3145dn: 4500 ECOSYS P3150dn: 5000 ECOSYS P3155dn: 5500 You will be unable to select from the domains registered. 2 Enter the ...
P3145dn/P3150dn/P3155dn Operation Guide
Page 48
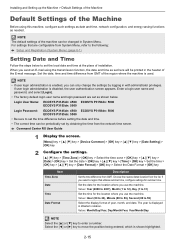
... for the location where you can be printed in Western notation. Installing and Setting up the Machine > Default Settings of the Machine Default Settings of the Machine Before using the transmission function, the date and time as shown below to the following... is disabled, the user authentication screen appears. The year is used. Login User Name: ECOSYS P3145dn: 4500 ECOSYS P3150dn: 5000 ECOSYS P3155dn: 5500 Login Password: ECOSYS P3145dn: 4500 ECOSYS P3150dn: 5000 ECOSYS P3155dn: 5500 • Be sure to 31) Set the time for the location where you...
... for the location where you can be printed in Western notation. Installing and Setting up the Machine > Default Settings of the Machine Default Settings of the Machine Before using the transmission function, the date and time as shown below to the following... is disabled, the user authentication screen appears. The year is used. Login User Name: ECOSYS P3145dn: 4500 ECOSYS P3150dn: 5000 ECOSYS P3155dn: 5500 Login Password: ECOSYS P3145dn: 4500 ECOSYS P3150dn: 5000 ECOSYS P3155dn: 5500 • Be sure to 31) Set the time for the location where you...

P3145dn/P3150dn/P3155dn Operation Guide
Page 49
...default login user name and login password are set by Using the Setup Utility of IB-50. When using the dedicated Web page. Setting the Connection by using Command Center RX. Login User Name: Login Password: ECOSYS P3145dn: 4500 ECOSYS P3155dn: 5500 ECOSYS P3145dn: 4500 ECOSYS P3155dn: 5500 ECOSYS P3150dn: 5000 ECOSYS... 1 key > [DHCP] > [OK] key key > [On] > [OK] key 2-16 Enter a login user name and password, and select [Login]. Connecting LAN Cable (page 2-7) For other platforms. Set up the Machine > Network Setup Network Setup Configuring the Wired...
...default login user name and login password are set by Using the Setup Utility of IB-50. When using the dedicated Web page. Setting the Connection by using Command Center RX. Login User Name: Login Password: ECOSYS P3145dn: 4500 ECOSYS P3155dn: 5500 ECOSYS P3145dn: 4500 ECOSYS P3155dn: 5500 ECOSYS P3150dn: 5000 ECOSYS... 1 key > [DHCP] > [OK] key key > [On] > [OK] key 2-16 Enter a login user name and password, and select [Login]. Connecting LAN Cable (page 2-7) For other platforms. Set up the Machine > Network Setup Network Setup Configuring the Wired...

P3145dn/P3150dn/P3155dn Operation Guide
Page 58
... mode operates for a preset time. Login User Name: Login Password: ECOSYS P3145dn: 4500 ECOSYS P3155dn: 5500 ECOSYS P3145dn: 4500 ECOSYS P3155dn: 5500 ECOSYS P3150dn: 5000 ECOSYS P3150dn: 5000 Auto Sleep Auto Sleep automatically switches the machine...ECOSYS P3145dn, 20 seconds for ECOSYS P3150dn and 25 seconds for the machine to enter a number. 2 Select the [OK] key. Sleep and Auto Sleep NOTE If user login administration is enabled, you can set the sleep timer for ECOSYS P3155dn. For more slowly. Enter a login user name and password, and select [Login]. The default...
... mode operates for a preset time. Login User Name: Login Password: ECOSYS P3145dn: 4500 ECOSYS P3155dn: 5500 ECOSYS P3145dn: 4500 ECOSYS P3155dn: 5500 ECOSYS P3150dn: 5000 ECOSYS P3150dn: 5000 Auto Sleep Auto Sleep automatically switches the machine...ECOSYS P3145dn, 20 seconds for ECOSYS P3150dn and 25 seconds for the machine to enter a number. 2 Select the [OK] key. Sleep and Auto Sleep NOTE If user login administration is enabled, you can set the sleep timer for ECOSYS P3155dn. For more slowly. Enter a login user name and password, and select [Login]. The default...

P3145dn/P3150dn/P3155dn Operation Guide
Page 71
...IPSec SNMPv3 *1 The optional Card Authentication Kit is required. *2 The optional SSD is required. *3 It is shipped with two default users registered one with Machine Administrator rights, and another user from handling the documents stored in the machine from interception and wiretapping....for the Administrator Additional Preparations for the Administrator In addition to only those who have a registered login name and password. therefore, please change the login user name and password. Restrict the users of the machine. Reference page page 9-2 page 8-31 page 9-11 page 5-5 Data ...
...IPSec SNMPv3 *1 The optional Card Authentication Kit is required. *2 The optional SSD is required. *3 It is shipped with two default users registered one with Machine Administrator rights, and another user from handling the documents stored in the machine from interception and wiretapping....for the Administrator Additional Preparations for the Administrator In addition to only those who have a registered login name and password. therefore, please change the login user name and password. Restrict the users of the machine. Reference page page 9-2 page 8-31 page 9-11 page 5-5 Data ...

P3145dn/P3150dn/P3155dn Operation Guide
Page 72
...default setting for the default user with administrator privileges is connected to change security settings and the host name. Network Settings Configure the network advanced settings. Security Settings Configure the security advanced settings. General User *1 - 2-39 Entering the predefined administrator password.... Device Settings Configure the advanced settings of the Command Center RX pages, enter the User Name and Password and click [Login]. Function Settings Configure the advanced function settings. Setting Description Administrator Device Information The machine...
...default setting for the default user with administrator privileges is connected to change security settings and the host name. Network Settings Configure the network advanced settings. Security Settings Configure the security advanced settings. General User *1 - 2-39 Entering the predefined administrator password.... Device Settings Configure the advanced settings of the Command Center RX pages, enter the User Name and Password and click [Login]. Function Settings Configure the advanced function settings. Setting Description Administrator Device Information The machine...

P3145dn/P3150dn/P3155dn Operation Guide
Page 73
...screen. 1 Launch your Web browser. 2 In the address or location bar, enter the machine's IP address or the host name. The factory default setting for IP address) https://MFP001 (if the host name is a problem with administrator privileges is displayed, configure the certificate. Select a ... is "MFP001") The web page displays basic information about the machine and Command Center RX as well as their current status. Entering the predefined administrator password allows the user to check the machine's IP address and the host name. [Menu] key key > [Report] > [OK] key key > [Report...
...screen. 1 Launch your Web browser. 2 In the address or location bar, enter the machine's IP address or the host name. The factory default setting for IP address) https://MFP001 (if the host name is a problem with administrator privileges is displayed, configure the certificate. Select a ... is "MFP001") The web page displays basic information about the machine and Command Center RX as well as their current status. Entering the predefined administrator password allows the user to check the machine's IP address and the host name. [Menu] key key > [Report] > [OK] key key > [Report...

P3145dn/P3150dn/P3155dn Operation Guide
Page 74
... administrator privileges is shown below. (Upper case and lower case letters are distinguished (case sensitive).) Login User Name: Admin Login Password: Admin 4 Click [Security Settings]. 2-41 The factory default setting for the default user with administrator privileges. Installing and Setting up the Machine > Command Center RX Changing Security Settings 1 Display the screen. 1 Launch...
... administrator privileges is shown below. (Upper case and lower case letters are distinguished (case sensitive).) Login User Name: Admin Login Password: Admin 4 Click [Security Settings]. 2-41 The factory default setting for the default user with administrator privileges. Installing and Setting up the Machine > Command Center RX Changing Security Settings 1 Display the screen. 1 Launch...

P3145dn/P3150dn/P3155dn Operation Guide
Page 76
...] key > [Yes] 3 Log in with administrator privileges is shown below. (Upper case and lower case letters are distinguished (case sensitive).) Login User Name: Admin Login Password: Admin 4 From the [Device Settings] menu, click [System]. 3 1 2 2-43 Installing and Setting up the Machine > Command Center RX Changing Device Information 1 Display the screen. 1 Launch... your Web browser. 2 In the address or location bar, enter the machine's IP address or the host name. The factory default setting for the default user with administrator privileges.
...] key > [Yes] 3 Log in with administrator privileges is shown below. (Upper case and lower case letters are distinguished (case sensitive).) Login User Name: Admin Login Password: Admin 4 From the [Device Settings] menu, click [System]. 3 1 2 2-43 Installing and Setting up the Machine > Command Center RX Changing Device Information 1 Display the screen. 1 Launch... your Web browser. 2 In the address or location bar, enter the machine's IP address or the host name. The factory default setting for the default user with administrator privileges.

P3145dn/P3150dn/P3155dn Operation Guide
Page 78
The factory default setting for specifying the SMTP settings is explained below . (Upper case and lower case letters are distinguished (case sensitive).) Login User Name: Admin Login Password: Admin 2-45 In addition, configure the following. • SMTP settings Item: "SMTP Protocol" and ...Report Print] > [OK] key key > [Status Page] > [OK] key > [Yes] 3 Log in "E-mail Send Settings" The procedure for the default user with administrator privileges. Print the status page to a mail server using the SMTP protocol. Installing and Setting up the Machine > Command Center RX E-mail...
The factory default setting for specifying the SMTP settings is explained below . (Upper case and lower case letters are distinguished (case sensitive).) Login User Name: Admin Login Password: Admin 2-45 In addition, configure the following. • SMTP settings Item: "SMTP Protocol" and ...Report Print] > [OK] key key > [Status Page] > [OK] key > [Yes] 3 Log in "E-mail Send Settings" The procedure for the default user with administrator privileges. Print the status page to a mail server using the SMTP protocol. Installing and Setting up the Machine > Command Center RX E-mail...

P3145dn/P3150dn/P3155dn Operation Guide
Page 115
...[OK] key 3 Specify the number of copies to print as follows. 1 Display the screen. 1 [Document Box] key key > [Private/Stored] > [OK] key NOTE If the default screen of the box is as desired, and the [OK] key > [Yes]. NOTE If the document is protected by entering the access code on the... right of printing, the Private/Stored job is released for printing by an access code, the password entry screen will be displayed. The job is automatically deleted. The file is selected. Upon completion of the all checkmarked files are possible: ...
...[OK] key 3 Specify the number of copies to print as follows. 1 Display the screen. 1 [Document Box] key key > [Private/Stored] > [OK] key NOTE If the default screen of the box is as desired, and the [OK] key > [Yes]. NOTE If the document is protected by entering the access code on the... right of printing, the Private/Stored job is released for printing by an access code, the password entry screen will be displayed. The job is automatically deleted. The file is selected. Upon completion of the all checkmarked files are possible: ...

P3145dn/P3150dn/P3155dn Operation Guide
Page 116
... Print box. Select the checkmarked file and select [Select] again to delete, and [Select] > [OK] key. NOTE If the document is deleted. Enter the password using the numeric keys. 4-14 Checkmarks will be placed on the right of the document, and select the [OK] key. 2 Delete the document. 1 Select the... screen will be displayed. The procedure is as follows. 1 Display the screen. 1 [Document Box] key key > [Private/Stored] > [OK] key NOTE If the default screen of the box is set to a Custom Box, display the Job Box screen. [Document Box] key > [Back] key key > [Job Box] > [OK] key ...
... Print box. Select the checkmarked file and select [Select] again to delete, and [Select] > [OK] key. NOTE If the document is deleted. Enter the password using the numeric keys. 4-14 Checkmarks will be placed on the right of the document, and select the [OK] key. 2 Delete the document. 1 Select the... screen will be displayed. The procedure is as follows. 1 Display the screen. 1 [Document Box] key key > [Private/Stored] > [OK] key NOTE If the default screen of the box is set to a Custom Box, display the Job Box screen. [Document Box] key > [Back] key key > [Job Box] > [OK] key ...

P3145dn/P3150dn/P3155dn Operation Guide
Page 117
... you set up an access code as follows. 1 Display the screen. 1 [Document Box] key key > [Private/Stored] > [OK] key NOTE If the default screen of the box is set up an access code, enter the access code when printing. The following operations are possible: Printing the Documents (page... machine. A checkmark will allow printing of copies to print, and [Select] > [OK] key. The file is protected by an access code, the password entry screen will be displayed. NOTE If the document is selected. Checkmarks will be placed on the right of the selected file. Printing starts. Printing...
... you set up an access code as follows. 1 Display the screen. 1 [Document Box] key key > [Private/Stored] > [OK] key NOTE If the default screen of the box is set up an access code, enter the access code when printing. The following operations are possible: Printing the Documents (page... machine. A checkmark will allow printing of copies to print, and [Select] > [OK] key. The file is protected by an access code, the password entry screen will be displayed. NOTE If the document is selected. Checkmarks will be placed on the right of the selected file. Printing starts. Printing...

P3145dn/P3150dn/P3155dn Operation Guide
Page 118
... Delete the documents stored in a Stored Job box. Select the checkmarked file and select [Select] again to delete, and [Select] > [OK] key. Enter the password using the numeric keys. 4-16 Checkmarks will be placed on the right of the document, and select the [OK] key. 2 Print and delete the document... screen will be displayed. The procedure is as follows. 1 Display the screen. 1 [Document Box] key key > [Private/Stored] > [OK] key NOTE If the default screen of the box is set to a Custom Box, display the Job Box screen. [Document Box] key > [Back] key key > [Job Box] > [OK] key 2 ...
... Delete the documents stored in a Stored Job box. Select the checkmarked file and select [Select] again to delete, and [Select] > [OK] key. Enter the password using the numeric keys. 4-16 Checkmarks will be placed on the right of the document, and select the [OK] key. 2 Print and delete the document... screen will be displayed. The procedure is as follows. 1 Display the screen. 1 [Document Box] key key > [Private/Stored] > [OK] key NOTE If the default screen of the box is set to a Custom Box, display the Job Box screen. [Document Box] key > [Back] key key > [Job Box] > [OK] key 2 ...
P3145dn/P3150dn/P3155dn Operation Guide
Page 132
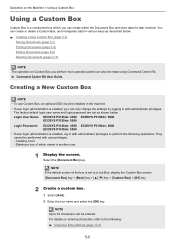
Login User Name: ECOSYS P3145dn: 4500 ECOSYS P3150dn: 5000 ECOSYS P3155dn: 5500 Login Password: ECOSYS P3145dn: 4500 ECOSYS P3150dn: 5000 ECOSYS P3155dn: 5500 • If user login administration is enabled, log in the machine. • If user login administration is ... for later retrieval. Creating a box - Deleting a box of the box is another user. 1 Display the screen. NOTE If the default screen of which you can create or delete a Custom Box, and manipulate data in with administrator privileges to perform the following : Character Entry Method...
Login User Name: ECOSYS P3145dn: 4500 ECOSYS P3150dn: 5000 ECOSYS P3155dn: 5500 Login Password: ECOSYS P3145dn: 4500 ECOSYS P3150dn: 5000 ECOSYS P3155dn: 5500 • If user login administration is enabled, log in the machine. • If user login administration is ... for later retrieval. Creating a box - Deleting a box of the box is another user. 1 Display the screen. NOTE If the default screen of which you can create or delete a Custom Box, and manipulate data in with administrator privileges to perform the following : Character Entry Method...

P3145dn/P3150dn/P3155dn Operation Guide
Page 134
... screen. NOTE If the default screen of the printing from a PC. Creating a New Custom Box (page 5-5) To delete 1 Select the box you can edit all boxes. 2 [Menu key > [Delete] > [OK] key > [Yes] NOTE If a custom box is protected by a password, enter the correct password. NOTE • When ...OK] key 2 Edit the custom box. To edit 1 Select the box you can delete all boxes. • If a custom box is protected by a password, enter the correct password. 2 [Menu key > [Box Detail/Edit] > [OK] key 3 Change the box information. NOTE • When you have logged in as a user,...
... screen. NOTE If the default screen of the printing from a PC. Creating a New Custom Box (page 5-5) To delete 1 Select the box you can edit all boxes. 2 [Menu key > [Delete] > [OK] key > [Yes] NOTE If a custom box is protected by a password, enter the correct password. NOTE • When ...OK] key 2 Edit the custom box. To edit 1 Select the box you can delete all boxes. • If a custom box is protected by a password, enter the correct password. 2 [Menu key > [Box Detail/Edit] > [OK] key 3 Change the box information. NOTE • When you have logged in as a user,...

P3145dn/P3150dn/P3155dn Operation Guide
Page 135
... (ChangeSet)] is explained below. 1 Display the screen. 1 Select the [Document Box] key. NOTE If the default screen of the all checkmarked files are checked, all files when [All Files] is protected by a password, enter the correct password. • Select [Select] to cancel the selection. Checkmarks will be placed on the right of the...
... (ChangeSet)] is explained below. 1 Display the screen. 1 Select the [Document Box] key. NOTE If the default screen of the all checkmarked files are checked, all files when [All Files] is protected by a password, enter the correct password. • Select [Select] to cancel the selection. Checkmarks will be placed on the right of the...

P3145dn/P3150dn/P3155dn Operation Guide
Page 136
...and edit box details. To edit (page 5-7) • [File Detail]: Display the details for moving documents is protected by a password, enter the correct password. • Select [Menu] to perform the following operations. • [Search(Name)]: Search using the box number. 2 Move the ...deselected. Operation on the Machine > Using a Custom Box Editing Documents This function allows you to move , and select [Select]. NOTE If the default screen of the selected file. The procedure for the selected file. • [Delete]: Delete the document. To delete (page 5-7) 2 ...
...and edit box details. To edit (page 5-7) • [File Detail]: Display the details for moving documents is protected by a password, enter the correct password. • Select [Menu] to perform the following operations. • [Search(Name)]: Search using the box number. 2 Move the ...deselected. Operation on the Machine > Using a Custom Box Editing Documents This function allows you to move , and select [Select]. NOTE If the default screen of the selected file. The procedure for the selected file. • [Delete]: Delete the document. To delete (page 5-7) 2 ...

P3145dn/P3150dn/P3155dn Operation Guide
Page 137
... Custom Box are deselected. A checkmark will be placed on the right of the box is protected by a password, enter the correct password. • Select [Menu] to delete, and select the [OK] key. NOTE If the default screen of the selected file. NOTE Select [Menu] to perform the following operations. - [Sort]: Sort the...
... Custom Box are deselected. A checkmark will be placed on the right of the box is protected by a password, enter the correct password. • Select [Menu] to delete, and select the [OK] key. NOTE If the default screen of the selected file. NOTE Select [Menu] to perform the following operations. - [Sort]: Sort the...
P3145dn/P3150dn/P3155dn Operation Guide
Page 150
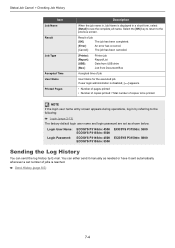
... (page 2-13) The factory default login user name and login password are set number of copies to be printed NOTE If the login user name entry screen appears during operations, log in by E-mail. Login User Name: ECOSYS P3145dn: 4500 ECOSYS P3150dn: 5000 ECOSYS P3155dn: 5500 Login Password: ECOSYS P3145dn: 4500 ECOSYS P3150dn: 5000 ECOSYS P3155dn: 5500 Sending the...
... (page 2-13) The factory default login user name and login password are set number of copies to be printed NOTE If the login user name entry screen appears during operations, log in by E-mail. Login User Name: ECOSYS P3145dn: 4500 ECOSYS P3150dn: 5000 ECOSYS P3155dn: 5500 Login Password: ECOSYS P3145dn: 4500 ECOSYS P3150dn: 5000 ECOSYS P3155dn: 5500 Sending the...

