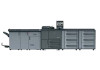
SD-513 User Manual
Page 3
... Printing a Sample during Output and Checking it: Sample Print 4-91 5 Various Settings and Adjustment 5.1 5.1.1 5.1.2 5.2 5.2.1 5.2.2 5.2.3 5.3 5.4 5.4.1 5.4.2 5.4.3 5.5 5.6 5.7 5.8 5.9 5.10 5.11 5.12 5.12.1 5.12.2 Tray Setting ...5-2 PI-PFU Tray Setting (bizhub PRESS 1250/1250P/1052 5-2 Tray Setting for PI Trays: Post Inserter of Folding Unit FD-503 5-9 [Saddle Stitcher Adjustment] - [Staple Center Adjustment 5-16 Center Position of 2 Position Staples...
SD-513 User Manual
Page 7
bizhub PRESS 1250/1052 - Comply with the prohibited items for copying ... body and optional devices. - Also, if this machine is equipped with the following digital printing systems. - bizhub PRESS C1070P/C71hc - Faithfully observe inspection and maintenance instructions. - Disclaimers We assume no responsibility for damages that is ...staple function and the fore-edge trimming function. mechanical functions or electrical functions do not run when: - bizhub PRESS 1250P - an error or damage has been detected; - Strictly observe the national and corporate safety regulations and ...
SD-513 User Manual
Page 23
2 Paper Information 2.4 Maximum stapling capacity for plain or fine paper bizhub PRESS 1250/1250P/1052 Body weight 14 to 16 lb Bond (50 g/m2 to 61 g/m2) 17 to 21 lb Bond (62 g/m2 to 81 g/m2) 22 to ... (11~25)+1 - - 24 (10~24)+1 24 (10~24)+1 - - 19 (8~19)+1 14 (8~14)+1 - - 14 (6~14)+1 9 (6~9)+1 - - 9 (5~9)+1 4 (4 only)+1 - - 4 (3~4)+1 3 (3 only)+1 - - 2 (2 only)+1 2 (2 only)+1 - - 2-14 Saddle Stitcher SD-513 bizhub PRESS C1070/C1070P/C1060/C71hc bizhub PRESS C1100/C1085 Body Weight 15 to 16 lb Bond (55 g/m2 to 61 g/m2) *3 17 to 21 lb Bond (62 g/m2 to 80...
SD-513 User Manual
Page 24
... or cracked image. *2: For 4-position stapling, the quantity limits are indicated in parentheses. *3: bizhub PRESS C1100/C1085 only Maximum stapling capacity for coated or color paper bizhub PRESS 1250/1250P/1052 Body weight 14 to 16 lb Bond (50 g/m2 to 61 g/m2) 17 to...)+1 24 (11~24)+1 - - 14 (10~14)+1 9 (8~9)+1 - - 9 (8~9)+1 4 (-)+1 - - 4 (-)+1 - - - 2.4 Paper Information 2 *1: Applied when grain long paper is acceptable. bizhub PRESS C1070/C1070P/C1060/C71hc bizhub PRESS C1100/C1085 Body Weight 15 to 16 lb Bond (55 g/m2 to 61 g/m2) *3 17 to 21 lb Bond (62 g/m2 to 80...
SD-513 User Manual
Page 25
... than 7.15 inches or 182 mm (smaller than Kent paper can still result in paper wrinkling or cracked image. *2: bizhub PRESS C1100/C1085 only 2-16 Saddle Stitcher SD-513 Any other than B5 w) bizhub PRESS 1250/1250P/1052 Body weight 14 to 20 lb Bond (50 g/m2 to 74 g/m2) 21 to 24 lb Bond (75... 14 to 57 lb Bond 58 to 80 lb Bond (50 g/m2 to 216 g/m2) (217 g/m2 to 300 g/m2) 16 15+1 15+1 8 7+1 3+1 4 3+1 bizhub PRESS C1070/C1070P/C1060/C71hc bizhub PRESS C1100/C1085 Body weight Cover sheet*1 No cover sheet 15 to 16 lb Bond (55 g/m2 to 61 g/m2)*2 17 to 21 lb...
bizhub PRESS 1052/1250/1250P Additional Information for 3rd Party Options
Page 8
...Screen. 2 Select [Feeder] under [Paper Tray]. 2-2 bizhub PRESS 1250/1250P/1052 Auto Tray Selection Setting: For details, see page 2-2 in this document. 4 Make the necessary settings for the main body when copying or for bizhub PRESS 1250P (Inch area)). % For details on turning ON/OFF ...in this document. Main Body] for the printer driver when printing, and start the output operation. tation. 3 Specify the paper conditions for bizhub PRESS 1250P (Metric area), [User's Guide - Machine Information & Copier] for the paper loaded to the Feeder's documen- 2 Operating the Machine with ...
bizhub PRESS 1052/1250/1250P Additional Information for 3rd Party Options
Page 9
...with the Feeder 2 3 Specify the tray setting using the same paper conditions, such as Paper Size and Weight, for bizhub PRESS 1250P.) 1 Position the original. 2 Press [COPY] tab to display the Copy Screen. 3 Select [Feeder] in the paper tray area. 4 Select additional copy conditions, .... 5 Press Start on the control panel. % You cannot output unless you start printing. 2.1.4 Print Operations The operation differs depending on the appropriate printer from the Feeder, select [Feeder] in the paper tray area on the Copy Screen. Copier]. (The copy function is [KONICA MINOLTA 1250/1052 PCL...
bizhub PRESS 1052/1250/1250P Additional Information for 3rd Party Options
Page 14
... front and back sides, make adjustments for bizhub PRESS 1250P (Inch area)). Adj. (Side 1)] - [01 Magnification Adjustment] - [03 Printer CD-Mag. Adj. (Side 2)] - [02 Timing Adjustment] - [02 Printer Restart Timing (Side 2)] When the above adjustments are complete for the front side in [User's Guide - Adj. (Side 1)]. 2-8 bizhub PRESS 1250/1250P/1052 If transfer misalignment occurs on the...
bizhub PRESS 1052/1250/1250P Additional Information for 3rd Party Options
Page 17
... how to adjust all trays, refer to adjust all trays including the Feeder tray. quence. Allowance: 20 +/- 0.5 mm (metric A/B) Allowance: 25.4 (1 inch) +/- 0.5 mm (inch series) bizhub PRESS 1250/1250P/1052 2-11 POD Administrator's Reference] (or "10.2.5 [02 Timing Adjustment] - [01 Printer Restart Timing (Side 1)]" in [User's Guide - A sample pattern will be output. 10 Measure...
bizhub PRESS 1052/1250/1250P Additional Information for 3rd Party Options
Page 20
...print is recommended that you are limited to N], and [OFF], respectively. 2-14 bizhub PRESS 1250/1250P/1052 The output sheets are fixed to [Face Up], [1 to [Sort] and [Group]. Main Body] for bizhub PRESS 1250P (Inch area)). % For details on turning ON/OFF the power switch of Tray... selectable output modes are loading paper or changing the output conditions. 4 Make the necessary settings for the main body when copying or for bizhub PRESS 1250P (Metric area), [User's Guide - POD Administrator's Reference] (or "4.2.3 Outlines of the main body, refer to appropriate sections in the...
bizhub PRESS 1250/1250P/1052/PRO 951 User Guide Addional Information
Page 13
...User's Guide - Main Body for bizhub PRESS 1250P (Inch area)). 1 Follow the procedure on page 1-4 to display the Quick Security Setting Menu Screen. 2 Press [WebUtilities Setting] on the Quick Security Setting Menu Screen. 3 Select [Use] or [Not Use]. 4 Press [OK] to the Quick Security Setting... Menu Screen. In both cases, you will return to complete the setting. % To cancel the change, press [Cancel]. bizhub PRESS 1250/1250P/1052, bizhub PRO 951 1-9 1.2 Quick Security Setting 1 1.2.7 Web Utilities Setting: Selecting Whether or Not to Use Web Utilities You can...
bizhub PRESS 1250/1250P/1052/PRO 951 User Guide Addional Information
Page 14
... cancel the change, press [Cancel]. Main Body for bizhub PRESS 1250P (Inch area)). 1 Follow the procedure on page 1-4 to display the Quick Security Setting Menu Screen. 2 Press [PSWC Setting] on the Quick Security Setting Menu Screen. 3 Select [Use] or [Not Use]. 4 Press [OK] to the Quick Security Setting Menu Screen. 1-10 bizhub PRESS 1250/1250P/1052, bizhub PRO 951 d Reference For...
bizhub PRESS 1250/1250P/1052/PRO 951 User Guide Addional Information
Page 17
...Quick IP Filtering], [PSWC Setting], and [Security Warning Display] of [Quick Security Setting]. Main Body for bizhub PRESS 1250P (Inch area)). NOTICE If a general user presses [Set Now] when Admin. Authentication is turned OFF, he /she is allowed to make changes to enter...password and the Quick Security Setting Menu Screen will not be displayed. 1 Press [Set Now]. 2 Press [Administrator Password] on the screen accessed from [Utility Menu] - [System Setting] - [Default Screen Setting]. bizhub PRESS 1250/1250P/1052, bizhub PRO 951 1-13 1.2 Quick Security Setting 1 % If the Quick ...
bizhub PRESS 1250/1250P/1052/PRO 951 User Guide Addional Information
Page 20
...registered and recalled as a paper setting. Start with the scale, and then enter the measured values to the front side. Main Body] for bizhub PRESS 1250P.) - This is a method to be registered in the paper setting to enter the Both Sides Adjust Screen: - NOTICE The Zoom/Image ... Adjustment can be recalled later. The Zoom/Image Shift Adjustment can also recall and modify the registered Zoom/Image Shift values. 2-2 bizhub PRESS 1250/1250P/1052, bizhub PRO 951 Start with the scale, and then enter the measured values to the front side. The adjustment value cannot also be...
bizhub PRESS 1250/1250P/1052/PRO 951 User Guide Addional Information
Page 21
...front side, then perform the Scan Measurement Adjustment or Gap Adjustment to the printing position of the front side. bizhub PRESS 1250/1250P/1052, bizhub PRO 951 2-3 Checking reference positions on the print side are automatically adjusted by adjusting the magnification ratio and ...02 Printer FD-Mag. Adj. (Side 2)] - [01 Magnification Adjustment] - [04 Printer CD-Mag. Performing the Both Sides Adjust for bizhub PRESS 1250P.) 2.2.1 Scan Measurement Adjustment Adjust the magnification ratio and printing position of the back side with reference to adjust those of the back side ...
bizhub PRESS 1250/1250P/1052/PRO 951 User Guide Addional Information
Page 22
... average value of Both Sides Adjust 2.2 NOTICE bizhub PRESS 1250P, which is a simple method to adjust only the magnification ratio and image position of the Zoom/Image Shift Adjustment registered in printing position between the first and last sheets which can be adjusted. 3 Press [Scan Meas.]. 2-4 bizhub PRESS 1250/1250P/1052, bizhub PRO 951 NOTICE Performing the Scan Measurement...
bizhub PRESS 1250/1250P/1052/PRO 951 User Guide Addional Information
Page 80
Rotation." 7-2 bizhub PRESS 1250/1250P/1052, bizhub PRO 951 To specify "180 Deg. Rotation" from the Copy Screen Procedure 1 Display the Copy Screen. 2 Press [Output Setting]. This functionality can be specified on the Output Setting Screen which is displayed by pressing [Output Setting] on the Copy Screen... Screen is displayed. 3 Select either [ON] or [OFF] for "180 Deg. The Output Setting Screen is not provided for bizhub PRESS 1250P.) Purpose To output paper by rotating the printed surface by 180 degrees. 7 Other Additional Information and Corrections 7.1 7 Others 7.1 Other...
bizhub PRESS 1250/1250P/1052/PRO 951 User Guide Addional Information
Page 81
... Screen. 2 Press [Output Setting]. Rotation." 7.1 Other Additional Information and Corrections 7 To specify "180 Deg. Main Body] for "180 Deg. The Output Setting Screen to "9.2.8 Operating Ticket Edit for Suspended Job" in [User's Guide - bizhub PRESS 1250/1250P/1052, bizhub PRO 951 7-3 Rotation" from the Ticket Edit Screen is displayed. 3 Select either [ON] or [OFF] for bizhub PRESS 1250P (Inch...
bizhub PRESS 1250/1250P/1052/PRO 951 User Guide Addional Information
Page 82
... "6.2.2 [08 Administrator Setting] - [01 Software Switch Setting]" in [User's Guide - See the following table for selecting OFF(0)/ON(1) for bizhub PRESS 1250P (Inch area)). Setting value: 0: Top binding layout 1: Left binding layout [Restrictions] Available only for each status 1: Merge statuses to perform ... the trimmed size area to be satisfied: • Set Switches No. 32 and No. 42 to distinguish the job names. 7-4 bizhub PRESS 1250/1250P/1052, bizhub PRO 951 Important: When a change is output Setting value: 0: Do not distinguish the job names of "@PJL JOB NAME" and ...
bizhub PRESS 1250/1250P/1052/PRO 951 User Guide Addional Information
Page 84
... via [06 Administrator Setting] - [04 Network Setting] - [02 Controller NIC Setting] on the Utility Menu Screen. Correct Available only for bizhub PRESS 1250P (Inch area)). Refer also to fe80: 0: 0: 0: ffff: ffff: ffff: ffff. Contact your service representative, if desired. 7.1.4 Additional ...Unavailable only for this machine) The note (*6) of this machine and to fe80: 0: 0: 0: ffff: ffff: ffff: ffff. 7-6 bizhub PRESS 1250/1250P/1052, bizhub PRO 951 Selecting [ON] for the IWS (Internal Web Server) Setting enables you to have a print data conversion application transferred to ...