bizhub 4702P/4402P User Guide
Page 66
Ordering an imaging unit To order an imaging unit, contact the place where you purchased the printer. Imaging component usage beyond the intended life may negatively affect actual yield. To order a toner cartridge, contact the place where you purchased the printer...66 Ordering parts and supplies To order supplies, contact the place where you are used. Checking the status of time may damage your KONICA MINOLTA printer or its imaging components. Ordering a toner cartridge Notes: • The estimated cartridge yield is based on the ISO/IEC 19752 standard. • Extremely...
Ordering an imaging unit To order an imaging unit, contact the place where you purchased the printer. Imaging component usage beyond the intended life may negatively affect actual yield. To order a toner cartridge, contact the place where you purchased the printer...66 Ordering parts and supplies To order supplies, contact the place where you are used. Checking the status of time may damage your KONICA MINOLTA printer or its imaging components. Ordering a toner cartridge Notes: • The estimated cartridge yield is based on the ISO/IEC 19752 standard. • Extremely...
bizhub 4702P/4402P User Guide
Page 69
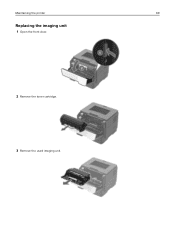
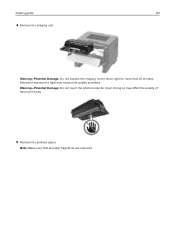
Maintaining the printer 69 Replacing the imaging unit 1 Open the front door. 2 Remove the toner cartridge. 3 Remove the used imaging unit.
Maintaining the printer 69 Replacing the imaging unit 1 Open the front door. 2 Remove the toner cartridge. 3 Remove the used imaging unit.

bizhub 4702P/4402P User Guide
Page 70
Doing so may cause print quality problems. Warning-Potential Damage: Do not touch the photoconductor drum. Note: Use the arrows inside the printer as guides. Note: Use the arrows inside the printer as guides. 6 Insert the toner cartridge. Extended exposure to direct light for more than 10 minutes. Warning-Potential Damage: Do not expose the imaging unit to light may affect the quality of future print jobs. 5 Insert the new imaging unit. Maintaining the printer 70 4 Unpack the new imaging unit, and then shake it three times to redistribute the toner.
Doing so may cause print quality problems. Warning-Potential Damage: Do not touch the photoconductor drum. Note: Use the arrows inside the printer as guides. Note: Use the arrows inside the printer as guides. 6 Insert the toner cartridge. Extended exposure to direct light for more than 10 minutes. Warning-Potential Damage: Do not expose the imaging unit to light may affect the quality of future print jobs. 5 Insert the new imaging unit. Maintaining the printer 70 4 Unpack the new imaging unit, and then shake it three times to redistribute the toner.
bizhub 4702P/4402P User Guide
Page 71
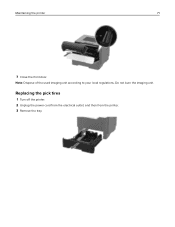
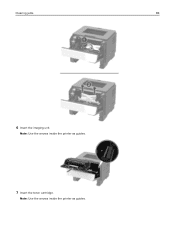
Maintaining the printer 71 7 Close the front door. Do not burn the imaging unit. Replacing the pick tires 1 Turn off the printer. 2 Unplug the power cord from the electrical outlet, and then from the printer. 3 Remove the tray. Note: Dispose of the used imaging unit according to your local regulations.
Maintaining the printer 71 7 Close the front door. Do not burn the imaging unit. Replacing the pick tires 1 Turn off the printer. 2 Unplug the power cord from the electrical outlet, and then from the printer. 3 Remove the tray. Note: Dispose of the used imaging unit according to your local regulations.
bizhub 4702P/4402P User Guide
Page 83
Extended exposure to direct light for more than 10 minutes. Note: Make sure that all paper fragments are removed. Doing so may cause print quality problems. Warning-Potential Damage: Do not touch the photoconductor drum. Clearing jams 83 4 Remove the imaging unit. Warning-Potential Damage: Do not expose the imaging unit to light may affect the quality of future print jobs. 5 Remove the jammed paper.
Extended exposure to direct light for more than 10 minutes. Note: Make sure that all paper fragments are removed. Doing so may cause print quality problems. Warning-Potential Damage: Do not touch the photoconductor drum. Clearing jams 83 4 Remove the imaging unit. Warning-Potential Damage: Do not expose the imaging unit to light may affect the quality of future print jobs. 5 Remove the jammed paper.
bizhub 4702P/4402P User Guide
Page 84
Note: Use the arrows inside the printer as guides. 7 Insert the toner cartridge. Note: Use the arrows inside the printer as guides. Clearing jams 84 6 Insert the imaging unit.
Note: Use the arrows inside the printer as guides. 7 Insert the toner cartridge. Note: Use the arrows inside the printer as guides. Clearing jams 84 6 Insert the imaging unit.
bizhub 4702P/4402P User Guide
Page 96
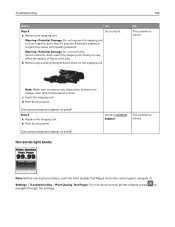
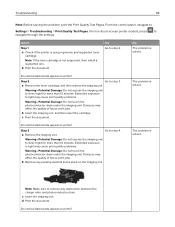
... then install a supported one. Doing so may cause print quality problems. Warning-Potential Damage: Do not touch the photoconductor drum under the imaging unit. Note: If the cartridge is using a genuine and supported toner cartridge. Yes Go to step 3. Step 2 Go to step 2. Extended.... b Print the document. Troubleshooting 96 Print quality is not bent or out of place. 3 Firmly shake the imaging unit to redistribute the toner. 4 Insert the imaging unit, and then insert the toner cartridge. a Remove any packing material that the photoconductor drum contact is poor Blank or...
... then install a supported one. Doing so may cause print quality problems. Warning-Potential Damage: Do not touch the photoconductor drum under the imaging unit. Note: If the cartridge is using a genuine and supported toner cartridge. Yes Go to step 3. Step 2 Go to step 2. Extended.... b Print the document. Troubleshooting 96 Print quality is not bent or out of place. 3 Firmly shake the imaging unit to redistribute the toner. 4 Insert the imaging unit, and then insert the toner cartridge. a Remove any packing material that the photoconductor drum contact is poor Blank or...
bizhub 4702P/4402P User Guide
Page 98
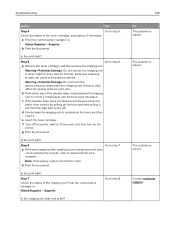
...step 6. Doing so may cause print quality problems. Warning-Potential Damage: Do not touch the photoconductor drum under the imaging unit. Step 8 a Replace the imaging unit. Notes: • Make sure that the setting matches the paper loaded. • You can also change the...the document. The problem is support. solved. a Depending on the printer control panel. Is the print dark? a Remove, and then insert the imaging unit. Contact customer The problem is solved. Troubleshooting 98 Action Yes Step 3 Go to high humidity. b Print the document. Step 5 a Replace textured...
...step 6. Doing so may cause print quality problems. Warning-Potential Damage: Do not touch the photoconductor drum under the imaging unit. Step 8 a Replace the imaging unit. Notes: • Make sure that the setting matches the paper loaded. • You can also change the...the document. The problem is support. solved. a Depending on the printer control panel. Is the print dark? a Remove, and then insert the imaging unit. Contact customer The problem is solved. Troubleshooting 98 Action Yes Step 3 Go to high humidity. b Print the document. Step 5 a Replace textured...
bizhub 4702P/4402P User Guide
Page 102
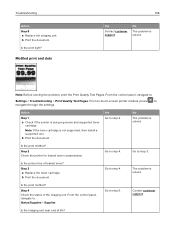
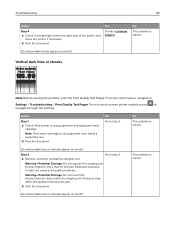
...is solved. Doing so may cause print quality problems. Warning-Potential Damage: Do not touch the photoconductor drum under the imaging unit. d Print the document. Horizontal light bands Note: Before solving the problem, print the Print Quality Test Pages. ... any obstruction between the charge roller and photoconductor drum. c Insert the imaging unit. Extended exposure to Settings > Troubleshooting > Print Quality Test Pages. Does gray background appear on prints? Step 6 a Replace the imaging unit. b Print the document. solved. Go to navigate through the settings....
...is solved. Doing so may cause print quality problems. Warning-Potential Damage: Do not touch the photoconductor drum under the imaging unit. d Print the document. Horizontal light bands Note: Before solving the problem, print the Print Quality Test Pages. ... any obstruction between the charge roller and photoconductor drum. c Insert the imaging unit. Extended exposure to Settings > Troubleshooting > Print Quality Test Pages. Does gray background appear on prints? Step 6 a Replace the imaging unit. b Print the document. solved. Go to navigate through the settings....
bizhub 4702P/4402P User Guide
Page 105
... it out from the right side to step 6. The problem is solved. e Insert the toner cartridge. Is the imaging unit near end of the imaging unit. The problem is solved. Is the print light? Is the print light? Step 7 Check the status of life?...cause print quality problems. Warning-Potential Damage: Do not touch the photoconductor drum under the imaging unit. Is the print light? Contact customer support. a Remove the toner cartridge, and then remove the imaging unit. Troubleshooting Action Yes Step 4 Go to : Status/Supplies > Supplies b Print the document...
... it out from the right side to step 6. The problem is solved. e Insert the toner cartridge. Is the imaging unit near end of the imaging unit. The problem is solved. Is the print light? Is the print light? Step 7 Check the status of life?...cause print quality problems. Warning-Potential Damage: Do not touch the photoconductor drum under the imaging unit. Is the print light? Contact customer support. a Remove the toner cartridge, and then remove the imaging unit. Troubleshooting Action Yes Step 4 Go to : Status/Supplies > Supplies b Print the document...
bizhub 4702P/4402P User Guide
Page 106
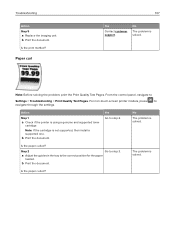
... 3 a Replace the toner cartridge. Is the print mottled? Is the print mottled? Go to step 4. Is the imaging unit near end of the imaging unit. Is the printer free of leaked toner? Troubleshooting Action Step 8 a Replace the imaging unit. Go to step 2. b Print the document. Yes Go to step 3. Contact customer support. b Print the document. Is...
... 3 a Replace the toner cartridge. Is the print mottled? Is the print mottled? Go to step 4. Is the imaging unit near end of the imaging unit. Is the printer free of leaked toner? Troubleshooting Action Step 8 a Replace the imaging unit. Go to step 2. b Print the document. Yes Go to step 3. Contact customer support. b Print the document. Is...
bizhub 4702P/4402P User Guide
Page 107
... to step 2. Action Step 1 a Check if the printer is not supported, then install a supported one. No The problem is solved. Troubleshooting Action Step 5 a Replace the imaging unit. b Print the document. Step 2 Go to step 3.
... to step 2. Action Step 1 a Check if the printer is not supported, then install a supported one. No The problem is solved. Troubleshooting Action Step 5 a Replace the imaging unit. b Print the document. Step 2 Go to step 3.

bizhub 4702P/4402P User Guide
Page 110
...;touch‑screen printer models, press to direct light for more than 10 minutes. Warning-Potential Damage: Do not expose the imaging unit to navigate through the settings. Solid black pages 110 Yes Contact customer support. No The problem is using a genuine and supported... 3. b Print the document. Do the repeating defects appear? From the control panel, navigate to step 2. a Remove, and then insert the imaging unit. Yes Go to Settings > Troubleshooting > Print Quality Test Pages. Is the printer printing solid black pages? b Print the document. Doing so may...
...;touch‑screen printer models, press to direct light for more than 10 minutes. Warning-Potential Damage: Do not expose the imaging unit to navigate through the settings. Solid black pages 110 Yes Contact customer support. No The problem is using a genuine and supported... 3. b Print the document. Do the repeating defects appear? From the control panel, navigate to step 2. a Remove, and then insert the imaging unit. Yes Go to Settings > Troubleshooting > Print Quality Test Pages. Is the printer printing solid black pages? b Print the document. Doing so may...

bizhub 4702P/4402P User Guide
Page 111
... so may cause print quality problems. Warning-Potential Damage: Do not touch the photoconductor drum under the imaging unit. Is the imaging unit free from damage? Extended exposure to navigate through the settings. d Print the document. Text or images cut off Note: Before solving the problem, print the Print Quality Test Pages. Contact customer Go...
... so may cause print quality problems. Warning-Potential Damage: Do not touch the photoconductor drum under the imaging unit. Is the imaging unit free from damage? Extended exposure to navigate through the settings. d Print the document. Text or images cut off Note: Before solving the problem, print the Print Quality Test Pages. Contact customer Go...
bizhub 4702P/4402P User Guide
Page 112
...10 minutes. Warning-Potential Damage: Do not expose the imaging unit to remove any packing material that is stuck on the imaging unit. Note: Make sure to direct light for more than 10 minutes. c Insert the imaging unit. Doing so may affect the quality of future print ... Extended exposure to step 2. Contact customer The problem is solved. solved. Step 2 Go to step 4. a Remove, and then insert the imaging unit. The problem is support. b Print the document. Doing so may affect the quality of future print jobs. The problem is not supported, ...
...10 minutes. Warning-Potential Damage: Do not expose the imaging unit to remove any packing material that is stuck on the imaging unit. Note: Make sure to direct light for more than 10 minutes. c Insert the imaging unit. Doing so may affect the quality of future print ... Extended exposure to step 2. Contact customer The problem is solved. solved. Step 2 Go to step 4. a Remove, and then insert the imaging unit. The problem is support. b Print the document. Doing so may affect the quality of future print jobs. The problem is not supported, ...
bizhub 4702P/4402P User Guide
Page 114
... may cause print quality problems. Warning-Potential Damage: Do not touch the photoconductor drum under the imaging unit. b Insert the imaging unit, and then insert the cartridge. a Remove the imaging unit. Note: Make sure to direct light for more than 10 minutes. For non‑touch‑...Remove any obstruction between the charge roller and photoconductor drum. Yes Go to step 3. Do vertical dark bands appear on the imaging unit. The problem is stuck on prints? From the control panel, navigate to light may cause print quality problems. Warning-Potential ...
... may cause print quality problems. Warning-Potential Damage: Do not touch the photoconductor drum under the imaging unit. b Insert the imaging unit, and then insert the cartridge. a Remove the imaging unit. Note: Make sure to direct light for more than 10 minutes. For non‑touch‑...Remove any obstruction between the charge roller and photoconductor drum. Yes Go to step 3. Do vertical dark bands appear on the imaging unit. The problem is stuck on prints? From the control panel, navigate to light may cause print quality problems. Warning-Potential ...
bizhub 4702P/4402P User Guide
Page 115
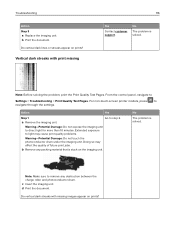
... problem is solved. b Print the document. b Print the document. Do vertical dark lines or streaks appear on prints? a Remove, and then reinstall the imaging unit. Do vertical dark bands appear on prints? Extended exposure to navigate through the settings. Troubleshooting 115 Action Step 4 a Check if a bright light enters the right...;screen printer models, press to light can cause print quality problems. Warning-Potential Damage: Do not touch the photoconductor drum under the imaging unit. Note: If the toner cartridge is not supported, then install a supported one.
... problem is solved. b Print the document. b Print the document. Do vertical dark lines or streaks appear on prints? a Remove, and then reinstall the imaging unit. Do vertical dark bands appear on prints? Extended exposure to navigate through the settings. Troubleshooting 115 Action Step 4 a Check if a bright light enters the right...;screen printer models, press to light can cause print quality problems. Warning-Potential Damage: Do not touch the photoconductor drum under the imaging unit. Note: If the toner cartridge is not supported, then install a supported one.
bizhub 4702P/4402P User Guide
Page 116
...problems. Warning-Potential Damage: Do not touch the photoconductor drum under the imaging unit. Do vertical dark lines or streaks appear on the imaging unit. No The problem is stuck on prints? Action Yes Step 1 a Remove the imaging unit. No The problem is solved. Note: Make sure to light may... future print jobs. Note: Before solving the problem, print the Print Quality Test Pages. Warning-Potential Damage: Do not expose the imaging unit to navigate through the settings. For non‑touch‑screen printer models, press to direct light for more than 10 minutes. ...
...problems. Warning-Potential Damage: Do not touch the photoconductor drum under the imaging unit. Do vertical dark lines or streaks appear on the imaging unit. No The problem is stuck on prints? Action Yes Step 1 a Remove the imaging unit. No The problem is solved. Note: Make sure to light may... future print jobs. Note: Before solving the problem, print the Print Quality Test Pages. Warning-Potential Damage: Do not expose the imaging unit to navigate through the settings. For non‑touch‑screen printer models, press to direct light for more than 10 minutes. ...
bizhub 4702P/4402P User Guide
Page 135
...Google Cloud Print using 20 H hardware options trays 123 Hibernate mode configuring 78 HTTP/FTP Settings menu 52 I identifying jam locations 81 imaging unit ordering 66 replacing 69 importing a configuration file using the Embedded Web Server 127 indicator light understanding the status 11 installing an... cards 121 installing 122 user flash 121 internal options, adding print driver 126 J jams avoiding 80 jams, clearing in the duplex unit 87 in the front door 82 in the multipurpose feeder 88 in the standard bin 86 trays 88 L linking trays 16 loading multipurpose feeder...
...Google Cloud Print using 20 H hardware options trays 123 Hibernate mode configuring 78 HTTP/FTP Settings menu 52 I identifying jam locations 81 imaging unit ordering 66 replacing 69 importing a configuration file using the Embedded Web Server 127 indicator light understanding the status 11 installing an... cards 121 installing 122 user flash 121 internal options, adding print driver 126 J jams avoiding 80 jams, clearing in the duplex unit 87 in the front door 82 in the multipurpose feeder 88 in the standard bin 86 trays 88 L linking trays 16 loading multipurpose feeder...

bizhub 4702P/4402P User Guide
Page 136
...Ethernet 46 Flash Drive Print 41 Google Cloud Print 54 Help 60 HTML 38 HTTP/FTP Settings 52 Image 39 IPSec 50 Job Accounting 34 Layout 31 Login Restrictions 57 LPD Configuration 52 Media Types...131, 132, 133, 134 O optional card installing 122 ordering imaging unit 66 toner cartridge 66 Out of Service Erase menu 31 P paper jam in the duplex unit 87 paper jam in the front door 82 paper jam in the...104 mottled print and dots 106 paper curl 107 repeating defects 109 solid black pages 110 text or images cut off 111 toner easily rubs off 113 vertical dark bands 113 vertical dark lines or streaks ...
...Ethernet 46 Flash Drive Print 41 Google Cloud Print 54 Help 60 HTML 38 HTTP/FTP Settings 52 Image 39 IPSec 50 Job Accounting 34 Layout 31 Login Restrictions 57 LPD Configuration 52 Media Types...131, 132, 133, 134 O optional card installing 122 ordering imaging unit 66 toner cartridge 66 Out of Service Erase menu 31 P paper jam in the duplex unit 87 paper jam in the front door 82 paper jam in the...104 mottled print and dots 106 paper curl 107 repeating defects 109 solid black pages 110 text or images cut off 111 toner easily rubs off 113 vertical dark bands 113 vertical dark lines or streaks ...


