bizhub 20P User Guide
Page 9
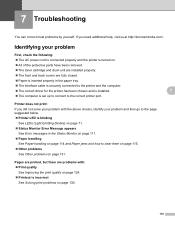
... Identifying your problem ...110 Error messages in the Status Monitor 111 Error message printout ...113 Paper handling ...114 Paper jams and how to clear them ...115 Jam MP tray / Tray1 / Tray2 / Tray3 / Inside 115 Jam Rear / Duplex...120 Improving the print quality...124 Solving print problems ...130 Network problems...131 Other problems ...131 For...
... Identifying your problem ...110 Error messages in the Status Monitor 111 Error message printout ...113 Paper handling ...114 Paper jams and how to clear them ...115 Jam MP tray / Tray1 / Tray2 / Tray3 / Inside 115 Jam Rear / Duplex...120 Improving the print quality...124 Solving print problems ...130 Network problems...131 Other problems ...131 For...
bizhub 20P User Guide
Page 35
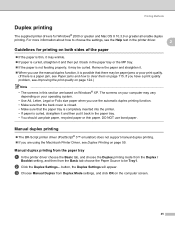
... Make sure that there may be curled. b Click the Duplex Settings... c Choose Manual Duplex from the Basic tab choose the Paper Source to clear them on page 115. Manual duplex printing from the paper tray 2 a In the printer driver choose the Basic tab, and choose the Duplex ... for Windows® 2000 or greater and Mac OS X 10.3.9 or greater all enable duplex printing. Remove the paper and straighten it is a paper jam, see Duplex Printing on page 59. Manual duplex printing 2 „ The BR-Script printer driver (PostScript® 3™ emulation) does not support ...
... Make sure that there may be curled. b Click the Duplex Settings... c Choose Manual Duplex from the Basic tab choose the Paper Source to clear them on page 115. Manual duplex printing from the paper tray 2 a In the printer driver choose the Basic tab, and choose the Duplex ... for Windows® 2000 or greater and Mac OS X 10.3.9 or greater all enable duplex printing. Remove the paper and straighten it is a paper jam, see Duplex Printing on page 59. Manual duplex printing 2 „ The BR-Script printer driver (PostScript® 3™ emulation) does not support ...
bizhub 20P User Guide
Page 85
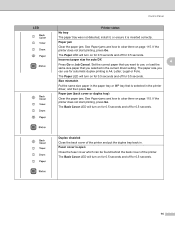
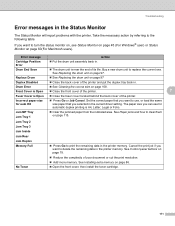
...for auto DX 4 Press Go or Job Cancel. Size mismatch Put the same size paper in the printer driver, and then press Go. Paper jam Clear the paper jam. The Paper LED will turn on for 0.5 seconds and off for 0.5 seconds. If the printer does not start printing, press Go. If...on for 0.5 seconds and off for automatic duplex printing is inserted correctly. The Back Cover LED will turn on page 115. See Paper jams and how to clear them on for 0.5 seconds and off for 0.5 seconds. LED Control Panel Printer status No tray The paper tray was not detected, install ...
...for auto DX 4 Press Go or Job Cancel. Size mismatch Put the same size paper in the printer driver, and then press Go. Paper jam Clear the paper jam. The Paper LED will turn on for 0.5 seconds and off for 0.5 seconds. If the printer does not start printing, press Go. If...on for 0.5 seconds and off for automatic duplex printing is inserted correctly. The Back Cover LED will turn on page 115. See Paper jams and how to clear them on for 0.5 seconds and off for 0.5 seconds. LED Control Panel Printer status No tray The paper tray was not detected, install ...
bizhub 20P User Guide
Page 120
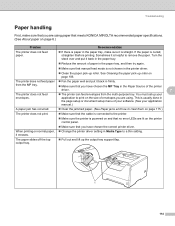
... fully closed. „ Paper is inserted properly in the Status Monitor on page 111. „ Paper handling See Paper handling on page 114 and Paper jams and how to the page suggested below. „ Printer LED is incorrect See Solving print problems on page 131. If you did not solve your...
... fully closed. „ Paper is inserted properly in the Status Monitor on page 111. „ Paper handling See Paper handling on page 114 and Paper jams and how to the page suggested below. „ Printer LED is incorrect See Solving print problems on page 131. If you did not solve your...
bizhub 20P User Guide
Page 121
...in the printer memory. See Installing extra memory on page 97. Cancel the print job if you want to the following table. Jam MP Tray Jam Tray 1 „ Clear the jammed paper from the indicated area. Take the necessary action by referring to delete the remaining data in . Buy a new drum unit... to clear them on page 79. „ Reduce the complexity of the printer. See Replacing the drum unit on page 86. „ Open the front cover, then install the toner cartridge. 111 See Paper jams and how to replace the current one. Front ...
...in the printer memory. See Installing extra memory on page 97. Cancel the print job if you want to the following table. Jam MP Tray Jam Tray 1 „ Clear the jammed paper from the indicated area. Take the necessary action by referring to delete the remaining data in . Buy a new drum unit... to clear them on page 79. „ Reduce the complexity of the printer. See Replacing the drum unit on page 86. „ Open the front cover, then install the toner cartridge. 111 See Paper jams and how to replace the current one. Front ...
bizhub 20P User Guide
Page 124
... your application manual.) A paper jam has occurred. „ Clear the jammed paper. (See Paper jams and how to clear them on page 115.) The printer does not print. „ Make sure that the cable is connected to a thin setting. When printing on the printer control panel. „ Make sure that meets KONICA MINOLTA recommended paper specifications. (See...
... your application manual.) A paper jam has occurred. „ Clear the jammed paper. (See Paper jams and how to clear them on page 115.) The printer does not print. „ Make sure that the cable is connected to a thin setting. When printing on the printer control panel. „ Make sure that meets KONICA MINOLTA recommended paper specifications. (See...
bizhub 20P User Guide
Page 125
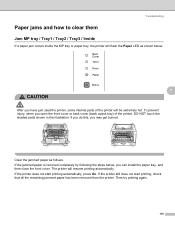
... as shown below , you may get burned. The printer will be extremely hot. Troubleshooting Paper jams and how to clear them 7 Jam MP tray / Tray1 / Tray2 / Tray3 / Inside 7 If a paper jam occurs inside the MP tray or paper tray, the printer will flash the Paper LED as follows. If the printer does ...not start printing, check that all the remaining jammed paper has been removed from the printer. Then ...
... as shown below , you may get burned. The printer will be extremely hot. Troubleshooting Paper jams and how to clear them 7 Jam MP tray / Tray1 / Tray2 / Tray3 / Inside 7 If a paper jam occurs inside the MP tray or paper tray, the printer will flash the Paper LED as follows. If the printer does ...not start printing, check that all the remaining jammed paper has been removed from the printer. Then ...
bizhub 20P User Guide
Page 128
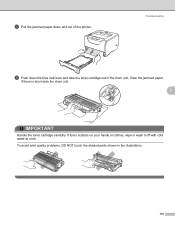
To avoid print quality problems, DO NOT touch the shaded parts shown in the illustrations. 118 Clear the jammed paper if there is any inside the drum unit. 7 IMPORTANT Handle the toner cartridge carefully. e Pull the jammed paper down the blue lock lever and take the toner cartridge out of the printer. If toner scatters on your hands or clothes, wipe or wash it off with cold water at once. Troubleshooting f Push down and out of the drum unit.
To avoid print quality problems, DO NOT touch the shaded parts shown in the illustrations. 118 Clear the jammed paper if there is any inside the drum unit. 7 IMPORTANT Handle the toner cartridge carefully. e Pull the jammed paper down the blue lock lever and take the toner cartridge out of the printer. If toner scatters on your hands or clothes, wipe or wash it off with cold water at once. Troubleshooting f Push down and out of the drum unit.
bizhub 20P User Guide
Page 131
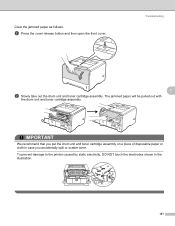
The jammed paper will be pulled out with the drum unit and toner cartridge assembly. Clear the jammed paper as follows. a Press the cover release button and then open the front cover. IMPORTANT We recommend that you accidentally spill or scatter toner. To prevent damage to the printer caused by static electricity, DO NOT touch the electrodes shown in case you put the drum unit and toner cartridge assembly on a piece of disposable paper or cloth in the illustration. 121 Troubleshooting 7 b Slowly take out the drum unit and toner cartridge assembly.
The jammed paper will be pulled out with the drum unit and toner cartridge assembly. Clear the jammed paper as follows. a Press the cover release button and then open the front cover. IMPORTANT We recommend that you accidentally spill or scatter toner. To prevent damage to the printer caused by static electricity, DO NOT touch the electrodes shown in case you put the drum unit and toner cartridge assembly on a piece of disposable paper or cloth in the illustration. 121 Troubleshooting 7 b Slowly take out the drum unit and toner cartridge assembly.


