Cube3 User Guide
Page 5
...• Engage with International Electric Committee (IEC) 60950-1 and meets the requirements of Service and Privacy Policy. The 3D Systems logo, 3D Systems, Cube and Cubify are designed to the following measures: -Reorient or relocate the receiving antenna. -Increase the separation between...de l'appareil doit accepter tout brouillage radioélectrique subi, même si le brouillage est susceptible d'en compromettre le fonctionnement. 3D Systems, Inc. 1 This document is the property of the following two conditions: (1) this device may cause undesired operation of materials, ...
...• Engage with International Electric Committee (IEC) 60950-1 and meets the requirements of Service and Privacy Policy. The 3D Systems logo, 3D Systems, Cube and Cubify are designed to the following measures: -Reorient or relocate the receiving antenna. -Increase the separation between...de l'appareil doit accepter tout brouillage radioélectrique subi, même si le brouillage est susceptible d'en compromettre le fonctionnement. 3D Systems, Inc. 1 This document is the property of the following two conditions: (1) this device may cause undesired operation of materials, ...
Cube3 User Guide
Page 6
...or conditions (such as riots, floods, misuse, neglect or improper service by email at [email protected]. 3D Systems, Inc. 2 WARRANTY 3D Systems warrants that the Cube 3D Printer will be free from defects in materials and workmanship, during the applicable warranty period, when used under... OF MERCHANTABILITY AND FITNESS FOR INTENDED OR PARTICULAR PURPOSES. THIS WARRANTY IS THE ONLY WARRANTY PROVIDED FOR THE CUBE 3D PRINTER. LIMITATION OF LIABILITY 3D SYSTEMS WILL NOT BE RESPONSIBLE FOR CONSEQUENTIAL, EXEMPLARY OR INCIDENTAL DAMAGES (SUCH AS LOSS OF PROFIT OR EMPLOYEE'S TIME)...
...or conditions (such as riots, floods, misuse, neglect or improper service by email at [email protected]. 3D Systems, Inc. 2 WARRANTY 3D Systems warrants that the Cube 3D Printer will be free from defects in materials and workmanship, during the applicable warranty period, when used under... OF MERCHANTABILITY AND FITNESS FOR INTENDED OR PARTICULAR PURPOSES. THIS WARRANTY IS THE ONLY WARRANTY PROVIDED FOR THE CUBE 3D PRINTER. LIMITATION OF LIABILITY 3D SYSTEMS WILL NOT BE RESPONSIBLE FOR CONSEQUENTIAL, EXEMPLARY OR INCIDENTAL DAMAGES (SUCH AS LOSS OF PROFIT OR EMPLOYEE'S TIME)...
Cube3 User Guide
Page 7
... are not accessible to ensure proper printing and be mindful of print materials, or 3D prints other than 3D Systems' print materials and genuine 3D Systems' components may happen that could cause personal injury. PRIOR TO ANY PART REPLACEMENT PROCEDURE, THE PRINTER MUST BE ... could cause personal injury. Read and follow all cautions and warnings in this user guide. ranty. • Use of and avoid hot surfaces. 3D Systems, Inc. 3 SHOCK WARNING: INDICATES A POTENTIAL SHOCK HAZARD. SHOCK WARNING: DUE TO RISK OF SHOCK, AVOID CONTACT WITH ALL INTERNAL ELECTRONIC COMPONENTS....
... are not accessible to ensure proper printing and be mindful of print materials, or 3D prints other than 3D Systems' print materials and genuine 3D Systems' components may happen that could cause personal injury. PRIOR TO ANY PART REPLACEMENT PROCEDURE, THE PRINTER MUST BE ... could cause personal injury. Read and follow all cautions and warnings in this user guide. ranty. • Use of and avoid hot surfaces. 3D Systems, Inc. 3 SHOCK WARNING: INDICATES A POTENTIAL SHOCK HAZARD. SHOCK WARNING: DUE TO RISK OF SHOCK, AVOID CONTACT WITH ALL INTERNAL ELECTRONIC COMPONENTS....
Cube3 User Guide
Page 8
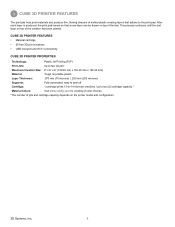
...materials and produce thin, flowing streams of the creation has been printed. This process continues until the last layer on the printer model and configuration. 3D Systems, Inc. 4 Up to the print pad. easy to peel off Cartridge: 1 cartridge prints 13-to two (2) jets* Maximum Creation Size: ...70 microns) | .200 mm (200 microns) Supports: Fully automated; CUBE 3D PRINTER FEATURES • Material cartridge • 25 free 3D print creations • USB inlet port and Wi-Fi connectivity CUBE 3D PRINTER PROPERTIES Technology: Plastic Jet Printing (PJP) Print Jets: Up to -...
...materials and produce thin, flowing streams of the creation has been printed. This process continues until the last layer on the printer model and configuration. 3D Systems, Inc. 4 Up to the print pad. easy to peel off Cartridge: 1 cartridge prints 13-to two (2) jets* Maximum Creation Size: ...70 microns) | .200 mm (200 microns) Supports: Fully automated; CUBE 3D PRINTER FEATURES • Material cartridge • 25 free 3D print creations • USB inlet port and Wi-Fi connectivity CUBE 3D PRINTER PROPERTIES Technology: Plastic Jet Printing (PJP) Print Jets: Up to -...

Cube3 User Guide
Page 9
4 AT A GLANCE B C F A G B C J D H H E KI A Print Jets B Print Jet Tubes C Material Cartridges D Print Pad E Print Platform F Touchscreen Display I K G On / Off Button H USB Inlet Port (Mass Storage Device) I Power Inlet J Refuse Bins K USB B Port (for future use) 3D Systems, Inc. 5
4 AT A GLANCE B C F A G B C J D H H E KI A Print Jets B Print Jet Tubes C Material Cartridges D Print Pad E Print Platform F Touchscreen Display I K G On / Off Button H USB Inlet Port (Mass Storage Device) I Power Inlet J Refuse Bins K USB B Port (for future use) 3D Systems, Inc. 5
Cube3 User Guide
Page 10
...Requirements Electrical Rating: 100 - 240 Volts, at room temperature: 16-29° C (60 - 85° F) • Non-condensing relative humidity: 5% - 25% 3D Systems, Inc. 6 MAC OS X REQUIREMENTS • OS X 10.8 and 10.9 • Minimum screen resolution: 1400 x 900 ANDROID • 4.0 ICS (tablets supported) IOS... with WPS Infrastructure • Ad Hoc mode USB MASS STORAGE DEVICE • USB mass storage device (supplied with time. and 64-bit operating systems • Windows 7, 8 and 8.1 • Minimum screen resolution: 1024 x 768 • Windows is needed. • Store at 50/60...
...Requirements Electrical Rating: 100 - 240 Volts, at room temperature: 16-29° C (60 - 85° F) • Non-condensing relative humidity: 5% - 25% 3D Systems, Inc. 6 MAC OS X REQUIREMENTS • OS X 10.8 and 10.9 • Minimum screen resolution: 1400 x 900 ANDROID • 4.0 ICS (tablets supported) IOS... with WPS Infrastructure • Ad Hoc mode USB MASS STORAGE DEVICE • USB mass storage device (supplied with time. and 64-bit operating systems • Windows 7, 8 and 8.1 • Minimum screen resolution: 1024 x 768 • Windows is needed. • Store at 50/60...
Cube3 User Guide
Page 12
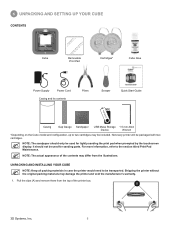
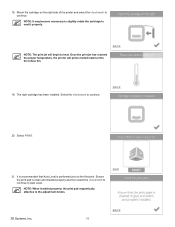
A 3D Systems, Inc. 8 It should only be used for lightly sanding the print pad when prompted by the touchscreen display. NOTE: The actual appearance of the contents ...
A 3D Systems, Inc. 8 It should only be used for lightly sanding the print pad when prompted by the touchscreen display. NOTE: The actual appearance of the contents ...
Cube3 User Guide
Page 13
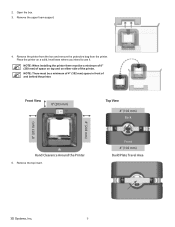
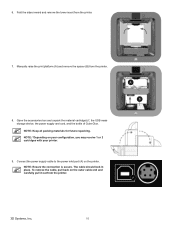
.... Front View 8" (203 mm) Top View 4" (102 mm) Back 8" (203 mm) 8" (203 mm) Hand Clearance Around the Printer 5. Front 4" (102 mm) Build Plate Travel Area 3D Systems, Inc. 9 Remove the upper foam support. 4. NOTE: There must be a minimum of 4" (102 mm) space in front of the printer. Open the box. 3. Remove the...
.... Front View 8" (203 mm) Top View 4" (102 mm) Back 8" (203 mm) 8" (203 mm) Hand Clearance Around the Printer 5. Front 4" (102 mm) Build Plate Travel Area 3D Systems, Inc. 9 Remove the upper foam support. 4. NOTE: There must be a minimum of 4" (102 mm) space in front of the printer. Open the box. 3. Remove the...
Cube3 User Guide
Page 14
... device, the power supply and cord, and the bottle of Cube Glue. Connect the power supply cable to the power inlet port (A) on the printer. A B A 3D Systems, Inc. 10
... device, the power supply and cord, and the bottle of Cube Glue. Connect the power supply cable to the power inlet port (A) on the printer. A B A 3D Systems, Inc. 10
Cube3 User Guide
Page 15
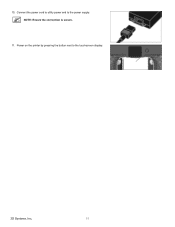
NOTE: Ensure the connection is secure. 11. Power on the printer by pressing the button next to the power supply. 10. Connect the power cord to utility power and to the touchscreen display. 3D Systems, Inc. 11
NOTE: Ensure the connection is secure. 11. Power on the printer by pressing the button next to the power supply. 10. Connect the power cord to utility power and to the touchscreen display. 3D Systems, Inc. 11
Cube3 User Guide
Page 16
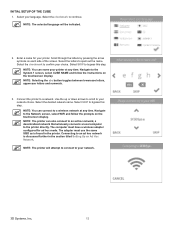
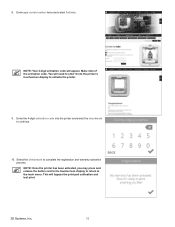
... symbols on the touchscreen display. Navigate to the Network screen, select WIFI and follow the instructions on each side of the screen. Navigate to the System 1 screen, select CUBE NAME and follow the prompts on the touchscreen display. Connecting to bypass this step. The computer must use the same SSID as... SKIP to an ad hoc network is found in the section titled Setting Up an Ad Hoc Network. NOTE: The printer can name your network. 3D Systems, Inc. 12
... symbols on the touchscreen display. Navigate to the Network screen, select WIFI and follow the instructions on each side of the screen. Navigate to the System 1 screen, select CUBE NAME and follow the prompts on the touchscreen display. Connecting to bypass this step. The computer must use the same SSID as... SKIP to an ad hoc network is found in the section titled Setting Up an Ad Hoc Network. NOTE: The printer can name your network. 3D Systems, Inc. 12
Cube3 User Guide
Page 17
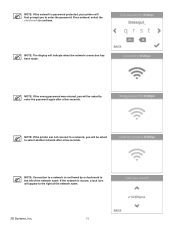
... asked to select another network after a few seconds. NOTE: Connection to a network is secure, a lock icon will appear to the left of the network name. 3D Systems, Inc. 13 NOTE: The display will indicate when the network connection has been made. If the network is confirmed by a checkmark to the right of...
... asked to select another network after a few seconds. NOTE: Connection to a network is secure, a lock icon will appear to the left of the network name. 3D Systems, Inc. 13 NOTE: The display will indicate when the network connection has been made. If the network is confirmed by a checkmark to the right of...
Cube3 User Guide
Page 18
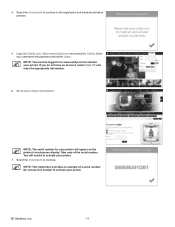
Select the checkmark to continue to activate your printer. 7. Enter your printer. 3D Systems, Inc. 14 NOTE: You must be logged in to activate your printer will need it to the registration and warranty activation process. 5. You will appear ...
Select the checkmark to continue to activate your printer. 7. Enter your printer. 3D Systems, Inc. 14 NOTE: You must be logged in to activate your printer will need it to the registration and warranty activation process. 5. You will appear ...
Cube3 User Guide
Page 19
8. NOTE: Your 4-digit activation code will bypass the print pad calibration and test print. 3D Systems, Inc. 15 Enter the 4-digit activation code into the printer's touchscreen display to complete the registration and warranty activation process. Make note of the activation ...
8. NOTE: Your 4-digit activation code will bypass the print pad calibration and test print. 3D Systems, Inc. 15 Enter the 4-digit activation code into the printer's touchscreen display to complete the registration and warranty activation process. Make note of the activation ...
Cube3 User Guide
Page 20
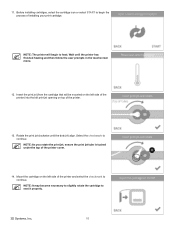
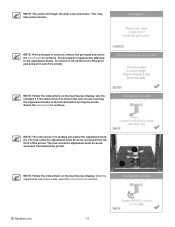
... is tucked under the top of the printer. 13. Before installing cartridges, select the cartridge icon or select START to begin to seat it properly. 3D Systems, Inc. 16 A 14. NOTE: It may become necessary to slightly rotate the cartridge to heat. Wait until the dots (A) align. Mount the cartridge on top...
... is tucked under the top of the printer. 13. Before installing cartridges, select the cartridge icon or select START to begin to seat it properly. 3D Systems, Inc. 16 A 14. NOTE: It may become necessary to slightly rotate the cartridge to heat. Wait until the dots (A) align. Mount the cartridge on top...
Cube3 User Guide
Page 21
... the print jet has reached the proper temperature, the printer will be mounted on the right side of the printer) into the refuse bin. 15. A 3D Systems, Inc. 17 NOTE: The printer will begin to continue. Insert the print jet (from the cartridge that will prime melted material into the right print...
... the print jet has reached the proper temperature, the printer will be mounted on the right side of the printer) into the refuse bin. 15. A 3D Systems, Inc. 17 NOTE: The printer will begin to continue. Insert the print jet (from the cartridge that will prime melted material into the right print...
Cube3 User Guide
Page 22
... the first print. It is recommended that Auto Level is clean and installed properly and then select the checkmark to continue to the adjustment knobs. 3D Systems, Inc. 18 NOTE: The print jet will prime melted material into the refuse bin. 19. The right cartridge has been installed. Select PRINT. 21. Mount...
... the first print. It is recommended that Auto Level is clean and installed properly and then select the checkmark to continue to the adjustment knobs. 3D Systems, Inc. 18 NOTE: The print jet will prime melted material into the refuse bin. 19. The right cartridge has been installed. Select PRINT. 21. Mount...
Cube3 User Guide
Page 23
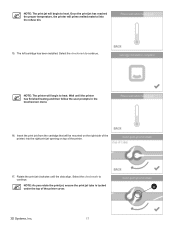
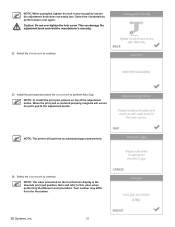
...: Follow the instructions on the touchscreen display. NOTE: If the print pad is not level, remove the print pad and select the checkmark to continue. 2 1 3D Systems, Inc. 19 Use the included 1.5 mm Allen wrench to loosen the lock screws securing the adjustment knobs to continue. Select the checkmark to the bracket...
...: Follow the instructions on the touchscreen display. NOTE: If the print pad is not level, remove the print pad and select the checkmark to continue. 2 1 3D Systems, Inc. 19 Use the included 1.5 mm Allen wrench to loosen the lock screws securing the adjustment knobs to continue. Select the checkmark to the bracket...
Cube3 User Guide
Page 24
... checkmark to perform Auto Level again. NOTE: The printer will secure the print pad to the adjustment knobs. Your number may differ from the illustration. 3D Systems, Inc. 20 Select the checkmark to continue. 23. Install the print pad and select the checkmark to continue. When the print pad is the absolute...
... checkmark to perform Auto Level again. NOTE: The printer will secure the print pad to the adjustment knobs. Your number may differ from the illustration. 3D Systems, Inc. 20 Select the checkmark to continue. 23. Install the print pad and select the checkmark to continue. When the print pad is the absolute...

Cube3 User Guide
Page 25
... information, refer to the section titled Applying Cube Glue. Select PRINT. Navigate to bypass this test print at any time. Select SKIP to the System 1 screen and select TEST PRINT. Gently squeeze the bottle and apply two thin layers of 5" (15 cm). NOTE: If Auto Gap is ...: The printer will assign an installed cartridge color to continue. Select the checkmark to heat and then begin printing the welcome message test print. 3D Systems, Inc. 21 NOTE: The printer will begin to continue. You can print this test print. NOTE: If Auto Gap is recommended that you...
... information, refer to the section titled Applying Cube Glue. Select PRINT. Navigate to bypass this test print at any time. Select SKIP to the System 1 screen and select TEST PRINT. Gently squeeze the bottle and apply two thin layers of 5" (15 cm). NOTE: If Auto Gap is ...: The printer will assign an installed cartridge color to continue. Select the checkmark to heat and then begin printing the welcome message test print. 3D Systems, Inc. 21 NOTE: The printer will begin to continue. You can print this test print. NOTE: If Auto Gap is recommended that you...


