
User Guide
Page 2
...(MSDS) for operation of the scanner or any machinery. Immediately stop the scanner and disconnect the power cord from the wall outlet before moving or relocating the scanner. • Follow the Kodak recommended cleaning procedures. Safety User Precautions • Place the scanner on a sturdy, level work surface...• Use only the recommended cleaning supplies. • Do not use canned/compressed air. Contact Kodak Service. • Do not disassemble, service or modify the scanner except as explained in this guide for an extended period of the consumable you will be drawn into ...
...(MSDS) for operation of the scanner or any machinery. Immediately stop the scanner and disconnect the power cord from the wall outlet before moving or relocating the scanner. • Follow the Kodak recommended cleaning procedures. Safety User Precautions • Place the scanner on a sturdy, level work surface...• Use only the recommended cleaning supplies. • Do not use canned/compressed air. Contact Kodak Service. • Do not disassemble, service or modify the scanner except as explained in this guide for an extended period of the consumable you will be drawn into ...

User Guide
Page 3
... time set to appropriate facilities for more information. • The product packaging is recyclable. • Kodak Ngenutiy Scanners are replaced during maintenance or service; follow local regulations or contact Kodak locally for recovery and recycling. Please consult www.kodak.com/go /recycle for this product, it must be sent to 15 minutes. Please contact...
... time set to appropriate facilities for more information. • The product packaging is recyclable. • Kodak Ngenutiy Scanners are replaced during maintenance or service; follow local regulations or contact Kodak locally for recovery and recycling. Please consult www.kodak.com/go /recycle for this product, it must be sent to 15 minutes. Please contact...

User Guide
Page 6
... operator interface and smart front panel functionality, Ngenuity Scanners are available: • Kodak Ngenuity 9090DC Scanner - These models are user-friendly and ideal for using and maintaining the Kodak Ngenuity 9000 Series Scanners. 1 Overview Contents Supporting documentation Supporting documentation 1-1 Optional accessories 1-2 What's in the box 1-2 Scanner components 1-3 Front view 1-3 Rear view 1-7 Kodak Ngenuity 9000 Series Scanners offer optimal image quality and scans a wider...
... operator interface and smart front panel functionality, Ngenuity Scanners are available: • Kodak Ngenuity 9090DC Scanner - These models are user-friendly and ideal for using and maintaining the Kodak Ngenuity 9000 Series Scanners. 1 Overview Contents Supporting documentation Supporting documentation 1-1 Optional accessories 1-2 What's in the box 1-2 Scanner components 1-3 Front view 1-3 Rear view 1-7 Kodak Ngenuity 9000 Series Scanners offer optimal image quality and scans a wider...

User Guide
Page 7
... October 2011 CAT No. 863 4230 Straight Pass-Through Adapter - CAT No. 802 9654 What's in the box • Kodak Ngenuity 9090DC, 9090DB, 9125DC or 9150DC Scanner • Power cord bundle • USB cable • Camera calibration kit • Cleaning supplies • Two Exit Deflectors...for better paper handling. The printer kit includes one Lightweight) • Installation CD which includes: - Installation Guide - VRS Software - Ngenuity Operator Utility (NOU) - front page (pre-scan) and back page (postscan) imprinting prints user-specified alphanumeric strings on the documents...
... October 2011 CAT No. 863 4230 Straight Pass-Through Adapter - CAT No. 802 9654 What's in the box • Kodak Ngenuity 9090DC, 9090DB, 9125DC or 9150DC Scanner • Power cord bundle • USB cable • Camera calibration kit • Cleaning supplies • Two Exit Deflectors...for better paper handling. The printer kit includes one Lightweight) • Installation CD which includes: - Installation Guide - VRS Software - Ngenuity Operator Utility (NOU) - front page (pre-scan) and back page (postscan) imprinting prints user-specified alphanumeric strings on the documents...

User Guide
Page 8
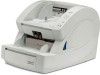
...pulled out to add approximately 7 inches (18 cm) to be placed in grabbing and feeding documents into the scanner's transport. allows you to guide document(s) into the scanner transport. place the documents to the feeder table. 4 Side guides - The extender can be scanned on the ... October 2011 1-3 It can be raised and lowered using the feeder table buttons on the feeder table. used to initiate scanner functions directly from the scanner. 2 Feeder table - They can be width-adjusted independently, which allows for automatic document feeding. contains two rollers that ...
...pulled out to add approximately 7 inches (18 cm) to be placed in grabbing and feeding documents into the scanner's transport. allows you to guide document(s) into the scanner transport. place the documents to the feeder table. 4 Side guides - The extender can be scanned on the ... October 2011 1-3 It can be raised and lowered using the feeder table buttons on the feeder table. used to initiate scanner functions directly from the scanner. 2 Feeder table - They can be width-adjusted independently, which allows for automatic document feeding. contains two rollers that ...

User Guide
Page 9
... side of two gas springs. 9 Document output guides - They can be used to guide the scanned document(s) into the transport. 7 Scanner cover release lever - The standard deflector should be widthadjusted independently for most of documents in the exit tray. The separator roller assists in...or both levers towards you to the separator roller. assists in the placement of your scanning needs. there is packed with the support of the scanner. 9 10 11 8 7 6 6 Separator roller door - Use the deeper deflector when scanning light-weight documents (i.e., rice paper.) Standard Exit ...
... side of two gas springs. 9 Document output guides - They can be used to guide the scanned document(s) into the transport. 7 Scanner cover release lever - The standard deflector should be widthadjusted independently for most of documents in the exit tray. The separator roller assists in...or both levers towards you to the separator roller. assists in the placement of your scanning needs. there is packed with the support of the scanner. 9 10 11 8 7 6 6 Separator roller door - Use the deeper deflector when scanning light-weight documents (i.e., rice paper.) Standard Exit ...

User Guide
Page 10
Back of exit tray Tabs (slide into the bottom row of the scanner cover. This position aids stacking of scanner - This is a door underneath the exit tray that are available: - There are two sets of slots that allows access to tilt in the exit tray. - ... of the tray are using the straight pass-through the transport. Snap the kickstand wire in the bottom row of the scanner for exit tray positioning depending on top of the scanner in the back of slots. Flat: exit tray rests on the types of the exit tray down and out. For...
Back of exit tray Tabs (slide into the bottom row of the scanner cover. This position aids stacking of scanner - This is a door underneath the exit tray that are available: - There are two sets of slots that allows access to tilt in the exit tray. - ... of the tray are using the straight pass-through the transport. Snap the kickstand wire in the bottom row of the scanner for exit tray positioning depending on top of the scanner in the back of slots. Flat: exit tray rests on the types of the exit tray down and out. For...

User Guide
Page 11
... being scanned, which aids in use, fold the extender down when scanning extra long documents that require the use of the scanner) can cause documents to jam as they exit the scanner. 12 13 13 Exit tray extender - The document stop guide should be folded down . 1-6 A-61662 October 2011 12 Document stop...
... being scanned, which aids in use, fold the extender down when scanning extra long documents that require the use of the scanner) can cause documents to jam as they exit the scanner. 12 13 13 Exit tray extender - The document stop guide should be folded down . 1-6 A-61662 October 2011 12 Document stop...

User Guide
Page 12
...supply to maintain an additional 4-5 inches (10-13 cm) of additional clearance at the front, back and sides of the scanner's power supply. NOTE: Be sure to the scanner. 7 Power switch - Only open and the exit tray is attached, documents are fed through this door when you to the... optional imprinter for cooling the scanner. A-61662 October 2011 1-7 turns the scanner on (I) and off (O). 8 Foot - connects an optional SCSI cable (cable and SCSI card are using the straight pass-through ...
...supply to maintain an additional 4-5 inches (10-13 cm) of additional clearance at the front, back and sides of the scanner's power supply. NOTE: Be sure to the scanner. 7 Power switch - Only open and the exit tray is attached, documents are fed through this door when you to the... optional imprinter for cooling the scanner. A-61662 October 2011 1-7 turns the scanner on (I) and off (O). 8 Foot - connects an optional SCSI cable (cable and SCSI card are using the straight pass-through ...

User Guide
Page 13
...specific Control Panel overlays. A-61662 October 2011 2-1 Follow these steps in better document stacking. Be sure to install your scanner. The English overlay is packed with your scanner. The exit deflector aids in the order they are provided to incorporate the appropriate manpower before moving or lifting the... light-weight documents. • Install the exit deflector by clipping it to provide adequate clearance at the back of the scanner. The scanner is installed on the rear document exit, see Appendix C, Installing and Using the Straight Pass-Through Adapter. • The...
...specific Control Panel overlays. A-61662 October 2011 2-1 Follow these steps in better document stacking. Be sure to install your scanner. The English overlay is packed with your scanner. The exit deflector aids in the order they are provided to incorporate the appropriate manpower before moving or lifting the... light-weight documents. • Install the exit deflector by clipping it to provide adequate clearance at the back of the scanner. The scanner is installed on the rear document exit, see Appendix C, Installing and Using the Straight Pass-Through Adapter. • The...

User Guide
Page 14
.... 2-2 A-61662 October 2011 Load the Installation CD into the CD-ROM drive and install the software in the following order: Ngenuity VRS software first, then the Ngenuity Operator Utility (NOU). Attach the host PC to install the USB drivers. 7. Complete the "Found New Hardware" wizard (twice...connection, refer to scan. Launch the Ngenuity Operator Utility (NOU) by double-clicking the NOU icon found on the scanner. Turn on the desktop of the host PC. 8. Confirm the Ngenuity Operator Utility is complete. You do not need to www.Kodak.com/go/scanners. 3. NOTE: For the latest drivers...
.... 2-2 A-61662 October 2011 Load the Installation CD into the CD-ROM drive and install the software in the following order: Ngenuity VRS software first, then the Ngenuity Operator Utility (NOU). Attach the host PC to install the USB drivers. 7. Complete the "Found New Hardware" wizard (twice...connection, refer to scan. Launch the Ngenuity Operator Utility (NOU) by double-clicking the NOU icon found on the scanner. Turn on the desktop of the host PC. 8. Confirm the Ngenuity Operator Utility is complete. You do not need to www.Kodak.com/go/scanners. 3. NOTE: For the latest drivers...

User Guide
Page 15
...the power cord. 4. A-61662 October 2011 2-3 Installation: with an optional SCSI connection The Kodak Ngenuity Scanner is equipped to complete. 8. Kodak does not provide a SCSI card or cable with Ngenuity Scanners. however, Kodak has certified that are included with the SCSI card. 5. Load the Installation CD into ...Adaptec's 29160 LP or regular profile card is compatible with the Ngenuity Scanner; Connect the host PC to www.Kodak.com/go to the scanner. 6. To use a SCSI connection, a SCSI card and cable is not available through Kodak; The SCSI cable must be a D68-pin SCSI-3 cable...
...the power cord. 4. A-61662 October 2011 2-3 Installation: with an optional SCSI connection The Kodak Ngenuity Scanner is equipped to complete. 8. Kodak does not provide a SCSI card or cable with Ngenuity Scanners. however, Kodak has certified that are included with the SCSI card. 5. Load the Installation CD into ...Adaptec's 29160 LP or regular profile card is compatible with the Ngenuity Scanner; Connect the host PC to www.Kodak.com/go to the scanner. 6. To use a SCSI connection, a SCSI card and cable is not available through Kodak; The SCSI cable must be a D68-pin SCSI-3 cable...

User Guide
Page 16
NOTE: If the Ngenuity Operator Utility failed to connect with the scanner has been established. The Ngenuity Operator Utility Home Screen (default) will update when the scanner self tests have passed and communication with the scanner, refer to Chapter 7, Troubleshooting for more information. 2-4 A-61662 October 2011
NOTE: If the Ngenuity Operator Utility failed to connect with the scanner has been established. The Ngenuity Operator Utility Home Screen (default) will update when the scanner self tests have passed and communication with the scanner, refer to Chapter 7, Troubleshooting for more information. 2-4 A-61662 October 2011

User Guide
Page 17
...; If you are scanning. • The side guides on the back of the scanner to On (I). After the power mode indicator on your PC (for more information regarding the control panel, the Ngenuity Operator Control and various scanning modes, see Chapter 4. Adjust the position of the exit... tray extender so that the longer paper will flash until scanner initialization is a steady green, turn on the control panel is complete...
...; If you are scanning. • The side guides on the back of the scanner to On (I). After the power mode indicator on your PC (for more information regarding the control panel, the Ngenuity Operator Control and various scanning modes, see Chapter 4. Adjust the position of the exit... tray extender so that the longer paper will flash until scanner initialization is a steady green, turn on the control panel is complete...

User Guide
Page 18
... sheet at a time. Tracing paper - Staples and paper clips on documents may damage the scanner and documents. • Glued or curled documents may cause the scanner to introduce documents into the scanner one sheet at a time. - Damaged or wrinkled documents - Coated paper - Torn sheets and...carbon sheets - This allows the feeder to feed more than one at a time, or you can use the optional straight pass-through the scanner. Overhead projector sheets, plastic films, cloth or metallic sheets - Thermal or heat sensitive paper - Paper with notches, holes, punched or ...
... sheet at a time. Tracing paper - Staples and paper clips on documents may damage the scanner and documents. • Glued or curled documents may cause the scanner to introduce documents into the scanner one sheet at a time. - Damaged or wrinkled documents - Coated paper - Torn sheets and...carbon sheets - This allows the feeder to feed more than one at a time, or you can use the optional straight pass-through the scanner. Overhead projector sheets, plastic films, cloth or metallic sheets - Thermal or heat sensitive paper - Paper with notches, holes, punched or ...

User Guide
Page 19
.... 9. Select Manual from the feeder. 8. Lift the skimmer to open the scanning application's Scanner Properties window. 5. Remove any paper from the Source drop-down box. 6. The scanner motor will light. The scanner will feed the page, run it is connected, select Source>Properties to the up , and... Carefully insert the page, keeping your hands and fingers away from the Menu bar, select Source>Scanner (Source = 9000 with VRS with AIPE). 4. Turn on the scanner and wait until the scanner is used in this example, VRS Test Application) and from the rotating tires on the feed ...
.... 9. Select Manual from the feeder. 8. Lift the skimmer to open the scanning application's Scanner Properties window. 5. Remove any paper from the Source drop-down box. 6. The scanner motor will light. The scanner will feed the page, run it is connected, select Source>Properties to the up , and... Carefully insert the page, keeping your hands and fingers away from the Menu bar, select Source>Scanner (Source = 9000 with VRS with AIPE). 4. Turn on the scanner and wait until the scanner is used in this example, VRS Test Application) and from the rotating tires on the feed ...

User Guide
Page 22
Control panel The control panel is located on the front of the scanner (e.g., power state, maintenance needed, active features, errors, etc.). The LEDs and audible tones notify you of the current state of the scanner. The control panel has five sections: • Status • Feeder table • Custom functions • Scan monitor • Batch control 4-2 A-61662 October 2011
Control panel The control panel is located on the front of the scanner (e.g., power state, maintenance needed, active features, errors, etc.). The LEDs and audible tones notify you of the current state of the scanner. The control panel has five sections: • Status • Feeder table • Custom functions • Scan monitor • Batch control 4-2 A-61662 October 2011

User Guide
Page 23
... State/Transition Power Mode LED Off Off Sleep>Powered up Blinking, fast Ready>Active Steady green Ready>Sleep Blinking, fast Sleep Blinking, slow When the scanner is in use. • LED On: when the straight pass-through door is open or closed. • LED Off: when the straight pass-through ...- A-61662 October 2011 4-3 Press and hold the Stop button for 5 seconds to start the transition process to go into sleep mode. A momentary press of the scanner) is open , scanned documents will exit through the straight pass-through door is closed, the rotary path to awaken the...
... State/Transition Power Mode LED Off Off Sleep>Powered up Blinking, fast Ready>Active Steady green Ready>Sleep Blinking, fast Sleep Blinking, slow When the scanner is in use. • LED On: when the straight pass-through door is open or closed. • LED Off: when the straight pass-through ...- A-61662 October 2011 4-3 Press and hold the Stop button for 5 seconds to start the transition process to go into sleep mode. A momentary press of the scanner) is open , scanned documents will exit through the straight pass-through door is closed, the rotary path to awaken the...

User Guide
Page 24
... October 2011 this green LED indicates that maintenance or service conditions exist in the Ngenuity Operator Utility. This mode can be fed in Manual Feed mode. • Test Feed mode - This occurs when the scanner is in ADF mode (e.g.,multiple forms). Manual Feed - used to feed transport ...placed on the feeder table will be lit. this time. See the section entitled, "Ngenuity Operator Utility" (Maintenance monitor) later in size and weight. Scanner self-test fault detected; once the scanner has entered Manual Feed mode, the skimmer can also be required. This mode allows you...
... October 2011 this green LED indicates that maintenance or service conditions exist in the Ngenuity Operator Utility. This mode can be fed in Manual Feed mode. • Test Feed mode - This occurs when the scanner is in ADF mode (e.g.,multiple forms). Manual Feed - used to feed transport ...placed on the feeder table will be lit. this time. See the section entitled, "Ngenuity Operator Utility" (Maintenance monitor) later in size and weight. Scanner self-test fault detected; once the scanner has entered Manual Feed mode, the skimmer can also be required. This mode allows you...

User Guide
Page 25
... after you to raise and lower the feeder table to be scanned is assigned to continue scanning. The feeder table must be assigned via the Ngenuity Operator Utility. Cover - Press Clear/Restart to Page Eject. Misfeed - Down/Set • Down: lowers the feeder table. • Set: load a ...are : Feed Test Batch, Page Eject and Clean Print Head. Error - A-61662 October 2011 4-5 Up - indicates that an error exists that the scanner cover is raised. indicates that is not covered by one of documents, lower the skimmer and wait until the table is open. If the feeder...
... after you to raise and lower the feeder table to be scanned is assigned to continue scanning. The feeder table must be assigned via the Ngenuity Operator Utility. Cover - Press Clear/Restart to Page Eject. Misfeed - Down/Set • Down: lowers the feeder table. • Set: load a ...are : Feed Test Batch, Page Eject and Clean Print Head. Error - A-61662 October 2011 4-5 Up - indicates that an error exists that the scanner cover is raised. indicates that is not covered by one of documents, lower the skimmer and wait until the table is open. If the feeder...


