User Manual
Page 2
... of FCC Rules for future reference. Do not install this machine is an open system in Part 15 of this Hardware Operation Guide for a Class A computing device. KIP C7800 is an international program that this product conforms to Directive 2002/96/EC of the European Parliament... around electronic equipment or precision instruments. Other devices may occur. The targeted products are uniform among participating nations. Thank you for the KIP C7800. Use a separate power line and install the PRINTER as far as computers, monitors, printers, facsimiles, copiers, scanners, and multifunction ...
... of FCC Rules for future reference. Do not install this machine is an open system in Part 15 of this Hardware Operation Guide for a Class A computing device. KIP C7800 is an international program that this product conforms to Directive 2002/96/EC of the European Parliament... around electronic equipment or precision instruments. Other devices may occur. The targeted products are uniform among participating nations. Thank you for the KIP C7800. Use a separate power line and install the PRINTER as far as computers, monitors, printers, facsimiles, copiers, scanners, and multifunction ...
User Manual
Page 4
.... 2. It may be burnt or receive an electric shock due to do not open the cover if not instructed to a hot item or electrically charged part inside of heat, as close to 240V plus 6% or minus 10%, 50/60Hz, 20A or higher 2. If the Power Cord is plugged into a fire or...
.... 2. It may be burnt or receive an electric shock due to do not open the cover if not instructed to a hot item or electrically charged part inside of heat, as close to 240V plus 6% or minus 10%, 50/60Hz, 20A or higher 2. If the Power Cord is plugged into a fire or...

User Manual
Page 15
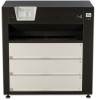
.... 20 sheets can be installed here. 5VDC max. Operator Call Error Service Call Error Warm sleep Cold sleep When printer is power-off the KIP C7800. PLEASE DO NOT push the LCD area too strong. 1. 5 Appearance 1. 5. 1 Front view User Interface USB Port Bypass Feeder Stack Tray... Status Indicator Power Switch Roll Decks LAN Cable Name of part Power Switch Bypass Feeder User Interface Stack Tray Roll Decks USB Port LAN Cable Status Indicator Function Turns on/off and print controller is a ...
.... 20 sheets can be installed here. 5VDC max. Operator Call Error Service Call Error Warm sleep Cold sleep When printer is power-off the KIP C7800. PLEASE DO NOT push the LCD area too strong. 1. 5 Appearance 1. 5. 1 Front view User Interface USB Port Bypass Feeder Stack Tray... Status Indicator Power Switch Roll Decks LAN Cable Name of part Power Switch Bypass Feeder User Interface Stack Tray Roll Decks USB Port LAN Cable Status Indicator Function Turns on/off and print controller is a ...

User Manual
Page 16
1. 5. 2 Left side view Toner Cartridge Left Side Door Name of part Toner Cartridge Left Side Door Function 4 Toner Cartridges (cyan, magenta, yellow and black) supplies the toner little by little. Open here to replace the Toner Cartridge. 1-8 Chapter 1 Before Use
1. 5. 2 Left side view Toner Cartridge Left Side Door Name of part Toner Cartridge Left Side Door Function 4 Toner Cartridges (cyan, magenta, yellow and black) supplies the toner little by little. Open here to replace the Toner Cartridge. 1-8 Chapter 1 Before Use

User Manual
Page 17
NOTE : Specification for the KIP C7800 (DC24V 2A) Prints come from the opening on this. Open here to shut off supplying the AC power. Collects the wasted toner. It is possible to clear a print jam in North America Use the following type of part Stacker Port Fuser Exit Door Waste Toner Box Breaker Power...
NOTE : Specification for the KIP C7800 (DC24V 2A) Prints come from the opening on this. Open here to shut off supplying the AC power. Collects the wasted toner. It is possible to clear a print jam in North America Use the following type of part Stacker Port Fuser Exit Door Waste Toner Box Breaker Power...

User Manual
Page 18
Collects the wasted toner. 1-10 Chapter 1 Before Use Rear Door Waste Toner Box (for Belt Unit) Name of part Rear Door Waste Toner Box (for Belt Unit) Function Can access the mis-fed media and the Waste Toner Box for Belt Unit by opening Rear Door.
Collects the wasted toner. 1-10 Chapter 1 Before Use Rear Door Waste Toner Box (for Belt Unit) Name of part Rear Door Waste Toner Box (for Belt Unit) Function Can access the mis-fed media and the Waste Toner Box for Belt Unit by opening Rear Door.
User Manual
Page 28
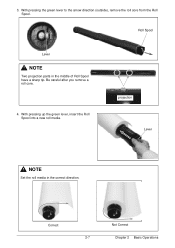
With pressing up the green lever, insert the Roll Spool into a new roll media. With pressing the green lever to the arrow direction (outside), remove the roll core from the Roll Spool. Roll Spool Lever NOTE Two projection parts in the correct direction. projection Lever NOTE Set the roll media in the middle of Roll Spool have a sharp tip. Be careful after you remove a roll core. 4. 3. Correct Not Correct 2-7 Chapter 2 Basic Operations
With pressing up the green lever, insert the Roll Spool into a new roll media. With pressing the green lever to the arrow direction (outside), remove the roll core from the Roll Spool. Roll Spool Lever NOTE Two projection parts in the correct direction. projection Lever NOTE Set the roll media in the middle of Roll Spool have a sharp tip. Be careful after you remove a roll core. 4. 3. Correct Not Correct 2-7 Chapter 2 Basic Operations

User Manual
Page 39
Keeping the Supply Hole upward, insert the Toner Cartridge to the corresponding color slot until it stops. Rotate the Toner Cartridge to unlock the Supply Hole. Supply hole 5. Supply hole 6. Turn the body part 180 degrees to the arrow direction until it stops. 4. NOTE If unlocking on step 4 is skipped, the UI screen shows "Toner Empty" again in about 10 minutes. 2-18 Chapter 2 Basic Operations Hold the Toner Cartridge with the Supply Hole upward.
Keeping the Supply Hole upward, insert the Toner Cartridge to the corresponding color slot until it stops. Rotate the Toner Cartridge to unlock the Supply Hole. Supply hole 5. Supply hole 6. Turn the body part 180 degrees to the arrow direction until it stops. 4. NOTE If unlocking on step 4 is skipped, the UI screen shows "Toner Empty" again in about 10 minutes. 2-18 Chapter 2 Basic Operations Hold the Toner Cartridge with the Supply Hole upward.

User Manual
Page 45
... Roll Deck fully. NOTE Some roll media are taped at all. 2-24 Chapter 2 Basic Operations Pressing the Initial Cut Button cuts off such poor quality part of the leading edge using a cutter knife and discard the portion with glue. 1.
... Roll Deck fully. NOTE Some roll media are taped at all. 2-24 Chapter 2 Basic Operations Pressing the Initial Cut Button cuts off such poor quality part of the leading edge using a cutter knife and discard the portion with glue. 1.

User Manual
Page 52
Press the green lever and lift up the upper part of the Lower Feeder Unit. mis-fed media 3-5 Chapter 3 Troubleshooting While lifting, pull and remove a mis-fed media from the Lower Feeder Unit. Green Lever mis-fed media NOTE If a mis-fed media is found but you could not pull it out, the media have not had cut manually. It should be cut at the Cutter Unit. See [If the mis-fed media not cut yet] on page 3-10. 3-2.
Press the green lever and lift up the upper part of the Lower Feeder Unit. mis-fed media 3-5 Chapter 3 Troubleshooting While lifting, pull and remove a mis-fed media from the Lower Feeder Unit. Green Lever mis-fed media NOTE If a mis-fed media is found but you could not pull it out, the media have not had cut manually. It should be cut at the Cutter Unit. See [If the mis-fed media not cut yet] on page 3-10. 3-2.

User Manual
Page 57
mis-fed media 4. This is the end of the Lower Feeder Unit. While lifting, pull and remove a mis-fed media from the Lower Feeder Unit. Lift up the upper part of removing mis-feed media. 3-10 Chapter 3 Troubleshooting Close the Roll Decks, Bypass Feeder, Left Side Door, Rear Door and Exit Cover. 3.
mis-fed media 4. This is the end of the Lower Feeder Unit. While lifting, pull and remove a mis-fed media from the Lower Feeder Unit. Lift up the upper part of removing mis-feed media. 3-10 Chapter 3 Troubleshooting Close the Roll Decks, Bypass Feeder, Left Side Door, Rear Door and Exit Cover. 3.

User Manual
Page 62
NOTE If "Rear Door Open" remains on the UI screen, the Rear Door looks closed but is half-shut. Gently push the circled part of the Rear Door until it clicks. 3. 2. 10 Fuser Exit Door Open "Fuser Exit Door Open" is indicated when the Fuser Exit Door is opened or not locked completely. Close the Fuser Exit Door firmly to clear the error. Close the Rear Door firmly to clear the error. 3-15 Chapter 3 Troubleshooting 3. 2. 9 Rear Door Open "Rear Door Open" is indicated when the Rear Door is opened or not locked completely.
NOTE If "Rear Door Open" remains on the UI screen, the Rear Door looks closed but is half-shut. Gently push the circled part of the Rear Door until it clicks. 3. 2. 10 Fuser Exit Door Open "Fuser Exit Door Open" is indicated when the Fuser Exit Door is opened or not locked completely. Close the Fuser Exit Door firmly to clear the error. Close the Rear Door firmly to clear the error. 3-15 Chapter 3 Troubleshooting 3. 2. 9 Rear Door Open "Rear Door Open" is indicated when the Rear Door is opened or not locked completely.