
KIP 7170 User Manual
Page 16
... Socket Function Open the Exit Cover when you would like to dry the paper in the humid season. Connect the LAN Cable to connect the KIP 7170 to shut off supplying the AC power. Connect the Power Cord here. 1-10 Chapter 1 Before Use
... Socket Function Open the Exit Cover when you would like to dry the paper in the humid season. Connect the LAN Cable to connect the KIP 7170 to shut off supplying the AC power. Connect the Power Cord here. 1-10 Chapter 1 Before Use
KIP 7170 User Manual
Page 33
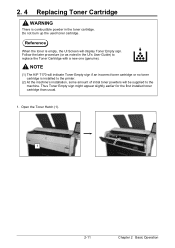
Follow the later procedure (or as noted in the toner cartridge. NOTE (1) The KIP 7170 will indicate Toner Empty sign if an incorrect toner cartridge or no toner cartridge is empty, the UI Screen will be supplied to replace the Toner Cartridge with a new one (genuine). Do not burn up the used toner cartridge...
Follow the later procedure (or as noted in the toner cartridge. NOTE (1) The KIP 7170 will indicate Toner Empty sign if an incorrect toner cartridge or no toner cartridge is empty, the UI Screen will be supplied to replace the Toner Cartridge with a new one (genuine). Do not burn up the used toner cartridge...
KIP 7170 User Manual
Page 35
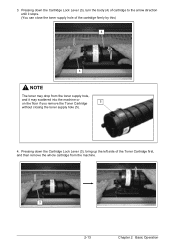
3. Pressing down the Cartridge Lock Lever (3), bring up the left side of the cartridge firmly by this) 4 3 NOTE The toner may drop from the toner supply hole, and it stops. (You can close the toner supply hole of the Toner Cartridge first, and then remove the whole cartridge from the machine. 3 2-13 Chapter 2 Basic Operation Pressing down the Cartridge Lock Lever (3), turn the body (4) of cartridge to the arrow direction until it may scattered into the machine or on the floor if you remove the Toner Cartridge 5 without closing the toner supply hole (5). 4.
3. Pressing down the Cartridge Lock Lever (3), bring up the left side of the cartridge firmly by this) 4 3 NOTE The toner may drop from the toner supply hole, and it stops. (You can close the toner supply hole of the Toner Cartridge first, and then remove the whole cartridge from the machine. 3 2-13 Chapter 2 Basic Operation Pressing down the Cartridge Lock Lever (3), turn the body (4) of cartridge to the arrow direction until it may scattered into the machine or on the floor if you remove the Toner Cartridge 5 without closing the toner supply hole (5). 4.
KIP 7170 User Manual
Page 36
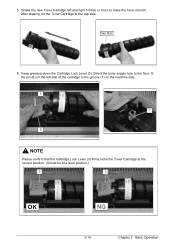
Shake the new Toner Cartridge left side of the cartridge to the groove (7) on the machine side. 6 7 3 NOTE Please confirm that the Cartridge Lock Lever (3) firmly locks the Toner Cartridge at the correct position. (It must be at a level position.) 3 3 OK NG 2-14 Chapter 2 Basic Operation After shaking, tilt the Toner Cartridge to make the toner smooth. Keep pressing down the Cartridge Lock Lever (3). 5. Direct the toner supply hole to the floor, fit the pin (6) on the left and right 5 times or more to the cap side. Cap Side 6.
Shake the new Toner Cartridge left side of the cartridge to the groove (7) on the machine side. 6 7 3 NOTE Please confirm that the Cartridge Lock Lever (3) firmly locks the Toner Cartridge at the correct position. (It must be at a level position.) 3 3 OK NG 2-14 Chapter 2 Basic Operation After shaking, tilt the Toner Cartridge to make the toner smooth. Keep pressing down the Cartridge Lock Lever (3). 5. Direct the toner supply hole to the floor, fit the pin (6) on the left and right 5 times or more to the cap side. Cap Side 6.
KIP 7170 User Manual
Page 37
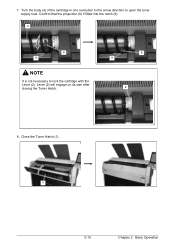
Confirm that the projection (8) if fitted into the notch (9). 4 8 9 NOTE It is not necessary to open the toner supply hole. 7. Lever (2) will engage on its own after closing the Toner Hatch. 8 9 2 8. Close the Toner Hatch (1). 1 2-15 Chapter 2 Basic Operation Turn the body (4) of the cartridge in one revolution to the arrow direction to lock the cartridge with the Lever (2).
Confirm that the projection (8) if fitted into the notch (9). 4 8 9 NOTE It is not necessary to open the toner supply hole. 7. Lever (2) will engage on its own after closing the Toner Hatch. 8 9 2 8. Close the Toner Hatch (1). 1 2-15 Chapter 2 Basic Operation Turn the body (4) of the cartridge in one revolution to the arrow direction to lock the cartridge with the Lever (2).

KIP 7170 User Manual
Page 43
... to start after a 15 minute of inactivity in order to reduce the power supply for the machine to get ready. (2) Tapping on the UI screen can cancel the screensaver but the KIP 7170 needs to reduce the power consumption. The KIP 7170 will start warming up for Fuser Unit and some other components. In the...
... to start after a 15 minute of inactivity in order to reduce the power supply for the machine to get ready. (2) Tapping on the UI screen can cancel the screensaver but the KIP 7170 needs to reduce the power consumption. The KIP 7170 will start warming up for Fuser Unit and some other components. In the...

KIP 7170 User Manual
Page 60
... closed. If it seems no suitable roll media required for the current print job, the UI Screen will display "Roll Replacement" sign. For the toner supply procedure, see [2.4 Replacing Toner Cartridge]. 3. 2. 3 Scanner Unit Open The UI screen shows "Scanner Unit Open" if the Scanner Unit is open (not closed properly), the...
... closed. If it seems no suitable roll media required for the current print job, the UI Screen will display "Roll Replacement" sign. For the toner supply procedure, see [2.4 Replacing Toner Cartridge]. 3. 2. 3 Scanner Unit Open The UI screen shows "Scanner Unit Open" if the Scanner Unit is open (not closed properly), the...