
SD-513 User Manual
Page 62
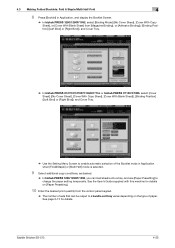
... Cover Tray. % Use the Setting Menu Screen to enable automatic selection of the Booklet mode in Application, and display the Booklet Screen. % In bizhub PRESS 1250/1250P/1052, select [Binding Mode] ([No Cover Sheet], [Cover With Copy Sheet], or [Cover With Blank Sheet] from the control panel keypad. % The number of paper. See page 2-13 for details on the type of sets that can be output to change the paper setting temporarily. See the User's Guide supplied with this machine for...
... Cover Tray. % Use the Setting Menu Screen to enable automatic selection of the Booklet mode in Application, and display the Booklet Screen. % In bizhub PRESS 1250/1250P/1052, select [Binding Mode] ([No Cover Sheet], [Cover With Copy Sheet], or [Cover With Blank Sheet] from the control panel keypad. % The number of paper. See page 2-13 for details on the type of sets that can be output to change the paper setting temporarily. See the User's Guide supplied with this machine for...

SD-513 User Manual
Page 132
... be specified in advance. 5.1 Tray Setting 5 Normal Use Setting, Common Setting, and Air Assist Setting For the PI-PFU tray setting, specify Paper Type, Weight, or Double Feed Detection for 2-side slit covers When Trimmer Unit TU-503 is equipped in Saddle Stitcher SD-513, the paper size of [Paper Size] under "PI-PFU Tray" on the Tray Setting Screen. The Size Setting Screen will be displayed. For Standard Detect, the paper size loaded in common to perform...
... be specified in advance. 5.1 Tray Setting 5 Normal Use Setting, Common Setting, and Air Assist Setting For the PI-PFU tray setting, specify Paper Type, Weight, or Double Feed Detection for 2-side slit covers When Trimmer Unit TU-503 is equipped in Saddle Stitcher SD-513, the paper size of [Paper Size] under "PI-PFU Tray" on the Tray Setting Screen. The Size Setting Screen will be displayed. For Standard Detect, the paper size loaded in common to perform...

SD-513 User Manual
Page 137
5 9 Press [Change Set] on the right side of the side. 11 Press [OK]. The Tray Setting Screen will be restored. 5-8 Saddle Stitcher SD-513 Selecting [Manual] enables the following settings: % Use [Weak] or [Strong] provided under "Lead" to select the desired air level within the range from [1] to turn off the air flow of "Air Assist". Press [OFF] to [9]. Tray Setting 5.1 The Air Assist Screen...
5 9 Press [Change Set] on the right side of the side. 11 Press [OK]. The Tray Setting Screen will be restored. 5-8 Saddle Stitcher SD-513 Selecting [Manual] enables the following settings: % Use [Weak] or [Strong] provided under "Lead" to select the desired air level within the range from [1] to turn off the air flow of "Air Assist". Press [OFF] to [9]. Tray Setting 5.1 The Air Assist Screen...

SD-513 User Manual
Page 138
... machine identifies one size from [Tray Setting] on perfect bind cover. To configure various settings, use setting. Perfect bind cover - Sheets to be punched/folded/folded and stapled/stapled manually. Tray Setting is not necessary for paper to be punched/folded/folded and stapled/stapled manually - When Trimmer Unit TU-503 is equipped in Saddle Stitcher SD-513, 2-side slitting can be viewed on the Machine Screen. See the User's Guide...
... machine identifies one size from [Tray Setting] on perfect bind cover. To configure various settings, use setting. Perfect bind cover - Sheets to be punched/folded/folded and stapled/stapled manually. Tray Setting is not necessary for paper to be punched/folded/folded and stapled/stapled manually - When Trimmer Unit TU-503 is equipped in Saddle Stitcher SD-513, 2-side slitting can be viewed on the Machine Screen. See the User's Guide...

Fiery Server with Auto Inspection Guide
Page 2
... more information, see the documentation included with your Konica Minolta printer and printer accessories. 1 In Command WorkStation, add your job to the Held queue. 2 Open Job Properties and click the Image tab. 3 Under Auto inspection, select the Auto inspection check box. 4 Make all other changes to Job Properties settings necessary for the job. 5 Use the Proof Print feature to print a copy of your job. 6 Retrieve the proof from the output tray. 7 Check the proof for imperfections...
... more information, see the documentation included with your Konica Minolta printer and printer accessories. 1 In Command WorkStation, add your job to the Held queue. 2 Open Job Properties and click the Image tab. 3 Under Auto inspection, select the Auto inspection check box. 4 Make all other changes to Job Properties settings necessary for the job. 5 Use the Proof Print feature to print a copy of your job. 6 Retrieve the proof from the output tray. 7 Check the proof for imperfections...

GBC PUNCH G2 User Manual
Page 4
... appliance inlet. DO NOT REMOVE THE MACHINE'S COVER. Please note that will enable you for safety purposes. Die Set User manual for easy operation. For customers that approved the cord. The following design features: Quick-change . An example would be interchanged without any required repairs or major maintenance for a Class A digital device, pursuant to shipping. GBC recommends use this equipment in a residential...
... appliance inlet. DO NOT REMOVE THE MACHINE'S COVER. Please note that will enable you for safety purposes. Die Set User manual for easy operation. For customers that approved the cord. The following design features: Quick-change . An example would be interchanged without any required repairs or major maintenance for a Class A digital device, pursuant to shipping. GBC recommends use this equipment in a residential...

GBC PUNCH G2 User Manual
Page 6
... test print job be run after installing a new die or a die that when using a new die some oil will no longer leave oil on the sheet. Push the Die set . 4. Step 1: Stop the printer/copier. Step 9: Proceed with both quick and easy, as indicated in the CCW direction, as the following instructions illustrate: Note: For advanced Die Set Configuration instructions- After punching 25 to economically punch documents for...
... test print job be run after installing a new die or a die that when using a new die some oil will no longer leave oil on the sheet. Push the Die set . 4. Step 1: Stop the printer/copier. Step 9: Proceed with both quick and easy, as indicated in the CCW direction, as the following instructions illustrate: Note: For advanced Die Set Configuration instructions- After punching 25 to economically punch documents for...

Plockmatic SD-350/SD-500 System Operator Manual
Page 46
... [check] button is fed to booklet maker from printer or by hand. The Cover Feeder can be used as sheets fed to the set from the printer, or if you move the fold position. A higher paper weight, pre-printed cover is pressed, the Cover Feeder will automatically feed one sheet to adjust the fold position. Fold position Adjusting fold position 2 From the Settings for how to avoid the error message "Load covers" from...
... [check] button is fed to booklet maker from printer or by hand. The Cover Feeder can be used as sheets fed to the set from the printer, or if you move the fold position. A higher paper weight, pre-printed cover is pressed, the Cover Feeder will automatically feed one sheet to adjust the fold position. Fold position Adjusting fold position 2 From the Settings for how to avoid the error message "Load covers" from...
Plockmatic SD-350/SD-500 Software Update Procedure
Page 6
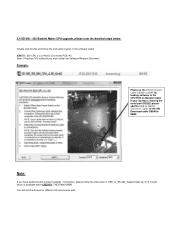
... drivers for loading software to the CPU PCB on Booklet maker If your lap top is missing the serial port (RS232) please add the USB to RS232 Converter Cable to the SW Download cable DB9M to DB9F for different OS versions as well. XXX500_350 CPU v x.xx Win02 (Controller PCB "A") Note: If loading CPU software you have problems with comport settings / connection, please follow the instruction in the software...
... drivers for loading software to the CPU PCB on Booklet maker If your lap top is missing the serial port (RS232) please add the USB to RS232 Converter Cable to the SW Download cable DB9M to DB9F for different OS versions as well. XXX500_350 CPU v x.xx Win02 (Controller PCB "A") Note: If loading CPU software you have problems with comport settings / connection, please follow the instruction in the software...

Plockmatic SD-350/SD-500 Software Update Procedure
Page 15
... reset is used after updating software, replacing the PCB Controller, PCB A, PCB Printer interface, PCB E (BM) or F (RCT), or when a part affecting the booklet quality has been replaced. The NVM reset procedure can also be cleared including jobs, jam history etc. Record NVM values: BM: Index 2-7 and 11. 5. Select target (module) [BM]. 16. Select item [Reset NVM]. Press [Go back] to reach BM Service components menu...
... reset is used after updating software, replacing the PCB Controller, PCB A, PCB Printer interface, PCB E (BM) or F (RCT), or when a part affecting the booklet quality has been replaced. The NVM reset procedure can also be cleared including jobs, jam history etc. Record NVM values: BM: Index 2-7 and 11. 5. Select target (module) [BM]. 16. Select item [Reset NVM]. Press [Go back] to reach BM Service components menu...
AccurioPress C6100/C6085 AccurioPress C3080/C3070/C3080P/C83hc Auto Inspection User Guide
Page 45
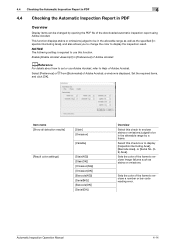
... check to enclose stains or omissions judged to enclose a number or bar code reading error. Enable [Enable Acrobat Javascript] in PDF Overview Display items can be in the allowable range by opening the PDF file of the downloaded automatic inspection report using Adobe Acrobat. Item name [Show all detection results] [Stain] [Omission] [Variable] [Result color settings] [Stain(NG)] [Stain(OK)] [Omission(NG)] [Omission(OK)] [Barcode(NG)] [Serial...
... check to enclose stains or omissions judged to enclose a number or bar code reading error. Enable [Enable Acrobat Javascript] in PDF Overview Display items can be in the allowable range by opening the PDF file of the downloaded automatic inspection report using Adobe Acrobat. Item name [Show all detection results] [Stain] [Omission] [Variable] [Result color settings] [Stain(NG)] [Stain(OK)] [Omission(NG)] [Omission(OK)] [Barcode(NG)] [Serial...
AccurioPress C6100/C6085 AccurioPress C3080/C3070/C3080P/C83hc Auto Inspection User Guide
Page 61
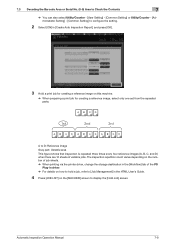
... [MACHINE] screen to [Job Management] in the HTML User's Guide. 4 Press [JOB LIST] on the number of job sheets. % When printing via the printer driver, change the storage destination in the [Workflow] tab of variable jobs. Automatic Inspection Operation Manual 7-9 7.3 Decoding the Barcode Area or Serial No. (0-9) Area to Check the Contents 7 % You can also select Utility/Counter - [User Setting] - [Common Setting] or Utility/Counter - [Administrator Setting] - [Common Setting] to configure the setting. 2 Select [ON] in [Create Auto Inspection Report...
... [MACHINE] screen to [Job Management] in the HTML User's Guide. 4 Press [JOB LIST] on the number of job sheets. % When printing via the printer driver, change the storage destination in the [Workflow] tab of variable jobs. Automatic Inspection Operation Manual 7-9 7.3 Decoding the Barcode Area or Serial No. (0-9) Area to Check the Contents 7 % You can also select Utility/Counter - [User Setting] - [Common Setting] or Utility/Counter - [Administrator Setting] - [Common Setting] to configure the setting. 2 Select [ON] in [Create Auto Inspection Report...

AccurioPress C3080/C3080P/C3070/Print C3070L Quick Guide IC-605/IC-417/IC-313/IC-314 Quick Guide
Page 7
... 1-17 Printer Delete Utility 1-18 Fiery Remote Scan 1-18 Fiery Hot Folders 1-19 Application functions (Image Controller IC-314 1-19 workspace 1-19 2 Let's Make Prints 2.1 Printing Flow 2-1 Step 1: Prepare the printer driver and applications 2-1 Step 2: Load paper into a tray 2-1 Step 3: Configure information of the paper loaded into a tray in this machine 2-1 Step 4: Use the printer driver to print data 2-2 Step 5: Check the finishing 2-5 3 Basic Operations 3.1 Loading Paper 3-1 Loading paper into the main body tray 3-1 Loading paper into the Paper Feeder Unit PF...
... 1-17 Printer Delete Utility 1-18 Fiery Remote Scan 1-18 Fiery Hot Folders 1-19 Application functions (Image Controller IC-314 1-19 workspace 1-19 2 Let's Make Prints 2.1 Printing Flow 2-1 Step 1: Prepare the printer driver and applications 2-1 Step 2: Load paper into a tray 2-1 Step 3: Configure information of the paper loaded into a tray in this machine 2-1 Step 4: Use the printer driver to print data 2-2 Step 5: Check the finishing 2-5 3 Basic Operations 3.1 Loading Paper 3-1 Loading paper into the main body tray 3-1 Loading paper into the Paper Feeder Unit PF...
AccurioPress C3080/C3080P/C3070/Print C3070L Quick Guide IC-605/IC-417/IC-313/IC-314 Quick Guide
Page 64
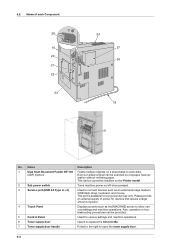
..., operation or troubleshooting procedures can be scanned by one paper feed op- This port is available for various settings and machine operations. 6 Toner supply door Opens to replace the toner bottle. 7 Toner supply door handle Pulled to the right to open the toner supply door. 5-3 Name Description 1 Dual Scan Document Feeder DF-706 Feeds multiple originals on /off when pressed. 3 Service port (USB 2.0 Type A e 3) Used to scan data. (ADF) (Option) Even a 2-sided original can be installed on the Printer model. 2 Sub power switch Turns machine power on a sheet...
..., operation or troubleshooting procedures can be scanned by one paper feed op- This port is available for various settings and machine operations. 6 Toner supply door Opens to replace the toner bottle. 7 Toner supply door handle Pulled to the right to open the toner supply door. 5-3 Name Description 1 Dual Scan Document Feeder DF-706 Feeds multiple originals on /off when pressed. 3 Service port (USB 2.0 Type A e 3) Used to scan data. (ADF) (Option) Even a 2-sided original can be installed on the Printer model. 2 Sub power switch Turns machine power on a sheet...

IC-307 User Guide
Page 5
...-307 print controller...7 Turning off the IC-307 print controller...8 2 Setting up your computer for printing 9 Setting up your computer overview...9 Setting up printing on a Windows computer 11 Adding a network printer to Windows Server 2008/2003/XP 11 Adding a network printer to Windows 7/Vista 12 Loading the Print Driver software for the first time 12 Shortcut for adding a printer...13 Deactivating the Print Driver software 13 Removing the Print Driver software 13 Downloading fonts...14 Setting up printing in Mac OS X...14 Installing the Print Driver software in Mac OS...
...-307 print controller...7 Turning off the IC-307 print controller...8 2 Setting up your computer for printing 9 Setting up your computer overview...9 Setting up printing on a Windows computer 11 Adding a network printer to Windows Server 2008/2003/XP 11 Adding a network printer to Windows 7/Vista 12 Loading the Print Driver software for the first time 12 Shortcut for adding a printer...13 Deactivating the Print Driver software 13 Removing the Print Driver software 13 Downloading fonts...14 Setting up printing in Mac OS X...14 Installing the Print Driver software in Mac OS...

IC-307 User Guide
Page 20
... to print different jobs with specific parameters set for processing and printing. Print Driver software Use the Print Driver software to set job parameters when you are published on a Windows computer when you can submit an RTP job for printing, or change job parameters regardless of parameters. Note: On a Mac computer, you want to the IC-307 print controller job parameters window. In the Print Driver window, you set of whether your computer. The default virtual printers are: ● Print-Files sent...
... to print different jobs with specific parameters set for processing and printing. Print Driver software Use the Print Driver software to set job parameters when you are published on a Windows computer when you can submit an RTP job for printing, or change job parameters regardless of parameters. Note: On a Mac computer, you want to the IC-307 print controller job parameters window. In the Print Driver window, you set of whether your computer. The default virtual printers are: ● Print-Files sent...

IC-307 User Guide
Page 158
... can open the workspace without logging on check box, and then enter a password for each time. Enables you to back up your color server Description By default, you want each user to log on, clear the Auto log on each access level. 148 Option Security Image Disks Scan Management Configuration Backup Mail Service SMS and Mail Accounts Calibration and Color Chapter 12-Setting up your system configuration to a local hard drive or network drive...
... can open the workspace without logging on check box, and then enter a password for each time. Enables you to back up your color server Description By default, you want each user to log on, clear the Auto log on each access level. 148 Option Security Image Disks Scan Management Configuration Backup Mail Service SMS and Mail Accounts Calibration and Color Chapter 12-Setting up your system configuration to a local hard drive or network drive...

IC-307 User Guide
Page 193
...-307 print controller, Page Counter Update is a problem, use the IPDS Capture Tool to collect and save the IPDS data trace output in a single file. The page displays the Transaction IPDS software. 2. In the Password box, type admin. 5. Select Configuration > Services. 7. Select the Enable IPDS Data Capture check box. 9. Click Emulator Setup. 8. Click Save Changes. In the Account Name list, select admin. 4. Make sure that is running . 1. In the Account Name list, select admin. 4. Click Login. 6. Modify the settings as...
...-307 print controller, Page Counter Update is a problem, use the IPDS Capture Tool to collect and save the IPDS data trace output in a single file. The page displays the Transaction IPDS software. 2. In the Password box, type admin. 5. Select Configuration > Services. 7. Select the Enable IPDS Data Capture check box. 9. Click Emulator Setup. 8. Click Save Changes. In the Account Name list, select admin. 4. Make sure that is running . 1. In the Account Name list, select admin. 4. Click Login. 6. Modify the settings as...

IC-307 User Guide
Page 198
... the printer language used, and partly on colored objects in an output job before a new job is selected, the Brightness Level can select both font caching size and overlay caching size. Enables you to the configuration. When this option is not selected the line feed control is CRLF (Carriage Return Line Feed) Enables you want the printer to use alternate binary strings (override default) to specify the line feed control. When this option is selected, the line feed control...
... the printer language used, and partly on colored objects in an output job before a new job is selected, the Brightness Level can select both font caching size and overlay caching size. Enables you to the configuration. When this option is not selected the line feed control is CRLF (Carriage Return Line Feed) Enables you want the printer to use alternate binary strings (override default) to specify the line feed control. When this option is selected, the line feed control...

IC-307 User Guide
Page 216
... Mac OS X 14 loading for the first time 12 defining a printer in Mac OS X 15 password protect jobs 24 removing in Mac OS X 16 removing in Windows 13 Print tab Color Set 117 Copies and Pages 117 Gallop 117 Layout 117 Paper stock 117 Print method 117 Print mode 117 Tray 117 printing a file to the server 23 printing a job 28 printing color jobs as black and white printing a job in grayscale mode 74 printing grays using black toner 75 printing grayscale CMYK elements using black toner 75 Process Power Kit 3 Professional Power...
... Mac OS X 14 loading for the first time 12 defining a printer in Mac OS X 15 password protect jobs 24 removing in Mac OS X 16 removing in Windows 13 Print tab Color Set 117 Copies and Pages 117 Gallop 117 Layout 117 Paper stock 117 Print method 117 Print mode 117 Tray 117 printing a file to the server 23 printing a job 28 printing color jobs as black and white printing a job in grayscale mode 74 printing grays using black toner 75 printing grayscale CMYK elements using black toner 75 Process Power Kit 3 Professional Power...


