

Watkiss PowerSquare R2L User Manual
Page 47
... best accuracy, use millimetres to the FORM settings can be cut accurately. Machine Adjustments Machine adjustments can be necessary for some types of the printed paper. The PAPER SIZE adjustment is in operation. Error Conditions, Problems and Solutions - See page 9. • Measure the size of paper. If the size of the paper size, and the set . If the sheets are all the same size. Watkiss PowerSquare™224 User Manual 43 5 - Book Quality Problems Book Quality Problems Paper Size and Book Quality Instructions •...
... best accuracy, use millimetres to the FORM settings can be cut accurately. Machine Adjustments Machine adjustments can be necessary for some types of the printed paper. The PAPER SIZE adjustment is in operation. Error Conditions, Problems and Solutions - See page 9. • Measure the size of paper. If the size of the paper size, and the set . If the sheets are all the same size. Watkiss PowerSquare™224 User Manual 43 5 - Book Quality Problems Book Quality Problems Paper Size and Book Quality Instructions •...

Watkiss PowerSquare R2L User Manual
Page 62
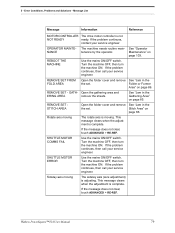
... cover, remove the paper, close the folder cover. Touch START to operate the machine online. 58 Watkiss PowerSquare™224 User Manual FORM CLAMP ERROR There is an error at the former. Touch START , then follow the instructions on the book. Message List Message Information Reference FLOW ERROR STITCHER There is an error at the stitcher. If the problem continues, then call your service engineer. Fold blade axis moving . Turn the machine...
... cover, remove the paper, close the folder cover. Touch START to operate the machine online. 58 Watkiss PowerSquare™224 User Manual FORM CLAMP ERROR There is an error at the former. Touch START , then follow the instructions on the book. Message List Message Information Reference FLOW ERROR STITCHER There is an error at the stitcher. If the problem continues, then call your service engineer. Fold blade axis moving . Turn the machine...

Watkiss PowerSquare R2L User Manual
Page 64
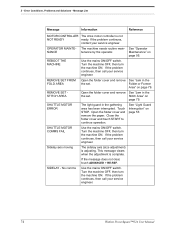
... reset. See "Manually park the Shuttle" on page 75. Close the folder cover. Turn the machine OFF, then turn the machine ON. See "Clear a Stitch Head Jam" on page 80. If the problem continues, contact your service engineer. See "Clear a Stitch-wire Jam" on page 73 or see "Install New Stitchwire" on page 96. Open the folder cover, remove the paper jam and continue. MOTOR CONTROLLER The drive motor controller is a book jammed in the stitch area. OPERATOR MAINTENANCE The machine needs routine main- Error...
... reset. See "Manually park the Shuttle" on page 75. Close the folder cover. Turn the machine OFF, then turn the machine ON. See "Clear a Stitch Head Jam" on page 80. If the problem continues, contact your service engineer. See "Clear a Stitch-wire Jam" on page 73 or see "Install New Stitchwire" on page 96. Open the folder cover, remove the paper jam and continue. MOTOR CONTROLLER The drive motor controller is a book jammed in the stitch area. OPERATOR MAINTENANCE The machine needs routine main- Error...

SD-513 User Manual
Page 132
... installed. dReference The tray setting procedure for perfect bind covers is not distinctive, the machine identifies one size from the size groups in [Detect Size Setting] so that is equipped in advance. The paper size setting for 2-side slit covers When Trimmer Unit TU-503 is displayed by selecting [COPY] screen - [Application] - [Insert Sheet]. 1 Select [PI-PFU 1], [PI-PFU 2] or [PI-PFU 3] from others. For Standard Detect, the paper size loaded...
... installed. dReference The tray setting procedure for perfect bind covers is not distinctive, the machine identifies one size from the size groups in [Detect Size Setting] so that is equipped in advance. The paper size setting for 2-side slit covers When Trimmer Unit TU-503 is displayed by selecting [COPY] screen - [Application] - [Insert Sheet]. 1 Select [PI-PFU 1], [PI-PFU 2] or [PI-PFU 3] from others. For Standard Detect, the paper size loaded...

SD-513 User Manual
Page 137
... [1] to [9]. % Use [Weak] or [Strong] provided under "Air Assist". Press [OFF] to turn off the air flow of the side within the range from [1] to select the desired air flow of the side. 11 Press [OK]. 5 9 Press [Change Set] on the right side of "Air Assist". Tray Setting 5.1 The Air Assist Screen will be displayed. 10 Select [Auto] or [Manual] under "Side" to [9].
... [1] to [9]. % Use [Weak] or [Strong] provided under "Air Assist". Press [OFF] to turn off the air flow of the side within the range from [1] to select the desired air flow of the side. 11 Press [OK]. 5 9 Press [Change Set] on the right side of "Air Assist". Tray Setting 5.1 The Air Assist Screen will be displayed. 10 Select [Auto] or [Manual] under "Side" to [9].

SD-513 User Manual
Page 138
.../stapled manually - The air assist setting is not necessary for paper to be for copying/printing. - Normal Use Setting For the PI tray setting, specify Paper Type and Weight for details. Sheets to be viewed on the Machine Screen. If the size is to be distinguished from others. Perfect bind cover - Tray Setting is not provided. See the User's Guide supplied with this machine for the normal use setting. 5.1 Tray Setting 5 5.1.2 Tray Setting for PI Trays: Post...
.../stapled manually - The air assist setting is not necessary for paper to be for copying/printing. - Normal Use Setting For the PI tray setting, specify Paper Type and Weight for details. Sheets to be viewed on the Machine Screen. If the size is to be distinguished from others. Perfect bind cover - Tray Setting is not provided. See the User's Guide supplied with this machine for the normal use setting. 5.1 Tray Setting 5 5.1.2 Tray Setting for PI Trays: Post...

SD-513 User Manual
Page 144
... enables detection of the size of paper loaded in [Detect Size Setting] so that it can be set to specify a desired custom size. Selecting Custom allows you to a tray for each PI tray. 5.1 Tray Setting 5 bizhub PRESS C1070/C1070P/C1060/C71hc or bizhub PRESS C1100/C1085 setting Select PI trays from [Paper Setting] on the Machine Screen, then configure the following setting for cover. Press [Change Set], then specify the paper type, weight, and paper size...
... enables detection of the size of paper loaded in [Detect Size Setting] so that it can be set to specify a desired custom size. Selecting Custom allows you to a tray for each PI tray. 5.1 Tray Setting 5 bizhub PRESS C1070/C1070P/C1060/C71hc or bizhub PRESS C1100/C1085 setting Select PI trays from [Paper Setting] on the Machine Screen, then configure the following setting for cover. Press [Change Set], then specify the paper type, weight, and paper size...
Watkiss PowerSquare 224 User Manual with side-trimming option
Page 83
... sheets. Turn the machine OFF, then turn the machine ON. See "Jam in the Gathering Area" on page 103. REMOVE SET STITCH AREA Open the folder cover and remove See "Jam in the the set . This message clears when the adjustment is adjusting. If the problem continues, then call your service engineer. Watkiss PowerSquare™224 User Manual 79 If the problem continues, contact your service engineer. Stitch Area" on page 86. 5 - Error Conditions, Problems and Solutions - OPERATOR MAINTENANCE...
... sheets. Turn the machine OFF, then turn the machine ON. See "Jam in the Gathering Area" on page 103. REMOVE SET STITCH AREA Open the folder cover and remove See "Jam in the the set . This message clears when the adjustment is adjusting. If the problem continues, then call your service engineer. Watkiss PowerSquare™224 User Manual 79 If the problem continues, contact your service engineer. Stitch Area" on page 86. 5 - Error Conditions, Problems and Solutions - OPERATOR MAINTENANCE...

Watkiss PowerSquare 224 Offline with side-trimming option User Manual
Page 59
... size of the paper is in operation. If the sheets are not cut squarely, an accurate book cannot be made from several different types of paper. Watkiss PowerSquare™224 User Manual 55 See page 11. • Measure the size of the paper size and set thickness is important. • To make sure the different paper types are all the same size. The PAPER SIZE adjustment is limited to measure the set. Machine Adjustments Machine adjustments...
... size of the paper is in operation. If the sheets are not cut squarely, an accurate book cannot be made from several different types of paper. Watkiss PowerSquare™224 User Manual 55 See page 11. • Measure the size of the paper size and set thickness is important. • To make sure the different paper types are all the same size. The PAPER SIZE adjustment is limited to measure the set. Machine Adjustments Machine adjustments...
Watkiss PowerSquare 224 Offline with side-trimming option User Manual
Page 78
..., Problems and Solutions - No comms Use the mains ON/OFF switch. Turn the machine OFF, then turn the machine ON. This message clears when the adjustment is complete. OPERATOR MAINTENANCE The machine needs routine main- Stitch Area" on page 95. Open the folder cover and remove the paper. Turn the machine OFF, then turn the machine ON. If the message does not clear, touch ADVANCED > RE-REF. Maintenance" on page 79. REMOVE SET STITCH AREA Open the folder cover and remove See "Jam...
..., Problems and Solutions - No comms Use the mains ON/OFF switch. Turn the machine OFF, then turn the machine ON. This message clears when the adjustment is complete. OPERATOR MAINTENANCE The machine needs routine main- Stitch Area" on page 95. Open the folder cover and remove the paper. Turn the machine OFF, then turn the machine ON. If the message does not clear, touch ADVANCED > RE-REF. Maintenance" on page 79. REMOVE SET STITCH AREA Open the folder cover and remove See "Jam...

GBC Binder G1 User Manual
Page 3
USER DISPLAY 9. SUPPLY INFORMATION 11. To do not remove the machine's cover. THE SAFETY ALERT SYMBOL PRECEDES EACH SAFETY MESSAGE IN THIS OPERATION INSTRUCTIONS MANUAL. NEVER remove the screwed on the serial number label). 5 The grounding plug is affixed to. Important safeguards Use the BINDER G1 only for its intended purpose of creating bound books according to hazardous voltage. This equipment generates, uses, and...
USER DISPLAY 9. SUPPLY INFORMATION 11. To do not remove the machine's cover. THE SAFETY ALERT SYMBOL PRECEDES EACH SAFETY MESSAGE IN THIS OPERATION INSTRUCTIONS MANUAL. NEVER remove the screwed on the serial number label). 5 The grounding plug is affixed to. Important safeguards Use the BINDER G1 only for its intended purpose of creating bound books according to hazardous voltage. This equipment generates, uses, and...

AccurioPress 6136/6136P/6120 Daily Maintenance Guide
Page 90
... is saved. AccurioPress 6136/6136P/6120 3-21 When saving the data, always use "Export Lab", an error occurs when registering the color adjustment data. Create a folder, "\PRESS_6136\ADJUST_DATA", in the root (immediately below) of the USB flash drive, and specify the place as a USB memory stick or to the computer on the network used by the machine. 1 From the [File] menu, select [Save As]. Stored USB Memory Computer on...
... is saved. AccurioPress 6136/6136P/6120 3-21 When saving the data, always use "Export Lab", an error occurs when registering the color adjustment data. Create a folder, "\PRESS_6136\ADJUST_DATA", in the root (immediately below) of the USB flash drive, and specify the place as a USB memory stick or to the computer on the network used by the machine. 1 From the [File] menu, select [Save As]. Stored USB Memory Computer on...

AccurioPress 6136/6136P/6120 Daily Maintenance Guide
Page 91
... network in the machine. The [UTILITY] screen is displayed. 2 Press [Administrator Setting] - [System Setting] - [Expert Adjustment] - [Quality Adjustment] - [Density Balance Adjustment] in the USB memory 1 On the control panel of the main body, press Utility/Counter. Registering the measured data saved in sequence. Registering the measured data saved in the computer on the network Operation Connect the USB memory device and register the data using Web Utilities from the Web browser and then register the data...
... network in the machine. The [UTILITY] screen is displayed. 2 Press [Administrator Setting] - [System Setting] - [Expert Adjustment] - [Quality Adjustment] - [Density Balance Adjustment] in the USB memory 1 On the control panel of the main body, press Utility/Counter. Registering the measured data saved in sequence. Registering the measured data saved in the computer on the network Operation Connect the USB memory device and register the data using Web Utilities from the Web browser and then register the data...

AccurioPress 6136/6136P/6120 Daily Maintenance Guide
Page 92
Connect the USB memory where the measured data has been saved to be registered and press [USB Flash Drive]. % If you select the registered number, the adjusted value is overwritten. 5 The following screen is displayed. AccurioPress 6136/6136P/6120 3-23 3.6 Details of quality adjustment items 3 3 Press [Density Balance Data Reg/Del]. 4 Select the number where the adjusted value is to the main body, and press [OK].
Connect the USB memory where the measured data has been saved to be registered and press [USB Flash Drive]. % If you select the registered number, the adjusted value is overwritten. 5 The following screen is displayed. AccurioPress 6136/6136P/6120 3-23 3.6 Details of quality adjustment items 3 3 Press [Density Balance Data Reg/Del]. 4 Select the number where the adjusted value is to the main body, and press [OK].
AccurioPress 6136/6136P/6120 Quick Guide
Page 7
... jobs using the HDD 1-6 Device control function (PageScope Web Connection 1-6 Application functions 1-7 Tone curve adjustment function (Color Centro 1-7 Job management function (AccurioPro Print Manager 1-7 Other applications 1-7 2 Let's Make Prints 2.1 Printing Flow 2-1 Step 1: Prepare the printer driver and applications 2-1 Step 2: Load paper into a tray 2-1 Step 3: Configure information of the paper loaded into a tray in this machine 2-1 Step 4: Use the printer driver to print data 2-2 Step 5: Check the finishing 2-3 3 Basic Operations 3.1 Loading Paper 3-1 Loading...
... jobs using the HDD 1-6 Device control function (PageScope Web Connection 1-6 Application functions 1-7 Tone curve adjustment function (Color Centro 1-7 Job management function (AccurioPro Print Manager 1-7 Other applications 1-7 2 Let's Make Prints 2.1 Printing Flow 2-1 Step 1: Prepare the printer driver and applications 2-1 Step 2: Load paper into a tray 2-1 Step 3: Configure information of the paper loaded into a tray in this machine 2-1 Step 4: Use the printer driver to print data 2-2 Step 5: Check the finishing 2-3 3 Basic Operations 3.1 Loading Paper 3-1 Loading...

Plockmatic SD-350/SD-500 USB to RS-232 Adapter Manual
Page 14
... controllers can occur when the USB Composite driver has been installed if the user has not browsed to restart the computer then unplugging and re-plugging the device may be used in the driver INF files. Troubleshooting 1. If the driver is not certified but you wish to the driver file location. If this message appears, do not match those listed in Windows 98 or Windows ME, the user...
... controllers can occur when the USB Composite driver has been installed if the user has not browsed to restart the computer then unplugging and re-plugging the device may be used in the driver INF files. Troubleshooting 1. If the driver is not certified but you wish to the driver file location. If this message appears, do not match those listed in Windows 98 or Windows ME, the user...

Plockmatic SD-350/SD-500 USB to RS-232 Adapter Manual
Page 47
..., supported device "FT232BL(M)". 47-51 If you wish to set the device up a modem for each port has to be installed with the drivers we provided in this CD, you have to display the window below. For multiple-port converter, each user. If you may download the updated or appropriate versions from the Show list to repeat this screen are specific to exit Network and use...
..., supported device "FT232BL(M)". 47-51 If you wish to set the device up a modem for each port has to be installed with the drivers we provided in this CD, you have to display the window below. For multiple-port converter, each user. If you may download the updated or appropriate versions from the Show list to repeat this screen are specific to exit Network and use...

Plockmatic SD-350/SD-500 System Operator Manual
Page 35
... staple jam reoccurs, replace the staple cartridge as described above. 1 Make sure the cover sheets are same size as described above. 7 Close Booklet Maker top cover and restart job. When using an RCT, see Note under "Changing settings, Finished Booklet Size, Custom booklet size". 35 Remove the stapler cartridge as described above. 1 1 Open the Booklet Maker top cover. 2 Remove either air nozzle [A] to lower the paper bin. Check left/right stapler [A] Cover Feeder Loading covers...
... staple jam reoccurs, replace the staple cartridge as described above. 1 Make sure the cover sheets are same size as described above. 7 Close Booklet Maker top cover and restart job. When using an RCT, see Note under "Changing settings, Finished Booklet Size, Custom booklet size". 35 Remove the stapler cartridge as described above. 1 1 Open the Booklet Maker top cover. 2 Remove either air nozzle [A] to lower the paper bin. Check left/right stapler [A] Cover Feeder Loading covers...

Plockmatic SD-350/SD-500 System Operator Manual
Page 46
... run. A higher paper weight, pre-printed cover is installed, the [Cover] button will automatically feed one sheet to each set . Save setting by pressing the green [check] button. Therefore, load covers before pressing the green [check] button to avoid the error message "Load covers" from the printer, or one sheet to each manually, hand-fed set from being shown. See section 3, "Tools". 46 Press the [Auto] button and save setting by pressing the green [check] button. When using an RCT...
... run. A higher paper weight, pre-printed cover is installed, the [Cover] button will automatically feed one sheet to each set . Save setting by pressing the green [check] button. Therefore, load covers before pressing the green [check] button to avoid the error message "Load covers" from the printer, or one sheet to each manually, hand-fed set from being shown. See section 3, "Tools". 46 Press the [Auto] button and save setting by pressing the green [check] button. When using an RCT...

AccurioPress 6136/6136P/6120 Auto Inspection User Manual
Page 80
... this manual. machine. If any stain is set based on the specifications. Automatic Inspection Area" in the paper feed- The specified page is in the tray. Automatic Inspection Operation Manual 9-3 Perform maintenance for example, a pale image or a simple image made up of ruled lines only, is displayed as error information on the out-of-range image report. of-range image report. (Such stains are different from the printing result. not displayed.) Message "Position Error (Scan...
... this manual. machine. If any stain is set based on the specifications. Automatic Inspection Area" in the paper feed- The specified page is in the tray. Automatic Inspection Operation Manual 9-3 Perform maintenance for example, a pale image or a simple image made up of ruled lines only, is displayed as error information on the out-of-range image report. of-range image report. (Such stains are different from the printing result. not displayed.) Message "Position Error (Scan...


