
User Manual
Page 1
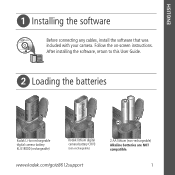
ENGLISH ᕡ Installing the software Before connecting any cables, install the software that was included with your camera. Follow the on-screen instructions. After installing the software, return to this User Guide. ᕢ Loading the batteries Kodak Li-Ion rechargeable digital camera battery KLIC-8000 (rechargeable) Kodak lithium digital camera battery CRV3 (non-rechargeable) www.kodak.com/go/z8612support 2 AA lithium (non-rechargeable) Alkaline batteries are NOT compatible. 1
ENGLISH ᕡ Installing the software Before connecting any cables, install the software that was included with your camera. Follow the on-screen instructions. After installing the software, return to this User Guide. ᕢ Loading the batteries Kodak Li-Ion rechargeable digital camera battery KLIC-8000 (rechargeable) Kodak lithium digital camera battery CRV3 (non-rechargeable) www.kodak.com/go/z8612support 2 AA lithium (non-rechargeable) Alkaline batteries are NOT compatible. 1
User Manual
Page 2
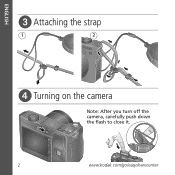
ENGLISH ᕣ Attaching the strap 1 2 ᕤ Turning on the camera Note: After you turn off the camera, carefully push down the flash to close it. 2 www.kodak.com/go/easysharecenter
ENGLISH ᕣ Attaching the strap 1 2 ᕤ Turning on the camera Note: After you turn off the camera, carefully push down the flash to close it. 2 www.kodak.com/go/easysharecenter
User Manual
Page 4
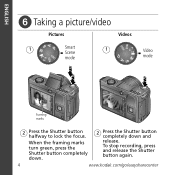
To stop recording, press and release the Shutter button again. 4 www.kodak.com/go/easysharecenter ENGLISH ᕦ Taking a picture/video Pictures Videos 1 Smart Scene 1 mode Video mode Framing marks 2 Press the Shutter button halfway to lock the focus. When the framing marks turn green, press the Shutter button completely down. 2 Press the Shutter button completely down and release.
To stop recording, press and release the Shutter button again. 4 www.kodak.com/go/easysharecenter ENGLISH ᕦ Taking a picture/video Pictures Videos 1 Smart Scene 1 mode Video mode Framing marks 2 Press the Shutter button halfway to lock the focus. When the framing marks turn green, press the Shutter button completely down. 2 Press the Shutter button completely down and release.
User Manual
Page 5
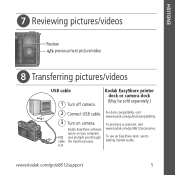
.../next picture/video ᕨ Transferring pictures/videos USB cable 1 Turn off camera. To use an EasyShare dock, see its Getting Started Guide. U-8 For dock compatibility, visit www.kodak.com/go /z8612accessories. To purchase accessories, visit www.kodak.com/go /dockcompatibility. Kodak EasyShare printer dock or camera dock (May be sold separately.) 2 Connect USB cable. 3 Turn on your...
.../next picture/video ᕨ Transferring pictures/videos USB cable 1 Turn off camera. To use an EasyShare dock, see its Getting Started Guide. U-8 For dock compatibility, visit www.kodak.com/go /z8612accessories. To purchase accessories, visit www.kodak.com/go /dockcompatibility. Kodak EasyShare printer dock or camera dock (May be sold separately.) 2 Connect USB cable. 3 Turn on your...

User Manual
Page 6
...; the extended user guide • interactive troubleshooting and repairs • interactive tutorials • FAQs • downloads • accessories • printing information • product registration 6 www.kodak.com/go/easysharecenter Finish reading this book, so you can take and share your computer Keep learning! Congratulations! You have: • set up your...
...; the extended user guide • interactive troubleshooting and repairs • interactive tutorials • FAQs • downloads • accessories • printing information • product registration 6 www.kodak.com/go/easysharecenter Finish reading this book, so you can take and share your computer Keep learning! Congratulations! You have: • set up your...
User Manual
Page 8
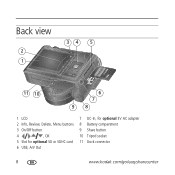
Back view 2 1 34 5 11 10 6 7 98 1 LCD 2 Info, Review, Delete, Menu buttons 3 On/Off button 4 , OK 5 Slot for optional SD or SDHC card 6 USB, A/V Out 7 DC-In, for optional 3V AC adapter 8 Battery compartment 9 Share button 10 Tripod socket 11 Dock connector 8 www.kodak.com/go/easysharecenter
Back view 2 1 34 5 11 10 6 7 98 1 LCD 2 Info, Review, Delete, Menu buttons 3 On/Off button 4 , OK 5 Slot for optional SD or SDHC card 6 USB, A/V Out 7 DC-In, for optional 3V AC adapter 8 Battery compartment 9 Share button 10 Tripod socket 11 Dock connector 8 www.kodak.com/go/easysharecenter
User Manual
Page 9
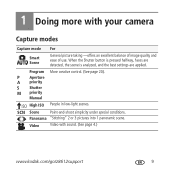
Video Video with your camera Capture modes Capture mode For Smart Scene General picture taking -offers an excellent balance of image quality and ease of use. 1 Doing more with sound. (See page 4.) www.kodak.com/go/z8612support 9 Panorama "Stitching" 2 or 3 pictures into 1 panoramic scene. When the Shutter button is pressed halfway, faces are...
Video Video with your camera Capture modes Capture mode For Smart Scene General picture taking -offers an excellent balance of image quality and ease of use. 1 Doing more with sound. (See page 4.) www.kodak.com/go/z8612support 9 Panorama "Stitching" 2 or 3 pictures into 1 panoramic scene. When the Shutter button is pressed halfway, faces are...

User Manual
Page 10
...camera Using optical zoom Use optical zoom to get up to 12X closer to zoom in/out. Focus distance W TD Auto 24 in. (60 cm)-infinity @ wide 3.9 ft (1.2m)-infinity @ telephoto Macro 4.7-23.7 in , move away from your subject before taking pictures.You may notice decreased image quality when using digital... zoom. 10 www.kodak.com/go/easysharecenter NOTE: To get a focused picture every time, remember: ■ Use the auto focus framing marks, page 4....
...camera Using optical zoom Use optical zoom to get up to 12X closer to zoom in/out. Focus distance W TD Auto 24 in. (60 cm)-infinity @ wide 3.9 ft (1.2m)-infinity @ telephoto Macro 4.7-23.7 in , move away from your subject before taking pictures.You may notice decreased image quality when using digital... zoom. 10 www.kodak.com/go/easysharecenter NOTE: To get a focused picture every time, remember: ■ Use the auto focus framing marks, page 4....

User Manual
Page 11
In low light, hold the camera steady or use a tripod. www.kodak.com/go/z8612support 11 Fill Red-eye Every time you take pictures at night, indoors, or outdoors in then fires again when the picture is ... Setup menu): the flash Setup menu): the flash fires once so the fires once and the camera eyes become accustomed to -subject distance in shadow or is "backlit" (when the light is turned on the camera. taken. Press the Flash button repeatedly to scroll through flash modes. (See flash modes below.) Flash...
In low light, hold the camera steady or use a tripod. www.kodak.com/go/z8612support 11 Fill Red-eye Every time you take pictures at night, indoors, or outdoors in then fires again when the picture is ... Setup menu): the flash Setup menu): the flash fires once so the fires once and the camera eyes become accustomed to -subject distance in shadow or is "backlit" (when the light is turned on the camera. taken. Press the Flash button repeatedly to scroll through flash modes. (See flash modes below.) Flash...
User Manual
Page 12
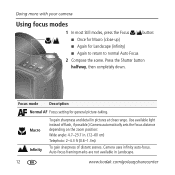
...-60 cm) Telephoto: 2-4.3 ft (0.6-1.3m) To gain sharpness of flash, if possible.) Camera automatically sets the focus distance depending on the zoom position: Wide angle: 4.7-23.7 in Landscape. 12 www.kodak.com/go/easysharecenter Use available light instead of distant scenes. Doing more with your... camera Using focus modes 1 In most Still modes, press the Focus button: ■ Once for Macro (close range. Camera uses infinity auto-focus.
...-60 cm) Telephoto: 2-4.3 ft (0.6-1.3m) To gain sharpness of flash, if possible.) Camera automatically sets the focus distance depending on the zoom position: Wide angle: 4.7-23.7 in Landscape. 12 www.kodak.com/go/easysharecenter Use available light instead of distant scenes. Doing more with your... camera Using focus modes 1 In most Still modes, press the Focus button: ■ Once for Macro (close range. Camera uses infinity auto-focus.
User Manual
Page 13
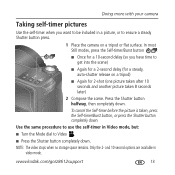
...are available in Video mode, but: ■ Turn the Mode dial to Video . ■ Press the Shutter button completely down. Only the 2- www.kodak.com/go/z8612support 13 In most Still modes, press the Self-timer/Burst button : ■ Once for a 10-second delay (so you want to be... included in a picture, or to ensure a steady Shutter button press. 1 Place the camera on a tripod) ■ Again for 2-shot (one picture taken after 10 seconds and another picture taken 8 seconds later) 2 Compose the scene. NOTE: The video ...
...are available in Video mode, but: ■ Turn the Mode dial to Video . ■ Press the Shutter button completely down. Only the 2- www.kodak.com/go/z8612support 13 In most Still modes, press the Self-timer/Burst button : ■ Once for a 10-second delay (so you want to be... included in a picture, or to ensure a steady Shutter button press. 1 Place the camera on a tripod) ■ Again for 2-shot (one picture taken after 10 seconds and another picture taken 8 seconds later) 2 Compose the scene. NOTE: The video ...
User Manual
Page 14
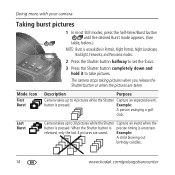
... Shutter button completely down and hold it to take pictures. Example: A child blowing out birthday candles. 14 www.kodak.com/go/easysharecenter Mode Icon First Burst Description Purpose Camera takes up to 4 pictures while the Shutter Capture an expected event. When the Shutter button is precise timing is ...pressed. Doing more with your camera Taking burst pictures 1 In most Still modes, press the Self-timer/Burst button until the desired Burst mode appears. (See table, below...
... Shutter button completely down and hold it to take pictures. Example: A child blowing out birthday candles. 14 www.kodak.com/go/easysharecenter Mode Icon First Burst Description Purpose Camera takes up to 4 pictures while the Shutter Capture an expected event. When the Shutter button is precise timing is ...pressed. Doing more with your camera Taking burst pictures 1 In most Still modes, press the Self-timer/Burst button until the desired Burst mode appears. (See table, below...
User Manual
Page 15
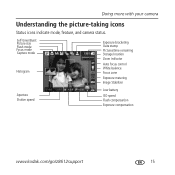
Self-timer/Burst Picture size Flash mode Focus mode Capture mode Histogram Exposure bracketing Date stamp Pictures/time remaining Storage location Zoom indicator Auto focus control White balance Focus zone Exposure metering Image Stabilizer Aperture Shutter speed Low battery ISO speed Flash compensation Exposure compensation www.kodak.com/go/z8612support 15 Doing more with your camera Understanding the picture-taking icons Status icons indicate mode, feature, and camera status.
Self-timer/Burst Picture size Flash mode Focus mode Capture mode Histogram Exposure bracketing Date stamp Pictures/time remaining Storage location Zoom indicator Auto focus control White balance Focus zone Exposure metering Image Stabilizer Aperture Shutter speed Low battery ISO speed Flash compensation Exposure compensation www.kodak.com/go/z8612support 15 Doing more with your camera Understanding the picture-taking icons Status icons indicate mode, feature, and camera status.
User Manual
Page 16
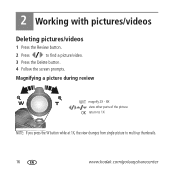
Magnifying a picture during review W/T magnify 2X - 8X view other parts of the picture OK return to 1X NOTE: If you press the W button while at 1X, the view changes from single-picture to find a picture/video. 3 Press the Delete button. 4 Follow the screen prompts. 2 Working with pictures/videos Deleting pictures/videos 1 Press the Review button. 2 Press to multi-up thumbnails. 16 www.kodak.com/go/easysharecenter
Magnifying a picture during review W/T magnify 2X - 8X view other parts of the picture OK return to 1X NOTE: If you press the W button while at 1X, the view changes from single-picture to find a picture/video. 3 Press the Delete button. 4 Follow the screen prompts. 2 Working with pictures/videos Deleting pictures/videos 1 Press the Review button. 2 Press to multi-up thumbnails. 16 www.kodak.com/go/easysharecenter
User Manual
Page 17
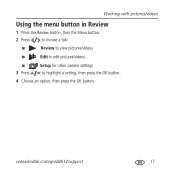
www.kodak.com/go/z8612support 17 Working with pictures/videos Using the menu button in Review 1 Press the Review button, then the Menu button. 2 Press to choose a tab: ■ Review to view pictures/videos ■ Edit to edit pictures/videos ■ 3 Press Setup for other camera settings to highlight a setting, then press the OK button. 4 Choose an option, then press the OK button.
www.kodak.com/go/z8612support 17 Working with pictures/videos Using the menu button in Review 1 Press the Review button, then the Menu button. 2 Press to choose a tab: ■ Review to view pictures/videos ■ Edit to edit pictures/videos ■ 3 Press Setup for other camera settings to highlight a setting, then press the OK button. 4 Choose an option, then press the OK button.
User Manual
Page 18
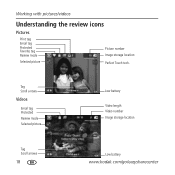
Tag Scroll arrows Videos Email tag Protected Review mode Selected picture Low battery Video length Video number Image storage location Tag Scroll arrows 18 Low battery www.kodak.com/go/easysharecenter Working with pictures/videos Understanding the review icons Pictures Print tag Email tag Protected Favorite tag Review mode Picture number Image storage location Selected picture Perfect Touch tech.
Tag Scroll arrows Videos Email tag Protected Review mode Selected picture Low battery Video length Video number Image storage location Tag Scroll arrows 18 Low battery www.kodak.com/go/easysharecenter Working with pictures/videos Understanding the review icons Pictures Print tag Email tag Protected Favorite tag Review mode Picture number Image storage location Selected picture Perfect Touch tech.

User Manual
Page 19
others remain until you turn off the camera. 1 Press the Menu button. 2 Press to highlight a setting, then press the OK button. 4 Choose an option, then press the OK button. Some capture modes offer limited settings. www.kodak.com/go/z8612support 19 Available only in PASM and ...Panorama modes. ■ Setup for other picture-taking settings. NOTE: Press the Info button for other camera settings. 3 Press to highlight a menu tab: ■ Capture...
others remain until you turn off the camera. 1 Press the Menu button. 2 Press to highlight a setting, then press the OK button. 4 Choose an option, then press the OK button. Some capture modes offer limited settings. www.kodak.com/go/z8612support 19 Available only in PASM and ...Panorama modes. ■ Setup for other picture-taking settings. NOTE: Press the Info button for other camera settings. 3 Press to highlight a menu tab: ■ Capture...
User Manual
Page 20
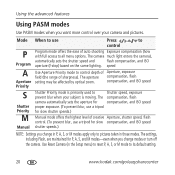
... only to pictures taken in the Setup menu) to reset P, A, S, or M mode to Shutter speed, exposure prevent blur when your camera and pictures. Aperture, exposure compensation, flash compensation, and ISO speed S Shutter Priority M Manual Shutter Priority mode is primarily used to its default... setting. 20 www.kodak.com/go/easysharecenter The settings, including Flash, are maintained for slow shutter speeds.) Manual mode offers the highest level of sharpness). The compensation, flash camera automatically sets the aperture for compensation, and ISO...
... only to pictures taken in the Setup menu) to reset P, A, S, or M mode to Shutter speed, exposure prevent blur when your camera and pictures. Aperture, exposure compensation, flash compensation, and ISO speed S Shutter Priority M Manual Shutter Priority mode is primarily used to its default... setting. 20 www.kodak.com/go/easysharecenter The settings, including Flash, are maintained for slow shutter speeds.) Manual mode offers the highest level of sharpness). The compensation, flash camera automatically sets the aperture for compensation, and ISO...
User Manual
Page 21
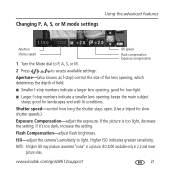
... light. good for low-light. ■ Larger f-stop numbers indicate a larger lens opening ; keeps the main subject sharp; ISO-adjust the camera's sensitivity to access available settings: Aperture-(also known as f-stop) control the size of the lens opening, which determines the depth of field. ...shutter stays open. (Use a tripod for landscapes and well-lit conditions. If the picture is too light, decrease the setting; www.kodak.com/go/z8612support 21 good for slow shutter speeds.) Exposure Compensation-adjust the exposure. if it's too dark, increase the setting. ...
... light. good for low-light. ■ Larger f-stop numbers indicate a larger lens opening ; keeps the main subject sharp; ISO-adjust the camera's sensitivity to access available settings: Aperture-(also known as f-stop) control the size of the lens opening, which determines the depth of field. ...shutter stays open. (Use a tripod for landscapes and well-lit conditions. If the picture is too light, decrease the setting; www.kodak.com/go/z8612support 21 good for slow shutter speeds.) Exposure Compensation-adjust the exposure. if it's too dark, increase the setting. ...
User Manual
Page 22
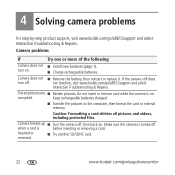
... replace it. Do not insert or remove card while the camera is before inserting or removing a card. 4 Solving camera problems For step-by-step product support, visit www.kodak.com/go /easysharecenter Make sure the camera is turned off when a card is on. Stored pictures ... (page 1). turn off , then back on . ■ Charge rechargeable batteries. If the camera still does turn on . inserted or removed. ■ Try another SD/SDHC card. 22 www.kodak.com/go /z8612support and select Interactive Troubleshooting & Repairs. Keep rechargeable batteries charged. ■ Transfer...
... replace it. Do not insert or remove card while the camera is before inserting or removing a card. 4 Solving camera problems For step-by-step product support, visit www.kodak.com/go /easysharecenter Make sure the camera is turned off when a card is on. Stored pictures ... (page 1). turn off , then back on . ■ Charge rechargeable batteries. If the camera still does turn on . inserted or removed. ■ Try another SD/SDHC card. 22 www.kodak.com/go /z8612support and select Interactive Troubleshooting & Repairs. Keep rechargeable batteries charged. ■ Transfer...
