
User Manual
Page 3
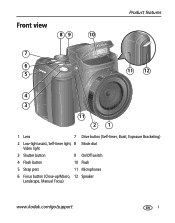
Front view 89 10 7 6 5 Product features 11 12 4 3 11 21 1 Lens 7 Drive button (Self-timer, Burst, Exposure Bracketing) 2 Low-light assist, Self-timer light, 8 Mode dial Video light 3 Shutter button 9 On/Off switch 4 Flash button 10 Flash 5 Strap post 11 Microphones 6 Focus button (Close-up/Macro, 12 Speaker Landscape, Manual Focus) www.kodak.com/go/support i
Front view 89 10 7 6 5 Product features 11 12 4 3 11 21 1 Lens 7 Drive button (Self-timer, Burst, Exposure Bracketing) 2 Low-light assist, Self-timer light, 8 Mode dial Video light 3 Shutter button 9 On/Off switch 4 Flash button 10 Flash 5 Strap post 11 Microphones 6 Focus button (Close-up/Macro, 12 Speaker Landscape, Manual Focus) www.kodak.com/go/support i

User Manual
Page 5
... the lens cap and strap 1 Loading the battery 2 Turning on the camera 3 Setting the language and date/time 3 Storing pictures on an SD card 4 2 Taking pictures/videos 5 Taking a picture 5 Using optical zoom 8 Using the Flash button 9 Using the Focus button 10 Using the Drive button ...the Info button 13 3 Working with pictures/videos 15 Reviewing pictures and videos 15 Deleting pictures and videos 16 Using the Menu button in Review 17 Using Kodak Perfect Touch technology 18 Cropping pictures 18 Adding sound tags 19 Editing videos 20 Using the histogram to view picture exposure...
... the lens cap and strap 1 Loading the battery 2 Turning on the camera 3 Setting the language and date/time 3 Storing pictures on an SD card 4 2 Taking pictures/videos 5 Taking a picture 5 Using optical zoom 8 Using the Flash button 9 Using the Focus button 10 Using the Drive button ...the Info button 13 3 Working with pictures/videos 15 Reviewing pictures and videos 15 Deleting pictures and videos 16 Using the Menu button in Review 17 Using Kodak Perfect Touch technology 18 Cropping pictures 18 Adding sound tags 19 Editing videos 20 Using the histogram to view picture exposure...
User Manual
Page 10
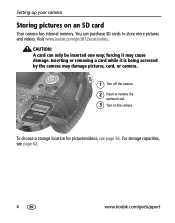
... or remove the optional card. 3 Turn on an SD card Your camera has internal memory. forcing it is being accessed by the camera may cause damage. Visit www.kodak.com/go /support To choose a storage location for pictures/videos, see page 62. 4 www.kodak.com/go /z812accessories. You can only be inserted one way; For...
... or remove the optional card. 3 Turn on an SD card Your camera has internal memory. forcing it is being accessed by the camera may cause damage. Visit www.kodak.com/go /support To choose a storage location for pictures/videos, see page 62. 4 www.kodak.com/go /z812accessories. You can only be inserted one way; For...
User Manual
Page 11
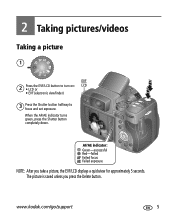
2 Taking pictures/videos Taking a picture 1 EVF 2 Press the EVF/LCD button to turn on: • LCD or LCD • EVF (electronic viewfinder) 3 Press the Shutter button halfway to focus and set exposure. AF/AE indicator: Green-successful Red-failed Failed focus Failed exposure NOTE: After you press the Delete button. The picture is saved unless you take a picture, the EVF/LCD displays a quickview for approximately 5 seconds. www.kodak.com/go/support 5 When the AF/AE indicator turns green, press the Shutter button completely down.
2 Taking pictures/videos Taking a picture 1 EVF 2 Press the EVF/LCD button to turn on: • LCD or LCD • EVF (electronic viewfinder) 3 Press the Shutter button halfway to focus and set exposure. AF/AE indicator: Green-successful Red-failed Failed focus Failed exposure NOTE: After you press the Delete button. The picture is saved unless you take a picture, the EVF/LCD displays a quickview for approximately 5 seconds. www.kodak.com/go/support 5 When the AF/AE indicator turns green, press the Shutter button completely down.
User Manual
Page 12
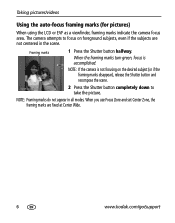
... not appear in the scene. When you use Focus Zone and set Center Zone, the framing marks are not centered in all modes. The camera attempts to focus on the desired subject (or if the framing marks disappear), release the Shutter button and recompose the scene. 2 Press the...green, focus is not focusing on foreground subjects, even if the subjects are fixed at Center Wide. 6 www.kodak.com/go/support Framing marks 1 Press the Shutter button halfway. Taking pictures/videos Using the auto-focus framing marks (for pictures) When using the LCD or EVF as a viewfinder, framing marks...
... not appear in the scene. When you use Focus Zone and set Center Zone, the framing marks are not centered in all modes. The camera attempts to focus on the desired subject (or if the framing marks disappear), release the Shutter button and recompose the scene. 2 Press the...green, focus is not focusing on foreground subjects, even if the subjects are fixed at Center Wide. 6 www.kodak.com/go/support Framing marks 1 Press the Shutter button halfway. Taking pictures/videos Using the auto-focus framing marks (for pictures) When using the LCD or EVF as a viewfinder, framing marks...

User Manual
Page 13
To stop recording, press and release the Shutter button again. Taking a video 1 EVF LCD 2 Press the EVF/LCD button to turn on: • LCD or • EVF (electronic viewfinder) 3 Press the Shutter button completely down and release. To play/pause the video during the quickview, press OK. The video is saved unless you take a video, the EVF/LCD displays a quickview for approximately 5 seconds. www.kodak.com/go/support 7 Taking pictures/videos NOTE: After you press the Delete button.
To stop recording, press and release the Shutter button again. Taking a video 1 EVF LCD 2 Press the EVF/LCD button to turn on: • LCD or • EVF (electronic viewfinder) 3 Press the Shutter button completely down and release. To play/pause the video during the quickview, press OK. The video is saved unless you take a video, the EVF/LCD displays a quickview for approximately 5 seconds. www.kodak.com/go/support 7 Taking pictures/videos NOTE: After you press the Delete button.
User Manual
Page 14
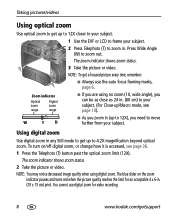
... (1X, wide angle), you can be as close as 24 in any Still mode to 12X), you are using digital zoom. The zoom indicator shows zoom status. 2 Take the picture or video. The blue slider on /off digital zoom, or change how it is accessed, see page 10). Zoom indicator Optical zoom range... (T) button past the optical zoom limit (12X). To turn on the zoom indicator pauses and turns red when the picture quality reaches the limit for video recording. 8 www.kodak.com/go/support The zoom indicator shows zoom status. 3 Take the picture or...
... (1X, wide angle), you can be as close as 24 in any Still mode to 12X), you are using digital zoom. The zoom indicator shows zoom status. 2 Take the picture or video. The blue slider on /off digital zoom, or change how it is accessed, see page 10). Zoom indicator Optical zoom range... (T) button past the optical zoom limit (12X). To turn on the zoom indicator pauses and turns red when the picture quality reaches the limit for video recording. 8 www.kodak.com/go/support The zoom indicator shows zoom status. 3 Take the picture or...
User Manual
Page 15
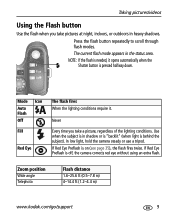
...Every time you take a picture, regardless of the lighting conditions. If Red Eye Preflash is off, the camera corrects red eye without using an extra flash. In low light, hold the camera steady or use a tripod. If Red Eye Preflash is on (see page 35), the flash fires ...twice. Zoom position Wide angle Telephoto Flash distance 1.6-25.6 ft (0.5-7.8 m) 4-14.4 ft (1.2-4.4 m) www.kodak.com/go/support 9 Taking pictures/videos Using the Flash button Use the ...
...Every time you take a picture, regardless of the lighting conditions. If Red Eye Preflash is off, the camera corrects red eye without using an extra flash. In low light, hold the camera steady or use a tripod. If Red Eye Preflash is on (see page 35), the flash fires ...twice. Zoom position Wide angle Telephoto Flash distance 1.6-25.6 ft (0.5-7.8 m) 4-14.4 ft (1.2-4.4 m) www.kodak.com/go/support 9 Taking pictures/videos Using the Flash button Use the ...
User Manual
Page 16
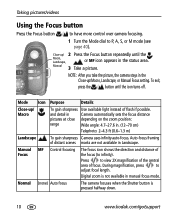
.... Manual 3 Take a picture. Auto-focus framing of focus. Digital zoom is pressed halfway down. 10 www.kodak.com/go/support During magnification, press to P, A, S, or M mode (see page 40). Taking pictures/videos Using the Focus button Press the Focus button to have more control over camera focusing. 1 Turn the Mode dial to adjust focal...
.... Manual 3 Take a picture. Auto-focus framing of focus. Digital zoom is pressed halfway down. 10 www.kodak.com/go/support During magnification, press to P, A, S, or M mode (see page 40). Taking pictures/videos Using the Focus button Press the Focus button to have more control over camera focusing. 1 Turn the Mode dial to adjust focal...
User Manual
Page 17
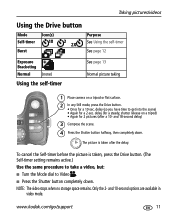
...kodak.com/go/support 11 delay (for a steady, shutter release on a tripod or flat surface. 2 In any Still mode, press the Drive button. • Once for a 10-sec. and 10-second options are available in video mode. delay (so you have time to Video...Drive button. (The Self-timer setting remains active.) Use the same procedure to take a video, but: ■ Turn the Mode dial to get into the scene) • Again...Compose the scene. 4 Press the Shutter button halfway, then completely down . Taking pictures/videos Using the Drive button Mode Self-timer Burst Icon(s) 10 2 2X Purpose See Using...
...kodak.com/go/support 11 delay (for a steady, shutter release on a tripod or flat surface. 2 In any Still mode, press the Drive button. • Once for a 10-sec. and 10-second options are available in video mode. delay (so you have time to Video...Drive button. (The Self-timer setting remains active.) Use the same procedure to take a video, but: ■ Turn the Mode dial to get into the scene) • Again...Compose the scene. 4 Press the Shutter button halfway, then completely down . Taking pictures/videos Using the Drive button Mode Self-timer Burst Icon(s) 10 2 2X Purpose See Using...
User Manual
Page 18
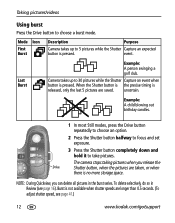
... taking pictures when you can delete all pictures in Review (see page 41.) 12 www.kodak.com/go/support Last Burst Example: A person swinging a golf club. Camera takes up to choose a burst mode. event. Example: A child blowing out birthday candles. 1 In most Still modes, press the... button, when the pictures are taken, or when there is no more storage space. Mode Icon First Burst Description Purpose Camera takes up to take pictures. Taking pictures/videos Using burst Press the Drive button to 5 pictures while the Shutter Capture an expected button is pressed.
... taking pictures when you can delete all pictures in Review (see page 41.) 12 www.kodak.com/go/support Last Burst Example: A person swinging a golf club. Camera takes up to choose a burst mode. event. Example: A child blowing out birthday candles. 1 In most Still modes, press the... button, when the pictures are taken, or when there is no more storage space. Mode Icon First Burst Description Purpose Camera takes up to take pictures. Taking pictures/videos Using burst Press the Drive button to 5 pictures while the Shutter Capture an expected button is pressed.
User Manual
Page 19
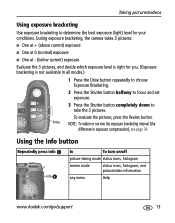
... Info In To turn on/off picture-taking mode status icons, histogram review mode status icons, histogram, and picture/video information any menu Help www.kodak.com/go/support 13 Drive NOTE: To widen or narrow the exposure bracketing interval (the difference in all modes.) ... to focus and set exposure. 3 Press the Shutter button completely down to determine the best exposure (light) level for your conditions. During exposure bracketing, the camera takes 3 pictures: ■ One at + (above current) exposure ■ One at 0 (normal) exposure ■ One at - (below current) exposure...
... Info In To turn on/off picture-taking mode status icons, histogram review mode status icons, histogram, and picture/video information any menu Help www.kodak.com/go/support 13 Drive NOTE: To widen or narrow the exposure bracketing interval (the difference in all modes.) ... to focus and set exposure. 3 Press the Shutter button completely down to determine the best exposure (light) level for your conditions. During exposure bracketing, the camera takes 3 pictures: ■ One at + (above current) exposure ■ One at 0 (normal) exposure ■ One at - (below current) exposure...
User Manual
Page 20
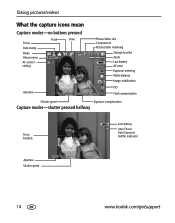
Taking pictures/videos What the capture icons mean Capture modes-no buttons pressed Focus Date stamp Mode Album name AF control setting Flash Drive Aperture Picture/video size Compression Pictures/time remaining Storage location Zoom Low battery AF zone Exposure metering White Balance Image stabilization ISO Flash compensation Shutter speed Exposure compensation Capture modes-shutter pressed halfway Focus brackets Low battery Auto Focus/ Auto Exposure (AF/AE indicator) Aperture Shutter speed 14 www.kodak.com/go/support
Taking pictures/videos What the capture icons mean Capture modes-no buttons pressed Focus Date stamp Mode Album name AF control setting Flash Drive Aperture Picture/video size Compression Pictures/time remaining Storage location Zoom Low battery AF zone Exposure metering White Balance Image stabilization ISO Flash compensation Shutter speed Exposure compensation Capture modes-shutter pressed halfway Focus brackets Low battery Auto Focus/ Auto Exposure (AF/AE indicator) Aperture Shutter speed 14 www.kodak.com/go/support
User Manual
Page 21
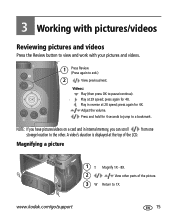
...Play in internal memory, you can scroll from one storage location to exit.) 2 View previous/next. NOTE: If you have pictures/videos on a card and in reverse at 2X speed; www.kodak.com/go/support 15 press again for 4X. Play at 2X speed; Adjust the volume. 3 Working with pictures.../videos Reviewing pictures and videos Press the Review button to view and work with your pictures and videos. 1 Press Review. (Press again to the other...
...Play in internal memory, you can scroll from one storage location to exit.) 2 View previous/next. NOTE: If you have pictures/videos on a card and in reverse at 2X speed; www.kodak.com/go/support 15 press again for 4X. Play at 2X speed; Adjust the volume. 3 Working with pictures.../videos Reviewing pictures and videos Press the Review button to view and work with your pictures and videos. 1 Press Review. (Press again to the other...
User Manual
Page 22
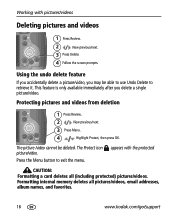
... undo delete feature If you accidentally delete a picture/video, you delete a single picture/video. The Protect icon picture/video. Formatting internal memory deletes all (including protected) pictures/videos. appears with pictures/videos Deleting pictures and videos 1 Press Review. 2 View previous/next. 3 ... Follow the screen prompts. Working with the protected CAUTION: Formatting a card deletes all pictures/videos, email addresses, album names, and favorites. 16 www.kodak.com/go/support This feature is only available immediately after you may be deleted. Press the ...
... undo delete feature If you accidentally delete a picture/video, you delete a single picture/video. The Protect icon picture/video. Formatting internal memory deletes all (including protected) pictures/videos. appears with pictures/videos Deleting pictures and videos 1 Press Review. 2 View previous/next. 3 ... Follow the screen prompts. Working with the protected CAUTION: Formatting a card deletes all pictures/videos, email addresses, album names, and favorites. 16 www.kodak.com/go/support This feature is only available immediately after you may be deleted. Press the ...
User Manual
Page 23
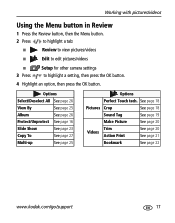
... 18 Pictures Crop See page 18 Sound Tag See page 19 Make Picture See page 20 Trim Videos Action Print See page 20 See page 21 Bookmark See page 22 www.kodak.com/go/support 17 Options Select/Deselect All See page 26 View By See page 25 Album ...25 Options Perfect Touch tech. Working with pictures/videos Using the Menu button in Review 1 Press the Review button, then the Menu button. 2 Press to highlight a tab: ■ Review to view pictures/videos ■ Edit to edit pictures/videos ■ 3 Press Setup for other camera settings to highlight a setting, then press ...
... 18 Pictures Crop See page 18 Sound Tag See page 19 Make Picture See page 20 Trim Videos Action Print See page 20 See page 21 Bookmark See page 22 www.kodak.com/go/support 17 Options Select/Deselect All See page 26 View By See page 25 Album ...25 Options Perfect Touch tech. Working with pictures/videos Using the Menu button in Review 1 Press the Review button, then the Menu button. 2 Press to highlight a tab: ■ Review to view pictures/videos ■ Edit to edit pictures/videos ■ 3 Press Setup for other camera settings to highlight a setting, then press ...
User Manual
Page 24
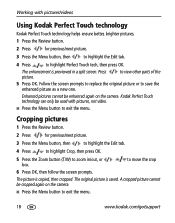
...to highlight the Edit tab. 4 Press to highlight Perfect Touch tech, then press OK. Enhanced pictures cannot be used with pictures/videos Using Kodak Perfect Touch technology Kodak Perfect Touch technology helps ensure better, brighter pictures. 1 Press the Review button. 2 Press for previous/next picture. 3 Press the... Touch technology can only be enhanced again on the camera. ■ Press the Menu button to exit the menu. 18 www.kodak.com/go/support to view other parts of the 5 Press OK. Working with pictures, not video. ■ Press the Menu button to exit the menu...
...to highlight the Edit tab. 4 Press to highlight Perfect Touch tech, then press OK. Enhanced pictures cannot be used with pictures/videos Using Kodak Perfect Touch technology Kodak Perfect Touch technology helps ensure better, brighter pictures. 1 Press the Review button. 2 Press for previous/next picture. 3 Press the... Touch technology can only be enhanced again on the camera. ■ Press the Menu button to exit the menu. 18 www.kodak.com/go/support to view other parts of the 5 Press OK. Working with pictures, not video. ■ Press the Menu button to exit the menu...
User Manual
Page 25
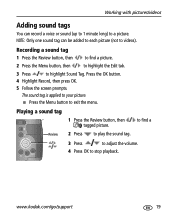
... 2 Press to play the sound tag. 3 Press to adjust the volume. 4 Press OK to stop playback. Working with pictures/videos Adding sound tags You can be added to each picture (not to videos). NOTE: Only one sound tag can record a voice or sound (up to 1 minute long) to exit the menu. www...
... 2 Press to play the sound tag. 3 Press to adjust the volume. 4 Press OK to stop playback. Working with pictures/videos Adding sound tags You can be added to each picture (not to videos). NOTE: Only one sound tag can record a voice or sound (up to 1 minute long) to exit the menu. www...
User Manual
Page 26
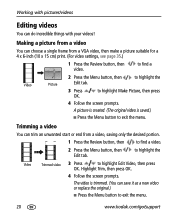
...then to find a 2 Press the Menu button, then to highlight the Video Picture Edit tab. 3 Press to exit the menu. 20 www.kodak.com/go/support to highlight the Video Trimmed video 3 Press to exit the menu. to find a video. 2 Press the Menu button, then Edit tab. Making a picture ...from a video You can save it as a new video or replace the original.) ■ Press the...
...then to find a 2 Press the Menu button, then to highlight the Video Picture Edit tab. 3 Press to exit the menu. 20 www.kodak.com/go/support to highlight the Video Trimmed video 3 Press to exit the menu. to find a video. 2 Press the Menu button, then Edit tab. Making a picture ...from a video You can save it as a new video or replace the original.) ■ Press the...
User Manual
Page 27
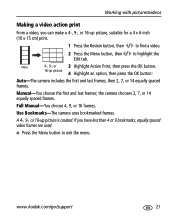
... 2, 7, or 14 equally spaced frames. A 4-, 9-, or 16-up picture 4 Highlight an option, then press the OK button: Auto-The camera includes the first and last frames, then 2, 7, or 14 equally spaced frames. If you can make a 4-, 9-, or 16-up picture, suitable for a 4 x ...up picture is created. Working with pictures/videos Making a video action print From a video, you have less than 4 or 9 bookmarks, equally spaced video frames are used. ■ Press the Menu button to exit the menu. www.kodak.com/go/support 21 Use Bookmarks-The camera uses bookmarked frames. Manual-You choose the...
... 2, 7, or 14 equally spaced frames. A 4-, 9-, or 16-up picture 4 Highlight an option, then press the OK button: Auto-The camera includes the first and last frames, then 2, 7, or 14 equally spaced frames. If you can make a 4-, 9-, or 16-up picture, suitable for a 4 x ...up picture is created. Working with pictures/videos Making a video action print From a video, you have less than 4 or 9 bookmarks, equally spaced video frames are used. ■ Press the Menu button to exit the menu. www.kodak.com/go/support 21 Use Bookmarks-The camera uses bookmarked frames. Manual-You choose the...


