

User Manual
Page 4
Product features Back view 1 2 34 5 6 7 14 13 12 11 10 9 8 optional memory card (sold separately) 1 LCD 2 Ready/Battery charging light 3 Delete button 4 Zoom button (Wide/Telephoto) 5 6 OK button 7 Strap post 8 SD or SDHC memory card slot 9 Battery compartment 10 Share button 11 Menu button 12 Review button 13 Dock connector 14 Tripod socket ii www.kodak.com/go/support
Product features Back view 1 2 34 5 6 7 14 13 12 11 10 9 8 optional memory card (sold separately) 1 LCD 2 Ready/Battery charging light 3 Delete button 4 Zoom button (Wide/Telephoto) 5 6 OK button 7 Strap post 8 SD or SDHC memory card slot 9 Battery compartment 10 Share button 11 Menu button 12 Review button 13 Dock connector 14 Tripod socket ii www.kodak.com/go/support

User Manual
Page 5
... Taking a picture 5 Taking a video 6 Using optical zoom 7 Using the flash 8 Using different picture-taking modes 9 Using camera Help 11 Taking panoramic pictures 12 Understanding the picture-taking icons 13 3 Working with pictures/videos 14 Reviewing pictures/videos 14 Using sound tags 16 Deleting pictures/...videos 17 Using the menu button in Review 18 Using Kodak Perfect Touch ...
... Taking a picture 5 Taking a video 6 Using optical zoom 7 Using the flash 8 Using different picture-taking modes 9 Using camera Help 11 Taking panoramic pictures 12 Understanding the picture-taking icons 13 3 Working with pictures/videos 14 Reviewing pictures/videos 14 Using sound tags 16 Deleting pictures/...videos 17 Using the menu button in Review 18 Using Kodak Perfect Touch ...

User Manual
Page 11
www.kodak.com/go/support 5 Delete button Press to focus and set exposure. 2 Taking pictures/videos Taking a picture 1 3 On/Off button 2 Framing marks Press the Shutter button halfway to play a video. to adjust the volume during playback To review pictures/videos anytime, see page 14. ...When the framing marks turn green, press the Shutter button completely down. Reviewing the picture just taken After you take a picture or video, the LCD displays a quickview for approximately 10 seconds. (To exit the quickview sooner, press the Shutter button halfway.) The picture ...
www.kodak.com/go/support 5 Delete button Press to focus and set exposure. 2 Taking pictures/videos Taking a picture 1 3 On/Off button 2 Framing marks Press the Shutter button halfway to play a video. to adjust the volume during playback To review pictures/videos anytime, see page 14. ...When the framing marks turn green, press the Shutter button completely down. Reviewing the picture just taken After you take a picture or video, the LCD displays a quickview for approximately 10 seconds. (To exit the quickview sooner, press the Shutter button halfway.) The picture ...

User Manual
Page 20
.... NOTE: If you press while at the top of the 4 Press OK to return to view and work with pictures/videos Reviewing pictures/videos Press the Review button to 1X. A video's duration is displayed at 1X, the view changes from single-picture to multi-up thumbnail pictures. ...(See page 23.) 14 www.kodak.com/go /m1063accessories.) Review NOTE: Pictures taken at 3:2 and 16:9 picture sizes have a black bar at the top and bottom. To save battery power, use an optional Kodak OK EasyShare dock or Kodak 5-volt AC adapter. (Visit: www.kodak.com/go /support 3 Working with ...
.... NOTE: If you press while at the top of the 4 Press OK to return to view and work with pictures/videos Reviewing pictures/videos Press the Review button to 1X. A video's duration is displayed at 1X, the view changes from single-picture to multi-up thumbnail pictures. ...(See page 23.) 14 www.kodak.com/go /m1063accessories.) Review NOTE: Pictures taken at 3:2 and 16:9 picture sizes have a black bar at the top and bottom. To save battery power, use an optional Kodak OK EasyShare dock or Kodak 5-volt AC adapter. (Visit: www.kodak.com/go /support 3 Working with ...

User Manual
Page 21
Working with pictures/videos Playing a video 1 Press during playback to reverse at 2X, 4X. www.kodak.com/go/support 15 during playback to adjust the 7 Press during pause to find previous/next video. Press OK to pause/unpause. 5 Press during playback to play . Viewing picture/video information 1 Press the Review button. 2 Repeatedly press to play at 2X, 4X. 2 Press the Review button. 3 Press to view previous/next video frame. 6 Press volume. Playback speed 4X 2X 1X 2X 4X Reverse Forward 4 Press to turn on/off status icons and picture/video info.
Working with pictures/videos Playing a video 1 Press during playback to reverse at 2X, 4X. www.kodak.com/go/support 15 during playback to adjust the 7 Press during pause to find previous/next video. Press OK to pause/unpause. 5 Press during playback to play . Viewing picture/video information 1 Press the Review button. 2 Repeatedly press to play at 2X, 4X. 2 Press the Review button. 3 Press to view previous/next video frame. 6 Press volume. Playback speed 4X 2X 1X 2X 4X Reverse Forward 4 Press to turn on/off status icons and picture/video info.

User Manual
Page 22
... or replay the sound tag during playback. 16 www.kodak.com/go/support Playing a sound tag 1 Press the Review button, then to find a 2 Press the Menu button, then to highlight Sound Tag. Recording a sound tag 1 Press the Review button, then picture. Press the OK button. 3 Choose... Record, then press OK. 4 Follow the screen prompts. Review 3 Press to adjust the volume. 4 Press OK to exit the menu. The sound tag ...
... or replay the sound tag during playback. 16 www.kodak.com/go/support Playing a sound tag 1 Press the Review button, then to find a 2 Press the Menu button, then to highlight Sound Tag. Recording a sound tag 1 Press the Review button, then picture. Press the OK button. 3 Choose... Record, then press OK. 4 Follow the screen prompts. Review 3 Press to adjust the volume. 4 Press OK to exit the menu. The sound tag ...

User Manual
Page 23
... The deleted picture (overlaid with the Delete menu) appears. 3 Select Exit to retrieve it. Protecting pictures/videos from deletion 1 Press the Review button. 2 Press for previous/next picture/video. 3 Press the Delete button. 4 Follow the screen prompts. Working with the protected picture/...Delete menu. I Press the Menu button to exit the menu. The Protect icon appears with pictures/videos Deleting pictures/videos 1 Press the Review button. 2 Press for previous/next picture/video. 3 Press the Menu button. 4 Press to highlight Undo Delete. 2 Press OK. Formatting...
... The deleted picture (overlaid with the Delete menu) appears. 3 Select Exit to retrieve it. Protecting pictures/videos from deletion 1 Press the Review button. 2 Press for previous/next picture/video. 3 Press the Delete button. 4 Follow the screen prompts. Working with the protected picture/...Delete menu. I Press the Menu button to exit the menu. The Protect icon appears with pictures/videos Deleting pictures/videos 1 Press the Review button. 2 Press for previous/next picture/video. 3 Press the Menu button. 4 Press to highlight Undo Delete. 2 Press OK. Formatting...

User Manual
Page 24
... of the 4 Press OK. to exit the menu. 18 www.kodak.com/go/support Using Kodak Perfect Touch technology Kodak Perfect Touch technology helps ensure better, brighter pictures. 1 Press the Review button, then for previous/next picture. 2 Press the Menu button,... then press to find : I Review to view pictures/videos I Edit to edit pictures/videos I Press the Menu button to view other camera...
... of the 4 Press OK. to exit the menu. 18 www.kodak.com/go/support Using Kodak Perfect Touch technology Kodak Perfect Touch technology helps ensure better, brighter pictures. 1 Press the Review button, then for previous/next picture. 2 Press the Menu button,... then press to find : I Review to view pictures/videos I Edit to edit pictures/videos I Press the Menu button to view other camera...

User Manual
Page 25
Press OK. 5 Follow the screen prompts. www.kodak.com/go/support 19 The original is saved.) I Press the ...Cropping pictures You can choose a single frame from a video, then make a picture suitable for printing. 1 Press the Review button, then to find a video. 2 Press the Menu button. Editing videos Making a picture from a video You can... crop a picture so that only the desired portion of the picture remains. 1 Press the Review button, then picture. Press to find Edit. 3 Press to find a Picture 2 Press the Menu button. to highlight...
Press OK. 5 Follow the screen prompts. www.kodak.com/go/support 19 The original is saved.) I Press the ...Cropping pictures You can choose a single frame from a video, then make a picture suitable for printing. 1 Press the Review button, then to find a video. 2 Press the Menu button. Editing videos Making a picture from a video You can... crop a picture so that only the desired portion of the picture remains. 1 Press the Review button, then picture. Press to find Edit. 3 Press to find a Picture 2 Press the Menu button. to highlight...

User Manual
Page 26
...button. Video 4-, 9-, or 3 Press to highlight Trim, then press . Auto options: The camera includes the first and last frames, then 2, 7, or 14 equally spaced frames. Manual options...Press to highlight Video Action Print, 16-up picture, suitable for a 4 x 6-inch (10 x 15 cm) print. 1 Press the Review button, then video. to find Edit. Making a video action print From a video, you ... the beginning or end of a video. 1 Press the Review button, then video. I Press the Menu button to exit the menu. 20 www.kodak.com/go/support Video Trimmed video 4 Follow the screen prompts...
...button. Video 4-, 9-, or 3 Press to highlight Trim, then press . Auto options: The camera includes the first and last frames, then 2, 7, or 14 equally spaced frames. Manual options...Press to highlight Video Action Print, 16-up picture, suitable for a 4 x 6-inch (10 x 15 cm) print. 1 Press the Review button, then video. to find Edit. Making a video action print From a video, you ... the beginning or end of a video. 1 Press the Review button, then video. I Press the Menu button to exit the menu. 20 www.kodak.com/go/support Video Trimmed video 4 Follow the screen prompts...

User Manual
Page 27
... page 16). The interval setting remains until you recorded (see page 24). to display your pictures/videos on the camera or on a sound tag you change it. www.kodak.com/go/support 21 Starting the slide show display interval The default interval setting displays each picture for 5 seconds. ...Changing the slide show 1 Press the Review button, then the Menu button. 2 Press to highlight Slide Show, then press the OK ...
... page 16). The interval setting remains until you recorded (see page 24). to display your pictures/videos on the camera or on a sound tag you change it. www.kodak.com/go/support 21 Starting the slide show display interval The default interval setting displays each picture for 5 seconds. ...Changing the slide show 1 Press the Review button, then the Menu button. 2 Press to highlight Slide Show, then press the OK ...
User Manual
Page 28
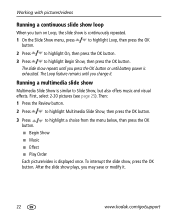
The slide show repeats until you press the OK button or until you change it . 22 www.kodak.com/go/support Then: 1 Press the Review button. 2 Press to highlight Begin Show, then press the OK button. Running a multimedia slide show Multimedia Slide Show is continuously repeated. 1 On the Slide Show ...
The slide show repeats until you press the OK button or until you change it . 22 www.kodak.com/go/support Then: 1 Press the Review button. 2 Press to highlight Begin Show, then press the OK button. Running a multimedia slide show Multimedia Slide Show is continuously repeated. 1 On the Slide Show ...

User Manual
Page 29
...the results of your camera or card, you 've tagged pictures with pictures/videos Viewing pictures/videos in multi-up view. Press the Wide Angle (W) button to return to view the picture full-screen. I Press the Review button to exit Review. www.kodak.com/go/support ...23 Choose another tab, highlight Exit and press the OK button. 5 To see page 25. Working with a Favorites tag or a tag that only some are displayed in different ways Viewing as thumbnails (multi-up) 1 Press the Review button. 2 Press the Zoom...
...the results of your camera or card, you 've tagged pictures with pictures/videos Viewing pictures/videos in multi-up view. Press the Wide Angle (W) button to return to view the picture full-screen. I Press the Review button to exit Review. www.kodak.com/go/support ...23 Choose another tab, highlight Exit and press the OK button. 5 To see page 25. Working with a Favorites tag or a tag that only some are displayed in different ways Viewing as thumbnails (multi-up) 1 Press the Review button. 2 Press the Zoom...

User Manual
Page 31
...print, transfer, or delete the selected pictures. Copy pictures/videos: 1 Press the Review button, then the Menu button. 2 Press to highlight Copy, then press OK. 3 Press to select pictures/videos. Tags that : I The camera's image storage location is set to the location from internal memory to a card....23.) 1 Press the Review button, then picture/video. To remove pictures/videos from the original location after copying, delete them (see page 17. A check mark appears on the picture. To apply protection to a picture/video, see page 17). www.kodak.com/go/support 25 ...
...print, transfer, or delete the selected pictures. Copy pictures/videos: 1 Press the Review button, then the Menu button. 2 Press to highlight Copy, then press OK. 3 Press to select pictures/videos. Tags that : I The camera's image storage location is set to the location from internal memory to a card....23.) 1 Press the Review button, then picture/video. To remove pictures/videos from the original location after copying, delete them (see page 17. A check mark appears on the picture. To apply protection to a picture/video, see page 17). www.kodak.com/go/support 25 ...

User Manual
Page 32
Working with pictures/videos Understanding the review icons Pictures Favorite Email tag Kodak Perfect Touch Review mode Tagged picture Protect Print tag/number of prints Picture number Image storage location Scroll arrows Videos Review mode 26 Battery level Video length Video number Image storage location Play time Volume control indicator Battery level www.kodak.com/go/support
Working with pictures/videos Understanding the review icons Pictures Favorite Email tag Kodak Perfect Touch Review mode Tagged picture Protect Print tag/number of prints Picture number Image storage location Scroll arrows Videos Review mode 26 Battery level Video length Video number Image storage location Play time Volume control indicator Battery level www.kodak.com/go/support

User Manual
Page 33
Green-Picture is sharp enough for an acceptable 4 x 6-inch (10 x 15 cm) print or sharpness is displayed during quickview and review. White-Printability is not sharp enough for an acceptable 4 x 6-inch (10 x 15 cm) print. Yellow-Picture may be sharp enough for an acceptable 4 x 6-inch (10 x 15 cm) print. www.kodak.com/go/support 27 Red-Picture is still being determined. Working with pictures/videos Understanding blur warning icons A picture blur warning icon is not determined.
Green-Picture is sharp enough for an acceptable 4 x 6-inch (10 x 15 cm) print or sharpness is displayed during quickview and review. White-Printability is not sharp enough for an acceptable 4 x 6-inch (10 x 15 cm) print. Yellow-Picture may be sharp enough for an acceptable 4 x 6-inch (10 x 15 cm) print. www.kodak.com/go/support 27 Red-Picture is still being determined. Working with pictures/videos Understanding blur warning icons A picture blur warning icon is not determined.

User Manual
Page 34
... most common picture-taking settings I Capture plus options, see page 18. 28 www.kodak.com/go/support NOTE: For Review and Review plus for other picture-taking settings I Setup for other camera settings 3 Press to get the best results from your camera. others, until you change settings to highlight a setting, then press the OK button...
... most common picture-taking settings I Capture plus options, see page 18. 28 www.kodak.com/go/support NOTE: For Review and Review plus for other picture-taking settings I Setup for other camera settings 3 Press to get the best results from your camera. others, until you change settings to highlight a setting, then press the OK button...

User Manual
Page 41
.... NOTE: During quickview, you want to decrease exposure compensation. Using exposure compensation to adjust picture brightness Before you take up to 3 pictures in Review (see page 17). Burst is shown on the LCD; I Press to balance a picture between water, earth, and sky. the LCD gets brighter...rapid succession. 1 In most Still modes, press the button repeatedly until appears on /off the framing grid, repeatedly press . www.kodak.com/go/support 35 This is no more with your camera Using burst Use burst to take a picture, you can delete all pictures in menu mode. The...
.... NOTE: During quickview, you want to decrease exposure compensation. Using exposure compensation to adjust picture brightness Before you take up to 3 pictures in Review (see page 17). Burst is shown on the LCD; I Press to balance a picture between water, earth, and sky. the LCD gets brighter...rapid succession. 1 In most Still modes, press the button repeatedly until appears on /off the framing grid, repeatedly press . www.kodak.com/go/support 35 This is no more with your camera Using burst Use burst to take a picture, you can delete all pictures in menu mode. The...

User Manual
Page 49
...you can assign the favorite tag. 1 Press the Share button, then locate a picture/video. 2 Highlight Favorite, then press OK. www.kodak.com/go/support 43 When you transfer the tagged pictures/videos to pictures/videos First, create a new tag name: highlight Add Tag, .... 1 Press the Review button, then locate a picture/video. 2 Press the Menu button. 3 Highlight Tag, then press OK. 4 Highlight a tag name, then press OK. Assigning other tags to your computer, EasyShare software opens and categorizes your camera, see page 23. To remove a selection, highlight a tag name...
...you can assign the favorite tag. 1 Press the Share button, then locate a picture/video. 2 Highlight Favorite, then press OK. www.kodak.com/go/support 43 When you transfer the tagged pictures/videos to pictures/videos First, create a new tag name: highlight Add Tag, .... 1 Press the Review button, then locate a picture/video. 2 Press the Menu button. 3 Highlight Tag, then press OK. 4 Highlight a tag name, then press OK. Assigning other tags to your computer, EasyShare software opens and categorizes your camera, see page 23. To remove a selection, highlight a tag name...

User Manual
Page 51
... of the following activities that quickly deplete battery power: with Kodak Li-Ion reviewing pictures/videos on . Continue taking a picture. Camera does not turn on the LCD; I Remove the battery, then reinsert correctly (see page 2). rechargeable digital camera battery KLIC-7001. If the problem persists, visit www.kodak.com/go /m1063support, and select Interactive Troubleshooting & Repairs...
... of the following activities that quickly deplete battery power: with Kodak Li-Ion reviewing pictures/videos on . Continue taking a picture. Camera does not turn on the LCD; I Remove the battery, then reinsert correctly (see page 2). rechargeable digital camera battery KLIC-7001. If the problem persists, visit www.kodak.com/go /m1063support, and select Interactive Troubleshooting & Repairs...


