

User Manual
Page 1
Follow the on-screen instructions. ENGLISH ᕡ Installing the software Before connecting any cables, install the software that was included with your camera. Battery Charging light: • Blinking: charging • Steady: finished charging KLIC-7004 battery See the Extended user guide www.kodak.com/go/m1093support www.kodak.com/go/m1093support 1 After installing the software, return to this user guide. ᕢ Loading and charging the battery 1 Turn OFF the camera. 2 Connect the cable.
Follow the on-screen instructions. ENGLISH ᕡ Installing the software Before connecting any cables, install the software that was included with your camera. Battery Charging light: • Blinking: charging • Steady: finished charging KLIC-7004 battery See the Extended user guide www.kodak.com/go/m1093support www.kodak.com/go/m1093support 1 After installing the software, return to this user guide. ᕢ Loading and charging the battery 1 Turn OFF the camera. 2 Connect the cable.

User Manual
Page 2
See the Extended user guide Purchase accessories www.kodak.com/go/m1093support www.kodak.com/go/m1093accessories 2 www.kodak.com/go/easysharecenter Kodak 5V AC adapter (May be sold separately.) Kodak EasyShare camera, printer, or HDTV dock (May be sold separately.) Kodak USB cable and a USB computer port Ensure that the USB cable is connected to a powered USB port and the computer is turned on . ENGLISH Using other charging accessories First, turn OFF the camera. Charge until the Battery Charging light stays on (not in sleep mode).
See the Extended user guide Purchase accessories www.kodak.com/go/m1093support www.kodak.com/go/m1093accessories 2 www.kodak.com/go/easysharecenter Kodak 5V AC adapter (May be sold separately.) Kodak EasyShare camera, printer, or HDTV dock (May be sold separately.) Kodak USB cable and a USB computer port Ensure that the USB cable is connected to a powered USB port and the computer is turned on . ENGLISH Using other charging accessories First, turn OFF the camera. Charge until the Battery Charging light stays on (not in sleep mode).
User Manual
Page 10
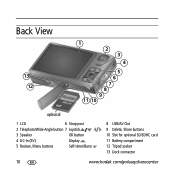
Back View 13 12 1 2 3 4 5 6 7 8 9 11 10 optional 1 LCD 6 Strap post 2 Telephoto/Wide Angle button 7 Joystick 3 Speaker OK button 4 DC-In (5V) Display 5 Review, Menu buttons Self-timer/Burst 8 USB/AV Out 9 Delete, Share buttons 10 Slot for optional SD/SDHC card 11 Battery compartment 12 Tripod socket 13 Dock connector 10 www.kodak.com/go/easysharecenter
Back View 13 12 1 2 3 4 5 6 7 8 9 11 10 optional 1 LCD 6 Strap post 2 Telephoto/Wide Angle button 7 Joystick 3 Speaker OK button 4 DC-In (5V) Display 5 Review, Menu buttons Self-timer/Burst 8 USB/AV Out 9 Delete, Share buttons 10 Slot for optional SD/SDHC card 11 Battery compartment 12 Tripod socket 13 Dock connector 10 www.kodak.com/go/easysharecenter

User Manual
Page 18
Doing more with your camera Understanding the picture-taking icons Self timer Picture size Flash mode Focus mode Capture mode Tag name Histogram Framing grid Long time exposure Date stamp Pictures/time remaining Image storage location Zoom indicator AF control White Balance Exposure metering AF zone Battery level ISO Exposure compensation 18 www.kodak.com/go/easysharecenter
Doing more with your camera Understanding the picture-taking icons Self timer Picture size Flash mode Focus mode Capture mode Tag name Histogram Framing grid Long time exposure Date stamp Pictures/time remaining Image storage location Zoom indicator AF control White Balance Exposure metering AF zone Battery level ISO Exposure compensation 18 www.kodak.com/go/easysharecenter

User Manual
Page 20
Picture/Video number Image storage location Relative picture number Videos Scroll arrows Email tag Protected Favorite tag Review Battery level Tag name Video length Picture/Video number Image storage location Relative video number Scroll arrows 20 Battery level Tag name www.kodak.com/go/easysharecenter Working with pictures/videos Understanding the review icons Pictures Email tag Protected Favorite tag Review Selected picture Print tag/number of prints Perfect Touch tech.
Picture/Video number Image storage location Relative picture number Videos Scroll arrows Email tag Protected Favorite tag Review Battery level Tag name Video length Picture/Video number Image storage location Relative video number Scroll arrows 20 Battery level Tag name www.kodak.com/go/easysharecenter Working with pictures/videos Understanding the review icons Pictures Email tag Protected Favorite tag Review Selected picture Print tag/number of prints Perfect Touch tech.
User Manual
Page 23
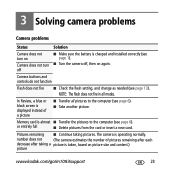
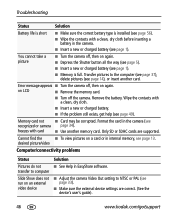
... Transfer all modes. Memory card is taken, based on again. 3 Solving camera problems Camera problems Status Solution Camera does not turn on Camera does not turn off , then on picture size and content.) picture www.kodak.com/go/m1093support 23 In Review, a blue or black screen is charged and... does not fire ■ Check the flash setting, and change as needed (see page 1). ■ Turn the camera off ■ Make sure the battery is displayed instead of pictures remaining after each decrease after taking pictures. or entirely full ■ Delete pictures from the...
... Transfer all modes. Memory card is taken, based on again. 3 Solving camera problems Camera problems Status Solution Camera does not turn on Camera does not turn off , then on picture size and content.) picture www.kodak.com/go/m1093support 23 In Review, a blue or black screen is charged and... does not fire ■ Check the flash setting, and change as needed (see page 1). ■ Turn the camera off ■ Make sure the battery is displayed instead of pictures remaining after each decrease after taking pictures. or entirely full ■ Delete pictures from the...

User Manual
Page 24
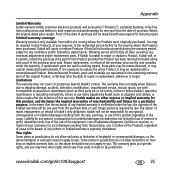
...; Follow all instructions of the airline. ■ When removing the battery, allow batteries to cool; Contact Kodak customer support. ■ The use of an accessory that battery fluid leaks onto your local health provider. Visit www.kodak.com/go /accessories. ■ Use only a USB-certified computer...an extended period of time. If the LCD breaks, do not touch the glass or liquid. Contact your local Kodak customer support. ■ Dispose of batteries according to shock and/or electrical or mechanical hazards. it to touch metal objects, including coins. 4 Appendix ...
...; Follow all instructions of the airline. ■ When removing the battery, allow batteries to cool; Contact Kodak customer support. ■ The use of an accessory that battery fluid leaks onto your local health provider. Visit www.kodak.com/go /accessories. ■ Use only a USB-certified computer...an extended period of time. If the LCD breaks, do not touch the glass or liquid. Contact your local Kodak customer support. ■ Dispose of batteries according to shock and/or electrical or mechanical hazards. it to touch metal objects, including coins. 4 Appendix ...
User Manual
Page 25
... replace Products if they fail to function properly during the warranty period, subject to any written or implied warranty is Kodak's only obligation. Remanufactured Products, parts and materials are used in both materials and workmanship for such damages resulting from ...Retain the original dated sales receipt. Kodak will be required with proof of the purchase price paid for the country where the Products were purchased. Appendix Limited Warranty Kodak warrants Kodak consumer electronic products and accessories ("Products"), excluding batteries, to be free from malfunctions and...
... replace Products if they fail to function properly during the warranty period, subject to any written or implied warranty is Kodak's only obligation. Remanufactured Products, parts and materials are used in both materials and workmanship for such damages resulting from ...Retain the original dated sales receipt. Kodak will be required with proof of the purchase price paid for the country where the Products were purchased. Appendix Limited Warranty Kodak warrants Kodak consumer electronic products and accessories ("Products"), excluding batteries, to be free from malfunctions and...
Extended User Guide
Page 4
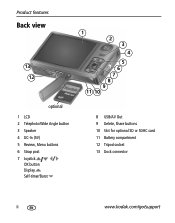
Product features Back view 13 12 optional 1 LCD 2 Telephoto/Wide Angle button 3 Speaker 4 DC-In (5V) 5 Review, Menu buttons 6 Strap post 7 Joystick OK button Display Self-timer/Burst 1 2 3 4 5 6 7 8 9 11 10 8 USB/AV Out 9 Delete, Share buttons 10 Slot for optional SD or SDHC card 11 Battery compartment 12 Tripod socket 13 Dock connector ii www.kodak.com/go/support
Product features Back view 13 12 optional 1 LCD 2 Telephoto/Wide Angle button 3 Speaker 4 DC-In (5V) 5 Review, Menu buttons 6 Strap post 7 Joystick OK button Display Self-timer/Burst 1 2 3 4 5 6 7 8 9 11 10 8 USB/AV Out 9 Delete, Share buttons 10 Slot for optional SD or SDHC card 11 Battery compartment 12 Tripod socket 13 Dock connector ii www.kodak.com/go/support

Extended User Guide
Page 5
Table of contents 1 1 Setting up your camera 1 Attaching the strap 1 Loading the KLIC-7004 battery 1 Charging the battery 2 Turning on the camera 2 Setting the language and date/time 4 Storing pictures on an SD or SDHC card 4 2 Taking pictures/videos 5 Taking a picture 5 Using the ... pictures/videos 14 Understanding the review icons 15 Using the menu button in review 16 Cropping pictures 17 Adding sound tags 17 Using Kodak Perfect Touch technology 18 Editing videos 19 Running a slide show 22 Viewing pictures/videos in different ways 25 Selecting multiple pictures/videos ...
Table of contents 1 1 Setting up your camera 1 Attaching the strap 1 Loading the KLIC-7004 battery 1 Charging the battery 2 Turning on the camera 2 Setting the language and date/time 4 Storing pictures on an SD or SDHC card 4 2 Taking pictures/videos 5 Taking a picture 5 Using the ... pictures/videos 14 Understanding the review icons 15 Using the menu button in review 16 Cropping pictures 17 Adding sound tags 17 Using Kodak Perfect Touch technology 18 Editing videos 19 Running a slide show 22 Viewing pictures/videos in different ways 25 Selecting multiple pictures/videos ...

Extended User Guide
Page 6
Table of contents 4 Doing more with your camera 27 Using the menu button to change settings 27 Using the Setup menu 32 Taking panoramic pictures 35 Using the histogram to view picture brightness ... help from your camera 49 Getting help on the Web 50 Getting help on the telephone 51 8 Appendix 52 Camera specifications 52 Care and maintenance 54 Upgrading your software and firmware 55 Storage capacities 55 Important safety instructions 55 Battery replacement, battery life 56 Limited warranty 57 Regulatory compliance 59 iv www.kodak.com/go...
Table of contents 4 Doing more with your camera 27 Using the menu button to change settings 27 Using the Setup menu 32 Taking panoramic pictures 35 Using the histogram to view picture brightness ... help from your camera 49 Getting help on the Web 50 Getting help on the telephone 51 8 Appendix 52 Camera specifications 52 Care and maintenance 54 Upgrading your software and firmware 55 Storage capacities 55 Important safety instructions 55 Battery replacement, battery life 56 Limited warranty 57 Regulatory compliance 59 iv www.kodak.com/go...

Extended User Guide
Page 7
www.kodak.com/go/support 1 Attaching the strap Loading the KLIC-7004 battery For information on replacing batteries and extending battery life, see your camera IMPORTANT: For package contents, see page 56. 1 Setting up your product package.
www.kodak.com/go/support 1 Attaching the strap Loading the KLIC-7004 battery For information on replacing batteries and extending battery life, see your camera IMPORTANT: For package contents, see page 56. 1 Setting up your product package.
Extended User Guide
Page 8
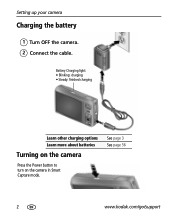
Battery Charging light: • Blinking: charging • Steady: finished charging Learn other charging options Learn more about batteries Turning on the camera Press the Power button to turn on the camera in Smart Capture mode. See page 3 See page 56 2 www.kodak.com/go/support Setting up your camera Charging the battery 1 Turn OFF the camera. 2 Connect the cable.
Battery Charging light: • Blinking: charging • Steady: finished charging Learn other charging options Learn more about batteries Turning on the camera Press the Power button to turn on the camera in Smart Capture mode. See page 3 See page 56 2 www.kodak.com/go/support Setting up your camera Charging the battery 1 Turn OFF the camera. 2 Connect the cable.
Extended User Guide
Page 9
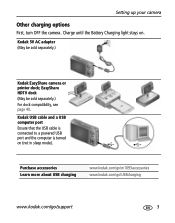
.... Charge until the Battery Charging light stays on (not in sleep mode). Purchase accessories Learn more about USB charging www.kodak.com/go/m1093accessories www.kodak.com/go/USBcharging www.kodak.com/go/support 3 Setting up your camera Other charging options First, turn OFF the camera. Kodak 5V AC adapter (May be sold separately.) Kodak EasyShare camera or printer dock;
.... Charge until the Battery Charging light stays on (not in sleep mode). Purchase accessories Learn more about USB charging www.kodak.com/go/m1093accessories www.kodak.com/go/USBcharging www.kodak.com/go/support 3 Setting up your camera Other charging options First, turn OFF the camera. Kodak 5V AC adapter (May be sold separately.) Kodak EasyShare camera or printer dock;

Extended User Guide
Page 18
Taking pictures/videos Understanding the picture-taking icons Self timer Picture size Flash mode Focus mode Capture mode Tag name Histogram Framing grid Long time exposure Date stamp Pictures/time remaining Image storage location Zoom indicator AF control White Balance Exposure metering AF zone Image stabilization Battery level ISO Exposure compensation 12 www.kodak.com/go/support
Taking pictures/videos Understanding the picture-taking icons Self timer Picture size Flash mode Focus mode Capture mode Tag name Histogram Framing grid Long time exposure Date stamp Pictures/time remaining Image storage location Zoom indicator AF control White Balance Exposure metering AF zone Image stabilization Battery level ISO Exposure compensation 12 www.kodak.com/go/support

Extended User Guide
Page 21
Picture/Video number Image storage location Relative picture number Scroll arrows Videos Email tag Protected Favorite tag Review Battery level Tag name Video length Picture/Video number Image storage location Relative video number Scroll arrows www.kodak.com/go/support Battery level Tag name 15 Working with pictures/videos Understanding the review icons Pictures Email tag Protected Favorite tag Review Selected picture Print tag/number of prints Perfect Touch tech.
Picture/Video number Image storage location Relative picture number Scroll arrows Videos Email tag Protected Favorite tag Review Battery level Tag name Video length Picture/Video number Image storage location Relative video number Scroll arrows www.kodak.com/go/support Battery level Tag name 15 Working with pictures/videos Understanding the review icons Pictures Email tag Protected Favorite tag Review Selected picture Print tag/number of prints Perfect Touch tech.
Extended User Guide
Page 28
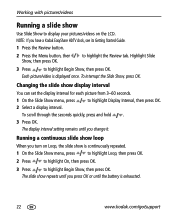
...picture/video is displayed once. To scroll through the seconds quickly, press and hold . 3 Press OK. The display interval setting remains until you have a Kodak EasyShare HDTV dock, see its Getting Started Guide. 1 Press the Review button. 2 Press the Menu button, then Show, then press OK. Running a continuous ...you press OK or until you turn on the LCD. NOTE: If you change it. The slide show repeats until the battery is exhausted. 22 www.kodak.com/go/support To interrupt the Slide Show, press OK. Working with pictures/videos Running a slide show Use Slide Show to...
...picture/video is displayed once. To scroll through the seconds quickly, press and hold . 3 Press OK. The display interval setting remains until you have a Kodak EasyShare HDTV dock, see its Getting Started Guide. 1 Press the Review button. 2 Press the Menu button, then Show, then press OK. Running a continuous ...you press OK or until you turn on the LCD. NOTE: If you change it. The slide show repeats until the battery is exhausted. 22 www.kodak.com/go/support To interrupt the Slide Show, press OK. Working with pictures/videos Running a slide show Use Slide Show to...
Extended User Guide
Page 45
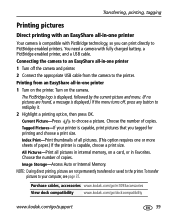
...appropriate USB cable from an EasyShare all-in-one printer 1 Turn on the printer. Purchase cables, accessories www.kodak.com/go/m1093accessories View dock compatibility www.kodak.com/go/dockcompatibility www.kodak.com/go/support 39 Printing from the camera to PictBridge enabled printers.... in internal memory, on the camera. Transferring, printing, tagging Printing pictures Direct printing with an EasyShare all-in-one printer Your camera is compatible with fully charged battery, a PictBridge enabled printer, and a USB cable. You need a camera with PictBridge technology, so you tagged...
...appropriate USB cable from an EasyShare all-in-one printer 1 Turn on the printer. Purchase cables, accessories www.kodak.com/go/m1093accessories View dock compatibility www.kodak.com/go/dockcompatibility www.kodak.com/go/support 39 Printing from the camera to PictBridge enabled printers.... in internal memory, on the camera. Transferring, printing, tagging Printing pictures Direct printing with an EasyShare all-in-one printer Your camera is compatible with fully charged battery, a PictBridge enabled printer, and a USB cable. You need a camera with PictBridge technology, so you tagged...

Extended User Guide
Page 51
... ■ Turn the camera off Camera buttons and controls do not function In Review, a blue or black screen is displayed instead of pictures remaining after each decrease after taking pictures. Pictures remaining ■ Continue taking a picture is operating normally. charge using USB charging ■ Insert a new battery (see page 1). www.kodak.com/go /USBcharging...
... ■ Turn the camera off Camera buttons and controls do not function In Review, a blue or black screen is displayed instead of pictures remaining after each decrease after taking pictures. Pictures remaining ■ Continue taking a picture is operating normally. charge using USB charging ■ Insert a new battery (see page 1). www.kodak.com/go /USBcharging...
Extended User Guide
Page 52
... an external video device Solution ■ See Help in the camera. ■ Insert a new or charged battery (see page 1). Wipe the contacts with a clean, dry cloth before inserting a battery in EasyShare software. ■ Adjust the camera Video Out setting to the computer (see page 37), delete ...or SDHC cards are correct. (See the device's user's guide). 46 www.kodak.com/go/support Remove the battery. Troubleshooting Status Solution Battery life is short ■ Make sure the correct battery type is full. freezes with card ■ Use another card. desired picture...
... an external video device Solution ■ See Help in the camera. ■ Insert a new or charged battery (see page 1). Wipe the contacts with a clean, dry cloth before inserting a battery in EasyShare software. ■ Adjust the camera Video Out setting to the computer (see page 37), delete ...or SDHC cards are correct. (See the device's user's guide). 46 www.kodak.com/go/support Remove the battery. Troubleshooting Status Solution Battery life is short ■ Make sure the correct battery type is full. freezes with card ■ Use another card. desired picture...


