
User's Guide
Page 4
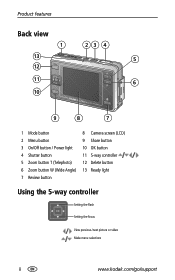
Product features Back view 1 23 4 13 5 12 11 6 10 9 8 7 1 Mode button 2 Menu button 3 On/Off button / Power light 4 Shutter button 5 Zoom button T (Telephoto) 6 Zoom button W (Wide Angle) 7 Review button 8 Camera screen (LCD) 9 Share button 10 OK button 11 5-way controller 12 Delete button 13 Ready light Using the 5-way controller Setting the flash Setting the focus View previous./next picture or video Make menu selections ii www.kodak.com/go/support
Product features Back view 1 23 4 13 5 12 11 6 10 9 8 7 1 Mode button 2 Menu button 3 On/Off button / Power light 4 Shutter button 5 Zoom button T (Telephoto) 6 Zoom button W (Wide Angle) 7 Review button 8 Camera screen (LCD) 9 Share button 10 OK button 11 5-way controller 12 Delete button 13 Ready light Using the 5-way controller Setting the flash Setting the focus View previous./next picture or video Make menu selections ii www.kodak.com/go/support
User's Guide
Page 5
... videos 9 Taking a picture 9 Taking a video 9 Camera modes 10 Focus setting 12 Using the AF frame 13 Reviewing pictures and videos just taken (Quickview 14 Using optical zoom 15 Using digital zoom 15 Using the flash 16 Manually setting the white balance ...Reviewing pictures and videos 32 Review mode and Favorites mode 32 Viewing single pictures and videos 32 Viewing multiple pictures and videos 33 Playing a video 33 Editing videos 34 Deleting pictures and videos 34 Magnifying pictures 35 Changing review settings 35 Protecting pictures and videos from deletion 36 www.kodak...
... videos 9 Taking a picture 9 Taking a video 9 Camera modes 10 Focus setting 12 Using the AF frame 13 Reviewing pictures and videos just taken (Quickview 14 Using optical zoom 15 Using digital zoom 15 Using the flash 16 Manually setting the white balance ...Reviewing pictures and videos 32 Review mode and Favorites mode 32 Viewing single pictures and videos 32 Viewing multiple pictures and videos 33 Playing a video 33 Editing videos 34 Deleting pictures and videos 34 Magnifying pictures 35 Changing review settings 35 Protecting pictures and videos from deletion 36 www.kodak...
User's Guide
Page 12
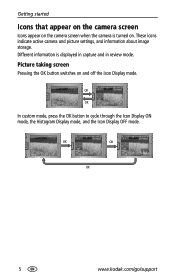
Different information is turned on and off the Icon Display mode. OK OK In custom mode, press the OK button to cycle through the Icon Display ON mode, the Histogram Display mode, and the Icon Display OFF mode. These icons indicate active camera and picture settings, and information about image storage. OK OK OK 5 www.kodak.com/go/support Picture taking screen Pressing the OK button switches on . Getting started Icons that appear on the camera screen Icons appear on the camera screen when the camera is displayed in capture and in review mode.
Different information is turned on and off the Icon Display mode. OK OK In custom mode, press the OK button to cycle through the Icon Display ON mode, the Histogram Display mode, and the Icon Display OFF mode. These icons indicate active camera and picture settings, and information about image storage. OK OK OK 5 www.kodak.com/go/support Picture taking screen Pressing the OK button switches on . Getting started Icons that appear on the camera screen Icons appear on the camera screen when the camera is displayed in capture and in review mode.

User's Guide
Page 13
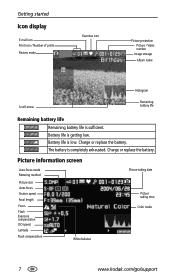
...is in the middle area of the graph. OK OK OK www.kodak.com/go/support 6 Icon display The active camera settings are displayed. Optimal exposure is achieved when the peak is too dark. Review screen Pressing the OK button cycles through the Icon Display ON mode, ...it is to the right, the subject is a graph that shows the distribution of pictures remaining / Time remaining Image storage Album name Zoom indicator White balance Latitude ISO sensitivity Exposure compensation Histogram Remaining battery life Flash compensation NOTE: A histogram is too bright. Self Timer / ...
...is in the middle area of the graph. OK OK OK www.kodak.com/go/support 6 Icon display The active camera settings are displayed. Optimal exposure is achieved when the peak is too dark. Review screen Pressing the OK button cycles through the Icon Display ON mode, ...it is to the right, the subject is a graph that shows the distribution of pictures remaining / Time remaining Image storage Album name Zoom indicator White balance Latitude ISO sensitivity Exposure compensation Histogram Remaining battery life Flash compensation NOTE: A histogram is too bright. Self Timer / ...
User's Guide
Page 14
... length Focus Flash Exposure compensation ISO speed Latitude Flash compensation White balance Picture taking date Picture taking time Color mode 7 www.kodak.com/go/support Charge or replace the battery. Battery life is getting low. Battery life is low. The battery is sufficient.... Getting started Icon display E-mail icon Print icon / Number of prints Review mode Favorites icon Picture protection Picture / Video number Image storage Album name Histogram Scroll arrow Remaining battery life Remaining battery life Remaining ...
... length Focus Flash Exposure compensation ISO speed Latitude Flash compensation White balance Picture taking date Picture taking time Color mode 7 www.kodak.com/go/support Charge or replace the battery. Battery life is getting low. Battery life is low. The battery is sufficient.... Getting started Icon display E-mail icon Print icon / Number of prints Review mode Favorites icon Picture protection Picture / Video number Image storage Album name Histogram Scroll arrow Remaining battery life Remaining battery life Remaining ...
User's Guide
Page 21
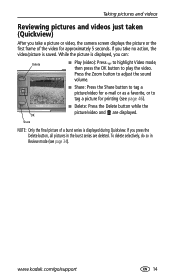
...to highlight Video mode, then press the OK button to tag a picture for approximately 5 seconds. Press the Zoom button to adjust the sound volume. ■ Share: Press the Share button to tag a picture/video ...for e-mail or as a favorite, or to play the video. www.kodak.com/go/support 14 Share NOTE: Only the final picture of the video for printing (see page...you take a picture or video, the camera screen displays the picture or the first frame of a burst series is saved. Taking pictures and videos Reviewing pictures and videos just taken (Quickview) After...
...to highlight Video mode, then press the OK button to tag a picture for approximately 5 seconds. Press the Zoom button to adjust the sound volume. ■ Share: Press the Share button to tag a picture/video ...for e-mail or as a favorite, or to play the video. www.kodak.com/go/support 14 Share NOTE: Only the final picture of the video for printing (see page...you take a picture or video, the camera screen displays the picture or the first frame of a burst series is saved. Taking pictures and videos Reviewing pictures and videos just taken (Quickview) After...
User's Guide
Page 39
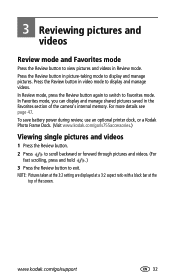
... are displayed at a 3:2 aspect ratio with a black bar at the top of the camera's internal memory. 3 Reviewing pictures and videos Review mode and Favorites mode Press the Review button to view pictures and videos in picture-taking mode to display and manage pictures. www.kodak.com/go /ls755accessories.) Viewing single pictures and videos 1 Press the...
... are displayed at a 3:2 aspect ratio with a black bar at the top of the camera's internal memory. 3 Reviewing pictures and videos Review mode and Favorites mode Press the Review button to view pictures and videos in picture-taking mode to display and manage pictures. www.kodak.com/go /ls755accessories.) Viewing single pictures and videos 1 Press the...
User's Guide
Page 40
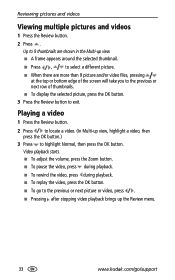
...up view, highlight a video, then press the OK button.) 3 Press to highlight Normal, then press the OK button. Reviewing pictures and videos Viewing multiple pictures and videos 1 Press the Review button. 2 Press . Up to 9 thumbnails are more than 9 picture and/or video files, pressing at the top ... or next picture or video, press . ■ Pressing after stopping video playback brings up the Review menu. 33 www.kodak.com/go/support Video playback starts. ■ To adjust the volume, press the Zoom button. ■ To pause the video, press during playback. ■ To rewind the video,...
...up view, highlight a video, then press the OK button.) 3 Press to highlight Normal, then press the OK button. Reviewing pictures and videos Viewing multiple pictures and videos 1 Press the Review button. 2 Press . Up to 9 thumbnails are more than 9 picture and/or video files, pressing at the top ... or next picture or video, press . ■ Pressing after stopping video playback brings up the Review menu. 33 www.kodak.com/go/support Video playback starts. ■ To adjust the volume, press the Zoom button. ■ To pause the video, press during playback. ■ To rewind the video,...
User's Guide
Page 41
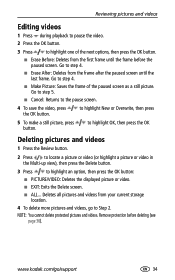
to Step 2. www.kodak.com/go to highlight New or Overwrite, then press 5 To make a still...more pictures and videos, go /support 34 to highlight OK, then press the OK Deleting pictures and videos 1 Press the Review button. 2 Press to locate a picture or video (or highlight a picture or video in the Multi-up view), ...button: ■ PICTURE/VIDEO: Deletes the displayed picture or video. ■ EXIT: Exits the Delete screen. ■ ALL... Reviewing pictures and videos Editing videos 1 Press during playback to pause the video. 2 Press the OK button. 3 Press to step 4....
to Step 2. www.kodak.com/go to highlight New or Overwrite, then press 5 To make a still...more pictures and videos, go /support 34 to highlight OK, then press the OK Deleting pictures and videos 1 Press the Review button. 2 Press to locate a picture or video (or highlight a picture or video in the Multi-up view), ...button: ■ PICTURE/VIDEO: Deletes the displayed picture or video. ■ EXIT: Exits the Delete screen. ■ ALL... Reviewing pictures and videos Editing videos 1 Press during playback to pause the video. 2 Press the OK button. 3 Press to step 4....
User's Guide
Page 42
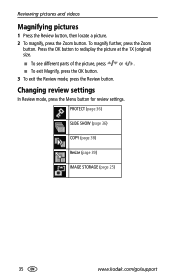
... 36) COPY (page 38) Resize (page 39) IMAGE STORAGE (page 25) 35 www.kodak.com/go/support Changing review settings In Review mode, press the Menu button for review settings. To magnify further, press the Zoom button. Press the OK button to redisplay the picture at the 1X (original) size. &#...9632; To see different parts of the picture, press or . ■ To exit Magnify, press the OK button. 3 To exit the Review mode, press the Review button. Reviewing pictures and videos ...
... 36) COPY (page 38) Resize (page 39) IMAGE STORAGE (page 25) 35 www.kodak.com/go/support Changing review settings In Review mode, press the Menu button for review settings. To magnify further, press the Zoom button. Press the OK button to redisplay the picture at the 1X (original) size. &#...9632; To see different parts of the picture, press or . ■ To exit Magnify, press the OK button. 3 To exit the Review mode, press the Review button. Reviewing pictures and videos ...
User's Guide
Page 43
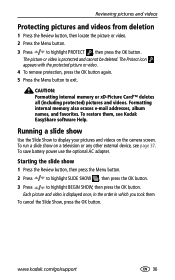
... videos Protecting pictures and videos from deletion 1 Press the Review button, then locate the picture or video. 2 Press the Menu button. 3 Press to display your pictures and videos on a television or any other external device, see Kodak EasyShare software Help. CAUTION: Formatting internal memory or xD-Picture ... BEGIN SHOW, then press the OK button. To save battery power use the optional AC adapter. To run a slide show 1 Press the Review button, then press the Menu button. 2 Press to highlight SLIDE SHOW , then press the OK button. 3 Press to exit. The picture...
... videos Protecting pictures and videos from deletion 1 Press the Review button, then locate the picture or video. 2 Press the Menu button. 3 Press to display your pictures and videos on a television or any other external device, see Kodak EasyShare software Help. CAUTION: Formatting internal memory or xD-Picture ... BEGIN SHOW, then press the OK button. To save battery power use the optional AC adapter. To run a slide show 1 Press the Review button, then press the Menu button. 2 Press to highlight SLIDE SHOW , then press the OK button. 3 Press to exit. The picture...
User's Guide
Page 44
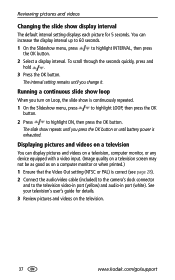
... videos Changing the slide show display interval The default interval setting displays each picture for details. 3 Review pictures and videos on the television. 37 www.kodak.com/go/support The interval setting remains until you press the OK button or until you change it. See your television...1 Ensure that the Video Out setting (NTSC or PAL) is correct (see page 28). 2 Connect the audio/video cable (included) to the camera's dock connector and to highlight INTERVAL, then press 2 Select a display interval. You can display pictures and videos on a television, computer monitor, ...
... videos Changing the slide show display interval The default interval setting displays each picture for details. 3 Review pictures and videos on the television. 37 www.kodak.com/go/support The interval setting remains until you press the OK button or until you change it. See your television...1 Ensure that the Video Out setting (NTSC or PAL) is correct (see page 28). 2 Connect the audio/video cable (included) to the camera's dock connector and to highlight INTERVAL, then press 2 Select a display interval. You can display pictures and videos on a television, computer monitor, ...
User's Guide
Page 45
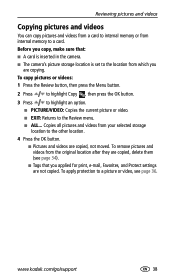
... ■ ALL... Copies all pictures and videos from which you applied for print, e-mail, Favorites, and Protect settings are not copied. www.kodak.com/go/support 38 Before you copy, make sure that you are copying. To apply protection to a picture or video, see page 34). ...; The camera's picture storage location is set to the location from your selected storage location to the other location. 4 Press the OK button. ■ Pictures and videos are copied, not moved. To remove pictures and videos from internal memory to a card. Reviewing pictures and videos Copying pictures and ...
... ■ ALL... Copies all pictures and videos from which you applied for print, e-mail, Favorites, and Protect settings are not copied. www.kodak.com/go/support 38 Before you copy, make sure that you are copying. To apply protection to a picture or video, see page 34). ...; The camera's picture storage location is set to the location from your selected storage location to the other location. 4 Press the OK button. ■ Pictures and videos are copied, not moved. To remove pictures and videos from internal memory to a card. Reviewing pictures and videos Copying pictures and ...
User's Guide
Page 46
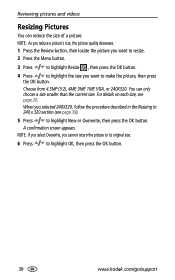
... 3MP, 1MP, VGA, or 240X320. For details on each size, see page 39). 5 Press to highlight OK, then press the OK button. 39 www.kodak.com/go/support NOTE: If you select Overwrite, you want to resize. 2 Press the Menu button. 3 Press to highlight Resize , then press the OK ...picture to its original size. 6 Press to highlight New or Overwrite, then press the OK button. You can reduce the size of a picture. Reviewing pictures and videos Resizing Pictures You can only choose a size smaller than the current size. When you selected 240X320, follow the procedure described in ...
... 3MP, 1MP, VGA, or 240X320. For details on each size, see page 39). 5 Press to highlight OK, then press the OK button. 39 www.kodak.com/go/support NOTE: If you select Overwrite, you want to resize. 2 Press the Menu button. 3 Press to highlight Resize , then press the OK ...picture to its original size. 6 Press to highlight New or Overwrite, then press the OK button. You can reduce the size of a picture. Reviewing pictures and videos Resizing Pictures You can only choose a size smaller than the current size. When you selected 240X320, follow the procedure described in ...
User's Guide
Page 47
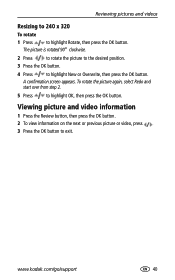
... information on the next or previous picture or video, press . 3 Press the OK button to highlight Rotate, then press the OK button. www.kodak.com/go/support 40 Reviewing pictures and videos Resizing to 240 x 320 To rotate 1 Press to exit. The picture is rotated 90° clockwise. 2 Press to rotate the...
... information on the next or previous picture or video, press . 3 Press the OK button to highlight Rotate, then press the OK button. www.kodak.com/go/support 40 Reviewing pictures and videos Resizing to 240 x 320 To rotate 1 Press to exit. The picture is rotated 90° clockwise. 2 Press to rotate the...

User's Guide
Page 55
... cropped slightly to your computer 1 If it's not already installed, install Kodak EasyShare software (V 4.0 or later) on your camera 1 Press the Review button to enter the Review mode, then press the Review button again. 2 Press to scroll through your computer. (See page 43.) 2 Connect the camera to the computer. Tag pictures as 1 Press the Share button. Optional...
... cropped slightly to your computer 1 If it's not already installed, install Kodak EasyShare software (V 4.0 or later) on your camera 1 Press the Review button to enter the Review mode, then press the Review button again. 2 Press to scroll through your computer. (See page 43.) 2 Connect the camera to the computer. Tag pictures as 1 Press the Share button. Optional...

User's Guide
Page 56
... button. 2 Highlight PRINT or E-MAIL , then press the OK button. EasyShare software removes the favorites on your computer Use Kodak EasyShare software (V 4.0 or later) to a 4 x 6 inch (10 x 15 cm) print. First-on your camera 1 In Favorites mode, press the Menu button. 2 Highlight REMOVE FAVORITES ,...can tag album names of the camera's internal memory. 4 Connect the camera to the camera's internal memory. Preventing favorites from your camera. Printing and emailing favorites You can be copied to the computer using the album function in Review mode. Up to exit the menu...
... button. 2 Highlight PRINT or E-MAIL , then press the OK button. EasyShare software removes the favorites on your computer Use Kodak EasyShare software (V 4.0 or later) to a 4 x 6 inch (10 x 15 cm) print. First-on your camera 1 In Favorites mode, press the Menu button. 2 Highlight REMOVE FAVORITES ,...can tag album names of the camera's internal memory. 4 Connect the camera to the camera's internal memory. Preventing favorites from your camera. Printing and emailing favorites You can be copied to the computer using the album function in Review mode. Up to exit the menu...

User's Guide
Page 62
...open, you cannot turn on the Kodak EasyShare software CD. The camera screen Turn the camera off , then on again. displayed instead of the following The camera does not turn on The camera does not turn off and the lens does not retract Camera buttons do not function ■ ... of a picture The pictures remaining number does not decrease after transfer. Camera problems If... For updates to the computer (page 51). 8 Troubleshooting Additional technical information is available in the ReadMe file located on In Review, a blue or Transfer the picture or all the way. ■...
...open, you cannot turn on the Kodak EasyShare software CD. The camera screen Turn the camera off , then on again. displayed instead of the following The camera does not turn on The camera does not turn off and the lens does not retract Camera buttons do not function ■ ... of a picture The pictures remaining number does not decrease after transfer. Camera problems If... For updates to the computer (page 51). 8 Troubleshooting Additional technical information is available in the ReadMe file located on In Review, a blue or Transfer the picture or all the way. ■...
User's Guide
Page 70
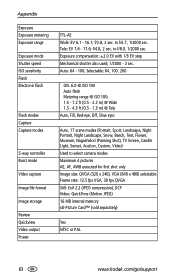
..., Auction, Custom, Video) Used to f/8.0, 1/2000 sec. f/4.8, 2 sec. Auto: 64 - 100; to select camera modes Maximum 4 pictures AE, AF, AWB executed for first shot only Image size: QVGA (320 x 240), VGA ...memory xD-Picture Card™ (sold separately) Yes NTSC or PAL 63 www.kodak.com/go/support Appendix Exposure Exposure metering Exposure range Exposure mode Shutter speed ISO sensitivity... flash Flash modes Capture Capture modes 5-way controller Burst mode Video capture Image file format Image storage Review Quickview Video output Power TTL-AE Wide: EV 6.1 - 16.1; f/2.8, 2 sec. Tele: EV...
..., Auction, Custom, Video) Used to f/8.0, 1/2000 sec. f/4.8, 2 sec. Auto: 64 - 100; to select camera modes Maximum 4 pictures AE, AF, AWB executed for first shot only Image size: QVGA (320 x 240), VGA ...memory xD-Picture Card™ (sold separately) Yes NTSC or PAL 63 www.kodak.com/go/support Appendix Exposure Exposure metering Exposure range Exposure mode Shutter speed ISO sensitivity... flash Flash modes Capture Capture modes 5-way controller Burst mode Video capture Image file format Image storage Review Quickview Video output Power TTL-AE Wide: EV 6.1 - 16.1; f/2.8, 2 sec. Tele: EV...
User's Guide
Page 76
...beach mode, 11 black & white pictures, 22 burst mode, 20 button location on camera, ii review, ii, 32 share, 45 zoom, 15 69 1 C cable audio/video, 1, 37 USB, 1, 51 camera screen reviewing pictures, 32 reviewing videos, 32 specifications, 62 Canadian compliance, 67 candle light mode, 12 capture specifications...card to memory, 38 memory to card, 38 cover, lens, i customer support, 61 customizing camera settings, 26-28 D date stamp, 28 date, setting, 4 deleting pictures/videos, 34 protecting pictures, videos, 36 digital zoom, 15 disposal, recycling, 65 dock connector, i, 3 www.kodak.com/go/support
...beach mode, 11 black & white pictures, 22 burst mode, 20 button location on camera, ii review, ii, 32 share, 45 zoom, 15 69 1 C cable audio/video, 1, 37 USB, 1, 51 camera screen reviewing pictures, 32 reviewing videos, 32 specifications, 62 Canadian compliance, 67 candle light mode, 12 capture specifications...card to memory, 38 memory to card, 38 cover, lens, i customer support, 61 customizing camera settings, 26-28 D date stamp, 28 date, setting, 4 deleting pictures/videos, 34 protecting pictures, videos, 36 digital zoom, 15 disposal, recycling, 65 dock connector, i, 3 www.kodak.com/go/support


