
User Manual
Page 3
Table of Contents 1 Getting Started 1 Attaching the Neck Strap 2 Using the Lens Cap 2 Loading the Battery 3 Charging the Battery 4 Inserting a Picture Card 5 Removing a Picture Card 6 Turning the Camera On and Off 6 Checking the Battery 7 Setting the Clock 8 Adjusting the Viewfinder 9 Camera Menus Overview 10 Manual Picture Taking Menu 10 Review Pictures Menu 11 Camera Setup Menu 12 2 Taking Pictures 13 Choosing a Capture Mode 14 Taking a Picture 15 Shooting in Fully Automatic Mode 16 i
Table of Contents 1 Getting Started 1 Attaching the Neck Strap 2 Using the Lens Cap 2 Loading the Battery 3 Charging the Battery 4 Inserting a Picture Card 5 Removing a Picture Card 6 Turning the Camera On and Off 6 Checking the Battery 7 Setting the Clock 8 Adjusting the Viewfinder 9 Camera Menus Overview 10 Manual Picture Taking Menu 10 Review Pictures Menu 11 Camera Setup Menu 12 2 Taking Pictures 13 Choosing a Capture Mode 14 Taking a Picture 15 Shooting in Fully Automatic Mode 16 i
User Manual
Page 5
Setting Picture Sharpness 38 Adjusting the ISO Sensitivity 39 Setting the Shutter Speed 40 Placing the Date on Pictures 40 4 Reviewing Your Pictures 41 Viewing Pictures 42 Magnifying Pictures 43 Deleting Pictures 44 Protecting Pictures 45 Running a Slide Show 46 Selecting Pictures for Automatic Printing 47 Viewing Picture Information 49 5 Personalizing Your Camera 51 Selecting a Power Save Setting 52 Setting Digital Zoom Behavior 54 Adjusting the Camera Sounds 56 Setting Video Out 57 Selecting a Language 58 Formatting a Picture Card 59 iii
Setting Picture Sharpness 38 Adjusting the ISO Sensitivity 39 Setting the Shutter Speed 40 Placing the Date on Pictures 40 4 Reviewing Your Pictures 41 Viewing Pictures 42 Magnifying Pictures 43 Deleting Pictures 44 Protecting Pictures 45 Running a Slide Show 46 Selecting Pictures for Automatic Printing 47 Viewing Picture Information 49 5 Personalizing Your Camera 51 Selecting a Power Save Setting 52 Setting Digital Zoom Behavior 54 Adjusting the Camera Sounds 56 Setting Video Out 57 Selecting a Language 58 Formatting a Picture Card 59 iii
User Manual
Page 18
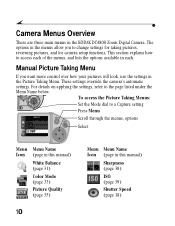
...section explains how to change settings for taking pictures, reviewing pictures, and for camera setup functions. Camera Menus Overview There are three main menus in each of the menus, and lists the options available in the KODAK DC4800 Zoom Digital Camera. The options in the Picture Taking Menu. These... settings override the camera's automatic settings. Manual Picture Taking Menu If you want more control over how your...
...section explains how to change settings for taking pictures, reviewing pictures, and for camera setup functions. Camera Menus Overview There are three main menus in each of the menus, and lists the options available in the KODAK DC4800 Zoom Digital Camera. The options in the Picture Taking Menu. These... settings override the camera's automatic settings. Manual Picture Taking Menu If you want more control over how your...

User Manual
Page 19
...on applying the options, refer to the page listed under the Menu Name below. 85 6 28 P SE TUP To access the Review Menus: REVIE W Turn the Mode Dial to Review Press Menu Scroll through the pictures, menus, option Select Menu Icon Menu Name (page in this manual) Magnify (page 43) Delete... (page 44) Protect (page 45) Menu Icon Menu Name (page in your camera. For details on the Picture Card in this manual) Slide...
...on applying the options, refer to the page listed under the Menu Name below. 85 6 28 P SE TUP To access the Review Menus: REVIE W Turn the Mode Dial to Review Press Menu Scroll through the pictures, menus, option Select Menu Icon Menu Name (page in this manual) Magnify (page 43) Delete... (page 44) Protect (page 45) Menu Icon Menu Name (page in your camera. For details on the Picture Card in this manual) Slide...

User Manual
Page 20
... applying the options, refer to Setup Scroll through the menus, options Select Menu Icon Menu Name (page in this manual) Power Save (page 52) Digital Zoom (page 54) Camera Sounds (page 56) Date and Time (page 8) Video Out (page 57) 12 Menu Icon Menu Name (page in the Setup Menu to customize... your camera according to your personal preferences. To access the Setup Menus: SE TUP Turn the Mode Dial to the page listed under the Menu Name below. ...
... applying the options, refer to Setup Scroll through the menus, options Select Menu Icon Menu Name (page in this manual) Power Save (page 52) Digital Zoom (page 54) Camera Sounds (page 56) Date and Time (page 8) Video Out (page 57) 12 Menu Icon Menu Name (page in the Setup Menu to customize... your camera according to your personal preferences. To access the Setup Menus: SE TUP Turn the Mode Dial to the page listed under the Menu Name below. ...

User Manual
Page 49
Viewing Pictures page 42 Magnifying Pictures 43 Deleting Pictures 44 Protecting Pictures 45 Running a Slide Show 46 4 Selecting Pictures for Automatic Printing 47 Viewing Picture Information 49 41 4 Reviewing Your Pictures Use the Review setting on the Mode Dial to review and work with the pictures that are stored on the Picture Card in your camera.
Viewing Pictures page 42 Magnifying Pictures 43 Deleting Pictures 44 Protecting Pictures 45 Running a Slide Show 46 4 Selecting Pictures for Automatic Printing 47 Viewing Picture Information 49 41 4 Reviewing Your Pictures Use the Review setting on the Mode Dial to review and work with the pictures that are stored on the Picture Card in your camera.

User Manual
Page 50
... the pictures: forwards; The dark section of the memory bar represents the part of the card that is refreshed with friends, or for verifying your camera in full LCD size, or you release the / button, the LCD is full while the needle locator shows the position of the picture on the... card. 5 To exit the filmstrip, press Menu. 42 SE TUP The last picture taken is ideal for sharing pictures on the camera with the new current picture. Filmstrip Memory bar Needle locator 4 Use the / buttons to scroll through the memory bar, press OK while holding a / button. When...
... the pictures: forwards; The dark section of the memory bar represents the part of the card that is refreshed with friends, or for verifying your camera in full LCD size, or you release the / button, the LCD is full while the needle locator shows the position of the picture on the... card. 5 To exit the filmstrip, press Menu. 42 SE TUP The last picture taken is ideal for sharing pictures on the camera with the new current picture. Filmstrip Memory bar Needle locator 4 Use the / buttons to scroll through the memory bar, press OK while holding a / button. When...

User Manual
Page 51
... TUP 2 Press Menu to different parts of a picture. The magnified picture, with magnification level, appears on your pictures. 85 6 28 P 1 Turn the Mode Dial to Review. Magnifying Pictures Use the Magnify feature to zoom in on specific parts of the picture. 7 To exit Picture Magnify, press the OK button. 43 With...
... TUP 2 Press Menu to different parts of a picture. The magnified picture, with magnification level, appears on your pictures. 85 6 28 P 1 Turn the Mode Dial to Review. Magnifying Pictures Use the Magnify feature to zoom in on specific parts of the picture. 7 To exit Picture Magnify, press the OK button. 43 With...

User Manual
Page 52
... are affected. A filmstrip appears at the bottom of the pictures on the Picture Card. 85 REVIE W 44 6 28 P SE TUP 1 Turn the Mode Dial to Review. 2 Press Menu to display the Menu screen. 3 Press a / button until the picture you want to delete is highlighted. 4 Press a / button until the option you want...
... are affected. A filmstrip appears at the bottom of the pictures on the Picture Card. 85 REVIE W 44 6 28 P SE TUP 1 Turn the Mode Dial to Review. 2 Press Menu to display the Menu screen. 3 Press a / button until the picture you want to delete is highlighted. 4 Press a / button until the option you want...

User Manual
Page 53
SE TUP 2 Press Menu to protect the picture. The Protect icon appears in the LCD with the protected picture. 4 6 To remove picture protection, press OK again. 45 REVIE W 3 Press a / button until the picture you want to Protect is highlighted. 4 Press a / button until the icon is highlighted. 5 Press OK to display the Menu screen. Protecting Pictures Use the Protect feature to prevent specific pictures from being accidentally deleted from the Picture Card. 85 6 28 P 1 Turn the Mode Dial to Review.
SE TUP 2 Press Menu to protect the picture. The Protect icon appears in the LCD with the protected picture. 4 6 To remove picture protection, press OK again. 45 REVIE W 3 Press a / button until the picture you want to Protect is highlighted. 4 Press a / button until the icon is highlighted. 5 Press OK to display the Menu screen. Protecting Pictures Use the Protect feature to prevent specific pictures from being accidentally deleted from the Picture Card. 85 6 28 P 1 Turn the Mode Dial to Review.

User Manual
Page 54
... an external mvideo device, plug the video cable in: Plug the appropriate end of the video cable (included with your camera) into the video-in setup. 1 Turn the Mode Dial to Review. 2 Press Menu to display the Menu screen. 3 Press a / button until the icon is highlighted. 4 Press OK to ... the LCD (5-99 seconds). 6 Press OK to start the slide show feature to automatically display your external device (television, VCR, computer m monitor, digital projector). NOTE: The Slide Show feature is not available when using battery power, with a video input, such as a television, computer monitor, or...
... an external mvideo device, plug the video cable in: Plug the appropriate end of the video cable (included with your camera) into the video-in setup. 1 Turn the Mode Dial to Review. 2 Press Menu to display the Menu screen. 3 Press a / button until the icon is highlighted. 4 Press OK to ... the LCD (5-99 seconds). 6 Press OK to start the slide show feature to automatically display your external device (television, VCR, computer m monitor, digital projector). NOTE: The Slide Show feature is not available when using battery power, with a video input, such as a television, computer monitor, or...

User Manual
Page 55
..., only the images you want to print is highlighted. 4 Press a / button until the option you marked are printed. 85 6 28 P 1 Turn the Mode Dial to Review. INDEX PRINT-orders a contact sheet containing multiple thumb-nail m pictures on a sheet of paper. REVIE W 3 Press a / button until the picture you want is highlighted. 4 icon... the Print Order feature to select specific pictures and print quantities to be printed automatically to display the Menu screen. SE TUP 2 Press Menu to a KODAK Personal Picture Maker, or other directprint-enabled printers.
..., only the images you want to print is highlighted. 4 Press a / button until the option you marked are printed. 85 6 28 P 1 Turn the Mode Dial to Review. INDEX PRINT-orders a contact sheet containing multiple thumb-nail m pictures on a sheet of paper. REVIE W 3 Press a / button until the picture you want is highlighted. 4 icon... the Print Order feature to select specific pictures and print quantities to be printed automatically to display the Menu screen. SE TUP 2 Press Menu to a KODAK Personal Picture Maker, or other directprint-enabled printers.

User Manual
Page 57
... 6 28 P 1 Turn the Mode Dial to scroll up and down through the picture information. 6 To exit Picture Info, press OK. 49 Use the / buttons to Review. The picture information is view-only and is highlighted. 4 5 Press OK to display the Menu screen. Viewing Picture Information The Picture Information feature displays specific... LCD. REVIE W 3 Press a / button until the picture for which you want to view information is highlighted. 4 Press a / button until the icon is displayed in your camera. SE TUP 2 Press Menu to display the Picture Info screen.
... 6 28 P 1 Turn the Mode Dial to scroll up and down through the picture information. 6 To exit Picture Info, press OK. 49 Use the / buttons to Review. The picture information is view-only and is highlighted. 4 5 Press OK to display the Menu screen. Viewing Picture Information The Picture Information feature displays specific... LCD. REVIE W 3 Press a / button until the picture for which you want to view information is highlighted. 4 Press a / button until the icon is displayed in your camera. SE TUP 2 Press Menu to display the Picture Info screen.

User Manual
Page 60
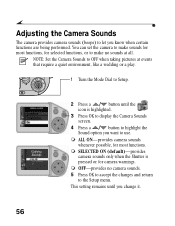
... feature is not available when the AC adapter is being used. Select from three Power Save settings to display the Power Save screen. 52 Camera Function POWER SAVE ON STANDARD POWER SAVE OFF Preview Frame Rate LCD Brightness Slide Show Loops Simultaneous LCD/Television display Automatic Quickview 15 fps Low... No No No 30 fps Normal Yes (5x) No Yes 30 fps High Yes (5x) Yes Yes 56 28 8 P REVIEW 1 Turn the Mode Dial to balance battery consumption with camera performance. Selecting a Power Save Setting The Power Save feature is designed to Setup.
... feature is not available when the AC adapter is being used. Select from three Power Save settings to display the Power Save screen. 52 Camera Function POWER SAVE ON STANDARD POWER SAVE OFF Preview Frame Rate LCD Brightness Slide Show Loops Simultaneous LCD/Television display Automatic Quickview 15 fps Low... No No No 30 fps Normal Yes (5x) No Yes 30 fps High Yes (5x) Yes Yes 56 28 8 P REVIEW 1 Turn the Mode Dial to balance battery consumption with camera performance. Selecting a Power Save Setting The Power Save feature is designed to Setup.

User Manual
Page 62
You can specify how the digital zoom feature behaves when you want to its farthest T Telephoto position. Setting Digital Zoom Behavior Digital zoom provides two times magnification beyond the optical zoom. See page 24 for how to use digital zoom. 56 28 P REVIEW 1 Turn the Mode Dial to Setup. 8 2 Press a / button until the SE TUP icon is highlighted. 3 Press OK to display the Digital Zoom screen. 4 Press a / button to highlight the Digital Zoom option you move the Zoom button to use. 54
You can specify how the digital zoom feature behaves when you want to its farthest T Telephoto position. Setting Digital Zoom Behavior Digital zoom provides two times magnification beyond the optical zoom. See page 24 for how to use digital zoom. 56 28 P REVIEW 1 Turn the Mode Dial to Setup. 8 2 Press a / button until the SE TUP icon is highlighted. 3 Press OK to display the Digital Zoom screen. 4 Press a / button to highlight the Digital Zoom option you move the Zoom button to use. 54
User Manual
Page 64
... to OFF when taking pictures at all. SELECTED ON (default)-provides camera sounds only when the Shutter is highlighted. 3 Press OK to display the Camera Sounds screen. 4 Press a / button to highlight the m Sound option you want to use. OFF-provides no sounds at events... are being performed. ALL ON-provides camera sounds m whenever possible, for camera warnings. You can set the camera to make no camera sounds. 5 Press OK to accept the changes and return to Setup. 56 28 8 P REVIEW Adjusting the Camera Sounds The camera provides camera sounds (beeps) to make sounds for...
... to OFF when taking pictures at all. SELECTED ON (default)-provides camera sounds only when the Shutter is highlighted. 3 Press OK to display the Camera Sounds screen. 4 Press a / button to highlight the m Sound option you want to use. OFF-provides no sounds at events... are being performed. ALL ON-provides camera sounds m whenever possible, for camera warnings. You can set the camera to make no camera sounds. 5 Press OK to accept the changes and return to Setup. 56 28 8 P REVIEW Adjusting the Camera Sounds The camera provides camera sounds (beeps) to make sounds for...

User Manual
Page 65
... . SE TUP 2 Press a / button until you to match the camera's video-out signal to Setup. This setting remains until the icon is the standard used in most countries except Europe. m NTSC (default)-standard used in most countries outside of Europe. 56 28 P REVIEW 8 1 Turn the Mode Dial to the standard applicable in...
... . SE TUP 2 Press a / button until you to match the camera's video-out signal to Setup. This setting remains until the icon is the standard used in most countries except Europe. m NTSC (default)-standard used in most countries outside of Europe. 56 28 P REVIEW 8 1 Turn the Mode Dial to the standard applicable in...

User Manual
Page 66
NOTE: In certain countries, the language menu is highlighted. 3 Press OK to display the Language screen. 4 Press a / button to highlight the Language you want to use. 5 Press OK to accept the changes and return to Setup. SE TUP 2 Press a / button until you change it. 58 56 28 8 P REVIEW Selecting a Language The Language feature allows you to display the menus and screen messages in the language installed at the factory. 1 Turn the Mode Dial to the Setup menu. These cameras must be operated only in different languages. This setting remains until the icon is not available.
NOTE: In certain countries, the language menu is highlighted. 3 Press OK to display the Language screen. 4 Press a / button to highlight the Language you want to use. 5 Press OK to accept the changes and return to Setup. SE TUP 2 Press a / button until you change it. 58 56 28 8 P REVIEW Selecting a Language The Language feature allows you to display the menus and screen messages in the language installed at the factory. 1 Turn the Mode Dial to the Setup menu. These cameras must be operated only in different languages. This setting remains until the icon is not available.
User Manual
Page 67
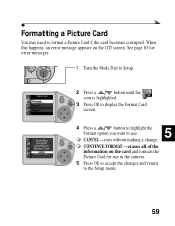
... this happens, an error message appears on the card and formats the Picture Card for error messages. 1 Turn the Mode Dial to use in the camera. 5 Press OK to accept the changes and return to format a Picture Card if the card becomes corrupted. 56 28...
... this happens, an error message appears on the card and formats the Picture Card for error messages. 1 Turn the Mode Dial to use in the camera. 5 Press OK to accept the changes and return to format a Picture Card if the card becomes corrupted. 56 28...
User Manual
Page 68
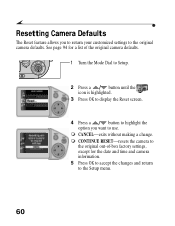
... the original out-of-box factory settings, except for a list of the original camera defaults. 1 Turn the Mode Dial to the original camera defaults. SE TUP 2 Press a / button until the icon is highlighted. 3 Press OK to display the Reset screen. 4 Press a / button to highlight the ...you to return your customized settings to Setup. m CANCEL-exits without making a change. See page 94 for the date and time and camera information. 5 Press OK to accept the changes and return to use. 56 28 8 P REVIEW Resetting Camera Defaults The Reset feature allows you want to the Setup menu. 60
... the original out-of-box factory settings, except for a list of the original camera defaults. 1 Turn the Mode Dial to the original camera defaults. SE TUP 2 Press a / button until the icon is highlighted. 3 Press OK to display the Reset screen. 4 Press a / button to highlight the ...you to return your customized settings to Setup. m CANCEL-exits without making a change. See page 94 for the date and time and camera information. 5 Press OK to accept the changes and return to use. 56 28 8 P REVIEW Resetting Camera Defaults The Reset feature allows you want to the Setup menu. 60


