
Extended user guide
Page 3
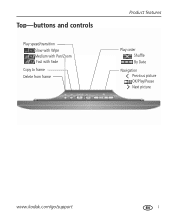
Top-buttons and controls Play speed/transition Slow with Wipe Medium with Pan/Zoom Fast with Fade Copy to frame Delete from frame Product features Play order Shuffle By Date Navigation Previous picture OK/Play/Pause Next picture www.kodak.com/go/support i
Top-buttons and controls Play speed/transition Slow with Wipe Medium with Pan/Zoom Fast with Fade Copy to frame Delete from frame Product features Play order Shuffle By Date Navigation Previous picture OK/Play/Pause Next picture www.kodak.com/go/support i

Extended user guide
Page 5
... faceplate 1 Attaching the power cable 2 Turning your frame on and off 3 Inserting a memory card 4 Connecting a USB device 4 Adding a new standard picture frame 5 2 Viewing and copying pictures 10 Viewing pictures from...frame 14 3 Troubleshooting and support 15 Learning more about your frame 15 Maintaining your frame 15 Upgrading your firmware 16 Picture frame problems 17 Identifying graphic messages 18 Identifying error messages 19 Setting automatic shut-off time 20 4 Appendix 21 Digital frame specifications 21 Important safety instructions 22 Limited warranty 23 www.kodak...
... faceplate 1 Attaching the power cable 2 Turning your frame on and off 3 Inserting a memory card 4 Connecting a USB device 4 Adding a new standard picture frame 5 2 Viewing and copying pictures 10 Viewing pictures from...frame 14 3 Troubleshooting and support 15 Learning more about your frame 15 Maintaining your frame 15 Upgrading your firmware 16 Picture frame problems 17 Identifying graphic messages 18 Identifying error messages 19 Setting automatic shut-off time 20 4 Appendix 21 Digital frame specifications 21 Important safety instructions 22 Limited warranty 23 www.kodak...

Extended user guide
Page 6
Viewing your KODAK EASYSHARE Digital Frame. Attaching the stand and faceplate Fit the stand into the slot and slide to a different slot. 3 2 1 1 www.kodak.com/go/support To adjust the display angle, move the stand to lock. 1 Getting started Welcome to your pictures couldn't be simpler!
Viewing your KODAK EASYSHARE Digital Frame. Attaching the stand and faceplate Fit the stand into the slot and slide to a different slot. 3 2 1 1 www.kodak.com/go/support To adjust the display angle, move the stand to lock. 1 Getting started Welcome to your pictures couldn't be simpler!
Extended user guide
Page 8
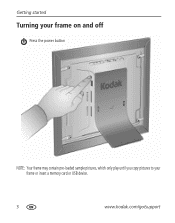
Getting started Turning your frame on and off Press the power button NOTE: Your frame may contain pre-loaded sample pictures, which only play until you copy pictures to your frame or insert a memory card or USB device. 3 www.kodak.com/go/support
Getting started Turning your frame on and off Press the power button NOTE: Your frame may contain pre-loaded sample pictures, which only play until you copy pictures to your frame or insert a memory card or USB device. 3 www.kodak.com/go/support
Extended user guide
Page 10
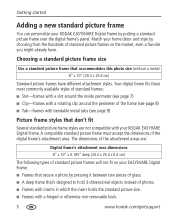
...25.4 cm) Standard picture frames have . Choosing a standard picture frame size Use a standard picture frame that 's designed to hold 3-dimensional objects instead of photos. ■ Frames with inserts in which the insert holds the standard picture size. ■ Frames with your KODAK EASYSHARE Digital Frame by pressing it between two... pieces of the attachment areas are not compatible with a hinged or otherwise non-removable back. 5 www.kodak.com/go/support Match your home ...
...25.4 cm) Standard picture frames have . Choosing a standard picture frame size Use a standard picture frame that 's designed to hold 3-dimensional objects instead of photos. ■ Frames with inserts in which the insert holds the standard picture size. ■ Frames with your KODAK EASYSHARE Digital Frame by pressing it between two... pieces of the attachment areas are not compatible with a hinged or otherwise non-removable back. 5 www.kodak.com/go/support Match your home ...
Extended user guide
Page 11
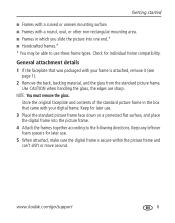
... move around. Use CAUTION when handling the glass, the edges are sharp. www.kodak.com/go/support 6 Keep any leftover foam spacers for later use. 5 When attached, make sure the digital frame is attached, remove it (see page 1). 2 Remove the back, backing material,... end.* ■ Handcrafted frames.* * You may be able to use . 3 Place the standard picture frame face down on a protected flat surface, and place the digital frame into the picture frame. 4 Attach the frames together according to the following directions. Keep for individual frame compatibility. General attachment details ...
... move around. Use CAUTION when handling the glass, the edges are sharp. www.kodak.com/go/support 6 Keep any leftover foam spacers for later use. 5 When attached, make sure the digital frame is attached, remove it (see page 1). 2 Remove the back, backing material,... end.* ■ Handcrafted frames.* * You may be able to use . 3 Place the standard picture frame face down on a protected flat surface, and place the digital frame into the picture frame. 4 Attach the frames together according to the following directions. Keep for individual frame compatibility. General attachment details ...
Extended user guide
Page 12
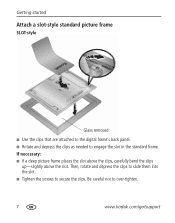
Then, rotate and depress the clips to slide them into the slot. ■ Tighten the screws to engage the slot in the standard frame. Getting started Attach a slot-style standard picture frame SLOT-style Glass removed ■ Use the clips that are attached to the digital frame's back panel. ■ Rotate and depress the clips as needed to secure the clips. Be careful not to over-tighten. 7 www.kodak.com/go/support If necessary: ■ If a deep picture frame places the slot above the clips, carefully bend the clips up-slightly above the slot.
Then, rotate and depress the clips to slide them into the slot. ■ Tighten the screws to engage the slot in the standard frame. Getting started Attach a slot-style standard picture frame SLOT-style Glass removed ■ Use the clips that are attached to the digital frame's back panel. ■ Rotate and depress the clips as needed to secure the clips. Be careful not to over-tighten. 7 www.kodak.com/go/support If necessary: ■ If a deep picture frame places the slot above the clips, carefully bend the clips up-slightly above the slot.
Extended user guide
Page 13
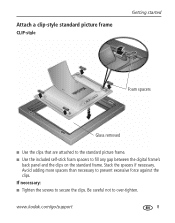
Be careful not to prevent excessive force against the clips. Avoid adding more spacers than necessary to over-tighten. If necessary: ■ Tighten the screws to fill any gap between the digital frame's back panel and the clips on the standard frame. www.kodak.com/go/support 8 Attach a clip-style standard picture frame CLIP-style Getting started Foam spacers Glass removed ■ Use the clips that are attached to the standard picture frame. ■ Use the included self-stick foam spacers to secure the clips. Stack the spacers if necessary.
Be careful not to prevent excessive force against the clips. Avoid adding more spacers than necessary to over-tighten. If necessary: ■ Tighten the screws to fill any gap between the digital frame's back panel and the clips on the standard frame. www.kodak.com/go/support 8 Attach a clip-style standard picture frame CLIP-style Getting started Foam spacers Glass removed ■ Use the clips that are attached to the standard picture frame. ■ Use the included self-stick foam spacers to secure the clips. Stack the spacers if necessary.

Extended user guide
Page 14
Getting started Attach a bendable metal tab-style standard picture frame TAB-style Foam spacers Glass removed ■ Bend the metal tabs down to secure the digital frame to the standard frame. ■ If necessary, use the included self-stick foam spacers to fill any gap between the digital frame's back panel and the metal tabs. 9 www.kodak.com/go/support
Getting started Attach a bendable metal tab-style standard picture frame TAB-style Foam spacers Glass removed ■ Bend the metal tabs down to secure the digital frame to the standard frame. ■ If necessary, use the included self-stick foam spacers to fill any gap between the digital frame's back panel and the metal tabs. 9 www.kodak.com/go/support
Extended user guide
Page 15
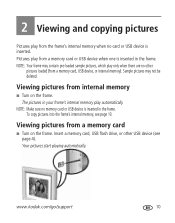
...internal memory ■ Turn on the frame. Insert a memory card, USB flash drive, or other pictures loaded (from a memory card, USB device, or internal memory). www.kodak.com/go/support 10 2 Viewing and copying pictures Pictures play from the frame's internal memory when no memory card... or USB device is inserted in the frame. To copy pictures into the frame's internal memory, see page 4). Pictures play only...
...internal memory ■ Turn on the frame. Insert a memory card, USB flash drive, or other pictures loaded (from a memory card, USB device, or internal memory). www.kodak.com/go/support 10 2 Viewing and copying pictures Pictures play from the frame's internal memory when no memory card... or USB device is inserted in the frame. To copy pictures into the frame's internal memory, see page 4). Pictures play only...
Extended user guide
Page 18
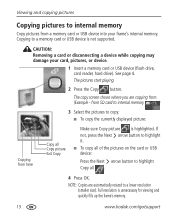
... start playing. 2 Press the Copy button. CAUTION: Removing a card or disconnecting a device while copying may damage your frame's internal memory. Full resolution is unnecessary for viewing and quickly fills up the frame's memory. 13 www.kodak.com/go/support The copy screen shows where you are automatically resized to highlight Copy all of...
... start playing. 2 Press the Copy button. CAUTION: Removing a card or disconnecting a device while copying may damage your frame's internal memory. Full resolution is unnecessary for viewing and quickly fills up the frame's memory. 13 www.kodak.com/go/support The copy screen shows where you are automatically resized to highlight Copy all of...
Extended user guide
Page 19
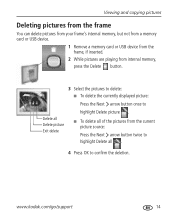
www.kodak.com/go/support 14 Viewing and copying pictures Deleting pictures from the frame You can delete pictures from your frame's internal memory, but not from a memory card or USB device. 1 Remove a memory card or USB device from the frame, if inserted. 2 While pictures are playing from internal memory, press the Delete button. 3 Select...
www.kodak.com/go/support 14 Viewing and copying pictures Deleting pictures from the frame You can delete pictures from your frame's internal memory, but not from a memory card or USB device. 1 Remove a memory card or USB device from the frame, if inserted. 2 While pictures are playing from internal memory, press the Delete button. 3 Select...
Extended user guide
Page 20
... use water, cleaning solutions, or other adhesives on the frame, apply light pressure. 15 www.kodak.com/go /digitalframesupport Interactive tutorials Frequently asked questions Downloads Product registration Maintaining your frame model, and select Step-by -step product support, visit www.kodak.com/go/digitalframesupport, select your frame IMPORTANT: Always disconnect the power before cleaning. Gently...
... use water, cleaning solutions, or other adhesives on the frame, apply light pressure. 15 www.kodak.com/go /digitalframesupport Interactive tutorials Frequently asked questions Downloads Product registration Maintaining your frame model, and select Step-by -step product support, visit www.kodak.com/go/digitalframesupport, select your frame IMPORTANT: Always disconnect the power before cleaning. Gently...
Extended user guide
Page 21
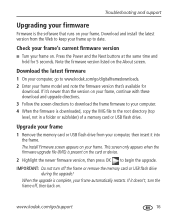
... for download. Upgrade your frame 1 Remove the memory card or USB flash drive from the Web to keep your frame up to www.kodak.com/go /support 16 The Install Firmware screen appears on your frame. When the upgrade is complete, your frame model and note the firmware... version that runs on your frame. www.kodak.com/go /digitalframedownloads. 2 Enter your frame automatically restarts. Troubleshooting ...
... for download. Upgrade your frame 1 Remove the memory card or USB flash drive from the Web to keep your frame up to www.kodak.com/go /support 16 The Install Firmware screen appears on your frame. When the upgrade is complete, your frame model and note the firmware... version that runs on your frame. www.kodak.com/go /digitalframedownloads. 2 Enter your frame automatically restarts. Troubleshooting ...
Extended user guide
Page 22
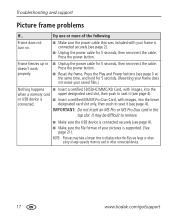
... to display when the files are large or when using a large capacity memory card or other connected device. 17 www.kodak.com/go/support Press the power button. ■ Reset the frame. Press the Play and Power buttons (see page 2). ■ Unplug the power cable for 5 seconds, then reconnect the ...be difficult to remove. ■ Make sure the USB device is connected securely (see page 4). ■ Make sure the file format of the following Frame does not turn on. ■ Make sure the power cable that was included with images, into the when a memory card upper designated card slot, ...
... to display when the files are large or when using a large capacity memory card or other connected device. 17 www.kodak.com/go/support Press the power button. ■ Reset the frame. Press the Play and Power buttons (see page 2). ■ Unplug the power cable for 5 seconds, then reconnect the ...be difficult to remove. ■ Make sure the USB device is connected securely (see page 4). ■ Make sure the file format of the following Frame does not turn on. ■ Make sure the power cable that was included with images, into the when a memory card upper designated card slot, ...
Extended user guide
Page 23
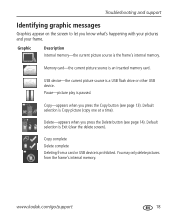
... memory. USB device-the current picture source is Exit (clear the delete screen). Default selection is the frame's internal memory. www.kodak.com/go/support 18 Delete-appears when you press the Copy button (see page 14). You may only delete pictures from a card or USB device ... (see page 13). Troubleshooting and support Identifying graphic messages Graphics appear on the screen to let you know what's happening with your pictures and your frame. Graphic Description Internal memory-the current picture source is Copy picture (copy one at a time).
... memory. USB device-the current picture source is Exit (clear the delete screen). Default selection is the frame's internal memory. www.kodak.com/go/support 18 Delete-appears when you press the Copy button (see page 14). You may only delete pictures from a card or USB device ... (see page 13). Troubleshooting and support Identifying graphic messages Graphics appear on the screen to let you know what's happening with your pictures and your frame. Graphic Description Internal memory-the current picture source is Copy picture (copy one at a time).
Extended user guide
Page 24
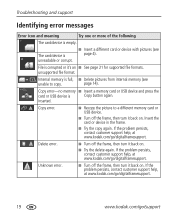
...■ Delete pictures from internal memory (see page 4). Insert the card or device in the frame. ■ Try the copy again. If the problem persists, contact customer support help, at www.kodak.com/go/digitalframesupport. The card/device is Copy button again. inserted. Unknown error. ■ ...unable to a different memory card or USB device. ■ Turn off the frame, then turn it back on . ■ Try the delete again. If the problem persists, contact customer support help , at www.kodak.com/go /support File is empty. unsupported file format. page 14). Copy ...
...■ Delete pictures from internal memory (see page 4). Insert the card or device in the frame. ■ Try the copy again. If the problem persists, contact customer support help, at www.kodak.com/go/digitalframesupport. The card/device is Copy button again. inserted. Unknown error. ■ ...unable to a different memory card or USB device. ■ Turn off the frame, then turn it back on . ■ Try the delete again. If the problem persists, contact customer support help , at www.kodak.com/go /support File is empty. unsupported file format. page 14). Copy ...
Extended user guide
Page 25
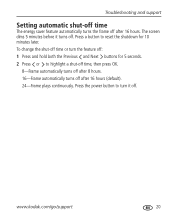
... both the Previous and Next buttons for 10 minutes later. Press the power button to highlight a shut-off time, then press OK. 8-Frame automatically turns off after 8 hours. 16-Frame automatically turns off after 16 hours. The screen dims 5 minutes before it off . To change the shut-off time or turn it... turns off . Troubleshooting and support Setting automatic shut-off time The energy saver feature automatically turns the frame off after 16 hours (default). 24-Frame plays continuously. www.kodak.com/go/support 20
... both the Previous and Next buttons for 10 minutes later. Press the power button to highlight a shut-off time, then press OK. 8-Frame automatically turns off after 8 hours. 16-Frame automatically turns off after 16 hours. The screen dims 5 minutes before it off . To change the shut-off time or turn it... turns off . Troubleshooting and support Setting automatic shut-off time The energy saver feature automatically turns the frame off after 16 hours (default). 24-Frame plays continuously. www.kodak.com/go/support 20

Extended user guide
Page 26
KODAK EASYSHARE D825 Digital Frame / Decor Series Color display 20.3 cm (8 in.) diagonal digital LCD, 800 x 600 pixels, 4:3 aspect ratio, 16.2 x 12.2 cm (6.4 x 4.8 in .) without faceplate Weight 843 gm (1.9 lb.) includes frame, stand, and AC adapter without faceplate 21 www.kodak.com/go /digitalframesupport. Output: 5V DC 1.5 Amp Communication USB 2.0 High Speed Type A with USB devices Picture formats JPEG...
KODAK EASYSHARE D825 Digital Frame / Decor Series Color display 20.3 cm (8 in.) diagonal digital LCD, 800 x 600 pixels, 4:3 aspect ratio, 16.2 x 12.2 cm (6.4 x 4.8 in .) without faceplate Weight 843 gm (1.9 lb.) includes frame, stand, and AC adapter without faceplate 21 www.kodak.com/go /digitalframesupport. Output: 5V DC 1.5 Amp Communication USB 2.0 High Speed Type A with USB devices Picture formats JPEG...

Extended user guide
Page 27
...injury. In the US, visit the Electronics Industry Alliance at www.eiae.org or visit www.kodak.com/go /support 22 Refer servicing to qualified service personnel. Contact Kodak customer support. ■ The use of other than those specified herein may result in some ...cleaning solution. Additional care and maintenance ■ To clean the frame or screen, use only. there are intended for more information. ■ For digital frame disposal or recycling information, contact your warranties. ■ Do not place frame near open flame sources such as suntan lotion, to contact painted...
...injury. In the US, visit the Electronics Industry Alliance at www.eiae.org or visit www.kodak.com/go /support 22 Refer servicing to qualified service personnel. Contact Kodak customer support. ■ The use of other than those specified herein may result in some ...cleaning solution. Additional care and maintenance ■ To clean the frame or screen, use only. there are intended for more information. ■ For digital frame disposal or recycling information, contact your warranties. ■ Do not place frame near open flame sources such as suntan lotion, to contact painted...


